How to quickly build up passive income without any skill requirements as soon as you finish the tutorial section. The sooner you get an early outpost setup the sooner you can start generating income while playing the main game content. Lessons learned from my own trial and error in the early game.
Introduction
While outposts are entirely optional content that can be very time consuming and resource intensive it is still possible to create an effective outpost early without diving deep into the outpost mechanics. I am walking you through how to setup your own automated mining operation that will collect valuable ores early for selling when money and resources are short on hand that you can expand and grow later on if you desire. The tricky part is finding the right location to setup a mining outpost because there are a lot of pitfalls not explained in game, but that I discovered through trial and error.
HUGE UPDATE: Sleeping in a bed for in-game time will cause all extractors to mine and will fill them all up so you can make quicker than I expected infinite money this way by sleeping 48 hours to reset vendors will also fill all extractors and their storage.
Location, Location, Location
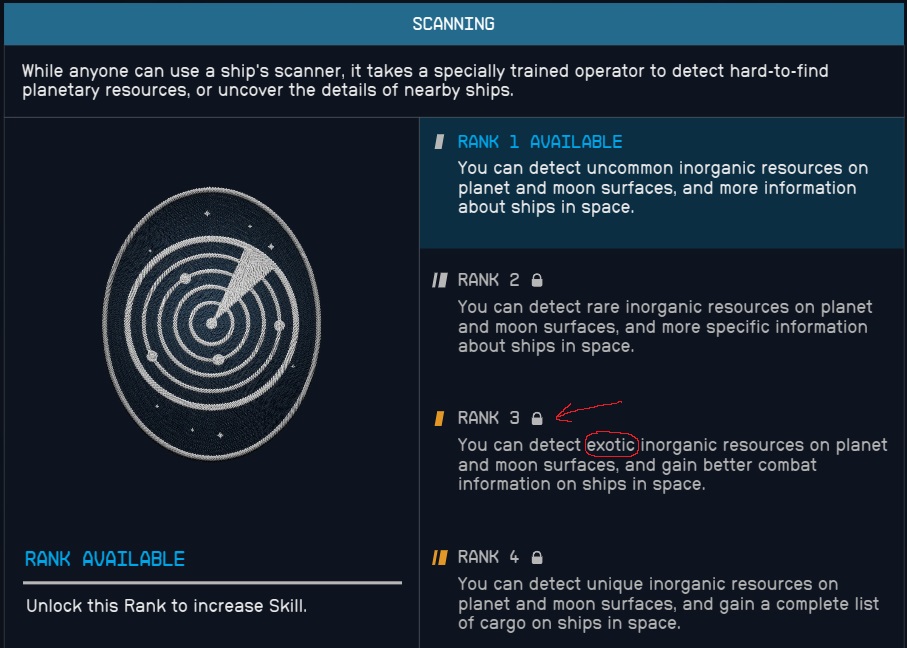
There are 5 tiers of minerals in the game represented by colored diamonds in the periodic table images in game: Common (no diamonds), Uncommon (1 blue diamond), Rare (2 purple diamonds), Exotic (3 yellow diamonds), and Unique (4 green diamonds). What we are looking for is Exotic Minerals that have 3 yellow diamonds in the image because I haven’t found the highest tier, unique – 4 green diamonds, in the early systems.

The problem is scanning a planet (hold R when in orbit) will only show the locations of the common, lowest tier resources that sell for the minimum. When you view an ore in your inventory you will see the base value, but when you go to sell it in any store you need to divide by 8, such that your initial sell price is 12.5% of the base value. As such the common and uncommon are typically selling for 1 credit each and you will never make money quickly due to the weight of the ores adds up quickly for little gain. The rares at best sell for 3 credits so better but not really lucrative still. The exotic tier is where it is at:
Ore (symbol) / Base Value / Sell Value / Weight
Plutonium (Pu) / 64 / 8 / 1.6
Dysprosium (Dy) / 56 / 7 / 1.4
Europium (Eu) / 40 / 5 / 1.0
Ytterbium (Yt) / 38 / 5 / 1.2
Antimony (Sb) / 30 / 4 / 0.8
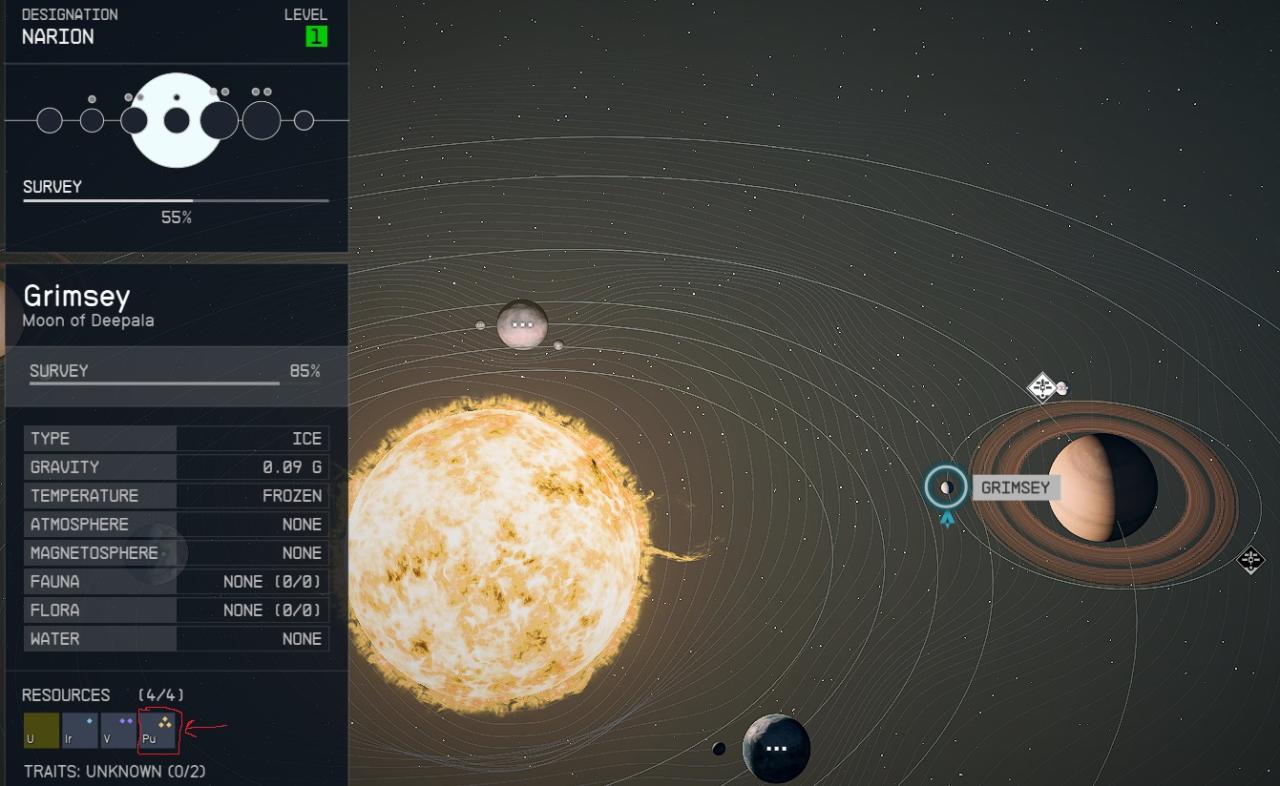
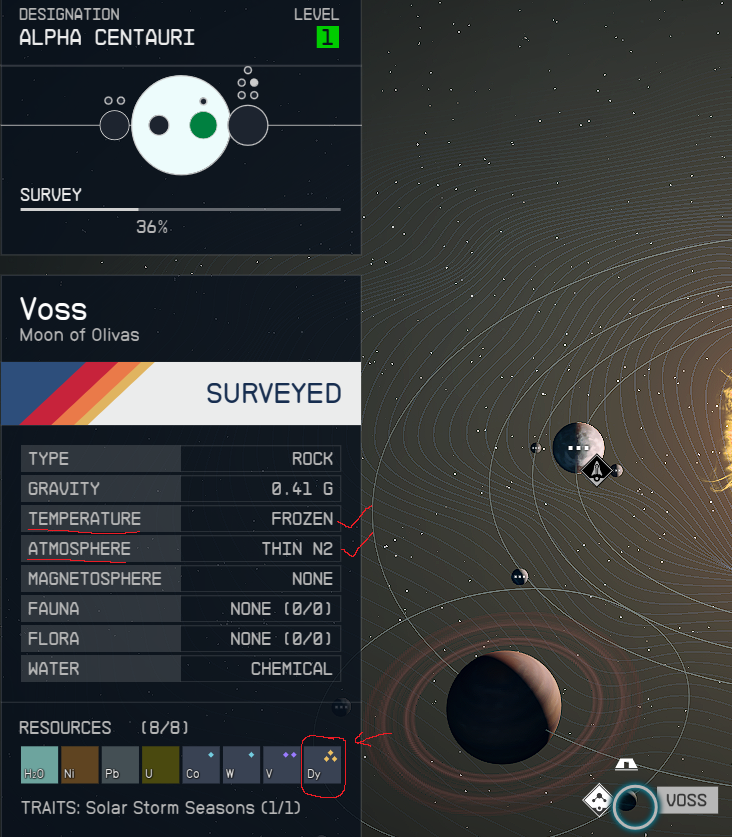
On the planet survey screen the resources you are looking for the two letter symbol and the 3 yellow diamonds. However, once you scan the planet you need to check a couple things before attempting to build an outpost because there are restrictions without a late game skill called Planetary Habitation such as Temperature cannot be Deep Freeze or Inferno, the Atmosphere cannot be Toxic or Corrosive (see skill description). You can always check by landing and pressing the scanner (F) and then press (R) to build an outpost signal that is free to place:

Some early locations (first two systems in the game) are the following:
1) Narion System – Grimsey (Plutonium)

2) Alpha Centauri System – Voss (Dysprosium)

3) Narion System – Andraphon (Europium)

I don’t think the planets resources are randomized based on other people mentioning these as good planets on reddit, but it is hard to find the resources because you have to blindly search without the level 3 of the scanning perk:

So when trying to find the exotic resource you purposely land in the non-colored locations because those contain higher tier resources. I usually try to land on near the edges of existing resources to get multiple resources. I have gotten up to 3 different resources in the same outpost. When you try to build an outpost it will tell you which resources you will get based on the location so just run around periodically checking the area around you for resources:

This part can be frustrating, but if you find a decent spot you can still put down an outpost for free and unlock it as a fast travel spot even if you don’t build anything yet. It is also to delete outpost you don’t use. One important note: Make sure you stay away from Points of Interest on the map because there is a no-build zone around all POI of around 200m in every direction
Building the Mining Outpost
I would recommend tracking the missing resources using the R key when you have something selected in the outpost building screen so it will mark it when you go to the stores. The stores that sell resources in New Atlantis are Jemison Mercantile in the Starport and the Trade Authority found underground in the “Well” which can be reached by elevator when you go to the MAST district on the train it is on you right before leaving the station. You are going to need tons of Iron and Aluminum in particular so it might be worthwhile creating an mining outpost to get them. You will also need to craft some materials at the Industrial Workstation (there is one in the Lodge basement where there is also unlimited storage for your crafting materials) such as Adaptive Frames.
Once you find an outpost spot with multiple resources the key is to switch to build mode (press F for scanner, then R for outpost) and switch to the bird’s eye view (press V). It doesn’t say but you can zoom out with the mouse by moving the mouse up or down (not scrolling). Select the appropriate extractor and it will highlight the zone you can build them, if the zone is cut off by the outpost boundaries, delete you outpost and reposition it closer to the vein.
At minimum your mining outpost will require the following:
Extractors:
Ore Extractors – 5 Iron (Fe), 2 Tungsten (W), and 4 Aluminum (Al)
Power:
Solar Array – 2 Beryllium (Be), 3 Copper (Cu), and 4 Aluminum (Al) OR
Wind Turbine – 2 Cobalt (Co), 3 Nickel (Ni), and 5 Aluminum (Al)
based on what gives more power in that situation and which you can afford
Storage:
Solid Storage – 6 Iron (Fe), 3 Adaptive Frames, and 5 Aluminum (Al)
Note: Make Adaptive Frames at the Industrial Workbench (3 Fe & 4 Al) for (1 Fe & 1 Al) each.
So you can see how Iron (Fe) and Aluminum (Al) are vital to getting started and you could build those extractors first in other outposts to get started.
I also recommend building one storage crate (4 Structural & 2 Aluminum) under decorations (thematically even the contraband variant) to specifically store contraband you find since most places will scan for it, but you can safely store it in your outpost for later.
An example of a later stage Dyposium Mining Operation is:

Important Tips and Tricks
2. In Artifact locations (i.e. like the first artifact) there will be an exotic mineral called “Caelumite” that is worth the most of any ore I have encountered in game at 264 base, so 33 per ore and it only weighs 0.3. The problem is I don’t think you can mine this passively on planets, which is why I didn’t mention it above. Use tip 1 to mine it so much faster!
3. Store excess resources that you cannot fit in your cargo hold in the lodge basement where there are multiple containers and ammo cases with infinite space (earliest access and easy fast travel) and you can use your companion to carry max resources by using the T button to transfer all resources. Also, don’t bother storing resources in outposts or the dream house because you have to craft containers with significant resources cost for limited storage (10 for small, 150 for large).
4. The Trade Authority (in person, not the yellow kiosk) is the “fence” where you can sell stolen (red tag) and contraband (yellow tag). You might also be able to sell to their ships in orbit if you come across them randomly.
5. Prioritize getting a ship with a larger cargo hold for holding resources and items you wish to sell because you have access to your ship hold in crafting and sell screens. Store anything you wish to keep long term in the lodge basement or other containers like ship crew and captain’s storage in the cockpit.
6. Get the 1st level of commerce right away because while it only gives a 10% buff to selling so you go from selling only 12.5% of base value to 13.75%, which seems small, but adds up quickly over the long term. Also, the upgrades only give additional 5% per skill point so the first level is the biggest gain you can do first thing.
7. To get early ships without disabling them in space (requires skills and EM weapons) is look for ships landing randomly on planets while exploring and to run in without killing all the enemies on the ground (since the ships tend to leave after all ground forces are dead) and just kill everyone inside, sit in the pilot chair and take off. This is how I got my early cargo ships. Note: Some friendly ships can be stolen, but usually requires security skill or killing friendlies that will anger your companion if one of the core constellation followers.
8. Surveying the entire planet or moon (find all resources and traits) will cause all resources gains to come in faster as a bonus (in addition to the experience and survey data to sell). The barren planets are easy to survey without plant and animal life.
9. You can research robots early on without skill requirements to unlock a sanitation robot which will boost ore production by 10% in the outpost.
Thanks to briantherunner for his excellent guide; all credit belongs to his effort. If this guide helps you, please support and rate it via Steam Community. Enjoy the game.
Related Posts:
- Starfield: Quickstart and Core Mechanics
- Starfield: Ship Crafting Guide (Modules, Manufacturers and Shipyard Locations)
- Starfield: Force Auto HDR with no .exe Renaming (HDR Fixed)
- Starfield: How to Change Your Field of View
- Starfield: HOTAS Support Workaround for Xbox Controller

