
A guide to building your own ships in Starfield. Covers modules, manufacturers and shipyard locations
Ship Crafting in Starfield
No resources, other than credits, are required. Just stop by a Ship Services Technician (or manufacturer’s sales kiosk) and try it out!
It won’t cost you half a million, either.
The very biggest Class C – with a 29 power reactor, every possible build point used and a wide selection of habs – barely broke 200k. A starter ship can be crafted for well under 100k … at least it could be if it weren’t for one little problem.
You can’t just “craft” a ship in Starfield, you have to buy an existing ship and then scrap it’s pieces. So around 65 – 75k for the initial purchase, minus the 10-15k you’ll get back from scrap … that’s sort of your baseline. But after that, 50-60k will probably do it for a Class A hauler. Maybe 65-75k if you want to go ham with the weapons. Either way, built right you can either get a ton of cargo space, or a major increase in space combat capability for just a little over 100k. That’s less than 2000 looted coffee mugs. Plus this chisel, and that desk sculpture, and maybe this potted plant … shut up Vasco, I’m busy looting. But yeah, you can walk out of the tutorial with over 30k of loot. The real trick is finding enough vendors to sell it all.
Regardless, you’ll probably be ready to start looking at ship building about 5 or so hours in. Especially if you put a point in Ship Design. And you don’t try outpost building – which is a voracious, giant, sucking black hole of a money pit.
Shipyards
New Atlantis / Jemison [Deimos/Nova]- next to the initial ramp down from the landing pad.
Akila City [Hope/Stroud/Taiyo] – In a small building between the two landing pads and the city gate
Neon Landing Pad [Stroud/Taiyo] – In a small building on the side of landing pad area (before crossing the bridge to security)
The Key [Stroud/Taiyo; specialty smuggling parts] – Jazz, a significant NPC in the quest line. They’ll lead you right to her on the initial station tour. At times in the quest line she will move around, but The Key’s a fairly small place and she’s not too hard to find.
Cydonia – Mars
Paradiso – Porrima II
Red Mile – Porrima III
The Den (specialty smuggling parts) – Wolf system
Manufacturer specific shipyards
These offer special parts not available elsewhere. 2×2 and 2×3 habs, bigger cockpits, etc.
Deimos Shipyard [Deimos] – Deimos, of course! That’s the second moon of Mars. Sol IV-b.
Stroud-Ekland Showroom [Stroud] – Neon Core, right in with the other merchants
Hopetown [Hope] – Valo system, planet Polvo
New Homestead [Nova] – Sol system, Titan (moon of Saturn)
Taiyo Astroneering [Taiyo] – Neon, Ryujin Tower (elevator at very end of Neon Core)
Habs
Habs are the interior of the ship. They are mostly decorative, though some have berths to hold more passengers and some have more stations to operate the ship.
A ship build is invalid if you do not have a hab path from the Bay to the Cockpit, and one from the Docker to the Cockpit.
Habs come with “A” and “B” versions. “A” habs only connect fore(front)/aft(rear)/dorsal(up)/ventral(down). “B” habs have all those connection points and add port(left)/starboard(right). Some manufacturers have “C” and “D” habs that have either port or starboard connectors, but not the reverse side.
1×1 habs:
- Companionway (default)
- Storeroom
2×1 habs:
- All-In-One-Berth (default, adds 2 passenger slots)
- Armory
- Captain’s Quarters
- Computer Core (adds 1 crew station)
- Control Station (adds 4 crew stations)
- Infirmary
- Living Quarters (adds 2 passenger slots)
- Science Lab
- Workshop
3×1 habs:
- Engineering Bay
Types of Components
Requires one, and only one. Aesthetics are all you’re going for here. The hull and mass numbers vary, but are too small to matter.
Most are either fore or aft entry, but Stroud has one with a side entry bay.
You can look inside a bay when building the ship and see if it has a boarding ladder or a hatchway to access the rest of the ship. This is important because there needs to be a fully walkable path through the habs from the bay to the cockpit.
Pretty self explanatory. More space means the ship can hold more stuff. It’s on a 1:1 basis, so 245 cargo score = 245 mass of stuff you can stick in the hold. Assuming you don’t have the “Payloads” skill, which adds a multiplier.
The big issue here is mass. Cargo holds tend to be the heaviest things on your ship. Be sure to watch your ship’s “Mobility” score as you add them. The biggest holds can take 10 – 20% off your mobility each.
Shielded cargo holds (available at The Key, The Den and Red Mile) have much lower capacity per mass, but help protect contraband from getting picked up by the authority’s scans. Contraband on the ship – that is not in a character’s personal inventory – seems to automatically be assigned to the shielded hold.
Requires one, and only one. This is largely an aesthetic decision, though cockpits do add to the ship’s cargo space. It’s negligible on bigger ships, but for your first build 200 – 300 cargo cap might matter.
Most cockpits are 5 hull and 2 crew stations. Some of the physically bigger cockpits have 4 crew stations.
Requires one, and only one. They don’t have any significant stats and have mostly similar costs.
The docker must be connected to the cockpit via habs, and must be placed on the “outside” of the ship. “Outside” generally means the most extreme edge of the ship, though there is a bit of latitude to this as some structural elements (but not all) placed further “outside” will not flag the build as invalid.
Dockers come in dorsal/top, fore/frontal and port/left varieties. The port variety can be flipped to starboard, but the other two cannot: no aft or ventral docking. The Nova docker has a 1×1 hab attached, which can be either useful or a pain depending on what you’re trying to accomplish.
Engines are the first ‘complicated’ part of the build. Your entire ship has a mass value, and the engines need to be strong enough to drive that mass value.
Every engine has a class, A (lowest), B or C (highest). You cannot build a ship with engines of a higher class than your reactor. However, you may use lower class engines. Indeed, the C class engines tend to be inferior to some of the higher-end B units.
Another key element to engines is Max Power. However, while this sounds like a good thing – more power is better, right? – that’s not how it actually works. Max Power indicates how many bars of reactor power required to fully drive the engine. Which means … bigger is worse. Not only do you need more power, but there is a maximum of 12 engine power available. A build with 13+ potential engine power will be marked invalid.
Since most engines are Max Power 3, this effectively means a limit of 4 engines on a ship. Or 6 Max Power 2 engines. Or 2 x Max Power 3 + 3 x Max Power 2.
Engine Thrust turns into Top Speed. More is better, though in practical situations, linear top speed isn’t nearly as important as mobility.
Maneuvering Thrust drives mobility and is the key stat (along with Max Power) of an engine. Max Power 2 engines top out just over 3000. The Class C Supernova has 6450, however due to its huge mass, it will often be outpaced by the Class B SAE-5330 (M.Thrust of 4830) for better mobility numbers.
The SA-4220 is an excellent Class A, Max Power 2 engine.
Engine Health is basically the hit points of your engine. More is better, but I wouldn’t obsess over it. In practice, your hull is likely to go before you loss most/all of your engines.
Pirate gear, available on the Key.
Comspike – requires Crimson Fleet mission progress, -25% to lock time (i.e. its faster), -20% cost to fire weapons in Target Mode
Conduction Grid – requires Crimson Fleet mission progress, increases shield regen by 25%, 50% less EM damage received
Scan Jammer – increases chance of scan evasion (by up to 50%) when using shielded cargo
Requires at least one. Fuel feels like an abandoned mechanic in Starfield, since your ship auto-refuels at every jump. Worse, the tanks have some mass to them. Not like cargo holds or engines, but enough that you should be sparing with these. 200 fuel is likely all you need, and you could probably get by with 125 or so.
There’s a calculation to determine how much landing gear is required. Smaller ships can get by with 3-4 points. Larger builds have required 12+ of “lander thrust”.
Mass and hull stats are too small to worry about here. Lander thrust can vary from 1 to 4 points per piece of gear.
Landing gear can vary greatly in cosmetics. The Stroud lander is particularly well adaptable to almost any ship design as it comes in port, starboard and center varieties (use Z to “flip” between the three choices).
Requires one, and only one. Can be located anywhere on the ship, does not have to be aft or even on the outside.
I’m not really sure what grav drive stats are for. I’ve never put more than 1 bar of power into my grav drive and it jumps in 8 seconds. They have some mass, making this a good place to skimp on.
Requires one, and only one. Reactors seem complicated, but honestly comes down to just class and power output. They are reasonably massive – not cargo hold massive, but still enough to worry about. They’re also one of the most expensive components … though honestly nothing in shipbuilding is really expensive; even the highest end reactor is less than 50k.
Your ship class is equal to your reactor class. Therefore you cannot fly any ship with a class C reactor without Piloting 4, or a Class B without Piloting 3. However, there are some very nice Class A reactors if you take points in Starship Design.
360T Stellarator – Class A, 20 power, 32 mass, 19k [Akila/New Atl, no skill req]
134MM Toroidal – Class A, 20 power, 27 mass, 15k [New Atlantis, no skill req]
154MM Toroidal – Class A, 26 power, 35 mass, 27k [Akila/New Atl, Starship Design 3]
Tokamak X-120S – Class A, 28 power, 30 mass, 29k [Akila, Starship Design 4]
102DS Mag Inertial – Class B, 24 power, 54 mass, 27k [Akila/New Atl, Starship Design 1]
Z Machine 2000 – Class B, 20 power, 57 mass, 23k [New Atlantis, no skill req]
Theta Pinch B9 – Class C, 24 power, 96 mass, 37k [Akila/New Atl, no skill req]
SF20 Sheared Flow – Class C, 27 power, 91 mass, 41k [Akila/New Atl, Starship Design 1]
Fusor DC401 – Class C, 29 power, 90 mass, 44k [New Atlantis, no skill req]
None required, no more than 1 installed. Shields can be tricky to evaluate. While more max health is obviously good, how often are you going to run the shield at max power?
For example, the tiny 10S shield has 310 strength and 3 Max Power. Meanwhile, the Class C SG-1000 has 730 strength and 7 Max Power. If we only operate at 3 bars of power – the two shields are effectively the same!
Whereas the SG-1800 has a whopping 1600 strength … but requires a full 12 bars of power to get that result.
Weapons
Manufacturer Cosmetics
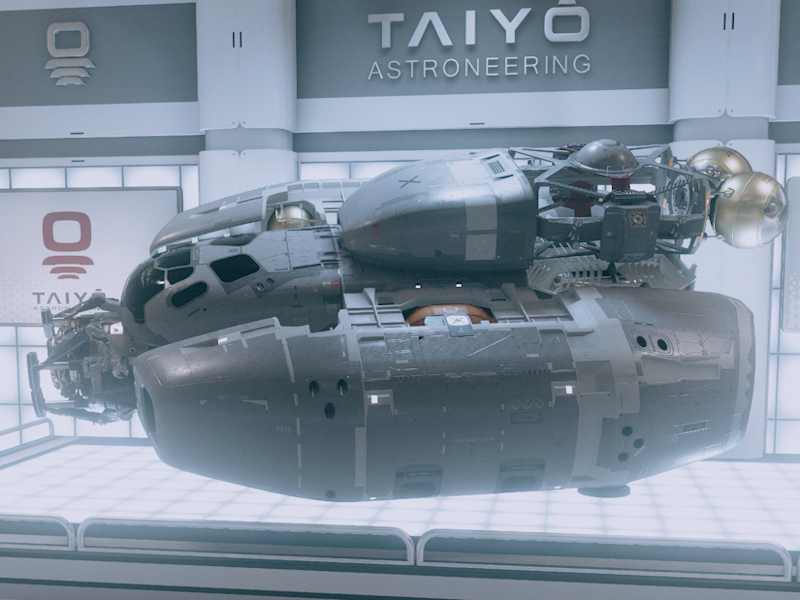
Taiyo parts are rounded, smoothing off the rough edges normal in Starfield spacecraft design. It can look a bit bulbous:
But there are better implementations of Taiyo, as well:

That’s a Nova mount on the front, but otherwise all Taiyo.
Stroud parts tend to have an clean industrial look to them. Very workmanlike, not a lot of decorative stuff.

Hope parts tend to have a scrappy, make-do-with-what-you’ve-got look.

Of course, you can always mix and match parts. The base habs look pretty similar other than the outside detail, so if you paint them it’s hard to tell the difference. Deimos base habs are more angled at the edges, while Taiyo is rounded, but the differences are not that big.
General Ship Crafting Interface Notes
The same key does both “Add” and “Attach”, which will drive you crazy. It all depends on what your mouse is pointing at when you hit the key. If “Attach”, the list will be limited to what is valid to place at the spot where your cursor was when you hit it. Whereas with “Add” you get the full list and free positioning. So make sure your mouse isn’t pointing at anything when you hit the key!
At first, I found it extremely frustrating to position ship parts, but then I found out the “R” and “F” keys allow you to move up and down levels rather than trying to shift the levels manually.
The ship will reposition its center as you build it, you can start building from any part of the ship you want.
When dorsally mounting weapons and special equipment, you may need to use the “Equipment Plate” structural component to attach to a dorsal (topside) module connector.
Similarly, the “Horizon Weapon Mount” structural will let you add up to 2 weapons to a port/starboard module connector.
Also, I find the “Nova Weapon Mount” structural to be quite useful in attaching weapons to the front of my ships.
You can rename your ship in the Flight Check window. As far as I know, this is the only place you can rename the ship. It’s not obvious, though, look down at the bottom of the Flight Check window to see you can hit the “G” key to rename.
Thanks to sarg for his excellent guide; all credit belongs to his effort. If this guide helps you, please support and rate it via Steam Community. Enjoy the game.
Related Posts:
- Starfield: Early Passive Income Walkthrough
- Starfield: Quickstart and Core Mechanics
- Starfield: New Game Plus Skip
- Starfield: HOTAS Support Workaround for Xbox Controller
- Starfield: How to Change Your Field of View