
General info for builds and playstyles.
Character Tier list with explanation. This guide is mainly for new players, who are having hard time with this game. In reality, this game is pretty easy, so if you are hardstuck somewhere, this means you are clearly doing something wrong. In this “mini-guide” i’l offer some info about characters and weapons.
Disclaimer – Work in Progress (WIP)
This guide is mainly for new players, who are having hard time with this game. In reality, this game is pretty easy, so if you are hardstuck somewhere, this means you are clearly doing something wrong. In this “mini-guide” i’l offer some info about characters and weapons. Keep in mind that everything in this guide is biased opinion of it’s author.
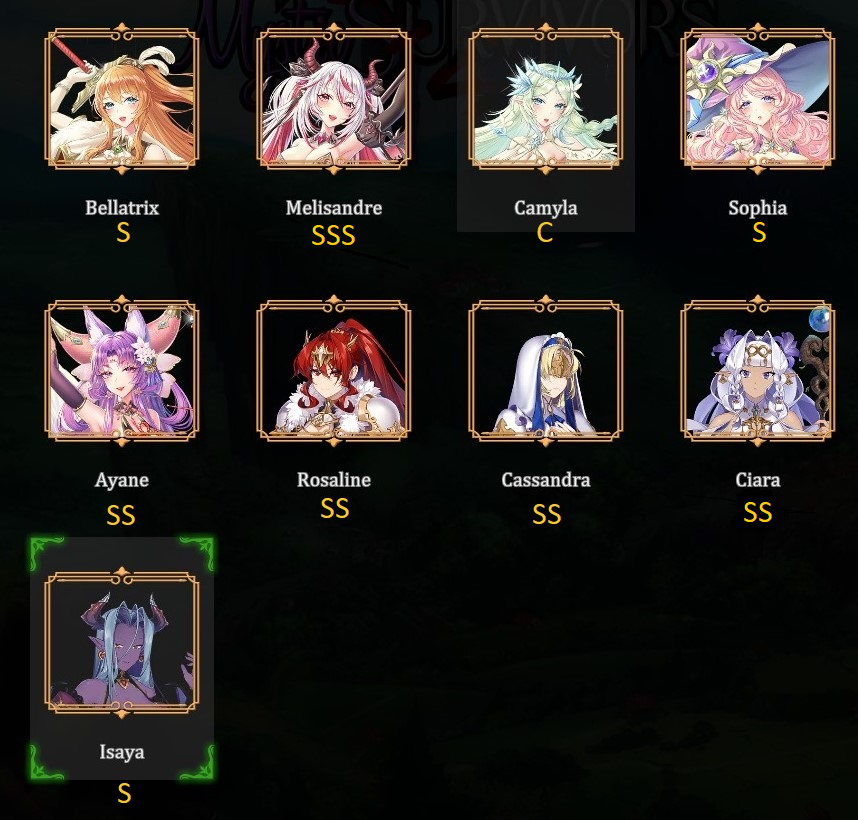
 1. Bellatrix – The Lady Knight – S tier
Passive – as one of the two starter characters Bellatrix is clearly much more powerful. First, her passive is just an amazing amount of free damage and close combat requirement is not a problem, you’l be forced into that after the enemy transform into a zerg.
Ultimate – solid ultimate that can be used as a burst damage ability or escape tool if you are surrounded. You’l also collect the experience (and items) from all killed enemies along the path.
 2. Camyla – The Stereotypical Elf – C tier
Passive – as a 2nd available character Camyla’s passive is kinda meh, even in her “buffed” state. Without numbers it’s hard to judge, but from the on-hand experience it’s rather negligible.
Ultimate – her ultimate provides a nice chuck of damage, which is also useful for the boss fight or create a path, however, you can’t use her ultimate when you are surrounded, since there’s a high risk of getting a hit from fast moving enemies.
 3. Melisandre – The Gold Mine – SSS for Extreme difficulty
Passive – Melisandre is a character for endgame gold farming. When you stack a max account Gold/Luck buffs with Gold/Luck items you can gain up to 80000-140000 gold easily in one run (Stage 2) and a lot of free % damage.
Ultimate – her ultimate spawn a few Tornadoes, which moves randomly, but got decent AoE. This ultimate is pretty good for high difficulties, since your screen will be overrun with enemies. Clear it up a bit with ult.
 4. Sophia – Run her own Atelier – S tier
Passive – Sophia gameplay may not be to everyone liking. In order to use her potential, you’l need to move constantly and destroy all chest in sight for potions + spam her skill. The buffs are applied randomly, but there’s a lot of them and you can gain powerful stuff like +Projectiles, +% Damage or Revival.
Ultimate – spam a healing potion(quality is random), that will stay for like 10 seconds and then disappear. Don’t forget to pick it up.
 5. Ayane – What Does The Fox Say – SS tier
Passive – the first goddess of this game has arrived. Ayane gets a random strong buff every 5 levels and after level 50 her ultimate get’s an upgrade.
Ultimate – Before level 50 this skill acts only as the indestructuble barrier, but after you reach level 50, it will also spawn a big amount of lazers around your character in random directions. This skill has relatively low cooldown and also absolutely obliterates Elites and Bosses. Just literally walk into them with this skill active and erase them from existence. Be mindful of the barrier duration though. It’s basically impossible to die/lose with Ayane if you reach level 50.
 6. Rosaline – Bazelgeuse in disguise – SS tier
Passive – in order to maximize her passive effects you’l need to remove all points from your Magnet and don’t pick Magnet item at all. Gather a big chuck of EXP with her dash and also correctly time it’s usage with the green sphere (which collects all gold/exp on the map). With this you can reach like level 120 by the end of the map.
Ultimate – her ultimate is simply awesome, it’s a damage/utility/defense/exploration tool all-in-one. You can rush into hordes of enemies, you can dash at high speed to reach certain items or you can just escape from a bad situation. However, be mindful on your end up location, you don’t want to end your dash completely surrounded.

Passive – A simple and powerful tool to increase the damage of her awesome ultimate. Maximize the potential (damage/cooldown) around level 60.
Ultimate – A single hit attack that deletes everything on screen. Nuff said.
 8. Ciara – What is “Plot”? – SS tier
Passive – Ciara passive allows you to pick up 7 passive items, making your build be less dependant on map spawns, but it’s best part that it allow you to gain additional level for passives. 50+% cooldown reduction and so on.
Ultimate – this ultimate is relatively strong screen cleaning tool, keep in mind that this attack is using diagonal patterns.
 9. Isaya – The Succubus Queen – S tier
Passive – Isaya can wield 7 weapons, which means 7 evolutions, but you’l need to get at least one item as a map drop, so pay attention what spawns at the start of your run.
Ultimate – summons 3 lesser Succubus sisters, which deal an amazing amount of AOE dps.
– In general, always aim to unlock new achievements, since those are also unlock new characters and items.
– For character unlocks & scenes check the specific part in this guide.
– Get 2000 Gold in one game to unlock map(ESC button) and then clear 3 Shrines (Star-shaped symbols on map) to unlock Banish feature, so you can erase useless weapons from the list.
– COMPLETELY IGNORE & AVOID RELICS IF YOU DIDN’T UNLOCK REROLL FEATURE FOR THEM. You may be forced into a choice that you will strongly regret. Just do the 3 Relics for achievements unlock first. 15-minute mark mini-boss also drop a Relic, so be aware.
– Evolved Lamp will be your first important Boss Killer / Elite Killer weapon, so don’t pass on it.
– Your main priority is always rush to the evolutions, so make always a priority to level up those.
– For weapon evolution you only need Level 8 weapon and Level 1 corresponding passive item. Then just pick a chest.
– You can’t evolve multiple weapons at once, so even if you open up a chest with 5 items, only one will evolve.
– Bosses are stupid, use energy shield weapon for survivability and run in circles/dodge projectiles.
How to unlock new characters & scenes
Melisandre – rescue her on Stage 1 via reaching the “?” mark on the map and killing mobs around her, then interact with her.
Sophia – kill the mini-boss of Stage 1 (The Horse), which appear on 15-minute mark.
Ayane – kill the final boss of Stage 1 (The Plant).
Rosalina – kill the mini-boss of Stage 2 aka Rimuru (Red Slime), which appear on 15-minute mark.
Cassandra – kill the final boss of Stage 2 (The Dragon).
Ciara – rescue her on Stage 2 via reaching the “?” mark on the map and killing mobs around her, then interact with her. However, the mobs around her now will move towards(aggro) you, instead of just idling.
Isaya – clear any stage with any character 5 times.
For H-scenes you’l need to complete a level with the heroine 2 times, each one will unlock a new scene. Right now the game only got scenes for Bellatrix, Camyla, Melisandre, Sophia and Ayane.
How to farm Gold $$$ (including Extreme difficulty)
– In order to farm gold efficiently, you better max Luck and Gold gain passives and get +Luck and +Gold items in the game.
– Start Stage 2 and proceed to farm your main weapons first and pay attention to passives spawned on map, in general you’l need to passives for weapon evolution to spawn.
This is an example of successful build.
Weapon priority(updated):
– Fire Boots Evo 1
– Rapier Evo 2/Chain Amulet/Sun Stone Evo 1
– Scythe (default weapon) Evo 2 or Evo 1
– Bow Evo 1
– Energy Shield Evo 2
– Holy Cross Evo 1
Example:
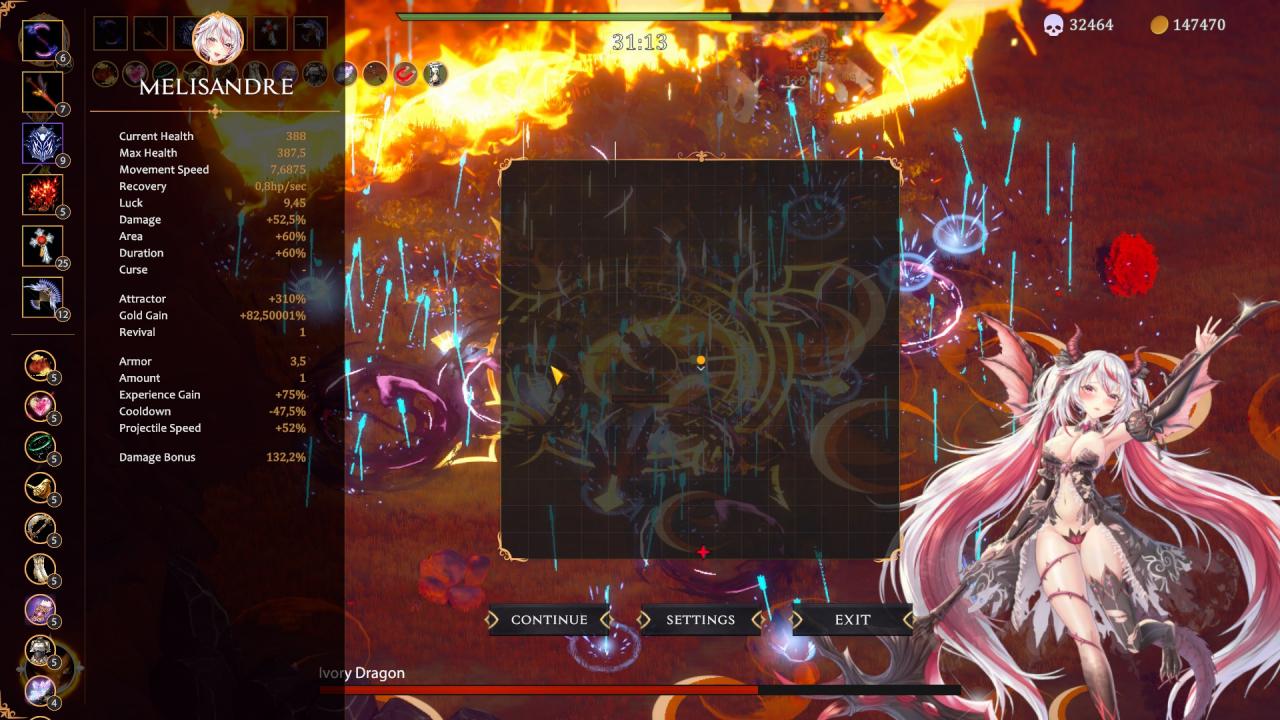
You can also do this with lesser talents, etc, so it’s not a hard requirement, just to help you understand the general idea behind this. Gold farming runs are usualle between 50k to 130k, with a possible max 150k+-, but that one depends on how much chest you will drop from normal mobs, which will bring the last part – The Relics.
– In general you’l only need a mandatory one – 0.1% chance to spawn chest from Normal mobs. In order to maximize this you’l need max possible Luck, since chests with 3 and 5 items give much more gold.
– If you are feeling strong enough, also pick two additional Relics, one which gives Gold from kills and another one which converts EXP into Gold, this relic just decrease your EXP gains and will not erase it completely.
– Walk constantly and your Rapier Evo 2 will shred all chest on screen nonstop, also pay attention to green spheres, you’l need to save at least one for around 29.30 minute mark, to collect all remaining Gold/Exp on map.
List of Relics /w commentary
1. Relic of Treasure
Description: regular enemies can drop a Chest with a 0.1% chance, but their health and damage is increased by 25%.
This is a pretty great relic to use for anyone. It’s still RNG, but you’l have a great chance to get golden (3 items) and black (5 items) chests, chance based on your Luck stat.
2. Relic of Despair
Description: Increase damage done by 25% when your health drops to 20% or lower.
This one is rather meh, however, it’s currently one of two “safe” relics to pick.
3. Relic of Healing
Description: restore 20% of your HP every time you level up.
The second available relic without any debuffs. This one is pretty useful.
4. Relic of Greed
Description: enemies will drop coins instead of EXP.
This relic does not completely erase your EXP gains, so you can still use it in the gold farming runs.
5. Relic of Gold
Description: enemies have 20% more health, but also got 10% chance to drop gold.
Self-explanatory, a small gold gain for farming builds.
6. Relic of Berserker
Description: increase damage received by 100% and damage dealt by 15%
Pretty safe relic to pick if you run Energy Shield (preferably Evo 2). Free damage is free damage.
7. Relic of Doom
Description: Fix your HP at 1, but increase damage done by 100%
For those who love risks.
Rosaline – The Explosion Queen
My favorite character in this game.
This build focused on extreme high mobility and crazy AoE melee potential, which is possible thanks to her dash.
Weapons:
1. Shield (default weapon).
Shield is decent enough for early stages to start your farming. But follow the usual rules and don’t put any points in it unless you are forced to do it aka can’t choose anything better.
2. Holy Cross (Core item) – Evolution 1
Holy Cross has absolutely crap single target potential, however, it’s also crazy in terms of AoE damage when you damage big hordes or are surrounded.
3. Energy Shield (Core item) – Evolution 2 – Lightning
This is a mandatory item for most builds in this game. Provides decent damage and survivability. As a downside, the basic weapon does not offer any damage.
4. Fire Boots (Core item) – Evolution 1 – Bombs
Creates a barrage of explosions together with the Holy Cross.
5. Rapier (Flex item) – Evolution 2
More AoE damage and knockback always welcome.
6. Bow (Flex item) – Evolution 1
Even more AoE damage.
Bellatrix – Friendly build for new players
This build is focused on weapons and items available early and is, technically, a generalist build for any character for a comfortable Stage 1 clear. I don’t mention advanced weapons, since if you have those unlocked, then you don’t need this guide in the first place.
Weapons:
1. Rapier (Default) – Evolution 2.
2. Evolved Magic Lamp – this weapon will be your bread and butter at boss killing, make sure to evolve it before 15-minute mark.
3. Sun Stone – Evolution 1.
4. Bow – Evolution 1.
5. Energy Shield – Evolution 2 (or 1, if 2 is not unlocked)
6. Last slot is flexible, you can use Chain Amulet or another weapon with evolve potential available to you, like Fire Boots (Evo 1).
Just don’t choose Blessed Hammer.
Melisandre – The Gold Mine
Weapon priority:
– Fire Boots Evo 1
– Rapier Evo 2
– Scythe (default weapon) Evo 2 or Evo 1
– Bow Evo 1
– Energy Shield Evo 2
– Holy Cross Evo 1
Thanks to Evan for his great guide, all credit to his effort. you can also read the original guide from Steam Community. enjoy the game.
Related Posts:
- Sexy Mystic Survivors: Advanced Weapons and Passives Guide
- Sexy Mystic Survivors: Weapon Evolution Chart