A guide for those who worry about making sub-optimal choices in the early game, and for those who can’t figure out how some of the game mechanics work.
Overview
Main quest quickstart
Pick one of these for your initial build
Cyberneticist
Soldier
Xenobiologist
[FILE NOT FOUND] (note, this is an actual pick, not a make-your-own)
- Extrovert
- United Colonies Native
- blank/whatever you want
As you level up, first focus on developing your skills in this order:
Combat, Social, Tech, Physical/Science
Primary Skills:
Physical : Wellness, Energy Weapon Dissapation, Pain Tolerance, Rejuvenation
Social: Persuasion, Negotiation, Scavenging,
Combat: Lasers XOR Ballistics, Particle Weapons, Rifle/Heavy Weapons stack
Science: Medicine, Surveying
Tech: Piloting, Security, Shield Systems
Secondary Skills:
Physical : Fitness, Weight Lifting (if you’re a horder), Rejuvination
Social : Commerce, Diplomacy, Intimidation, Ship Command
Combat : Any/all
Science: Astrodynamics, Space suit design, Weapons Engineering, Outpost Engineering, Aneutronic Fusion
Tech: Any Weapon System, Payloads (if you’re a horder)
There are some skills that you must spend at least one point in to unlock relevant game mechanics. They are:
Physical->Stealth: enables sneaking
Physical->Gymnastics: enables sliding
Social->Negotiation: enables bribing
Science->Surveying: enables zoom
Tech->Boost pack training: enables jetpacks
Tech->Piloting: enables directional thrusters on ship
Tech->Targeting Control Systems: lets you pick a system to attack on a ship
You may not want/need that game mechanic, but I put them here to let you know they will change how you play the game a bit. Definitely get boost pack training.
To beat the main quest, you will eventually need to develop a proficiency in all the main areas of gameplay: social interaction, personal combat and ship combat. You will also encounter a need to learn ship design and outpost building.
Now to cover each game mechanic in detail
FPS / Character
All motion controls are near the standard WASD.
Left click – fire
Right click – aim
Jump – Space
Sneak (toggle) – Left Ctrl
Sprint (toggle) – Left Shift
Walk/Run – Caps lock
Melee – V
Thrown attack – G
Reload – R, or left click when empty. If you interrupt the reload animation, it will only partially reload the clip.
Scan mode (toggle) – F
Character Menu – Tab
Game Menu – ESC
Tapping a key and holding a key are different actions. Tapping F will switch to scanner mode, holding F will toggle your flashlight.
Play around with this for a bit to make sure you know what a short tap feels like.
If a menu action has a letter next to it with a line underneath it, that indicates a long-press. (I imagine this feels more intuitive on a controller than on a keyboard)
Perk-specific:
Jet-pack – Long-Space (after jump). Requires 1 Skill/level point in Tech->BOOST PACK TRAINING. It is worth noting that this is only done in bursts and there is a particular rhythm between presses. You can trigger the jet-pack immediately after jumping, but that is rarely optimal. This rhythm changes as you level up the perk.
Slide – Left-Ctrl while Sprinting (Left-Shift). Requires 1 Skill/level point in Physical->GYMNASTICS
I call this my “loot finder”
A short F will toggle between scan mode and normal mode. Most combat controls are disabled while in scan mode (such as action-bar/# keys, which typically include your health packs).
It will also replace any “activate” or “use” commands with the standard “scan.”
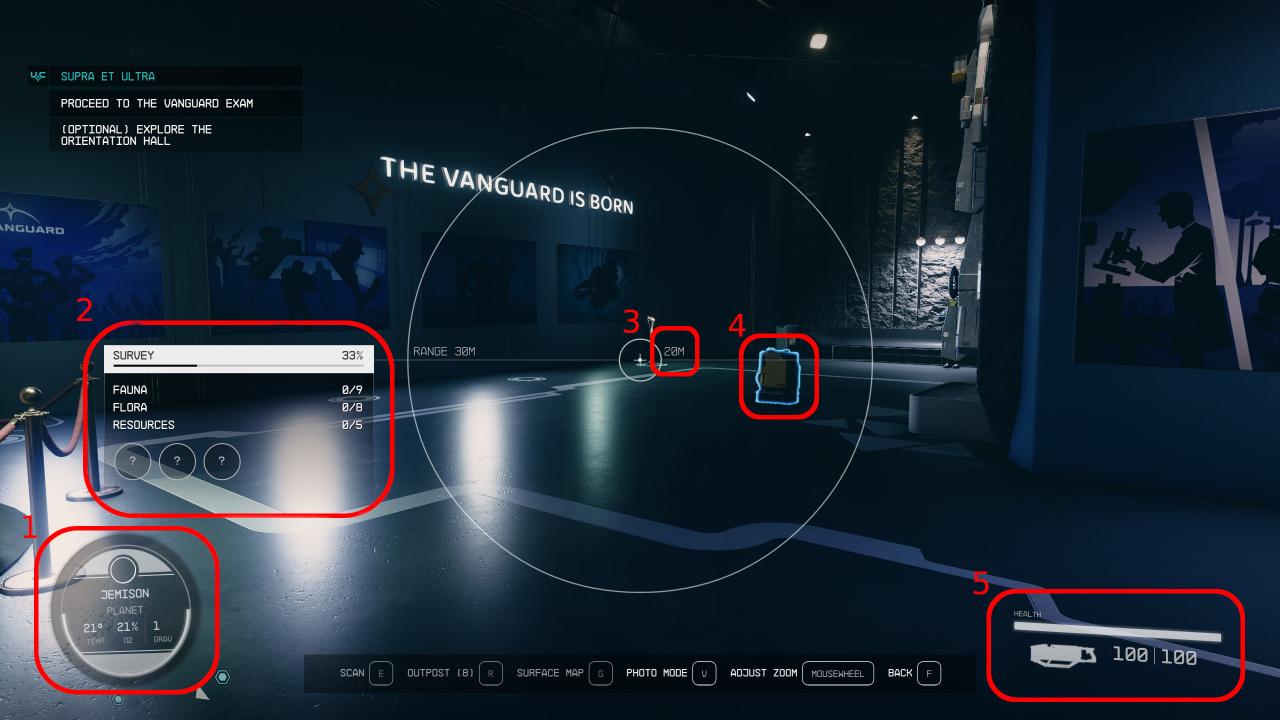
Scan mode will give you a wealth of information about your current environment.

1. Your compass and status indicator icon. Quest objectives are marked by the blue Hexagon. The solid curve line on the bottom of the circle is your stamina/O2. Note the gravity here as that will affect how you move around. Typically, anything above 0.66g and you’ll want to walk/run rather than try to use your jetpack.
2. Current planetary survey status. Fauna are animals, Flora are plants, Resources are Minerals. The circular question marks are planetary traits, marked as “unknown” points of interest when you are exploring a planet. These bars will fill up as you get close to and hit ‘e’ to scan different objects in the game. Planets also contain multiple biomes, and a green indicator will show up here if you’ve found all the relevant flora/fauna for your current biome.
3. Display/targeting indicator changes. Targeting indicator now marks the distance between you and what you’re looking at. Your maximum scan range is off to the left and the circle acts as a viewport for your scan region.
4. Interact-able object. Anything you can pickup, talk to, attack, or harvest will get at least a blue outline. A blue outline indicates a general object that might be scannable. For flora, fauna, and resources, this blue outline will change depending on where you’re at in your planetary survey. Solid blue means you’ve scanned this individual, and solid green means no more scans are needed on this object.
5. Laser cutter. If you have one in your inventory, then the laser cutter is the only ‘weapon’ you can use in scan mode. Left click to bring it out, and Long-R to holster it. It’s intended use is to mine minerals, but it is a potent weapon if you take the “laser” weapon perks, despite it’s 10m range limit.
Thanks to Tyggna for his excellent guide; all credit belongs to his effort. If this guide helps you, please support and rate it via Steam Community. Enjoy the game.
Related Posts:
- Starfield: New Game Plus Skip
- Starfield: HOTAS Support Workaround for Xbox Controller
- Starfield: Ship Crafting Guide (Modules, Manufacturers and Shipyard Locations)
- Starfield: Early Passive Income Walkthrough
- Starfield: Force Auto HDR with no .exe Renaming (HDR Fixed)

