Guide on how to add your own character to the game while not overwriting existing ones.
Note: If you want to customize existing characters. you can check out this guide on Steam.
Adding Character to game
Navigate to Vampire Survivors\resources\app\.webpack\renderer
MAKE A COPY OF main.bundle.js
(If you do something wrong Steam verification most likely has you covered, but better safe than sorry)
Open main.bundle.js with text editor that has a ctrl-F function (like Notepad++)
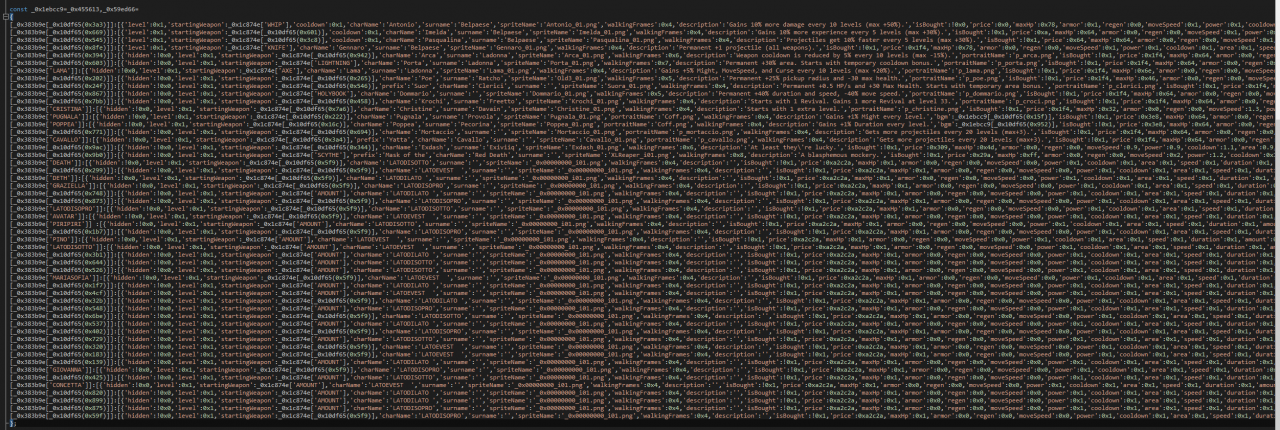
Look for const _0x1ebcc9=_0x455613,_0x59ed66=
(It’s an array containing all characters)
After some editing to make it look nicer it should look like this:
Next you want to find the end of that list and append a following line (repeat for additional characters):
[_0x383b9e['EDIT']]:[{'level':0x1,'startingWeapon':_0x1c874e['EDIT'],'charName':'Edit','surname':'Edit','spriteName':'Edit_01.png','walkingFrames':0x4,'description':'Edit','isBought':!0x0,'price':0x309,'maxHp':0x7f,'armor':0x1,'regen':0x0,'moveSpeed':0x1,'power':0x1,'cooldown':0x1,'area':0x1,'speed':0x1,'duration':0x1,'amount':0x0,'luck':0x1,'growth':0x1,'greed':0x1,'curse':0x1,'magnet':0x1,'revivals':0x0,'rerolls':0x0,'skips':0x0,'banish':0x0,'showcase':[]},{other}],
To customize: edit wherever you see “Edit”, or a HEX value (eg. 0x7f). You can use DEC instead of HEX.
Where:
- _0x383b9e[‘EDIT’] – character ID (we’ll need that later)
- ‘level’ – starting level (Exp still starts at 0 so exp bar will not move until you gather enough)
- ‘startingWeapon’:_0x1c874e[‘EDIT’] – a starting weapon (List can be found in Kormit the Frag’s guide)
- ‘charName’ – character’s first name
- ‘surname’ – character’s surname
- ‘spriteName’ – name of sprite’s first animation frame (More on that later)
- ‘walkingFrames’ – amount of frames in character sprite (Same as above)
- ‘description’ – description
- ‘isBought’ – !0x0 if character is bought and !0x1 if not
- ‘price’ – base price of character (only matters if not bought)
- ‘maxHP’ – base HP (eg. 0x64 = 100HP)
- ‘armor’ – base armor
- ‘regen’ – base regen
- ‘moveSpeed’ – base move speed as decimal
- ‘power’ – base might as decimal (eg. 1.1 = +10%)
- ‘cooldown’ – base cooldown as decimal (eg. 0.5 = -50%)
- ‘area’ – base area as decimal
- ‘speed’ – base speed as decimal
- ‘duration’ – base duration as decimal
- ‘amount’ – base amount
- ‘luck’ – base luck as decimal
- ‘growth’ – base growth as decimal
- ‘greed’ – base greed as decimal
- ‘curse’ – base curse as decimal
- ‘magnet’ – base magnet as decimal
- ‘revivals’ – base revivals
- ‘rerolls’ -base rerolls
- ‘skips’ – base skips
- ‘banish’ – base banishes
I’m not sure what ‘showcase’ is but I left it just in case.
The other at the end is responsible for bonuses you get for leveling eg.
- {‘level’:0xa,’power’:0.05,’curse’:0.05,’moveSpeed’:0.05}
(at level 10, +5% might, +5% curse +5% movement speed) - {‘level’:0x2,’cooldown’:-0.1}
(at level 2, cooldown -10%)
You can input multiple of these modifiers separated by comma eg.
'showcase':[]},{'level':0x2,'growth':0x9},{'level':0x3,'growth':-0x9}],
Bonuses for every level require a little different syntax:
'showcase':[],’onEveryLevelUp’:{'power':0x01}},{other}],
- Look for const _0x5843b8=_0x10df65;
After some editing to make it look nicer it should look like this:
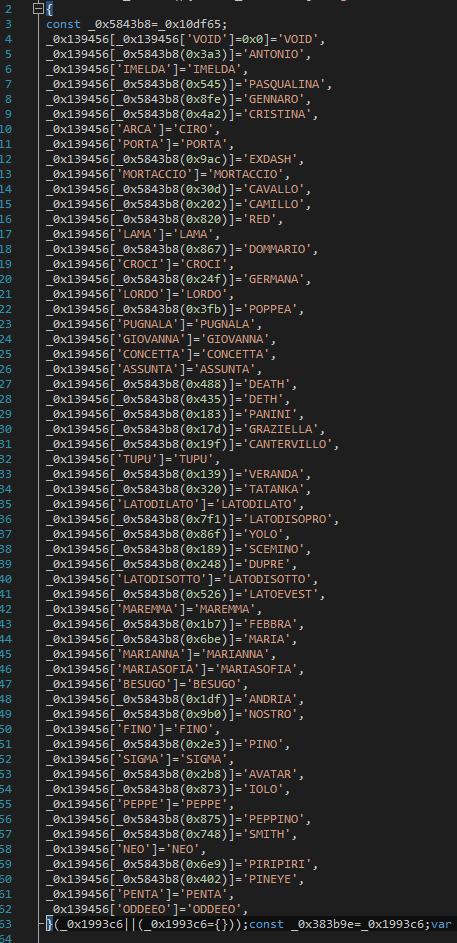
- Find the last _0x139456 and after a comma append _0x139456[‘EDIT’]=’EDIT’
Where EDIT is your character ID from before. Repeat for every character.
With all that done, our custom character is almost done. All that’s left is to add a sprite for them.
If you can’t be bothered with that you can just copy other character’s ‘spriteName’ (eg. Poppea_01.png)
Adding Character Sprite
MAKE A COPY OF characters.json
(Same reason as in first part)
Steal Find/Make a spritesheet and paste in that folder
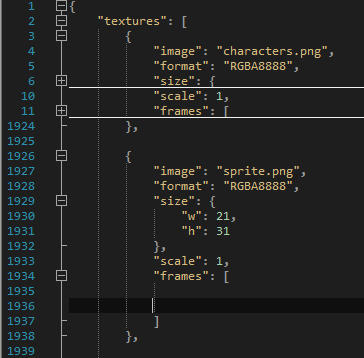
Open characters.json
Collapse so it looks like this:
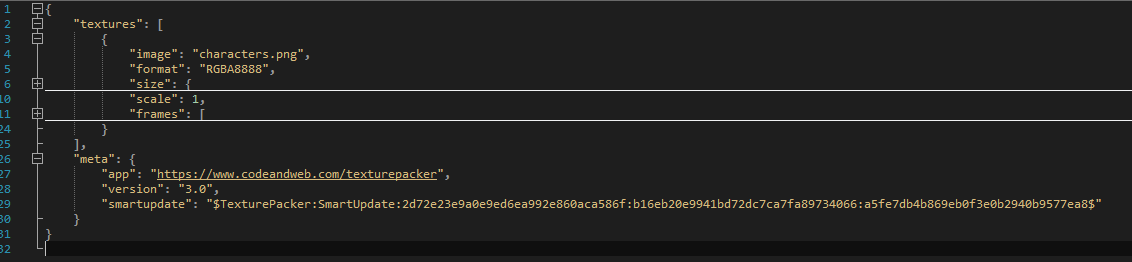
Add following block of code, repeat for every spritesheet:
{
    "image": "sprite.png", /*Insert the name of your spritesheet file*/
    "format": "RGBA8888",
    "size": {
        "w": 211,      /*Width of your spritesheet*/
        "h": 31        /*Height of your spritesheet*/
             },
    "scale": 1,
    "frames": [
                    (here goes the next part)
                  ]
}
It should look like this:
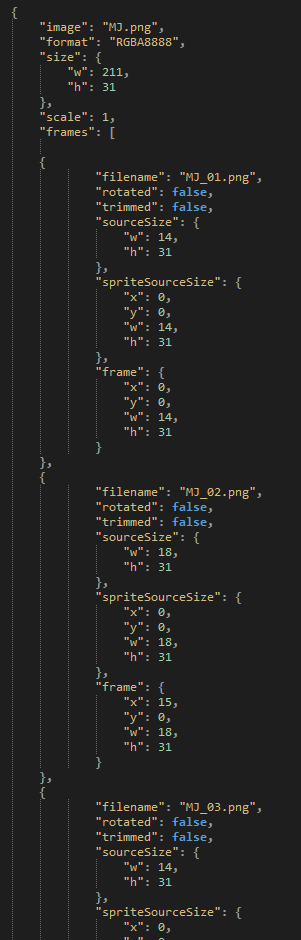
Now, in between the brackets after “frames”: for every frame of your sprite add:
{
    "filename": "Edit_01.png",  /*'spriteName' from before*/
    "rotated": false,           /*for every frame change 01 to frame number*/
    "trimmed": false,           /*eg. Edit_03.png for 3rd frame*/
    "sourceSize": {
    "w": 14,                /*Frame width in pixels*/
    "h": 31                 /*Frame height in pixels*/
    },
    "spriteSourceSize": {
    "x": 0,                 /*I have no idea what is this*/
    "y": 0,                 /*It works when it's 0 so I'll leave it as that*/
    "w": 14,                /*Frame width in pixels*/
    "h": 31                 /*Frame height in pixels*/
    },
    "frame": {
    "x": 0,                 /*Top left corner of given frame*/
    "y": 0,                 /*Coordinates given in pixels*/
    "w": 14,                /*Frame width in pixels*/
    "h": 31                 /*Frame height in pixels*/
    }
},
Example:
After all that is done, you have officially created your own custom character.
Thanks to MKZ2000 for his great guide, all credit to his effort. you can also read the original guide from Steam Community. enjoy the game.
Related Posts:
- Vampire Survivors: How to Unlock V0.10.0 New Secret Character (Cosmo Pavone & Big Trouser)
- Vampire Survivors: Lowest Cost for Meta Upgrades
- Vampire Survivors: Best Upgrade Order (0.3.2c)
- Vampire Survivors: How to Customize Skins
- Vampire Survivors: How to Kill Peaper and Unlock Red Death (Files Editing)