Ultrakill features a lot of hidden abilities, features and tech that are either not obvious or are simply not told to the player. This guide is designed to inform you of such tech, or maybe just remind you in case you forgot about them.
Sliding is useful in order to dodge attacks by sliding under them, or sliding away from incoming attacks. When it comes to avoiding attack, sliding is certainly not as effective as just normal dodging, it can be used regardless of your stamina. More importantly, sliding for extended periods will multiple any style points you gain to a multiple of 3. This is very useful when trying to get a higher rank on a level, however it can be tricky to use. A slide will continue infinitely until you either let go of the slide button, dash, jump or hit a wall. You cannot change the direction of your slide while sliding, so be careful to not fall off ledges or slide into enemies. Additionally, dashing while on the ground and then sliding immediately after will carry the momentum into the slide, allowing you to slide faster for a short time. Sliding into an upward ramp will also send you flying forward, and is actually needed for a secret on level 1-3.
Jumping is pretty simple. When in the air you can dash multiple times as your stamina constantly regenerates at a rate of 1 bar about every 1.5 seconds, and you can jump off of walls up to 3 times before needing to land and reset the wall jump count. You can also dash immediately after a jump in order to do a long jump in whatever direction you were dashing in. The momentum from this long jump can be put into your slide if you time it right, however it’s not terribly useful in most situations. Lastly, jumping immediately after performing a ground slam will allow you to do a Slam Bounce, causing you to jump high in the air. This amount of height gain depends on your height when you begin the ground slam. You can essentially gain infinite height if you use wall jumps and ledges to increase your height.
Parrying is an important part of your abilities, and one you should practice at getting used to. Parrying is achieved by punching an enemy or projectile right before the hit lands with your Feedbacker arm. Parrying will deflect the attack back in the direction you punch towards, so the returning attack may miss. Most attacks in the game can be parried. The parry will usually kill weaker enemies out right and do large amounts of damage to the tougher foes and bosses. Parrying can only be done with either the Feedbacker or Shotgun, the latter of which only works on melee attacks. Punching also has more uses than just normal melee damage and Parrying. It can also be used to launch some of your own projectiles, such as shotgun shells and coins.
The Piercer is the first variant for the revolver. Upon holding the alt fire key, letting go or firing normally will release a powerful 3-hit beam, essentially doing 3 times the normal damage. This beam is hitscan and pierces enemies (as the name implies) but is also capable of destroying glass.
The Marksman will allow you to flick out regenerating coins that can be shot midair, ricocheting your shot into the nearest enemy weak points. If a coin is shot and an enemy is charging an attack, it will instead redirect that ricochet into the charging attack, causing an interruption and doing more damage as a result. You can flick out multiple coins, one after another, and upon shooting one they shot will ricochet into the other coins, causing your style to increase even more. If you’ve got enough air time with the coin, you can shoot the coin with the Piercer variant’s charged shot (Thanks to Expired bread for reminding me of this one).
There is also a very useful technique for the coins called Split Shots. On the left you can see a drawing made by Ultrakill’s developer showing how the Split Shot works.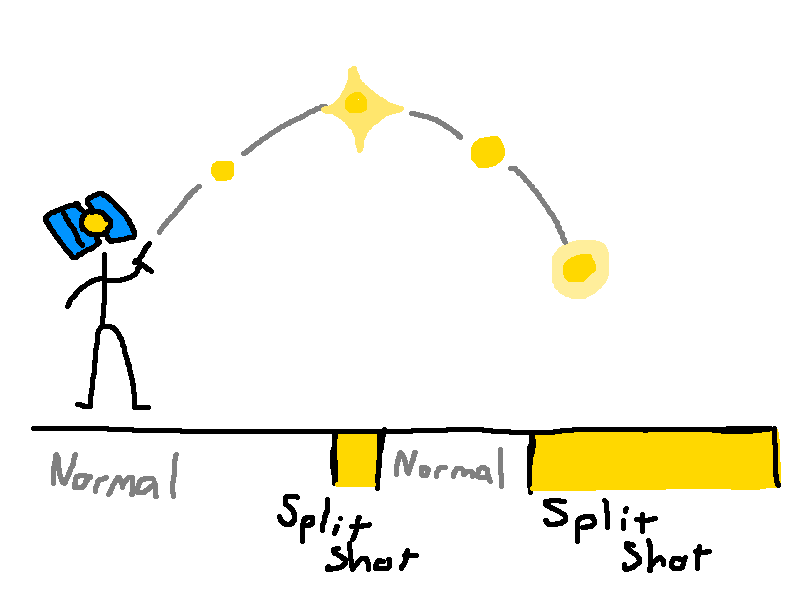 At the apex of it’s toss, the coin will flash. By shooting the coin while it is flashing, the shot will split, shooting 2 enemies instead of just one. This Split Shot state will also occur again a short time after the flash, however no flash will not be seen. Instead the coin will release a high pitched whine as it descends. So even if you miss or don’t have faith in hitting the first split shot state, you will have a longer window to use instead. Do note though, that hitting a split shot doesn’t mean both shots will home-in on the same enemy. If there is only 1 enemy left, only one shot will land, while the other will hit a random surface, so don’t bother with the split shot when going 1-1 with a foe.
You can also punch you coins, however it can be a bit tricky. Just flicking a coin will send a coin flying forward, and while it is possible to hit it by dashing forward, turning around and punching, it’s certainly not ideal. Since the direction the coin when flicked depends on the speed and direction you’re moving, my ideal way of performing this technique is to hold the back key for a half second and then flicking the coin. This will cause the coin to have little to no forward direction, allowing you to easily punch it. Punching a coin will send the coin flying at an enemy weak spot, and causing a Fistful of Dollars style additive. You can also punch or shoot the coin again as it will fly upward in the air after it hits an enemy, While not very useful and hard to pull off, it is pretty fun to do.
This is a very simple variant. By pressing the alt-fire key, you will “eject your core”. This is a fancy way of saying you fire out a grenade. Holding down the alt-fire key will charge the distance that the core will go. This variant is great for dealing with large clusters of weak enemies. Just pressing alt-fire with this variant is dangerous, as the core will kind of just flop right in front of you before exploding, so I highly recommend always holding down the charge. You can technically do a grenade jump with this by firing it at your feet, but it will send you flying in a somewhat random direction as well as doing 35 damage to yourself, so you really shouldn’t do it..
The Pump Charge variant works by repeatedly pressing the alt-fire key to charge your normal shot’s damage. The more charges you do, the less accurate you become. Pumping 3 times will put the shotgun in an overcharge state, which will just explode in your face and take 50 health. Switching off this variant or weapon will reset the charge state, so if you pump too many times, don’t worry. The variant without doing any pumps/ the first charge is actually more accurate than the CE variant, but most likely does less damage. The second charge is equivalent to the CE variant, and the third charge is more damaging and less accurate than that. The fourth charge may seem useless considering it explodes in your face, but if you get up in an enemy’s face and explode, you’ll be able to gain back a decent amount of health from their blood they let out as a result. Additionally, if you preform a dash at the exact same time as firing an explosive shot, you can completely avoid the damage. This can be dangerous if you miss time it, but can deal lots of damage quickly if you can pull it off repeatably (thanks to LavenderHorns for this one). The explosive charge is also very useful on The Cyber Grind, as you can save yourself from falling off by using the explosion to launch yourself in the air and land back on the stage. It’s certainly saved a few of my runs.
The Attractor variant allows you to shoot out a large magnetic nail. This magnet will cause all nails shot to be pulled towards said magnet, creating orbs of nails. It’s useful if you’re trying to focus on your surroundings but still want to be dealing damage to a specific foe or area. You can also put down multiple magnets, and (as long as the magnets are close enough) the nails will get in between them as best it can. This can create an area of damage that you can try and lead enemies into. Lastly, you can also break the magnets by shooting them with hitscan weapons like the Revolver.
The Overheat Variant is possibly the most powerful attack in the game. By shooting nails normally, a bar will fill up on the Nailgun’s screen. When full, pressing alt-fire will cause the Nailgun to spit out a large amount of nails quickly and can just melt certain enemies, bosses included. You have 2 charges, and you should make sure to only use the charges when the bar is completely full, as the bigger the bar, the bigger the burst. Once both charges are used, it will take about 20 for both bars to recharge, so you should switch to another weapon once that happens. Additionally, the Nailgun’s normal fire rate after using both charges will be drastically decreased and pretty much useless, so switch to the other variant or change weapons. Lastly, the nails launched by the Overheat charge will home-in on the magnet shot in the Attractor Variant (added in at the request of Mayor Ignaeon).
This is a basic Railgun shot. Shooting will cause a large beam to fire out of the Railgun that will pierce all enemies in its path and does quite a lot of damage while doing so. This variant also has a fun tech where if you shoot a coin from the Marksman Revolver with this variant, the beam will ricochet. It’s quite hard since you must switch fast enough from one gun to the other, but it’s very cool and damaging when you pull it off. Oddly, the store also says to not use this Variant in water, however as of now there is no repercussion when doing so.
This variant allows for a drill to be fired from the railgun that does damage overtime. It does about the same damage as the Electric, and to be honest the only real reason I would think to use this variant over the others is for health, as the enemy it hits will be constantly taking damage and bleeding as a result.
This variant fires an explosive beam that will do damage in a decently large area where it hits. It’s best used from crowds of enemies. This variant is also a reference to the Malicious Face enemy type, who will also perform an attack very similar to his.
The Feedbacker is your starting arm. Unlike the other arm, this one is faster and able to perform parries, including projectile boosts and coin punches.
This arm is slower than the Feedbacker, but does more damage and knockback. By holding down the punch button with this arm, you will perform a shockwave, will launch enemies away and kill lesser foes. Unlike the Feedback, you cannot perform any kind of parry, so be sure to switch back when you need to.
Related Posts:
- ULTRAKILL: All Challenges Guide
- Ultrakill Movement Techniques (Basic Controls)
- ULTRAKILL: Advanced Movements Guide
- ULTRAKILL: Layer 2 Secret Level Guide
- ULTRAKILL: All Layer 4 Challenges Guide