
The official documentation for the in-game level editor of The Rewind Factory
Introduction
- Left Click (LMB): Select anything
- Right Mouse Button (RBM) Hold: Look around
- Right Mouse Button (RBM) Click: Edit object properties
- F: Focus on selected object(s)
- WASD: Horizonal movement (only works when RMB is pressed)
- Q/Left Shift – E/Spacebar: Vertical movement
- Scroll wheel: Camera movement speed
- C / V: Change gridscale. Translation, rotation and scale have separate gridscales
- R: Return to editor. Only works while playing your level
- Ctrl + Z: Undo
- Ctrl + Y: Redo
- Ctrl + D/W: Duplicate selected object(s)
- F4: Toggle whether or not you can only move while RMB is pressed
Basics
You can look around by pressing RMB and then moving your mouse. While pressing RMB you can also move with WASD for horizontal movement and Q and E for vertical movement.
On the left side of the screen is an UI panel. In this panel is most of the functionality of the level editor. The first four buttons are:
- Exit: exits the level editor to the menu
- Load: Shows an UI where you can select an save file to load
- Save As: Saves the current level as a save file with a specified name
- Save: saves the current level to selected save file. You must have loaded or saved a level before this. You can check this by looking at the text above these buttons. The current level name will be shown there.
- Level Settings: This will show another UI where you can change certain level related settings. This will be further explained in the section: Level Settings
- Publish Map: This will show an UI where you can fill in the information needed to upload your map to the workshop. Once you’re done, you can press Publish and then your map will be uploaded and published to the steam workshop
- Play Level: Pressing this button will enter playmode. In playmode you can play and test your own map. If you press the three dots on the left, you can choose to either spawn at the default spawn location or spawn at the current camera position (in editor mode).

The next section of this UI panel (the object browser) contains all the available objects you can place. There are three “modes”:
- Activity: Here you’ll find all the objects that either have some kind of logic or are different from just shapes. Each object will be explained in further detail in the section: Objects
- Shapes: Here you’ll find all the shapes with which you can build levels.
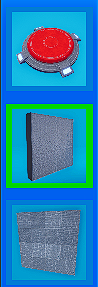
- Materials: Here you can select a material and click (LMB) on a shape to give it that material.
Further down there are four buttons:

- World & Local: This buttons displays the current mode of the gizmo
- Location: This sets the gizmo mode to location
- Rotation: This sets the gizmo mode to rotation
- Scale: This sets the gizmo mode to scale
Once you’ve selected an object or shape, you can place it in the world with LMB. If you want to select an object you can press LMB to select it. This will also show the gizmo. If you want to access the objects properties (only available for objects, not shapes), you can press RMB.
Level Settings

Medal Settings: If your level has something to do with time, you can specify the times needed for each medal here. The platinum (purple) medal is generally meant to be your own time (the developers time).
Ammo: Here you can specify the amount of bullets the player receives at the start of the level.
Override Difficulty: This enables you to specify a difficulty for your map. Otherwise the player’s own difficulty setting will be used.
Dash/Slide Unlocked: Enabling this gives the player the dash and slide ability (normally gained in test chamber 16). Otherwise the player will have other (worse) slide and no dash.
Player Settings: You can override a lot of settings from the player. All these settings will be explained beneath.
Fog Density: This controls how visible the fog is. The higher the value, the less you can see.
Fog Start Distance: This controls at which distance the fog starts. NOTE: this does not work when volumetric fog is enabled.
Volumetric Fog: This enables volumetric fog. With volumetric fog you can see light scatter through the fog. It generally looks better, however.. NOTE: Whether volumetric fog is enabled or not still depends on the users graphics settings (specifically Shadows/fog. Volumetric fog only works when this setting is set to High or Epic).
In this panel you can change a lot of player related settings:
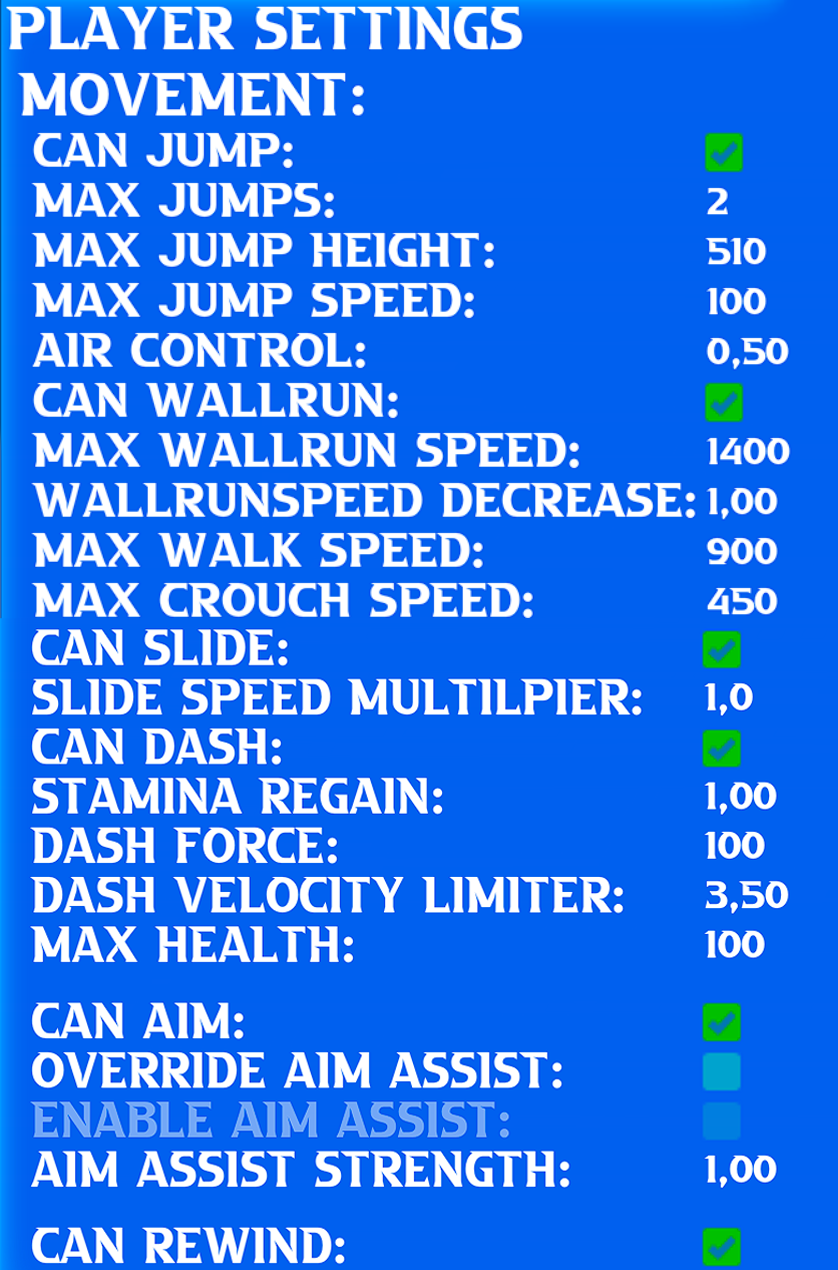
- Can jump: Whether the player can jump or not
- Max jumps: How many the player can jump
- Max jump height: How high the player can jump
- Max jump speed: How much horizontal velocity is added or kept during a jump
- Air control: How fast the player can turn and move in the air
- Can wall run: Whether or not the player can start a wall run
- Max wall run speed: The maximum speed at which you can wall run. If you go faster than this and start wall running, you will quickly lose speed until the maximum speed is reached
- Wall run speed decrease: A multiplier for how fast you lose speed while wall running. Negating it (e.g. -1.0) will inverse this, meaning you gain speed while wall running
- Max walk speed: The maximum speed the player can move while walking
- Max crouch speed: The maximum speed the player can move while crouched. The player can only crouch if Dash/slide Unlocked is enabled.
- Can slide: Whether or not the player can slide
- Slide speed multiplier: A multiplier for how much speed is gained when starting a slide.
- Can dash: Whether or not the player can dash
- Stamina regain: Multiplier for how fast you regain stamina. Stamina is used for dashing
- Dash force: How far you can dash
- Dash velocity limiter: Multiplier for limiting the velocity at the end of a dash. The higher the value, the more velocity you keep and vice versa.
- Max health: The maximum health the player has
- Can aim: Whether or not the player can aim
- Override aim assist: Enabling this will allow the next setting, Enable aim assist, to control whether or not aim assist is forced to be enabled. Normally aim assist is only enabled when playing with a controller. Overriding it means you could also enable it when playing with keyboard and mouse
- Enable aim assist: Whether or not aim assist is enabled. Only works when Override aim assist is enabled
- Aim assist strength: How strong and fast the aim assist is
- Can rewind: Whether or not the player can rewind
Objects
- Button: A button activates when the player walks over it.
- End Level Teleporter: If you want your level to have an endscreen (like normal test chambers), you can use this.
- Enemy: A normal enemy.
- Minigun Enemy: A minigun enemy.
- Water: A piece of water which can kill the player with water damage.
- Barrier: A barrier that blocks everything. Can be deactivated by a signal. Can also change color.
- Airvent: An airvent adds force to the player or a colliding object. The amount of force can be configured.
- Cube: A cube that has physics. The player can not collide with it, but the player’s bullets can collide with it and push it away. It can also be used with object 9.
- Cube Button: A button that activates when a cube (see object 8) falls onto it.
- Cube Spawner: An object that can spawn cubes (see object 8) based on a signal or just on a specified interval.
- Player Spawn: Specifies where the player will spawn when they start the level. There can only be one player spawn in your level.
- No Wallrun Zone: A zone where the player can’t wallrun.
- Trigger: An object that can send a signal to a list of objects, set a variable (like the time, player’s health, player’s bullets) or fire an event (e.g. make the player shoot, jump, die) when something collides with it.
- Laser Enemy: A laser enemy.
- Small lamp: A small lamp with 3 different variations. Can also change intensity.
- Big lamp: A big lamp which can also change intensity.
Most objects have a property panel that opens when you place it. You can also bring up the property panel by right clicking (RMB) on an object.
If you have to property panel open, you can press Middle Mouse Button (MMB; your scroll wheel) on another object of the same type to copy it’s properties to the selected object.
Workshop
First of all, make sure you have saved your level. Also, make sure your level has an appropriate name as it will show up in the custom level list in the menu for the people who download your level.
If your level doesn’t have an appropriate name or you just want to rename it, you can do so by loading your level and then saving it as a new level with your desired name.
The thumbnail for the workshop will automatically be generated once you click Publish Map (don’t worry, you can also upload your own custom thumbnail, more on that later). The thumbnail will be generated from your current camera view, so make sure you position your camera well. Once you’re happy with the view, you can press Publish Map.
Fill in all the information that’s needed:
- Title: The title of your level
- Description: A description of your level.
You can update both of these later through Steam as well.
If this is your first time publishing something to the Steam Workshop, you probably need to agree to the workshop terms of service. Otherwise you can not upload your level.
If you want to have a custom thumbnail for your level, you should replace the automatically generated thumbnail with your own. You can do so by going to the folder named after your level. In that folder you should find the automatically generated thumbnail. Replace it with your own image. It needs to have the exact name as the automatically generated one.

If you have done all the following steps you can press Publish and your level will be published to the workshop.
Thanks to Waterknaller for his excellent guide; all credits belong to his effort. If this guide helps you, please support and rate it via Steam Community. Enjoy the game.