An extensive guide explaining how the game mechanics work.
Introduction
This guide is not a quick tutorial; if you haven’t played the game yet, I recommend you play your first run and follow the game’s instructions first to get a feel for the game. This guide will hopefully answer the questions you will inevitably have after having played the game.
I must also note that this is not intended as a strategy guide. I will mainly just be explaining how the game works; how to actually achieve those S-rankings is up to you.
The basics
- There are three types of resources: Food, Production and Culture. Food and Production are used primarily for building and improving structures from the Food and Tech building trees. Culture is used primarily for unlocking special terrain tiles, but is also used for improving structures from the Culture building tree.
- The goal of the game is to produce as many resources total as possible within those 100 turns. At the end of each run, you are given a percentage score and a grade from E to S based on that score.
- The game consists of 100 turns. During each turn you can perform only one action. You use your actions to put structures on the terrain, which produce resources. Structures can be leveled up or evolved into more complex structure.
- At the end of every structure tree are special structures called ‘legacies‘; there can be only one of each in the world, and they’re very expensive, but they can provide extremely good yields.
- Each map (except for Plains World) contains special environment tiles (e.g. Mountains). These are very expensive to unlock, but give a powerful bonus depending on the resource production of the adjacent tiles (diagonals do not count). Some special environment tiles can be further upgraded to specific legacies.
- Before your run you select your Oracle. Each Oracle has a passive ability as well as a unique legacy structure you can build. They can be leveled up to strengthen the ability and unlock two more unique legacy buildings per Oracle.
- You also select a World to play on. The worlds are (with one exception) static; if a strategy didn’t work out, you’ll at least have learned the map and can devise a new strategy to try in the exact same starting layout. (The exact conditions for unlocking the worlds is currently unknown.)
- Performing particular tasks gets you minor rewards (Offerings). As they’re not covered elsewhere in this guide, they’re detailed later in this section.
- Twice per game, you will enter a Golden Age for three turns. During these three turns, you will get more of a certain resource (which one seems to depend on the Oracle). (I don’t the details of when they trigger or the exact boost.) Unfortunately, they come so late and don’t provide that much of a boost, so they’re fairly useless if you’re doing decently.
- Every now and then, your Oracle will happily tell you she’s found something useful, then give you resources in such small quantities that it’s almost always completely useless. Don’t be too hard on her, she’s trying her best. Kindly accept her gift knowing that it’s effectively irrelevant to the gameplay.
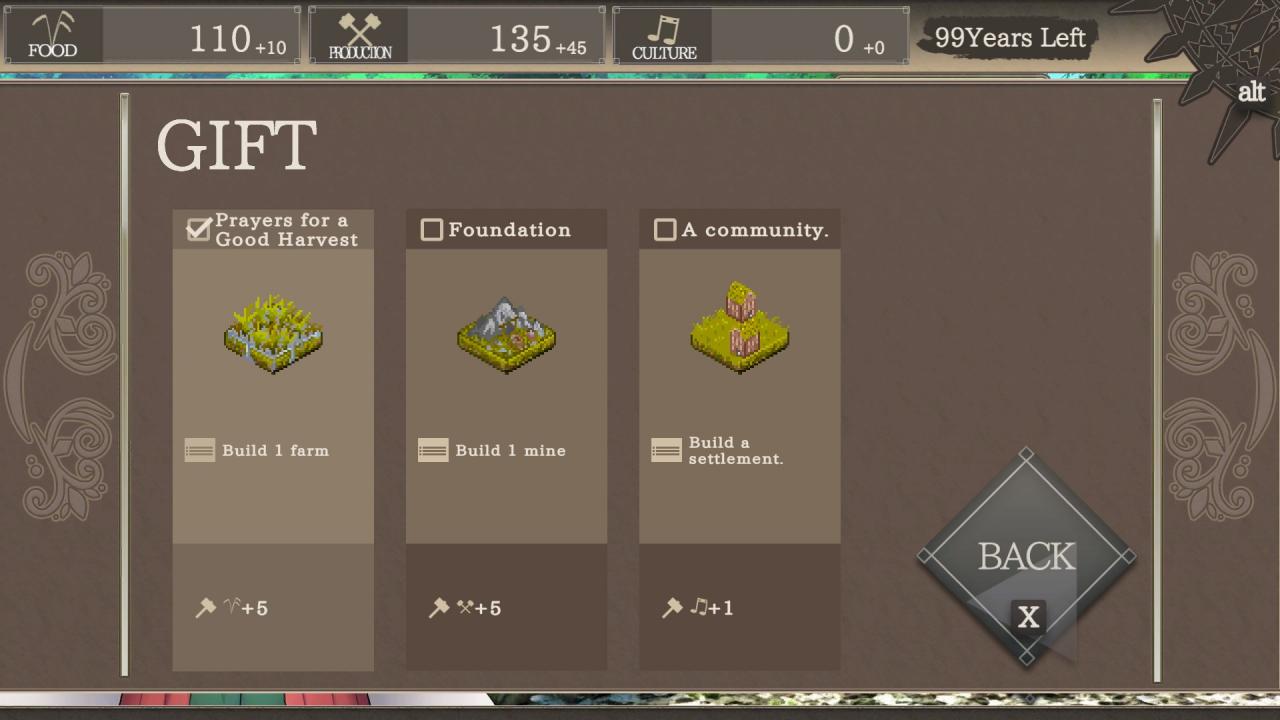
There are three rows of requests you can fulfill to get minor bonuses (Offerings).
- Claiming them does not take an action so they’re free resources.
- You can only claim them if the condition has been true while the request was listed (e.g. if you have a Castle and they ask for a Fortress, you’d need to build a new Fortress to claim it; having had a Fortress in the past does not count). If you already meet the requirement, however, you can just claim the reward without doing anything. (You can still claim the reward even after no longer meeting the condition, as long as you met it while the request was active.)
- One row always involves Food structures, another always Production structures, the third always Culture structures.
- The exact requests vary per world (but are consistent within that world).
The rewards can be nice in the first couple turns, but it’s typically not worth the effort to specifically cater to them. The final rewards can be nice, but require you to play so inefficiently you’re putting yourself at a disadvantage. You’re generally better off just claiming them when you happen to get them and otherwise ignoring them.
Objectives and scoring
- 87% or higher: S-rank
- 75% or higher: A-rank
- B-rank happens as low as 55%; don’t know where the threshold lies, presumably at 50%.
- C-rank: Presumably below 50%.
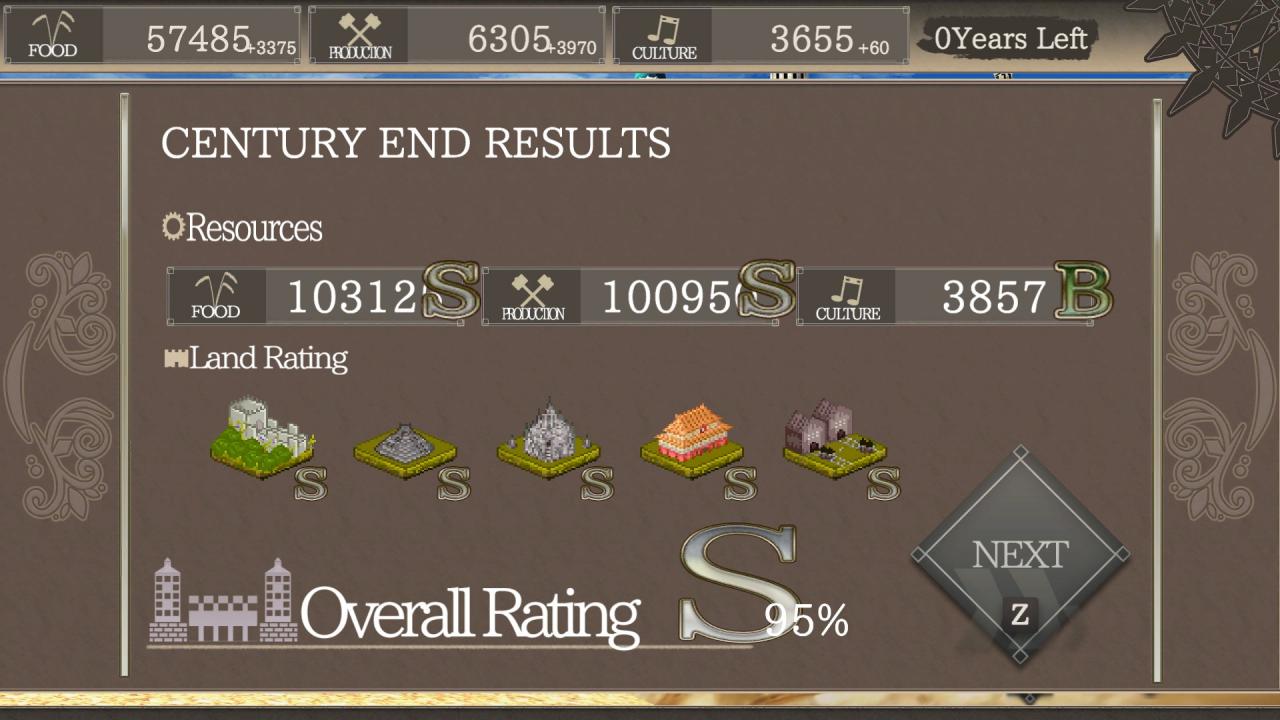
There are 8 (practically 4) factors involved in the percentage score:
- 1) Your total Food production throughout the entire run.
- 2) Your total Production production throughout the entire run.
- 3) Your total Culture production throughout the entire run.
- 4-8) The rankings of your 5 best tiles.
1-3 are easiest to explain. All produced food/production/culture throughout the run is tallied up (and it includes resources you’ve spent; everything is counted) and depending on how much you’ve produced you get one of the following rankings in that category:
- S rank: 100,000 food or production, or 10,000 culture.
- A rank: 45,000 food or production, or 4,500 culture.
- B rank: 15,000 food or production, or 1,500 culture.
- C rank: Exact cutoff unknown, it’s somewhere below 3,700. Don’t worry about it, you’ll get at least C.
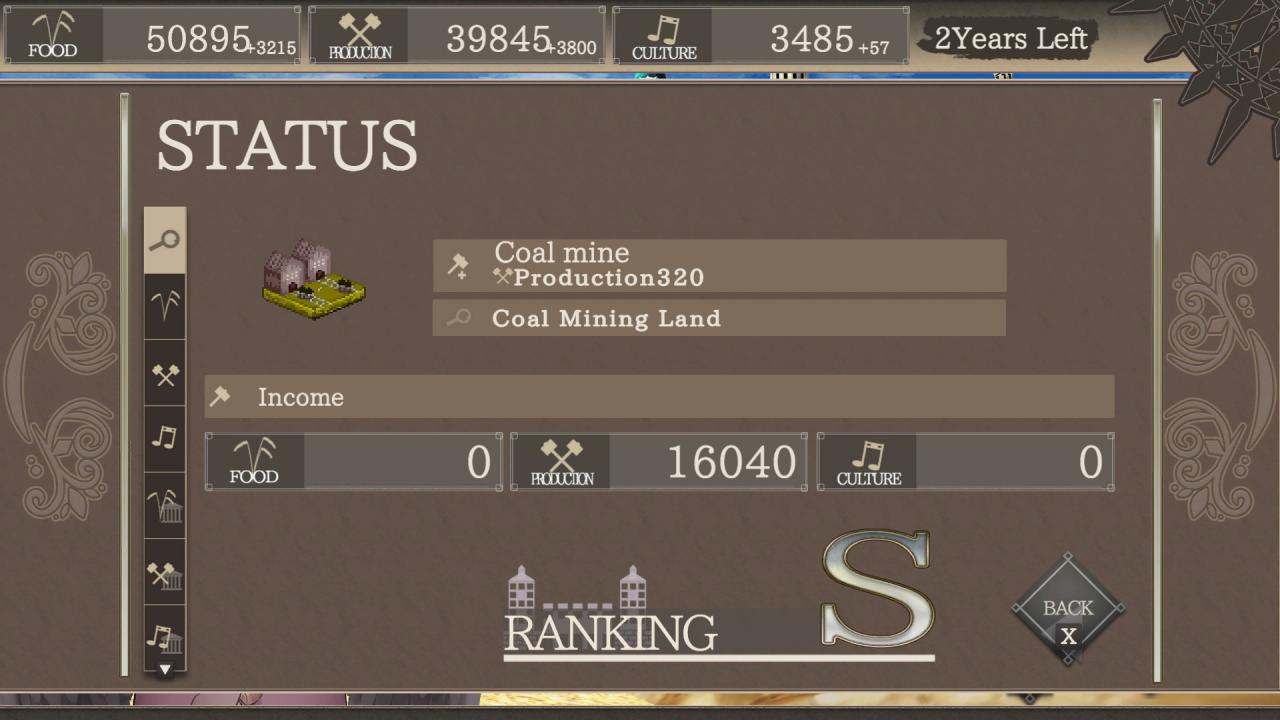
The tile ranking is somewhat more complicated, but still not too hard. Much like how the resource category ratings tallied all of your produced resources throughout the run, the game also tracks the same for individual tiles and gives each tile a ranking between E and S. This works as following:
- The rating is counted per tile, not per structure. This means that the yields of the structure (or special environment) previously on the tile also counts towards it! For example, if you evolve a Castle into the Forbidden City at some point, the tally is not reset but includes the 3 culture + 10 production per turn from when it was still a Castle (as well as it yields from back when it was a Fortress, and when it was a Village, and a Settlement).
- Naturally, this also means special environment tiles have their own ranking, and can be among your top 5 tiles (in fact, this is likely to happen if you play well!).
- The tile ranking is based on its combined yields. Let’s call it the ’tile score’. For example, a tile which produced 12,000 food and 3,000 production will have a tile score of 15,000.
- For the calculation of tile score, culture is multiplied by 10. For example, a tile which produced 2,000 food, 3,000 production and 800 culture would have a tile score of 2,000 + 3,000 + 800 * 10 = 13,000 points.
- The tile yields so far and current ranking (not projected eventual ranking!) can be seen in the Status Menu.
The rankings correlate to the tile score as follows:
- S rank: 15,000 points
- A rank: 7,500 points
- B rank: Below 7,500 points. (Don’t know how low C rank is, but you’re unlikely to have it among your top 5 tiles.)
Only the top 5 tile rankings count towards your Overall Rating! There is no point to having a sixth S-rank tile, other than that the yields it provides may push you to a better Food, Production or Culture ranking. Focus on getting 5 tiles to S rank, and beyond that just produce as many resources as possible.
Each of the 8 criteria determines 1/8 of your score. To break it down into parts:
- Each S-rank adds 12.5%
- Each A-rank adds 10%
- Each B-rank adds 7.5%
- Each C-rank adds 5%
- D-rank presumably adds 2.5%
- E-rank presumably adds nothing
Count them up, round it down to the nearest whole integer, and you have your percentage score. See the top of this section for which percentages correlate to which overall rankings.
Once you get good enough and become a perfectionist, you may start looking at it more negatively and count downwards from 100%:
- Each A-rank costs you 2.5% (1 rank too low)
- Each B-rank costs you 5% (2 ranks too low)
- Each C-rank costs you 7.5% (3 ranks too low)
If you lose 15% or more (6 ranks or more) you’ll drop from S to A.
Developing tiles
There are in essence six types of undeveloped tiles, one of which is technically not undeveloped and two of which don’t usually appear:
- Undeveloped Plains
- Potentials
- Special environment tiles
- Tiles with an unwanted structure
- Uncultivated Plains
- Uncultivated Potentials
The last two are exclusive to World of Wastelands and World of Nature. They are effectively the same as Undeveloped Plains and normal Potentials, except they’re way more expensive (generally about 2.5x the cost). They’re basically the hard-mode variants of these tiles.
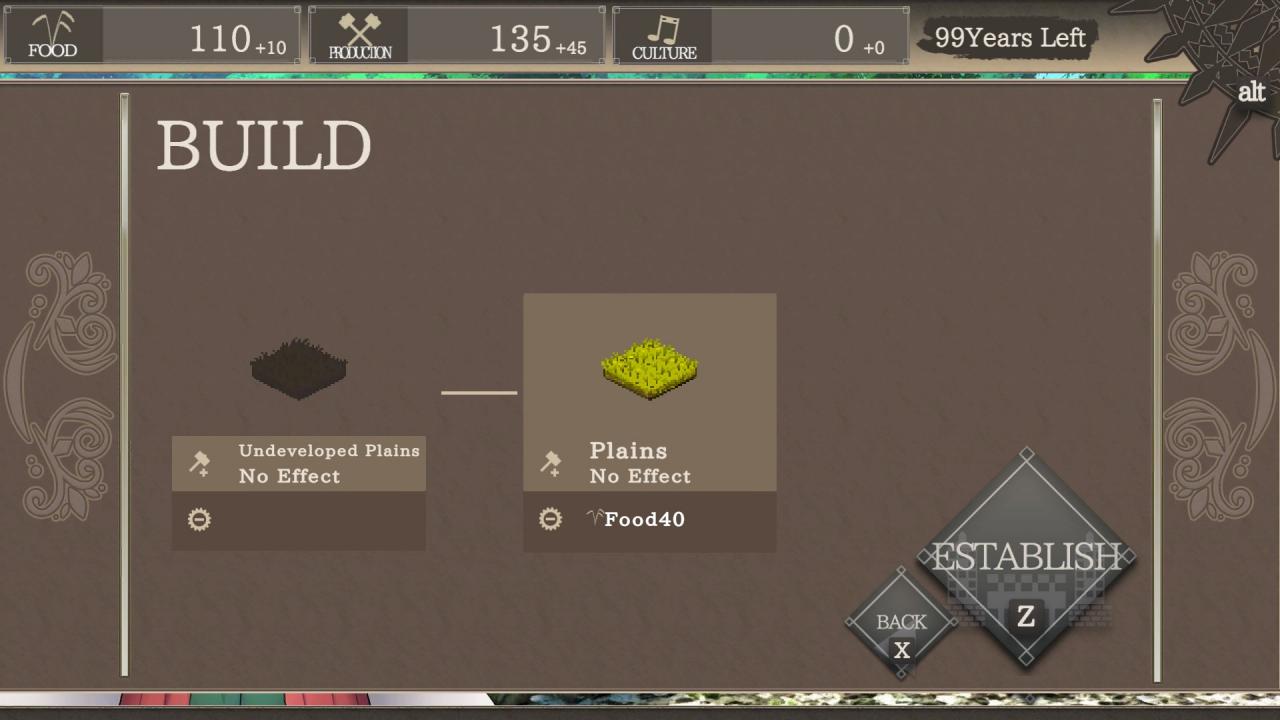
These tiles are darkened, and you will need to spend a turn and some resources to develop (unlock) them. There are four variants, being identical other than having different development costs. The possible costs are:
- 40 food
- 40 production
- 20 food and 20 production
- 10 culture
Consider carefully which tile you want to develop early in the game, as by picking the right tiles you can make sure you have the right resources to build what you want as soon as possible.
The culture variant is of particular interest: When playing as Amaterasu, Arianrhod or Freyja, and usually as Gaia, the cost is a significant obstacle, meaning you can’t develop them until later on when you’ve started developing Settlements. When playing as Inanna however, or when lucking into free Settlements with Gaia, these tiles become effectively free, getting you a turn in which you produce resources and unlock a tile as normal but without spending any food or production that turn. Your free culture income means you have to put in no effort to get it, and it will likely be a while until your food and production have caught up to let you spend significant amounts of culture elsewhere, so you don’t have anything better to spend your culture on early in the game.
Potentials are much like Undeveloped Plains in that they’re darkened and need to be developed before you can use them, but they’re far more expensive and come with a pre-built structure. This is both advantageous and disadvantageous: While the cost may seem steep, saving turns in constructing the structure is a huge benefit. Unfortunately, it may happen that the Potential is for a structure you do not want, in which case you develop it into a tile with an unwanted structure (see below).
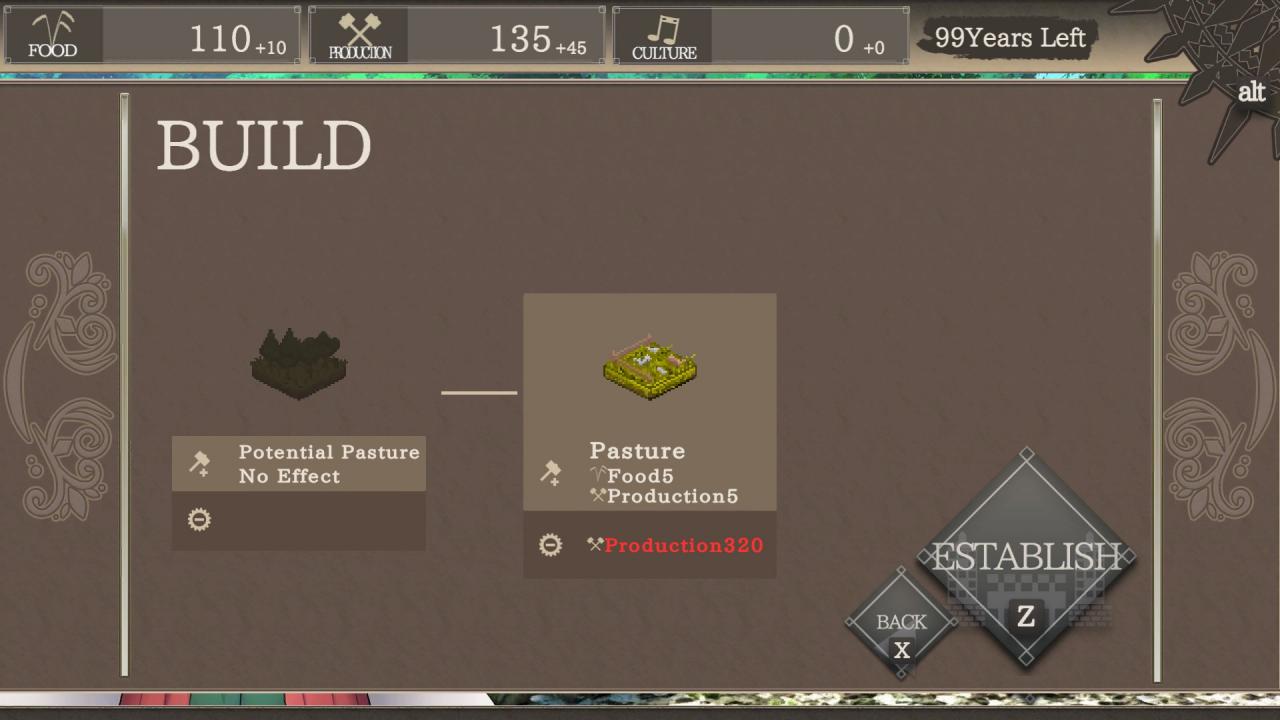
The development cost depends on how advanced the structure is and from which of the building trees it is:
- Tier 1: Farmlands and Mines have two different possible costs, so check the tile. They may cost 80 food and 80 production, or they may cost 160 of the resource of the opposite building tree (that is: a Farmland may cost 160 production, and a Mine may cost 160 food).
- Tier 2: Pastures and Quarries cost 320 of the opposite resource (e.g. a Quarry costs 320 food). Only Potential Quarries and Potential Pastures exist; there are no Potential Farm Estates or Potential Workshops.
- Tier 3: Windmills and Coal Mines cost 600 of the opposite resource as well as 40 culture. Again, the other buildings do not have potentials.
- Settlements break the pattern and always cost 80 food and 80 production. Notably, this is the only way to gain Settlements as they cannot be built on Plains, unlike the starters of the food and production trees. This also makes them valuable; you only get a limited number of these on the map!
- Villages likewise have an unusual cost: 600 production and 60 culture. A steep cost, but one you’ll definitely be paying once you run out of Potential Settlements as it’s the only way to gain culture buildings.
At some point you’ll run out of Plains tiles and will be forced to develop Potentials. Plan ahead for them!
Each world (other than Plains World) has a limited number of special environment tiles, typically between 2 and 4 of them. These tiles are all extremely expensive, but they provide a unique benefit: They look at what the adjacent tiles are producing, and produce half that much of a resource, effectively granting a 50% bonus (and possibly converting that 50% into the opposite type!). You’ll typically want to build a legacy next to them to get a massive adjacency bonus. (Keep in mind that adjacent in this game means horizontally or vertically next to it; tiles diagonally across are not considered.)
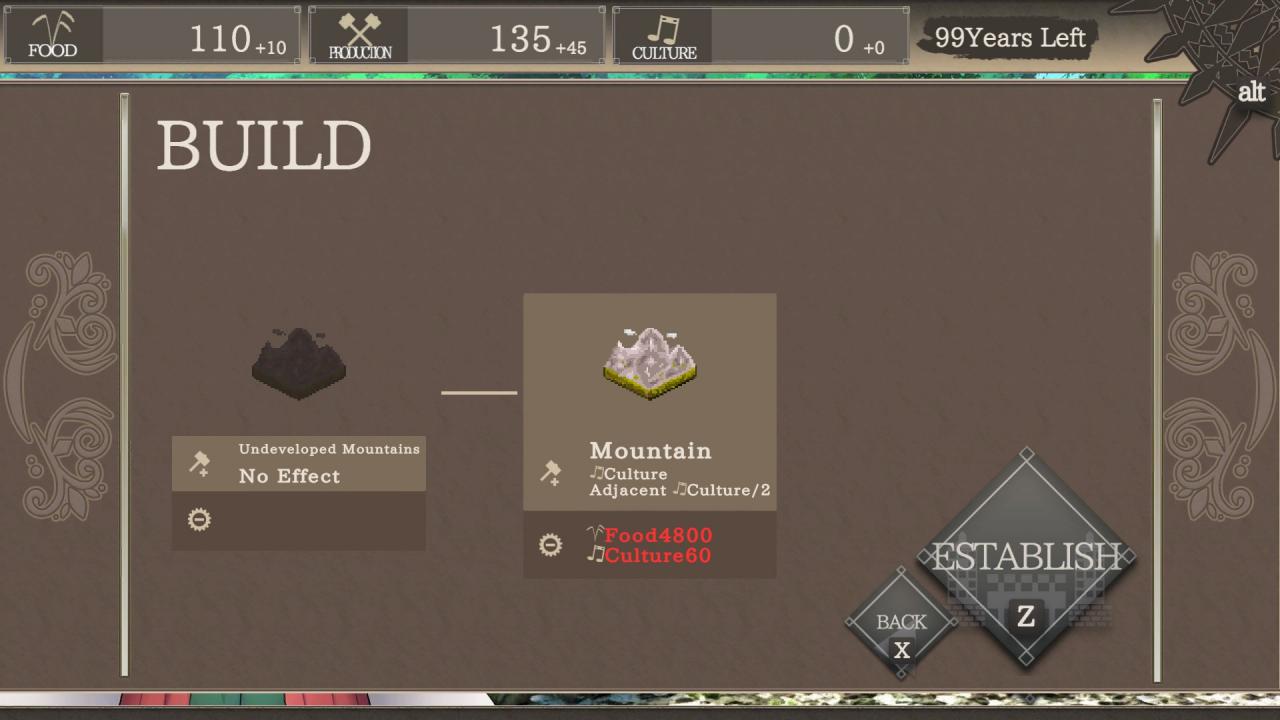
These are the special environment tiles, which resource should be produced adjacent to them, and which resource they output:
- Mountain: Culture -> Culture
- Sea: Food -> Food
- Forest: Production -> Production
- Island: Food -> Production
- Desert: Production -> Food
- Ruins: This one’s the odd one out. It provides no adjacency bonus; instead, it provides 1 culture per turn for every legacy structure currently on the map.
Costs to develop these tiles are X food/production and Y culture, where X varies from 4,800 to 6,400 and Y varies from 40 to 60. The big exception to this is the Desert: It costs 360 culture and nothing else. This can make it very easy to develop for Inanna, and very difficult to unlock for anyone else.
Furthermore, after developing these special environment tiles, some can be evolved into unique (or in two cases, non-unique) legacies. See my other guide for the details: Charts for building evolution trees
Technically not an undeveloped tile, but still something I want to mention as most players don’t seem to realize this. Any tile can be destroyed, turning it into a Plains and allowing you to build something you do want on that tile. Doing so costs you one turn, the same as it would take to develop a tile, but at no resource cost.
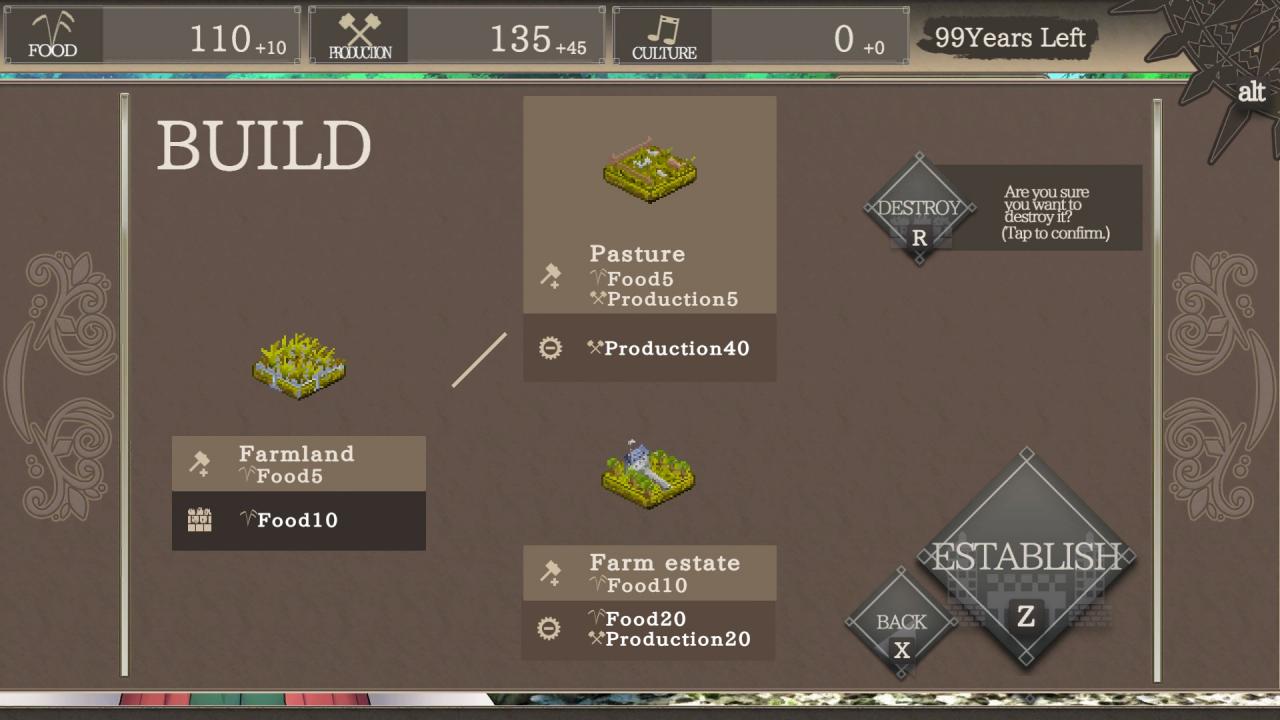
This means that if you have any old buildings laying around that are no longer very useful (let’s say a Farm Estate while you went for a Chichen Itza or Quarry-legacies strategy), and there are no more Undeveloped Plains to easily grab, you can just destroy the obsolete building to gain a Plains tile, just like if it were an Undeveloped Plains instead of an obsolete structure!
This also means that if you can spare the turns and the resources, Potential tiles can also be used as Undeveloped Plains with an extra step: Develop the Potential, then destroy the structure to end up with a Plains tile. Keep in mind that this costs you a lot of time, so you’ll want to avoid this if possible, but often there is no other choice to get more Farmland for your Prambanan Temple. (Raze everything! Every tile must become Farmland for that sweet x100 bonus!)
I must also note that every tile can be destroyed. If you’re not worried about the limited number of tiles for culture buildings, you can just raze that Settlement for more Farmland. (Do keep in mind that destroyed culture buildings cannot be rebuilt as Settlements can only be developed, not built.) Ruins in your way? You paid 4,800 production for it, but it’s not Farmland, so down it goes. Deserts, Mountains or Seas in your way? Don’t question it, everything becomes Plains if you spend one turn destroying it. If you want to, you can even destroy Plains t
Structures
- You can build a Farmland or Mines on Plains.
- You can evolve a structure into a higher-tier structure.
- You can level up an existing structure.
- You can evolve a structure into a legacy, or build a legacy on a developed special environment tile.
- You can destroy a structure.
For destroying structures, see the previous section on developing tiles; it’s covered there as it’s more similar to developing tiles than to upgrading tiles.
Not much to say here. Select a (developed) Plains and choose to either build a Farmland (cost: 10 production) or a Mines (cost: 10 food) on the tile. (Note that the cost is the opposite of what they produce.) Culture buildings cannot be built from scratch; they can only be developed from Potentials.
This is where things get complex. Any tier 1 or tier 2 structure can be evolved into one of two options of the next tier. Each option has different costs and yields. The options available to you and how to get to them are documented in my other guide: Charts for building evolution trees
General statements I can make here about the food and production tree:
- Tier 2 buildings always cost 40 resources and have a yield of 10 resources.
- Tier 3 buildings always cost 160 resources and have a yield of 20 resources, with two exceptions. (The Factory provides 25 production, the Library provides 15 production and 2 culture.)
- Each tier 3 in the food tree leads to a legacy, but this is notably not true on the production side (some don’t even lead to a legacy!).
When evolving a leveled up structure (see below), the level-up bonus is lost. You generally want to avoid evolving leveled up structures, and avoid leveling up structures you still want to evolve.
Sometimes you don’t want to evolve a structure. Maybe the next evolution changes the yield types, maybe the structure needs to remain the same type for legacy synergy, maybe the structure is already at tier 3 and you don’t want to or cannot turn it into a legacy. If you have resources to burn, you can still improve the structure by leveling it up: you pay a certain resource cost to double its yields.
- It doesn’t just add the base yield, it doubles the current yield. That means that if you have an Orchard (10F, 10P) and level it up, it gives 20 food and 20 production per turn. Level it up again, and it yields 40 food and 40 production. Do it again, and you get 80 food and 80 production.
- The catch? It gets more expensive every time you do it. And like the yields, the existing cost is multiplied, so it gets very expensive really quickly.
- But that’s not the worst part. The first two times, it costs ‘only’ double the previous cost. (In our Orchard example, that’s 80F 80P to get it in the first place, 160F 160P to level it up once, 320F 320P to level it up again.) After that, the cost quadruples. (Third level up costs 1,280F 1,280P, fourth level up costs 5,120F 5,120P.) If you still haven’t given up at that point, it starts multiplying the cost by 8 instead. (40,960F 40,960P for levelup #5, 327,680 for #6. That’s thrice overall S-rank, for reference.) I’ve never managed a sixth levelup, but I imagine it will multiply by 16 next.
- This increasing multiplier means that it can be more effective to level up a tier 3 than a lower-tier structure, despite the higher initial cost.
Two aspects of leveling up are worth noting for strategic value:
- Leveled-up tier 3 buildings can reach S-rank if you level them up fast enough.
- You can level up a structure next to a tile with an adjacency bonus to raise the yield of that adjacency tile. Not only does this multiply your gains from leveling up, it can also be a way to add a bit of extra yield to the adjacency tile to push it over the edge to S-rank.
Known in certain other games as ‘wonders’, legacies are unique buildings that are very expensive to build but can provide incredible benefits. Only one of them can exist on the map; you cannot build a duplicate. Most commonly, they provide a certain yield times the number of tiles with a specific structure on them (for example, Chichen Itza provides 40 food times the number of Farmlands on the map). These can make your food and production explode very rapidly, so plan ahead for them and build them as soon as possible. These will generally be your highest-ranked tiles (see the section on scoring for why this is relevant). Ideally, you want to place them next to a tile with an appropriate adjacency bonus.
A handful of legacies provide an adjacency bonus instead. These can be very powerful; be sure to plan ahead and place them appropriately. (You may have limited or no choice in positioning them (e.g. the Mountain legacies). Don’t accidentally build the wrong things around the intended location!) Still other legacies (none available by default) provide a static bonus. Whatever the effects, all legacies are candidates for becoming S-rank if used well.
Finally, one particularly obscure rule I’d like to point out is that unlike e.g. the Civilization games, the uniqueness limitation is only about only one existing on the map at any time. If you destroy a legacy, you can rebuild it elsewhere. (Do keep in mind that anything destroyed turns into Plains, no matter what it was before. Your Great Wall will not turn back into a Mountain!)
The Oracles
Where Civilization has leaders, The Hundred Year Kingdom has waifus Oracles. These mythological goddesses will talk your ear off and be very clingy but more importantly for the gameplay also provide a very useful passive resource boost, as well as granting you access to a unique legacy (eventually three unique legacies if you raise their level enough).
The Oracles and their abilities (and first unique legacies):
- Amaterasu: Provides 10 production per Oracle Level per turn. Grants access to Himeji Castle (15 production * Legacy Level * Sand Mines).
- Freyja: Provides 10 food per Oracle Level per turn. Grants access to Cologne Cathedral (2 culture * Legacy Level * Temples).
- Arianrhod: Provides 5 food and 5 production per Oracle Level per turn. Grants access to Westminster (15 production * Legacy Level * Factories).
- Inanna: Provides 3 culture per Oracle Level per turn. Grants access to Damascus (culture equal to adjacent tiles’ culture).
- Gaia: Provides no resource bonus. Instead, starting on level 2, she will let you start with X additional tiles, where X is half her Oracle Level rounded down (hence 0 extra tiles on level 1). These are usually Plains tiles, but can include non-Plains tiles, in which case you also start with free structures! Grants access to the Colosseum (2 culture * Legacy Level * Cities).

After your run, your Oracle and her unique legacy will gain experience and possibly level up, increasing their ability. (Except for Damascus, it’s already plenty good as-is. Still gets experience, but it doesn’t change anything.) The amount of experience gained depends either on your percentage score or your Overall Rating rank. One thing that confuses some people is that the Oracle Level and the Legacy Level are separate. At first they will match up making it irrelevant, but…
At Oracle Level 5, the Oracle unlocks a second unique legacy. After a run, only one of the legacies will gain experience! This is why you have to choose a legacy before starting a run; you can build any of your unique legacies during a run, but only the selected one will gain experience. (You don’t even have to build that specific legacy to have it gain experience.) There’s also a third unique legacy per Oracle which apparently unlocks at Oracle Level 9, but I haven’t actually leveled anyone that far yet despite reaching S-rank on every map. Suffice to say you’re going to have to grind a bit to get that third one.
Worlds
There are various playable maps in the game which the game calls Worlds. For the most part they follow the same rules and just have a different layout, but some call for a couple remarks.
It’s not clear from the description, but unlike the other worlds, this one is not static. While always having the same basic pattern, beyond that basic pattern this map is randomly generated.
Waper-34 explained it as such on the forums:
After having completed couple of runs on Empty World here, I can confirm that this map is indeed randomisd.
Having said that… Based on my observation, the main features of this map:
1. There are 3 tiles (Yes, three. No more or less and exist in fixed locations) of which can be any combination of the following:
– Iselands
– Sea
– Mountains
– Forest
– Desert2. There seem to be at least 4 tiles at fixed locations that are designated as Settlements.
3. Other than the first 2 points, all other tiles are randomised. (Except for the very 1st open tile which will always be an empty tile when we start the game)
So Empty World is for those who like a bit of challenge with random element.
This is not a challenge map, but a sandbox mode. The turn counter never moves from 100 and you can keep building for as many turns as you want. There is – to my knowledge – no way of committing your score here, so it will always remain listed as E rank in the World Settings.After exiting a run in this mode, the main menu will prompt you to continue. To start a new game, you need to go to the ‘World Settings’ menu and select a new world from there.
A world with only Plains and Potential Settlements. No special environment tiles or Potentials other than Settlements. It sounds simple, and it’s a simple design, but this is probably the most difficult world in the game. You’ll find yourself starved for both resources and time without the special environment tiles and Potentials to boost you.
For the most part a fairly normal map, if a bit crowded with Potentials. The notable feature of this map is that you start with three additional pre-developed tiles containing the unique ‘House of Worship’ structure that you can destroy to get free Plains tiles. By themselves they do nothing, but they have a unique upgrade path:
- The upper path, Trading Post, provides 10 production per city and can evolve into Water Supplier (40 production per city) and Hospital (40 food per city).
- The lower path, Schoolhouse, provides 3 culture per library and can be evolved into Seminary (3 culture per Temple) and Art Gallery (10 culture per Castle; essentially an additional Forbidden City).
A mostly normal map…except all Undeveloped and Potential tiles are instead ‘Uncultivated’, greatly raising their cost. Essentially hardmode, though I personally found it easier than World of Plains.
Has Uncultivated tiles like World of Wastelands, but also provides one House of Worship (see Goddesses’s World). Also contains a lot of special environment tiles.
In addition to providing a free Undeveloped Plains House of Worship (see Goddesses’s World), it also contains a (likewise pre-developed) unique structure named ‘Research lab’.
- Its first upgrade must be Philosophy, which costs 50 Culture but provides Culture equal to the number of Undeveloped and Potential tiles. The fewer tiles you’re using, the more Culture you gain. If you play around it, you can get an S-rank on it from that alone. Should you wish to upgrade it further, there are two paths:
- The upper path is Mathematics, 5 production per legacy for 100 culture. It leads to Engineering and Medicine; both cost 500 culture, with the former providing 10 production per legacy and the latter providing 10 food per legacy.
- The lower part is Literature, 2 culture per legacy at the cost of 100 culture. It’s a pretty harsh downgrade, but it leads to Theology, which provides 4 culture per Undeveloped/Potential tile. Alternatively, you can go for Art, which provides 4 culture per legacy.
There are no Uncultivated tiles or other particular challenges here, so it’s a fairly straightforward map, except it gives you boatloads of free culture.
Thanks to VDZ for his great guide, all credit to his effort. you can also read the original guide from Steam Community. enjoy the game.