Guide to earn all 17 Achievements for Terra Nil
Introduction
The entire guide will be so that you can easily complete, with most achievements being earned by completing a milestone within the game. Harder achievements that require some work or certain map design will be at the end of the list. Some achievements require finding all the animals and will be noted with an asterisk ( * ) at the start of the achievement name. If you need help with those, here’s my guide Every Region’s Scan Collection List .
Some achievements will be easier or harder depending on the map generation, so you may have to restart the region a few times to get a good map. Or, like myself, you might mess up something and can’t undo the action, so you may need to restart the phase. Frustrating, but easier than having to restart the entire region multiple times.
And onto the achievements! I hope this helps!
Restoration Achievements
– Complete the first map. This is the first map you’ll be able to do with a new profile.
Open-cast Reclamation – Restore the Abandoned Quarry
– This is the second map in the Temperate Region; complete and restore the map.
Flooded Isles – Restore the Archipelago
– This is the second map in the Tropical Region; complete and restore the map.
Northern Glaciation – Restore the Polluted Fjord
– This is the second map in the Polar Region; complete and restore the map.
Urban Renewal – Restore the Irradiated Sprawl
– This is the second map in the Continental Region; complete and restore the map.
Global Rejuvenation – Completely restore the planet
– Complete all 8 maps from the four regions. This will fill the bar at the bottom of the world view to 100% and earn you this achievement.
*Complete Biome Achievements
*Beneath the Snow – Discover all animal species and fully restore biomes and climate conditions in the polar region
*Oryx and Crake – Discover all animal species and fully restore biomes and climate conditions in the Continental region
– These three achievement descriptions explain them pretty well. You might need to restart the region a few times to earn this, but it’s mostly trial and error to learn what every animal needs. The biomes are automatically met through completing the map. The climate conditions are shown in the top right corner when you build the research station and explain which statuses need to be met to fill the climate condition.
Aerial View
This you can do at any point in the game. Open the “Options” (pause) menu either with the “options” button in the top left corner or hitting the escape button on your keyboard. Screenshot mode is the third option in the menu, and is like camera mode for most major games, letting you choose what on the screen you want a screenshot of, or if you want the entire map in the screenshot. Click on the camera icon, or “Screenshot Whole Map”, and you’ll unlock this achievement.
(Note: this will create a file on your desktop with the screenshots in it. This is not a shortcut folder; it lives on your desktop unless you move it or delete it.)
Screensaver
When you complete the map and your recycle ship picks up the little recycle boat, it will have “wasteland reclaimed” in the top left corner and give you the option to either “Continue” or “Appreciate”. Click “Appreciate” and let the game run for about a minute, and it will automatically give you the achievement. Once you have the achievement, you can click anywhere on the screen to bring the choices back and hit “Continue” to move on.
Antarctic Oasis
While I could have earned this on my first run for the Volcanic Glacier map, I didn’t realize this until I had to go back for this achievement. The trick is to not let the map get below 0°C – anything below freezing will cause the lava tiles to turn to stone. Because of this, either you earn this achievement first then do the map a second time for Beneath the Snow, or vice versa since from what I’ve learned you cannot complete all the climate conditions and earn this achievement.
Minecraft Rocks!
I earned this with the Volcanic Glacier map in the polar region, which is the third map in the progression. There are steaming fissures throughout the map. Use a Seismic Detonator on one near the coastline, and it should automatically earn you the achievement. If not, you can also earn it with the Abandoned Quarry map that unlocks after you complete the Continental map Flooded City. On the Abandoned Quarry map, you’ll create a river with the Water Pump, then use the Seismic Detonator on a nearby steaming fissure.
Wildfire
I was able to earn this on the first map unintentionally so I’ll be using the River Valley for this guide, but you can also do this on any map with the Solar Amplifier and fuel source to create a wild fire. You’ll want the region to have a nice medium to large area that is on the same level, all connected, and preferably with a Dead Forest tile already nearby. Progress through the region, using the Toxin Scrubbers to get fertile soil and then the Irrigators to create greenery.
This should get you to the point to unlock the second phase, and unlock the Solar Amplifier, the Beehive, and the Arboretum (if needed). If you have a Dead Forest tile that was revived into a Forest tile, use the Beehive to create Fynbos into the land space you want to burn. Count how many buildings you have already in the area, and build the remaining you need to get to 25. (Note: any building will burn unless it is on rocks.)
Use the Solar Amplifier to light a Fynbos tile on fire, and it will cause the entire area to burn, stopping only at the map edge, a cliff face, a River tile, or a Wetland tile. As long as there are enough buildings, they should all burn and earn you the achievement.
Marine Haven
I earned this one with by using the Archipelago map. When using the Undersea Dredger, you can control how much of the map is covered by land vs water. Once you think the map is about 50% covered with land, do not use the Undersea Dredger at all and finish the map through each phase.
Goldilocks
As the achievement description states, you need three bears, on their own hills, 10 tiles apart from each other. I found having a hill in each corner space and making sure the hills had the Forest tiles nearby was enough to appease the bears in this achievement. It didn’t matter if the Beehives created the Fynbos Field or not.
Perfect Location
This achievement was the hardest of them all to earn. I ended up referencing this guide to figure out how this works. I’ve seen users say that either the Tropical Region maps are easier, but I earned mine with the Volcanic Glacier map. With the Volcanic Glacier map, there’s a small hill in the bottom corner of the map, that will have at least one Fissure on the top of the hill. If you have the hill and easy access to the ocean, it’s easier to earn this achievement. If done correctly, you should earn the achievement shortly after you place the Animal Observatory. If it doesn’t, hover your mouse over the tile for a moment to check which type of tiles are nearby, and make sure that the tiles state “Boreal Forest”, “Lichen”, “Tundra”, and “Kelp Forest”. I don’t know if the tiles in the corners next to the Animal Observatory count, as I counted the ones that were sharing a full side.
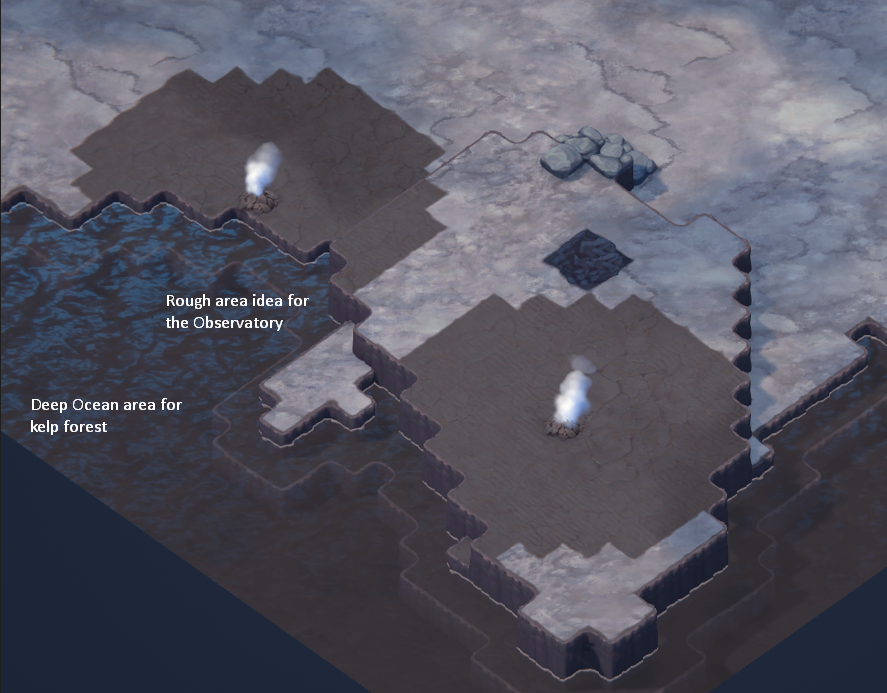 Complete phase 1 as normal for the map. For myself, I left this corner of the map alone after using the Seismic Detonator to create the lava ‘lake’ around the fissure on the hill, placed a Geothermal Plant on the hill, then left that corner well alone so I would have more room to work during phase 2 to earn the achievement.
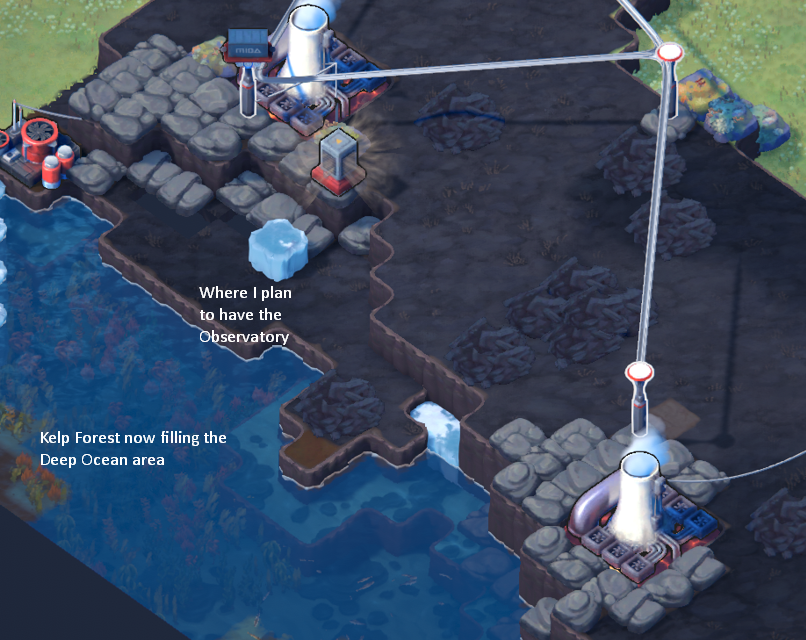 Once in phase 2, it’s time to start the work to get the achievement. To start, I used the Radial Excavator to both create a lava lake and get dirt from elsewhere on the map. Once the Radial Excavator is used, it is full of dirt and you can move that dirt elsewhere with the Monorail Nodes. Click on the Monorail Node near the Radial Excavator, and then place the Radial Excavator near the ocean. The goal of this is to have the land move to be a sheer cliff into the Kelp forest tiles that you created on the ocean floor nearby. This is the first phase 2 biome requirement met.
 Next, you’ll want to start by creating Greenery tiles on the top of the hill and in the dirt of the newly formed land. Depending on where you place the buildings on the hill, will change the Building Husk piles that are used for the Arboretum to create the Boreal Forest. It doesn’t matter too much, as long as there’s one close enough to spread the forest onto the level where the Animal Observatory will sit.
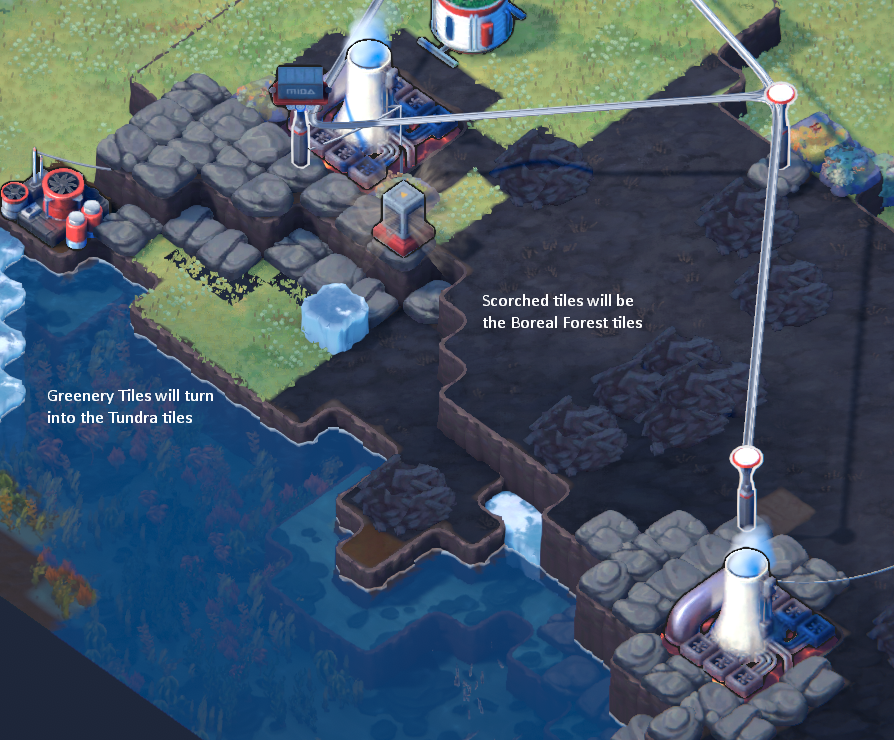
 Before you create the Boreal Forest tiles, use the Irrigator to create Greenery tiles. This is to plan where you will have the floral-colored Tundra tiles sit adjacent to the Animal Observatory. If not, the Boreal Forest Tiles will take up the majority of the tiles and make it harder to complete the achievement. Now you can create both the floral-colored Tundra and the Boreal Forest tiles next to the Animal Observatory. This covers the 2nd and 3rd phase 2 biomes. Finish with phase 2 to get the phase 3 tools.
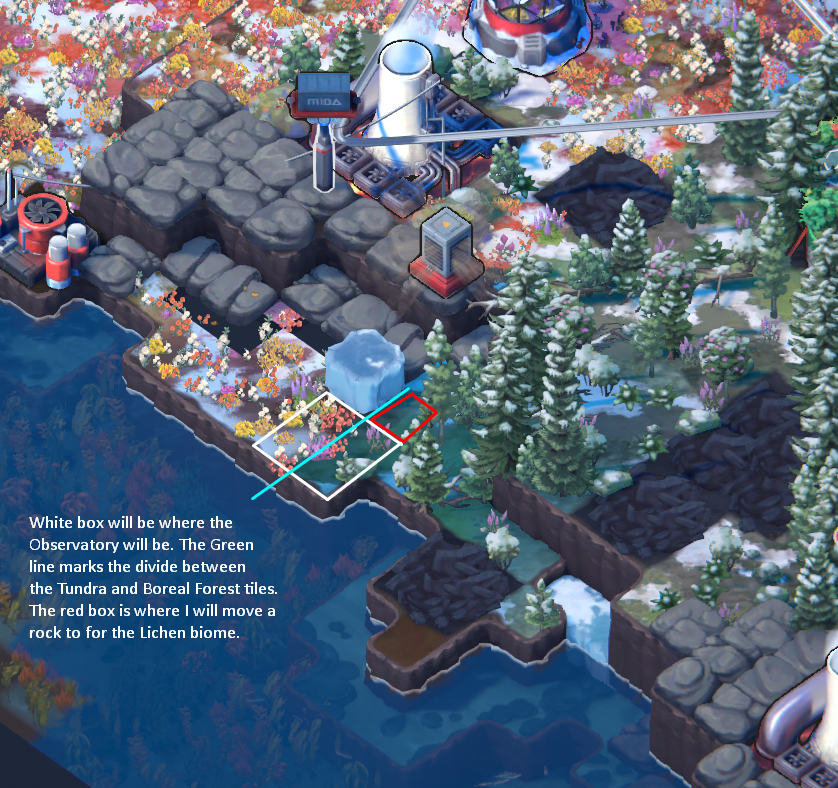
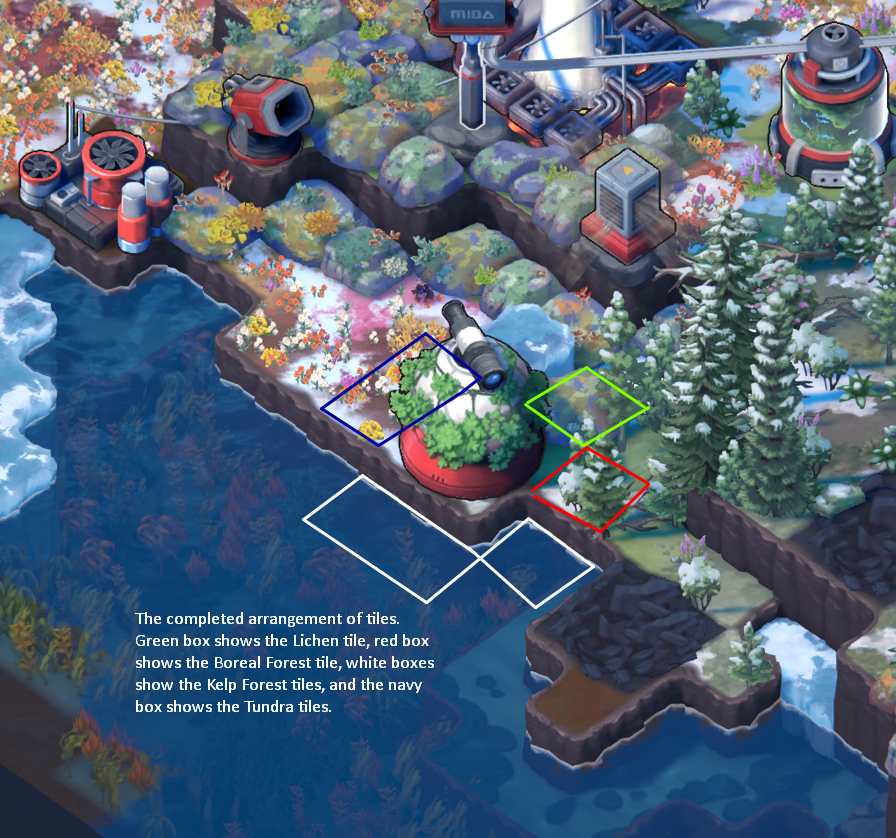 For the final biome, phase 3 will make it easy to complete. Make sure you can see the divide between the Tundra and the Boreal Forest tiles to keep track where the rocks need to be for the Lichen. With my favorite tool, the Rock Hopper (aka Rock Yeet-er), you can throw a rock over next to where you want the Animal Observatory to be. Place another Irrigator nearby, so you can use the Algae Greenhouse on the Irrigator to create the Lichen. At this point, all four biomes should be ready for you to place the Animal Observatory down.
Thanks to LeeThePhoenix for his excellent guide, all credits belong to his effort. if this guide helps you, please support and rate it via Steam Community. enjoy the game.