
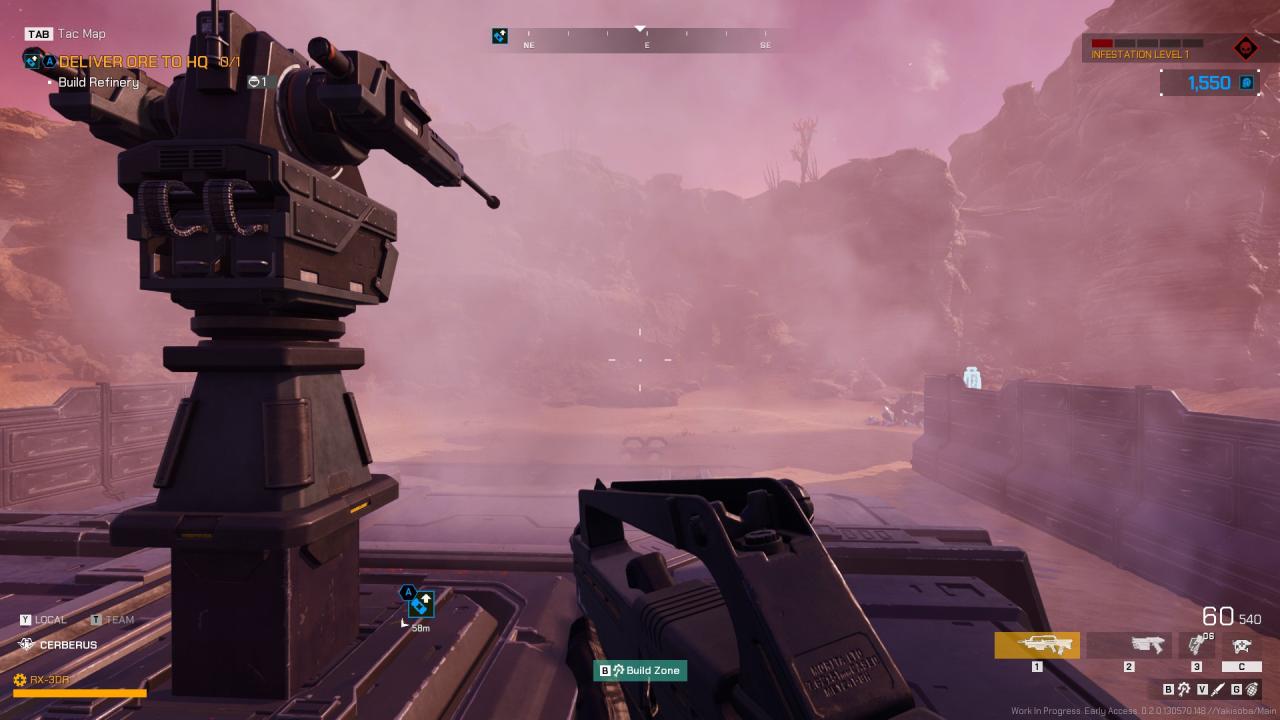
Having walls is not defending. Having people on walls not shooting is not defending. People need to be able to kill targets to be able to hold a position.
Foreword
Everyone is going to have a different experience with what they build and how the situation ended up so I would appreciate that if you were to leave feedback, you can provide some additional information so that there can at least be some discussion on further refining this as a useful resource for others.
The Approach to Defense
- + Losing walls are often just an inconvenience
- + Loud indication of walls breaking can easily draw in the attention of other players
- + Massive durability pool means it can stall approaching enemies for longer
- – Can result in poor resource efficiency
- – Significantly harder to designate rally point, which means more Ammo and Health resources will need to be spread out, or people have to travel more
- – Harder to maintain clean lines of sight, especially when walls are breached and people are forced to retreat
- – Base Sprawl

- + A critical defense tends to center around a stable rally point, providing a good position for Ammo and staging area to repair walls in the event of a breach
- + Bases tend to be much more compact, making travel much easier
- + Clean visibility for line of sight
- – Much harder to plan
- – More care needs to be maintained to ensure that the most critical buildings are not destroyed
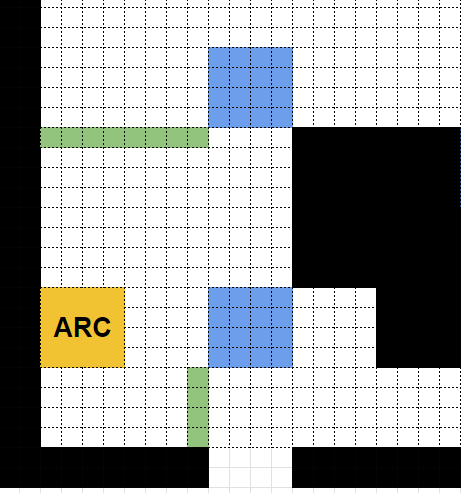
While having a layered defense might seem inefficient, there is certain situations where they serve their function. However, there is no situation where you can afford to defend a base without a Critical Defensive point. This is often times the poorly placed Bunker beside the Arc. A good strategy should try to employ them as necessary while trying to avoid straining resources and limits.
Dedicating resources to a backup plan is taking resources out of your initial plan. Planning for the walls to fail raises the odds of the walls failing. If your plan involves everyone eventually piling in the Bunker next to the Arc, why not push the Bunker a little bit forward with some walls and just have the fight take place there?
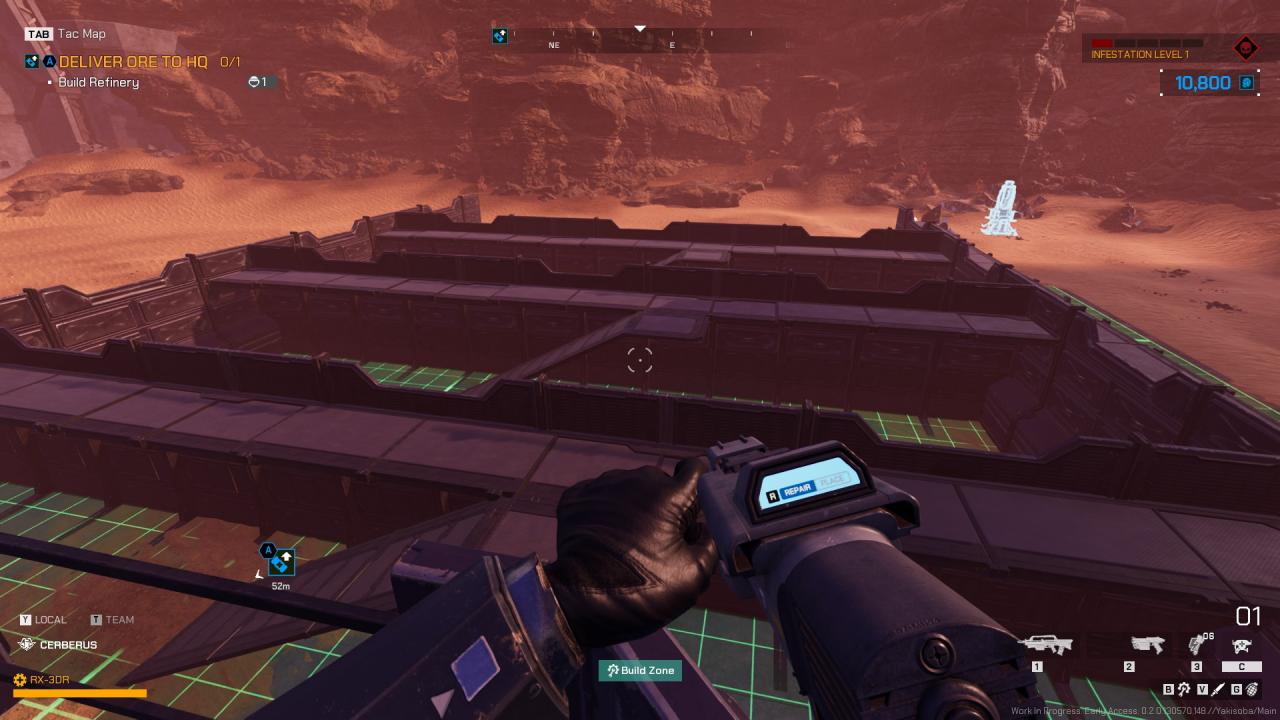
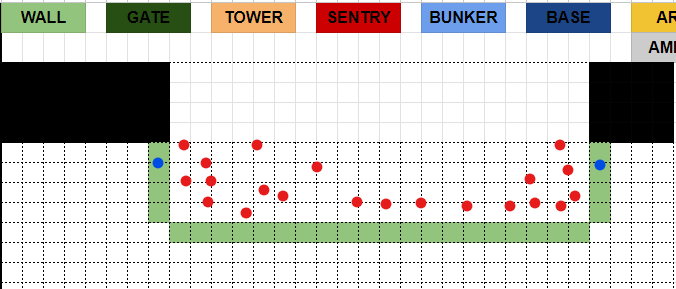
Base Components – Core
 These components all serve the same staple function. They exist to block access, for the bugs but also potentially for you.
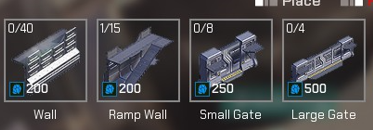
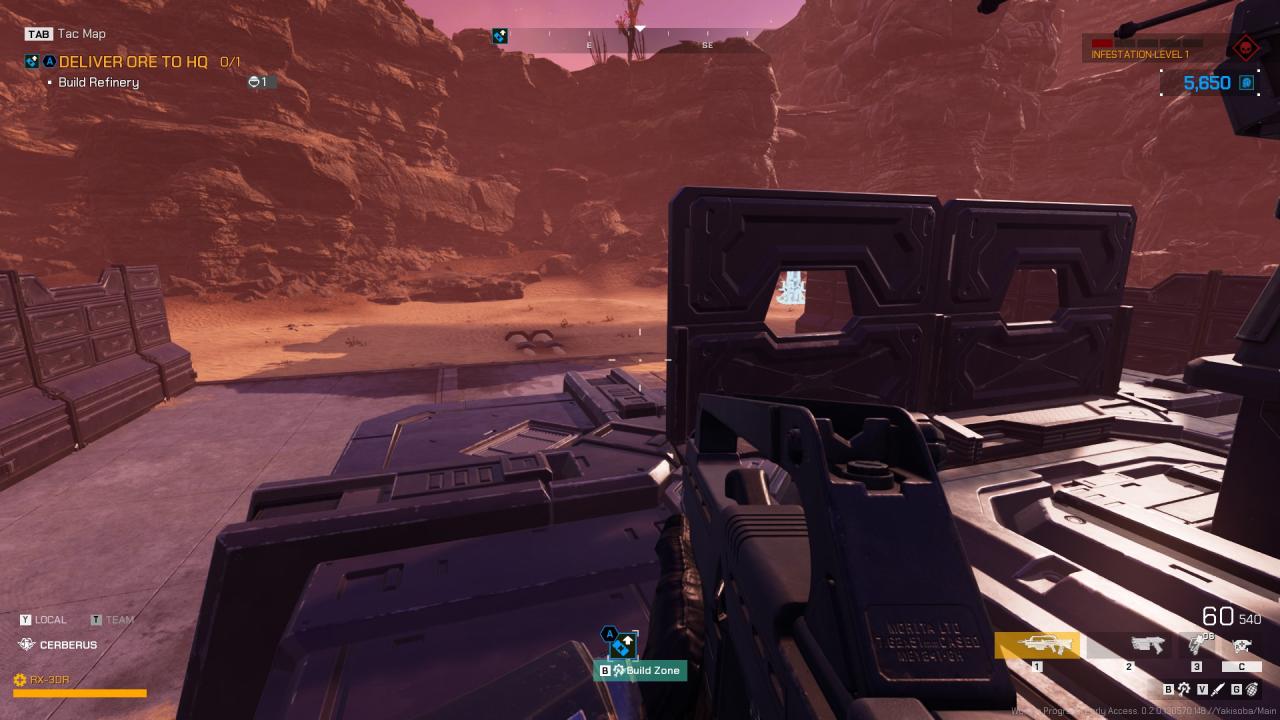
Walls
Durability : Moderate
Key Features : You can climb them from the exterior by jumping on the slope and scaling in through the low section in the middle.
Notes : Your standard wall with a walkway along the top. While they don’t serve any special function, they do what they’re intended to do well. Minor cover near the edges can provide cover against Gunner Bugs.
Ramp Walls
Durability : Moderate
Key Features : Ramp allows access to the walkway from the interior. Can be scaled like regular walls.
Notes : Just the regular wall, with a ramp. The additional ramp can be obstructed or obstruct other base components. Direction of the ramp is fixed, which can result in inconvenient access.
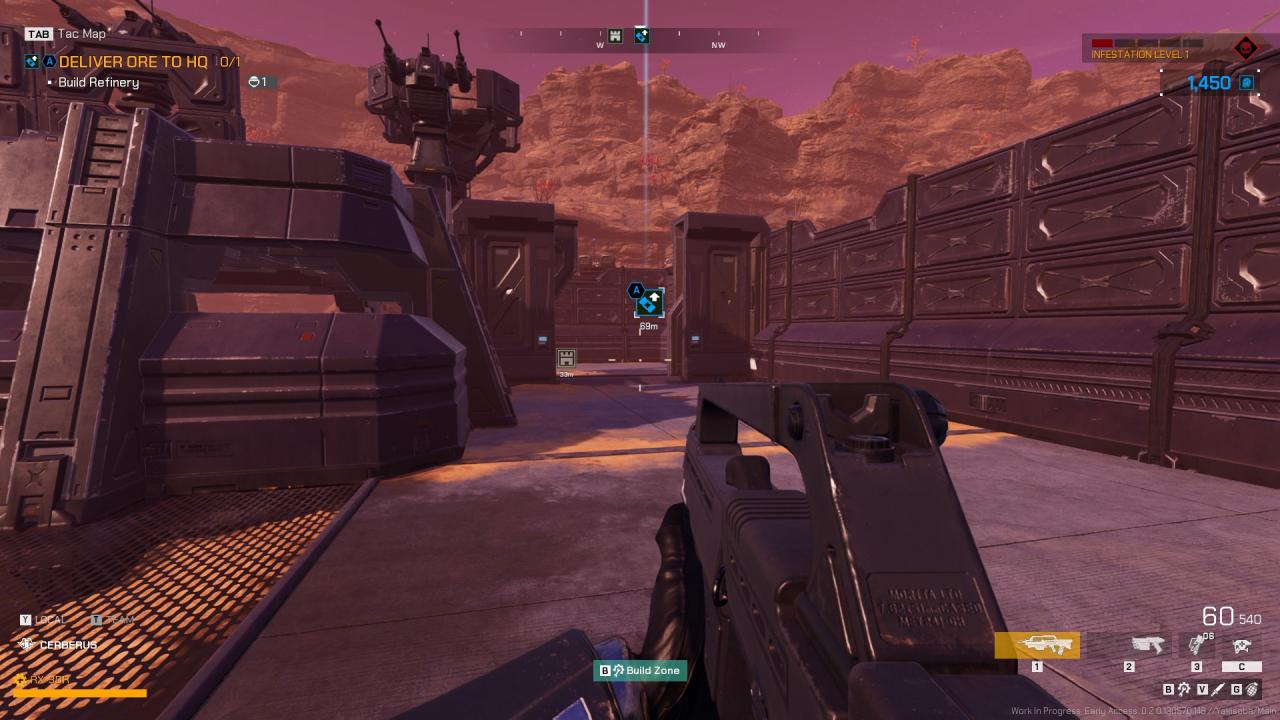
Small Gate
Durability: Moderate
Key Features : Door that can be opened and closed by interacting with the switches on all 4 corners of the doorway.
Notes : Can be used interchangeably with walls but the walkway has a gap in the middle. The door access will allow people to just sprint in and out without slowing down as long as the doors are already open. Should be used in areas where people are expected to come and go during the supplying phase but is often not necessary for extraction.
Large Gate
Durability: High
Key Features : Double length version of the Small Gate at a cost of a longer time to open or close.
Notes : It has some value as a wall replacement, effectively serving as a double-length wall. This has the advantage of having more durability and more convenient to repair over regular walls but it has some drawbacks that may cause problems. While it has more health, it comes with double the surface area which means it can take a lot more damage quicker. While it is more convenient to repair, it is harder to repair when getting swarmed as all bugs along the entire length will hinder the repair process.
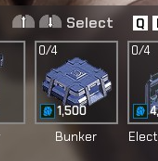
Durability: Very High
Key Features : Excellent visibility all around the Bunker while providing strong safety makes it easy cornerstone and rally point for a defense.
Notes: A versatile component but comes with the restriction of only having 4. The Bunker tends to the core of a critical defense and has some interesting interactions with other defenses. Bugs will not run into Bunkers so they will provide a safe heaven in the event of a breach.
Base Components – Utility
 Short Wall
Durability: Low
Key Features: Can fit in weird space, can be placed on top of Walls and Bunkers and has a small window at crouch height for shooting through.
Notes: The Short Wall may seem quite underwhelming but it has a place. Short Walls can be placed on top of Bunkers to provide Snipers or Grenadiers safety from being sniped by Gunner Bugs. They are short enough that if you have any elevation, you will have line of sight to deal with bugs right up against them. While their durability may seem poor, their size means that are often only being attacked by 1 Bug at a time.
Electric Fence
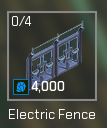 Durability: Low
Key Features: Damages and stuns enemies with excellent visibility.
Notes: A really expensive and limited component that has really strong value if used effectively. While it does have low durability, it makes up for it by stunning and damaging Bugs that are attacking it, allowing them to last much longer than their durability implies, especially since people can shoot through them to clean up nearby Bugs.
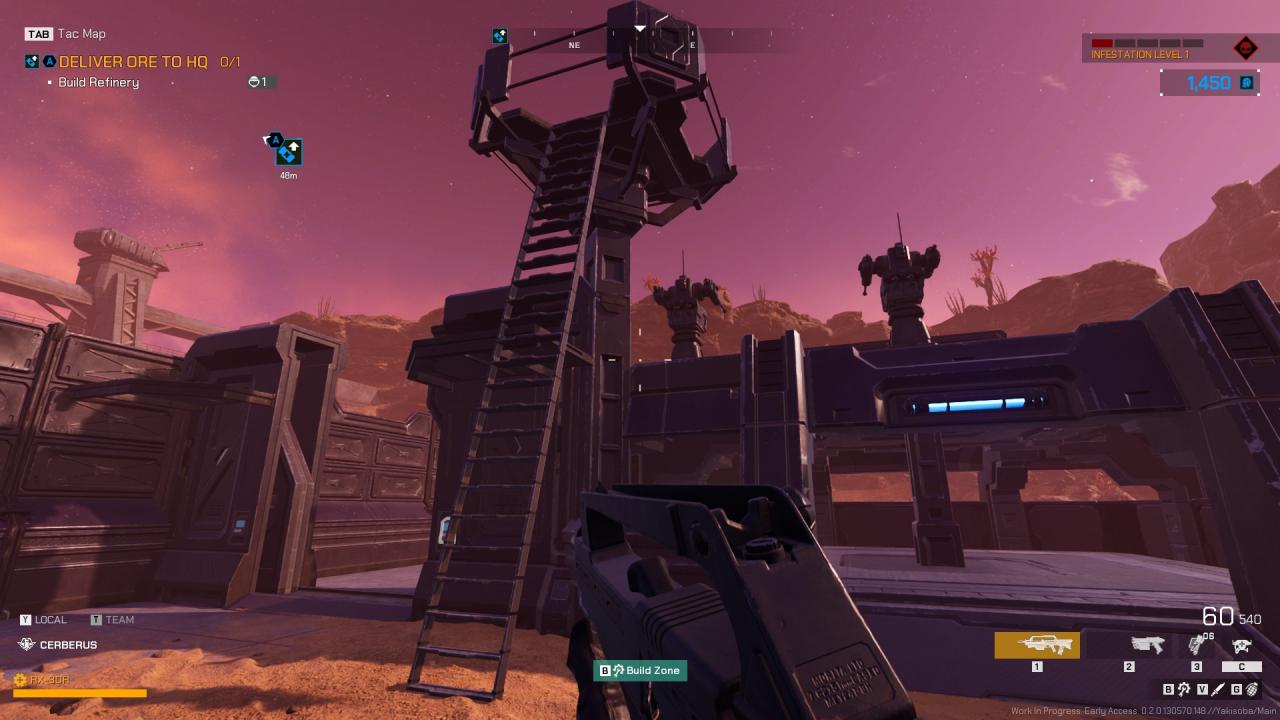
Tower
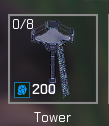 Durability: Moderate
Key Features: A raised platform with some cover, provides good altitude to deal with slopes.
Notes: A simple Tower that that provides a good point for people to shoot from. It can also be used as a ladder to climb up and jump down to reach the top of a Bunker or Wall.
MG Sentry
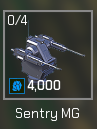
Key Features: An automated turret that does decent damage and will fire at enemies in a good radius.
Notes: Another expensive and limited component. While it isn’t particularly strong, it is extra firepower that never has to reload or refill on ammo. It has a fairly large range but requires line of sight so it needs to be placed correctly to be of good value.
Size and Location
A bigger base does not equal a better base. A larger base means that you will have a lot more walls as well as more distance between them. More walls also means more maintenance is required. People running to assist another location or looking for ammo is people not shooting. 16 players might sound like a lot but you can’t cover a massive base with having 10 people at where the primary spawn point is and 6 people running all around trying to protect a 5 wide wall and 2 small entrances.
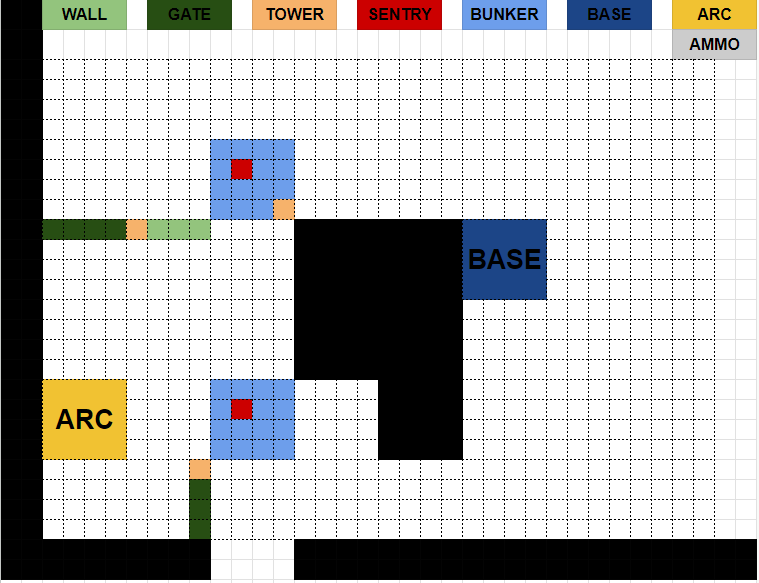
However, having a tiny base around the Arc alone is usually not possible and probably not recommended. Terrain restrictions will often make it nonviable to simply build a box around the Arc that is effective. Grenadier Bugs hitting a tiny base where everyone is cluttered together is a potential disaster.
So where do you start building?
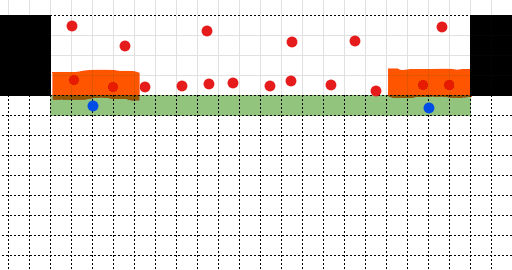
Given an imaginary scenario, entrances should be identified first relative to the Arc. Chokepoints should then be planned based on these entrances.
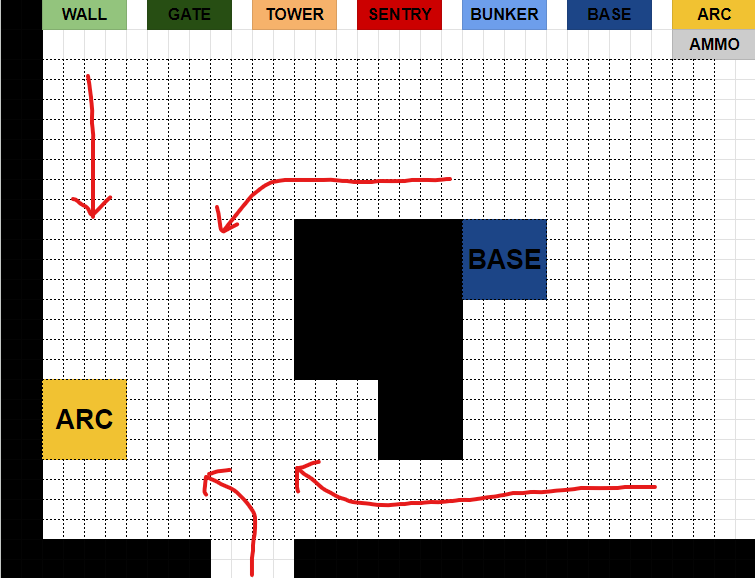
- In the North entrance, there is little that can be done and wherever you draw a defensive line, you’re going to need a span of walls.
- In the South entrance, the two entrances will eventually intersect, so a decision can be made there to either handle the entrances separately or to have the defensive line be after the point where both groups have merged.
From this, you can draw a basic critical defensive line of where you want the fight to happen.
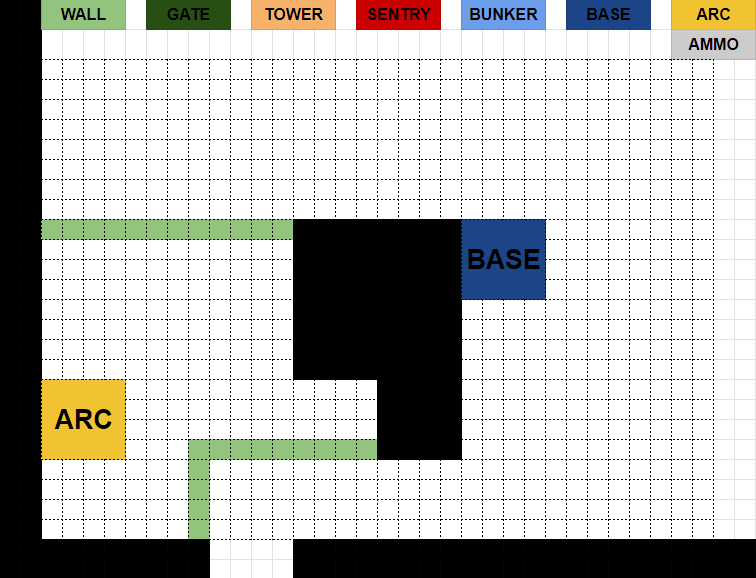
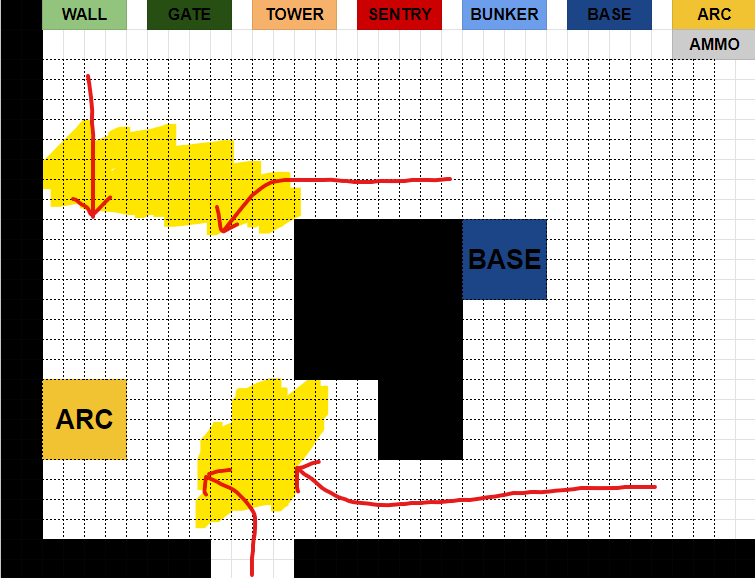
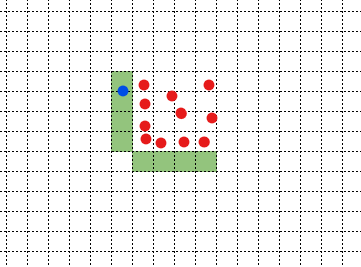
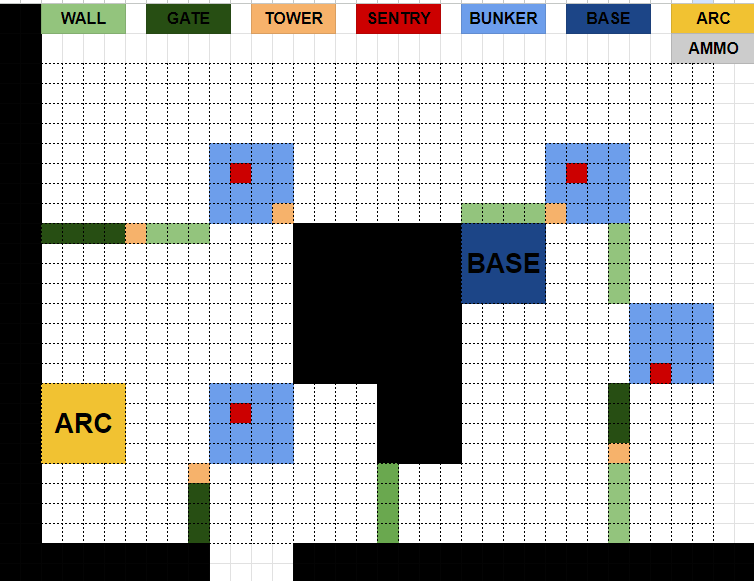
Base Sprawl
If you were to simply cover the entrances by the build zone, you would end up with a massive base and significantly more length of walls.
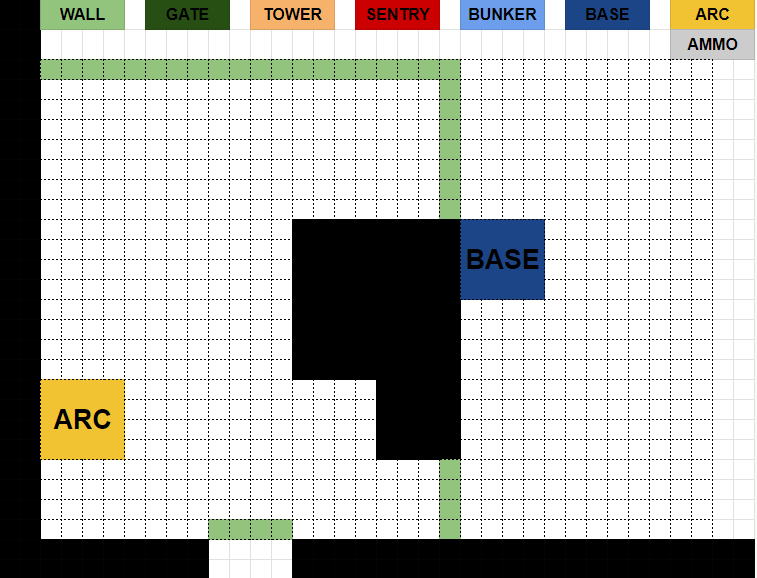
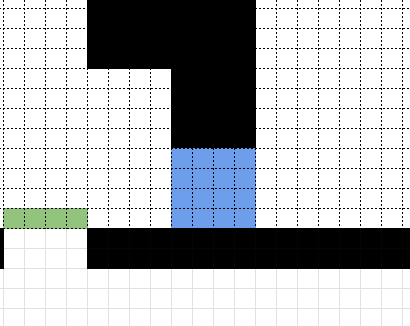
The more walls you have, the more scattered your resources and manpower will be. A single wall failing can be difficult for people to react effectively to, resulting in a cascading failure. Positions will also sometimes end up neglected, especially lone walls just blocking off an entrance at the edge of a base as seen in the lone South wall.
Designing Walls

Straight walls just the regular straight walls you imagine when you close your eyes. There will be a distinct blindspot in the areas right under the walls but if you’re building straight walls, it is simply because there are no order better choice.
Outward Corners are corners that have two sides facing outwards. These are a nightmare to defend as people have to move between each side to assist each other. It also creates an additional problem of splitting up enemy clusters, making explosives less effective.
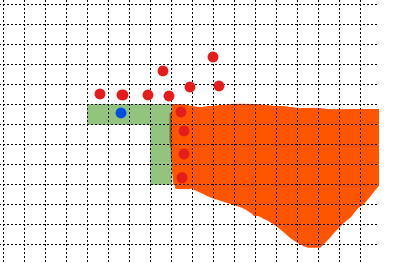
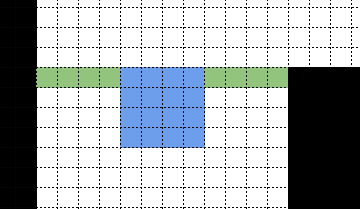
Inward corners are the corner stone of a kill box. They are 2 walls with the exterior wall facing inwards. This provides a natural clustering area between the 2 walls while providing a person visibility to the area underneath the other wall without movement.
Large areas and what to do with them
Large lengths of areas are difficult to deal with and there are locations where you have no real choice but to have a span of 3 or more walls no matter what you do. Applying the principles of inward corners, it would be preferential to pull the walls inward by some amount. However, there are things to consider.
- + Blocked terrain are free inward corner walls as they do not need repairs, but they might block line of sight.
- + The further you pull the walls back, the further enemies will be travelling to reach your front facing walls, giving you more time to shoot them down before they start damaging the walls.
- – The further you pull the walls back, more components are used and the length of the wall is increases, impacting repairing.
Expanding your Defense – Bunkers
The first thing people will probably do when placing Bunkers along the walls. While it is serviceable, it still has decent visibility round the corner, it doesn’t have clear visibility down the length of the wall. Under this usage, it’s mostly just a very strong wall and doesn’t take full advantage of the Bunker’s strengths.
The most commonly used decent Bunker placement. The easy solution to completely blocking off a corridor or tunnel is dropping a single Bunker in the way. It’s beefy and provides a good position to shoot from without having to worry about a low ceiling. Personally, while it is a sound strategy, I prefer to avoid it and instead, try to pull the defenses back as it only takes advantage of the Bunker’s beefy health and not it’s line of sight. Do it if you have to, but with good positioning, you might be able to avoid this by merging that entrance with another.
Forward Bunkers are a defensive powerhouse. They provide a strong position to rally at, can take a beating from multiple sides and will be a staging ground for mounting an even stronger defense. Placed protruding from a wall, half or full, it has full visibility to the areas under the walls on any side. Between the ability to mop up enemies under the wall and it usually being the priority target by being forward, a well placed Bunker will take a lot of heat off the surrounding walls.
(Something I was messing around with while writing this guide. I’m unsure of the viability of this as a good strategy, perhaps if someone has experience using this, do share if this is actually a decent idea.) Just a Bunker with the doorway split in half by a wall. It has a special application of replacing a corner and makes use of the whole 360 of the Bunker, provided it works.
Why do you hurt me so? Nothing much can be said, it’s a Bunker behind walls, and is going to be unused if the situation is good, or the walls in front of it were not useful if the situation is bad.
The Bunker has a stable roof area and strong health, making it a great position to build additional defenses on. More details will be provided in their respective component section.
Expanding your Defense – Short Walls and Electric Fences
Short Walls and Electric Fences are the only two area denial components that have a key specialty, they simultaneously block, while providing vision from a distance. This provides them the possibility of being a Layered Defense, without crippling line of sight.
Due to this, these components can be used to push the base further out from a Wall or Bunker while allowing people inside the base the ability to shoot targets getting stalled by them. In comparison, if walls were used in this context, someone would have to run up the wall to mop up Bugs, as it would be impossible to see any Bugs approaching or deal with them without first getting up close to the wall. However, Electric Fences cannot be climbed over so if used in this context, that entrance would be mostly sealed for player access.
Short Walls inside the base have their purpose. Bugs will stop to attack them if they’re in the way so you can use it to buy yourself some time for someone to get to repairing the wall. With how short they are, in a compact base, other defensive points might have clear visibility on the bugs that have breached and can provide assistance.
Electric Fences are limited and expensive. Using them inside the base might sound like a great idea as a last line of defense, but it’s investing a high resource cost in something that might never be used and is usually only necessary if the situation goes especially bad.
Short Walls can be placed on top of walls and Bunkers. While their placement on walls is very awkward, they can be placed around the center of the Bunker’s roof. This allows the Bunker to act as a larger but shorter tower, giving a great position for Snipers and Grenadiers to not only deal with distant targets, but enemies along the walls. Being out in the open on top of a Bunker is risky as Gunner Bugs can easily snipe you from large distances but with how cheap they are and how often they are underutilized, having one or two on a roof is a small investment to open up a safe platform to shoot from.
Expanding your Defense – Towers and Sentries
Towers are simple sniping platforms. Their much higher elevation that anything else allows them to shoot over walls at distant targets but they are still better if they can be up close rather than further behind. These are quite difficult to really make poor use of, they just need to be placed in a decent location where they have a good view of approaching enemies.
They can be used to access higher elevation without the need for a Ramp Wall where there might not be sufficient space.
Sentries should be built along Bunkers where they can remain quite safe thanks to the Bunker soaking up attention. They can be either fitted into the side, corner or center of the Bunker. They can be easily repaired from inside or on top of the Bunker and if your Bunkers are up in front, these Sentries will see plenty of action and slowly rack up damage throughout the entire mission.
Side/Corner Sentries
Sentries built into the side of a Bunker. Best placed on the side towards a receded wall, Sentries in this position will have clear shots on enemies attacking the walls. They do take a bit of damage but as enemies will be divided up between attacking the walls and the Bunker, they aren’t actively attacked unless the Bunker goes down. The support pillar will obstruct the window of the Bunker, which might be annoying to some.
Center Sentries
Sentries built into the center of a Bunker. The supporting pillar doesn’t block the windows and the Sentry will remain untouched until the Bunker is broken, however, it has blindspots around the Bunker and can be affected by the presence of Short Walls of the roof.
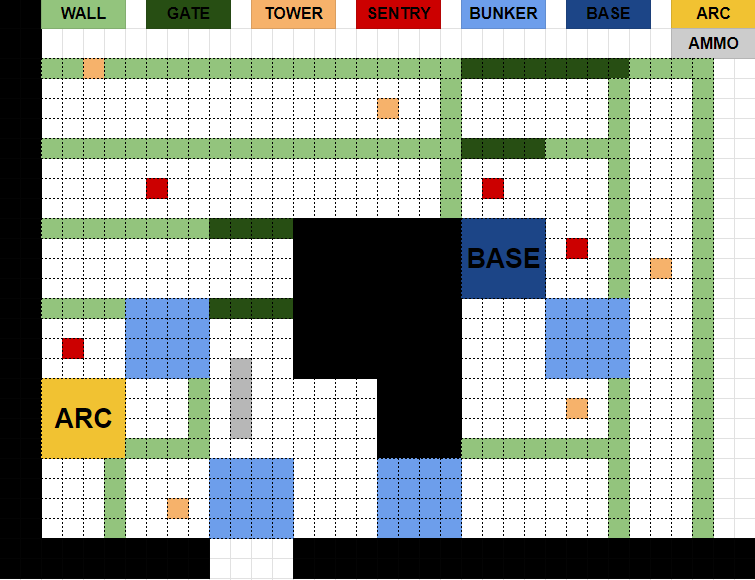
The Base You Built
While this means that any failure of a Bunker is a significant failure, it does provide you a very stable foundation that in many cases, the Bunker won’t fail without there being a larger problem elsewhere. While the walls may go down, walls that are touching the Bunker can be repaired from within the Bunker and people can quickly move in and out of the Bunkers to make additional repairs.
With the excess of resources, even the Base can be sufficiently covered.
—————————–
Your key goals with such a defensive line is,
- Bunkers absolutely cannot be allowed to go down. If they do, they should be repaired immediately to provide cover.
- Walls near the Bunker should be kept clean first. The Bunker can take a massive beating and as long as the Bunker isn’t near destruction, enemies in the kill box should take priority as a lot of heat can be taken off both the wall and Bunker with explosives.
- Grenadier Bugs need to be handled swiftly since a lot of people will be concentrated in a smaller area.
- Each Bunker should try to have at least 2 people on Standby so that one can repair while another can clear up Bugs. Everyone else can pile on at where the main enemy spawn is coming from.
- Ammo Boxes should be placed in, or near the Bunkers. These Bunkers are going to be placed at key areas where a lot of action happens.
- Moving all the way up to the windows of a Bunker, or even the back of a wall, should be avoided unless there are no enemies nearby. Enemies do damage to whatever is in front of them, even through walls and Bunkers. The bigger they are, the bigger the hitbox, the further you need to stay away,
As long as you keep your Bunkers alive, they will keep you alive.
The Base You Actually Get
Closing Notes
Someone’s going to be mad regardless, whether is it a poorly built base, resulting in people constantly scrambling around trying to save the Arc, or people being too demanding and constantly fighting each other on how to build the base right. If we can all make at least a step forward towards building a less wonky base, we can reduce the likelihood that 2 Bunkers are going to be next to each other near the Arc, with a 1 space gap between, while also reducing the disagreement gap on where something should be built.
Changelog
Thanks to RX-3DR for his great guide, all credit to his effort. you can also read the original guide from Steam Community. enjoy the game.
Related Posts:
- Starship Troopers: Extermination – How to Build Better Walls
- Starship Troopers: Extermination – How to Defend Your Base Like a True Citizen
- Starship Troopers: Extermination – Hunter Guide (Assault Class)