Put your best foot forward with this guide to help players overcome that early-game hump.
Introduction
You’re low on resources, you don’t have any team skills or weapon modifications, and your team isn’t levelled up – so their builds aren’t online yet. And when you get to the third mission, vermin activity starts and if you’re really unlucky (I’m looking at you, ‘Armored Rats’) the difficulty spikes dramatically. So what can we do about these problems?
I’ve beaten the game twice on normal and once on hard. On my hard-difficulty run, my team comprised the Medical Automaton, Michael Kipps, Anne Claxton, Rose Jennings (before her buff), and Silas Mitchell. I made it a point not to use Tilly, because I felt she made the game too easy. During that time I picked up some tricks that I hope I can communicate to others.
This guide is designed to go through some of the more granular details of the game, but let’s not waste any more time. Let’s jump right in.
Know Your Tactics
Without going too in-depth, when you perform certain actions on a single turn, a Tactic might activate and give you some sort of bonus. This isn’t a guide to cover all the tactics, but I want to highlight some of the more important ones. These tactics are the ones you’ll want to know inside-out and leverage regularly, because they can turn around a bad situation or otherwise give you a strong leg-up.
- Looting Spree
This is the big one. If three looting attempts are made in a single turn, this tactic activates and you get a looting bonus for two turns. That means all subsequent looting actions will let you pull more resources. Scrap, food, grenades, even fusion cores. It’s nice on Easy and Regular, but practically essential on Hard.
That part is easy enough to understand, but if we want to get the most out of this Tactic, we should activate it at the beginning of our turn whenever possible. That way we can have two full turns for additional looting, rather than just one.
Instead of immediately looting, what we’ll do is force-end the turn. In case you didn’t know, at the top-right corner (where the mouse cursor is) there’s an ‘end-turn’ button. This automatically ends the turn for your side.
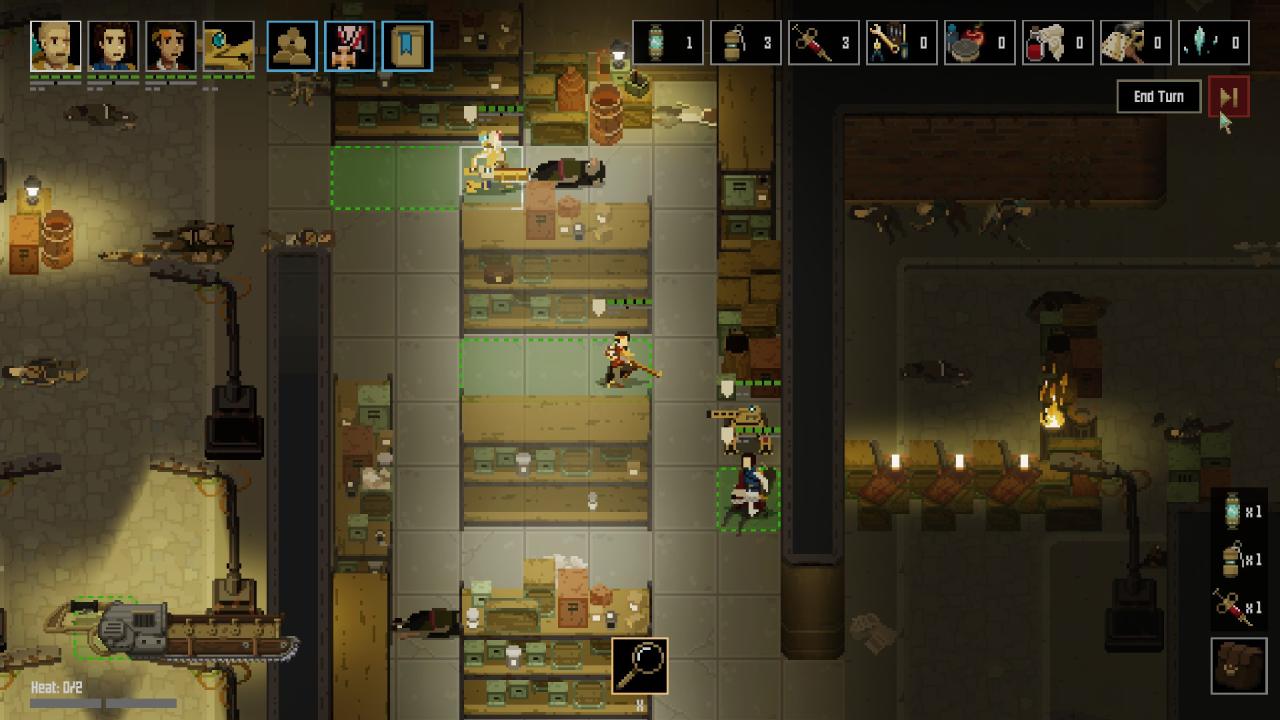
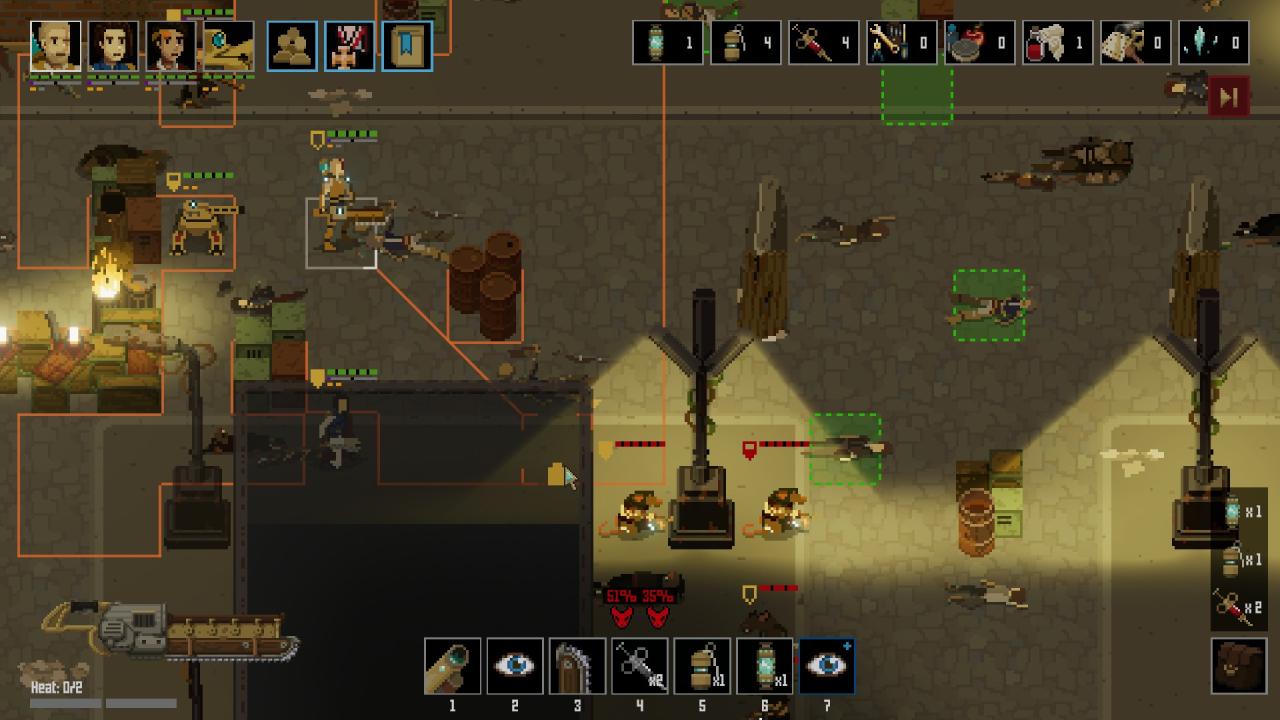
As you can see from the screenshot above, my team has used up all their AP and are all sitting on looting spots. Then I end the turn. When the next turn comes up, we immediately loot each of the three spots, thereby activating Looting Spree, and have a fresh set of AP for more looting. Enjoy your bountiful treasures. - Wait It Out
I’ll just touch on this one briefly. It’s an easy one to accomplish, but great for managing stress. You can use it whenever shooting or lobbing grenades isn’t feasible, or you have a spare turn while waiting for the bunker door to tick down.
Be forewarned though, this Tactic does not work for Silas (who can only recover stress through his ‘Gallows Humor’ skill) or for the sniper, Gunter Knapp. Gunter’s case is odd, because his ‘Take Cover’ skill is replaced with ‘Focus’, which is just a better version. But the game doesn’t recognise that skill for the purposes of that Tactic. Maybe it’ll be patched, but as of this writing, I don’t see it working.
- Adrenaline Rush
It’s not the tactic I want to discuss here, but its potential uses. Normally, it’s circumstantial but there’s a way that you can otherwise leverage this tactic if you, like me, have a risky playstyle. Namely, through overheated shots.
This may sound strange and suicidal, but you might want the overheat to trigger and damage your character. If you know that it’ll bring you down to exactly one HP, and you have a stimpack to spare, not only do you get your AP back but your shot does extra damage. This rings doubly true if you have a character that gains bonuses for using a stimpack, like Rose Jennings.
It’s an aggressive play, yes, and I’m not saying use it all the time, but an overheated shot might turn a damaged rat into a dead rat. Like if you’re down to your last shot, a Rat Bomber is headed straight towards your squad, and you need to drop him right now.
- Get ‘Em From The Side & Covering Fire
Get ‘Em From The Side gives every human on your team an extra AP. No bonus for the Automaton, sadly. This is obvious, but more AP is better and any Tactic (or anything in general) that gives AP should be considered seriously. The caveats are that they have to be against non-melee enemies and they have to be flanking shots.
Covering Fire gives bonus to-hit chances to their overwatch shots, also great. But they need to be right next to each other. The main issue here is that you aren’t always going to have two-space wide cover and that means, if you want to leverage this tactic, one or more teammates will be wide open to be hit.
There is a reason why I covered these two Tactics together: both of them pivot upon our understanding of how cover and flanking works, which segues nicely into the next section…
Know Your Angles
Shardpunk: Verminfall operates on a 90-degree cover system, unlike XCOM’s 180-degree cover system.
But what do all these fancy words mean?
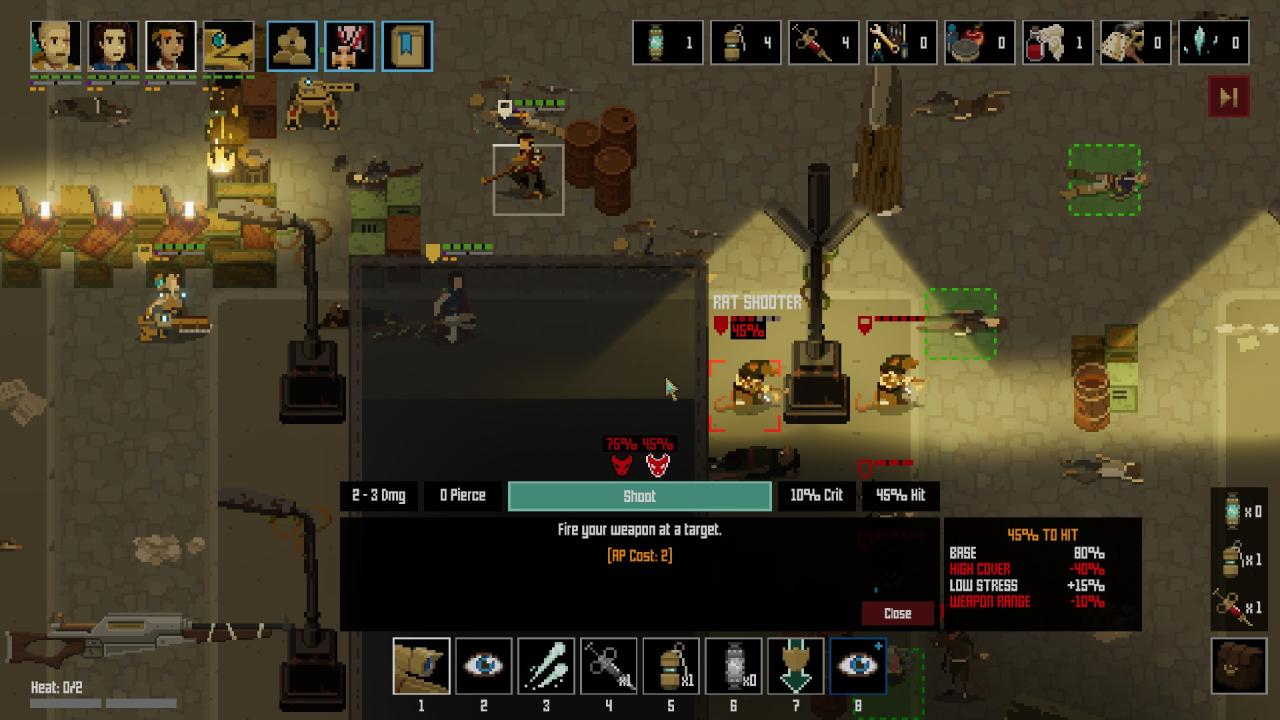
Here we have our (un)friendly rat shooter in Gideon’s sights. He’s in full cover right now, so we’re only getting a 45% chance to hit. Not good.
 I’ve moved Gunter up for a shot, but he’s got a 35% chance to hit. Even worse.
 Okay, I moved Hector up a bit further and now he’s got a 93% chance to hit, and since the little rat-icon is yellow, it’s a flanking shot. Great!
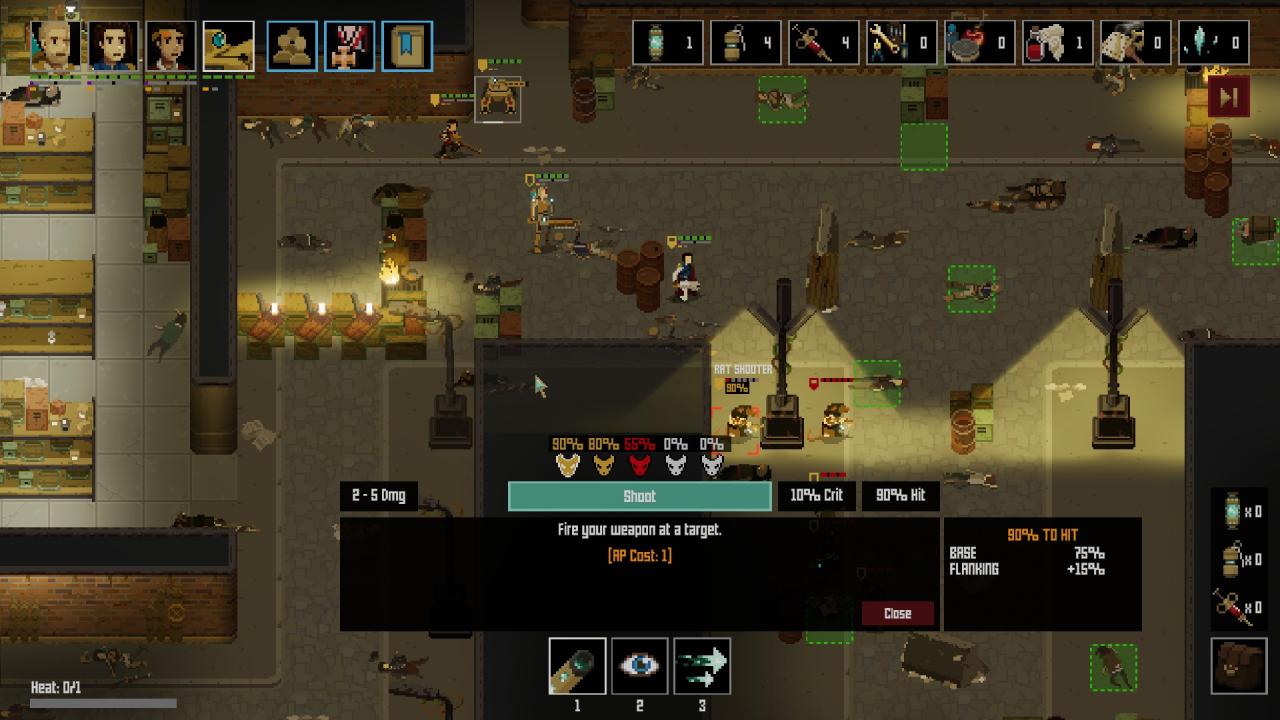 I then moved my Combat Automaton waaaaay out in the back at an angle.
But here’s the thing. It’s got a 90% chance to hit, and the Rat Shooter is still flanked.
Huh..? How? What’s happening here?
Let’s hop back to Gunter, but I’ll change the perspective so you get a better idea.
I want to bring to attention the line. It’s his movement, but I wanted to draw it out to show that Gunter is exactly 45-degrees from the Rat Shooter. That means that the rat is still under cover. This isn’t a perfect example, but if the rat was standing behind a single-tile of cover, this would apply on the other side as well. This is what I mean by a ’90-degree cover system’. It’s 45-degrees on each side of the side-of-cover.
Everything to the right of that imaginary line I drew is considered a flanking shot. That’s why Hector has a flanking shot. But that’s also why my Combat Automaton is also flanking the Rat Shooter, even though it doesn’t look like it: It’s moved past the 90-degrees of cover that the Rat Shooter has hidden behind.
It takes a bit to wrap your head around this concept. But if you’re like me and fancy math scares you, just use this rule of thumb: Diagonals are Death.
If you’re shooting someone at less than diagonal, they’ll be less-than-dead. If you’re shooting them at more than diagonal, they’ll be more-than-dead. And if you try to shoot them at exactly diagonal, you’re the one who’s going to be dead. ‘Cause you screwed up big time.
I don’t need to say it, but this is important. You can score flanking shots from a sizeable distance as long as you know you’re past the 45-degree mark. Conversely, this means that the bad guys can do the same to you. You might think you’re in cover, but a couple steps to the left and suddenly you’re flanked.
***
To close this section off, let’s talk about the opposite side of Knowing Your Angles – how to use them defensively.
This also goes without saying, but you can’t shoot what you can’t see. The poor saps you saw in our example were caught out mostly exposed. It’s going to be a very painful round for them. This is what happens when you’re obsessed with flanking shots.
In my mind, a better strategy would have been to simply retreat down the street (not into the building) you see on the left until they’re out of sight. If they had done that at the beginning of the turn, the rats would be forced to advance on them instead, leaving them open to a counterattack.
One important caveat to this strategy, do not have one of your team hug the corner of the building and set overwatch. You might think you’re being clever because you’re in full cover, but that counts as a visible square. That means the rats won’t advance and instead reposition to any cover in range and shoot at the one person they can see. Keep your whole team out of sight, and hug the wall.
Know The Details
- When Automatons upgrade, they also heal some of their HP.
Don’t be too afraid to have them get a little damage. If the Upgrade Station is up ahead, they’ll recover a bit.
- Ranged rats generally follow the same rules that the players do. That means they have two AP and have a movement range of four. That means they can shoot twice, move twice, or shoot and move. They also need to reload. In the early game, Shooter Rats reload after 2 shots.
In my experience, if you know they’ll have to reload, pushing up into their cover can sometimes force them out completely as they scramble for new cover and reload.
- Melee rats always move first. That means your precious overwatch shots usually get burned up by the Rat Grunts. But they also have 2 AP and follow the same 4-square movement that the ranged rats do. So if you’re more than 8 squares away, they’re effectively harmless that turn. And, more importantly, that spreads them out from their ranged allies.
If you pull them into a blind corner, you can deal with them without having to also deal with a volley of gunfire.
Putting It All Together
Hoo-boy. Let’s first break down the situation we have on our hands:
After the SNAFU that happened with the flanking shot, and then an unfortunate pincer attack later on that forced me to use my Fusion Core and some grenades, I’m left with a team that’s barely standing. We’ve got a big pack incoming, there’s still four turns left until the bunker opens, and there’s no fusion core to speed up the escape.
Just so that all the cards are on the table, all the teammates have vented their guns, so they’re ready to fight. Our Combat Automaton was damaged, but in the one stroke of good luck for the mission, the upgrade station was right next to the bunker, so it just began the upgrade process. It’s safe for two turns, and afterwards, it’ll be back up to full health.
If you were in my situation, what would you do?
I still have three grenades left, so an easy solution would be just to blow them all to kingdom come. But I wanted to save them for the following missions. So, if you wanted to win this skirmish without using any more grenades, what’s the play here?
…
Ready?
Here’s what I did.
First, I pulled Hector back behind the wall where Gunter and Gideon where huddling behind. Remembering my angles, that meant that all the rats would have to run forward and I could meet them on my terms.
Next, I had Hector and Gunter use a Stimpack each. Since they’re both at one HP, the Tactic ‘Adrenaline Rush’ activates for both of them, refunding both their APs.
Then, I have Gunter and Gideon hunker down, triggering the Tactic ‘Wait It Out’, which let me get rid of some of Gunter’s stress. I let Hector’s last AP go unused.
Afterwards, I ended my turn.
The rats are up. As expected, they all rushed forward. Melee rats moved 8 squares, but they still had a few squares left until they reached my team. The ranged rats moved only slightly slower, lagging behind by a square or two.
My turn now. I’m kicking myself for not taking a screenshot, but that’s okay, because all my team did was go straight into overwatch. They readied two shots each and also triggered the ‘Covering Fire’ Tactic, giving all three of them a 20% accuracy bonus. Hopefully, it would be enough when the pack turned the corner. I ended my turn.
Here’s what the battlefield looked like after the rats’ turn.
Not great, but could have been worse. Two Grunts down, the Shooters were behind cover though. Everyone’s guns were running hot. They would need to reload. But that meant only three shots maximum, and there’s four rats left. Two of them still at full health, and one of them waaay down at the bottom, hidden by the targetting symbols.
What’s next?
Well, my Combat Automaton is back up now and at full health, ready to join the fray. Gunter and Gideon each reload. Hector does not reload. No, he’s going melee now. But how do I distribute my attacks?
Gideon can only do a Quick Shot, which does paltry damage, so he goes for the Grunt with one HP. Gunter goes for a shot against the other Grunt. Both rats go down.
The Combat Automaton was ready to provide additional fire support against the grunts, but they were taken out. So instead, I take a long shot against the rat way down at the bottom of the map. Against the odds, it hits but unfortunately doesn’t finish it off, but at this point I’m no longer worried.
The Rat Shooter that was hiding around the corner was close enough for a white-move. That meant Hector could melee twice, which he did.
A single rat isn’t a problem for my team now, and by the following turn I mopped him up with another swipe of Hector’s sword.
The skirmish was over. All of my teammates survived, all the rats died, and I didn’t use any grenades to do it. I spent the finale turn coasting with another ‘Wait It Out’ Tactic to recover some stress, and then I leisurely strolled into the bunker.
And that is how you survive the early game.
Closing Words
I also thought about covering the characters and the automata, but I think it would be better to keep it a bit more general. You can look at their stats yourself, and figure out what playstyle works for you.
Thanks to FickleFuel for his excellent guide, all credits belong to his effort. if this guide helps you, please support and rate it via Steam Community. enjoy the game.