A collection of answers for all aspects of the game, including UI, tactics, mechanics, strategy, and so on.
1. Introduction
You bought this game. If you don’t know what it is, I’m proud of you for taking a dive into an unfamiliar, unforgiving genre, where the fans are heavy-breathing basement-dwelling anitisocials and the spreadsheets roam the plains in herds of thousands.
Phantom Brigade. At its core, it’s a real-time tactics game with a time prediction mechanic. Your battles quickly become very asymmetrical in numerical terms- eventually you’ll be facing 4v10 with multiple reinforcement waves if you don’t kill your enemies quickly enough.
The time prediction mechanic is what allows you to fight on even and better terms against such odds. By knowing where your enemies will be and whom they will target, you can make sure your own units are in cover, shielding, or dashing away when they’re under fire, and then be in a good position to return fire.
Avoiding damage is the main goal. Your machines are just as fragile, if not more so, than the enemy’s. You are subject to the same heating, the same damage numbers, the same stats, and the enemy has an aimbot. To win, you must take proportionally less damage than you deal, and to thrive, you must take as little damage as possible.
To achieve that, your machines can be customized with a huge variety of parts that influence their speed, durability, heat dissipation, even their hitboxes, since all attacks and projectiles are simulated in the physics engine. You get another huge variety of weapons to beat up your foes with, and they run the gamut from bread-and-butter assault rifles and shotguns to funky tracking plasma balls that can be lobbed over cover.
On the overworld, you scoot about the place, dodging patrols, raiding convoys, retaking enemy bases, and eventually, contesting a province and reclaiming it for The Good Guys. A variety of base upgrades change how you move and interact with enemies, as well as affecting other logistical aspects of the game. Build better parts, equip your machines, pet the dog, watch a meteor swarm. Life isn’t all guns and bombs.
Your overall objective: reclaim your country from the invader, province by province, battle by battle, smoking husk by smoking machine husk.
Get to it, commander.
This guide is meant as a comprehensive introduction / assistant / troubleshooting / guide to the interface, gameplay mechanics, tactics and strategy, little oddities that might catch you off guard, basically anything that I could think of.
I will be repeating myself. Some mechanics are relevant to multiple headings, and I intend for each section to be self-contained so that you will not need to scroll back and forth in order to understand anything.
Have fun!
2. Combat
Combat is the bread and butter of Phantom Brigade. It’s half the reason you play the game: to watch giant stompy robots shoot up and beat up other giant stompy robots, and occasionally free the oppressed or something like that.In most engagements, you will be at a matériel disadvantage. The enemy may have more machines, more tanks, higher-level equipment, and they will always have excellent accuracy at long range.
And what’s more, the enemy just has to survive. You have to think about the future. Losing a powerful part could be permanent. Not having enough Liquid Fix to repair your machines after the battle could ruin a campaign to contest a province. Even coming out of a battle with too much damage might leave you vulnerable to the next patrol if you can’t get your machines repaired in time.
Some general trends emerge. The most effective way to play is to avoid as much damage as possible, sometimes at the cost of opportunities to attack.
Note that that does not mean you always play defensively. Sometimes the best defense is in fact a good offense. Take out priority targets, push aggressively forwards into cover, and force enemies to shoot through each other. There’s a lot of ways to remain effective while minimizing damage.
— Briefing
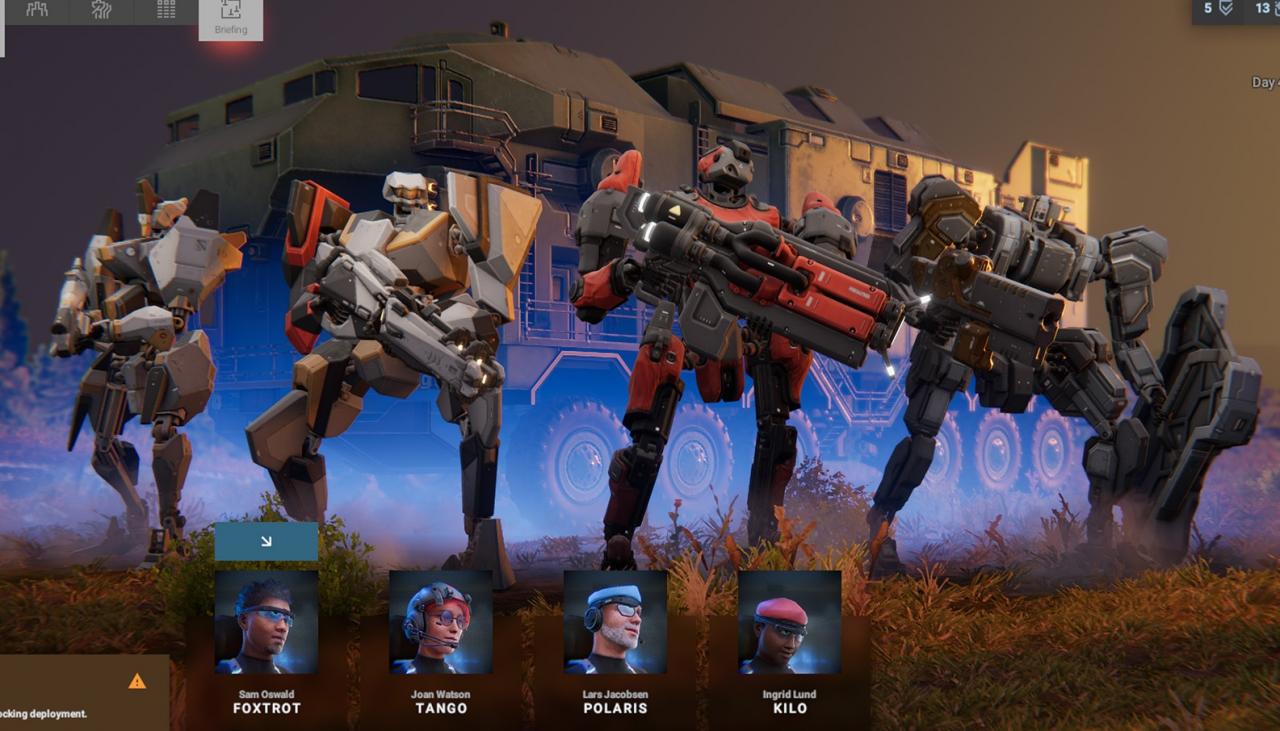
On the briefing screen, you get to set up your deployment and review the mission objectives and restrictions. Don’t ignore the map in the background though, it is actually accurate– it shows you where you will deploy, your retreat zone, where enemies are deployed, and the layout and height of terrain and buildings.Remember that you can still customize your units right before the battle. The tabs at the top of the screen still work, and you can jump into the units tab to swap out parts. This lets you plan ahead for the terrain you expect.
— UI

This panel shows you what your objectives are, as well as any side objectives, optional objectives, and incoming enemy reinforcements, their number, and their ETA, and finally, if you are allowed to retreat.
Side objectives include destroying sensor towers / alarms to prevent additional reinforcements, or capturing enemy supplies during convoy raids.
Note that if you kill all the convoy guards, the supplies are automatically captured. Also, you can’t damage supplies, so go as loud as you need to.
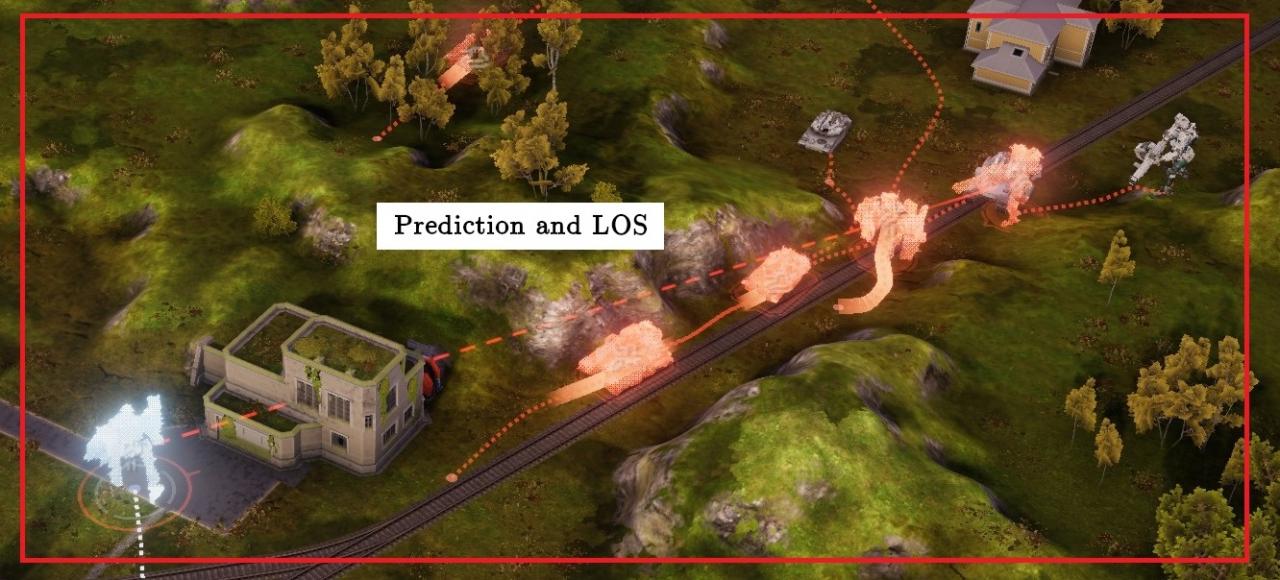
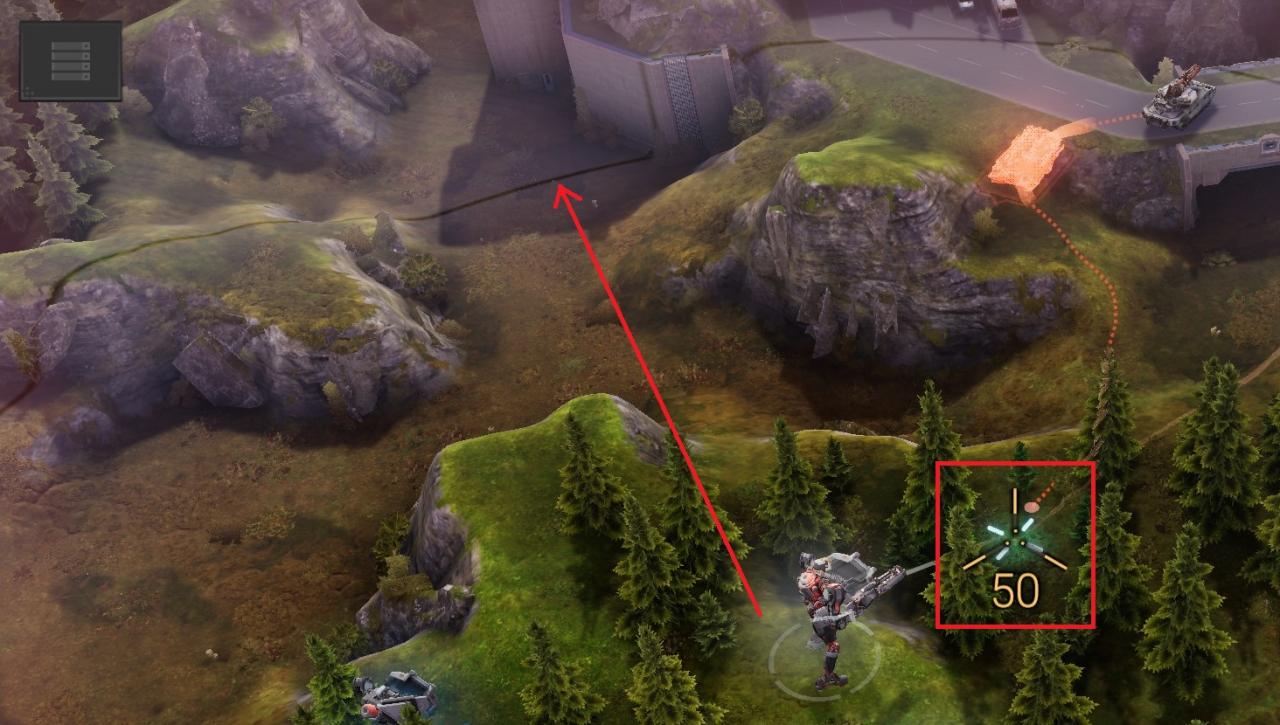
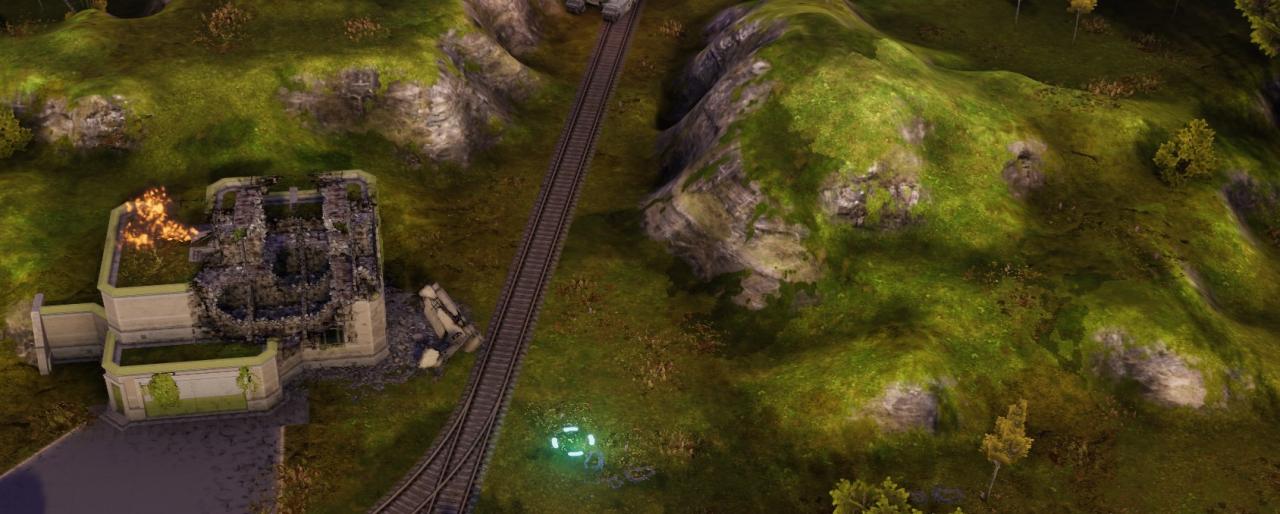
The main screen shows you the predicted state of the battlefield at the particular moment in time on the timeline represented by the vertical line. By moving your cursor over the timeline, all the pieces on the battlefield will also shift accordingly. You can predict and give orders up to 5 seconds ahead.
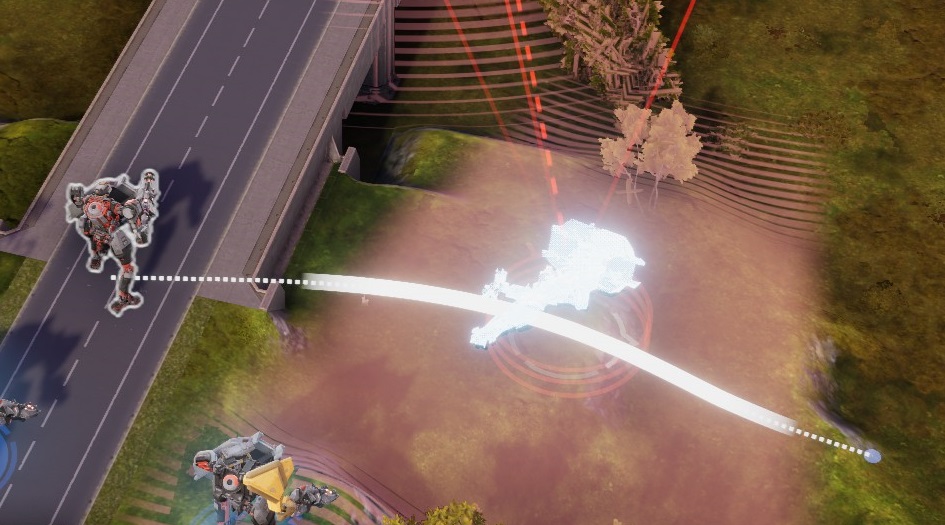
Dotted lines on the ground represent predicted movement paths, red for the enemy and blue for your units. The coloured silhouettes and bright lines on the ground represent the unit’s current movement direction and speed.
Collisions and crashes that occur during the turn are not simulated. The possibility of a collision is simulated (and shows up as a yellow dome), but even if a unit crashes and stops moving in the middle of the actual turn, its full movement path will still show up in planning mode.
Direct LOS is shown as a solid line, blocked LOS as a dotted line. Enemy LOS blocked by other units will also appear as a dotted line.
Weapons that penetrate units and cover (like railguns) do not appear with a dotted line even if they are shooting through other things. Be very careful with friendly fire when using them.

The line simply represents a direct LOS. It does not take into account weapon scatter cones or ricochets, so you can still get hit while behind cover if a part of your machine is poking out and the enemy is firing, say, a shotgun or a machine gun.
In the image to the left, the enemy tank’s direct LOS is blocked, but just barely. There is a decent chance that the friendly unit will still be hit, which is represented by the part of the red cone that continues on from where the LOS hit the hill.
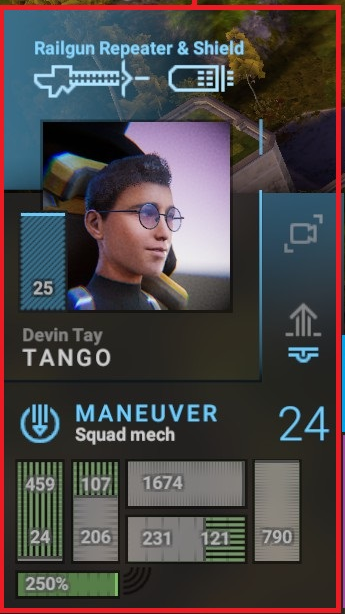
The panel in the bottom left shows you information about the currently selected unit: its level, equipped weapons, unit type, walk speed and weight class, the health of all its parts, and how much Liquid Fix it has.
The camera button centers the camera on the currently selected unit.
Below the camera button are the unit’s walking speed and its weight class. Faster units have more vertical lines, heavier units have more horizontal lines.
Below that is the unit’s level, which is the average of the levels of all its individual parts (including weapons). Apparently a stealth buff is applied to higher level units shooting at lower level ones, but I haven’t checked it myself.
The bar next to the pilot’s portrait shows their remaining concussion resistance. Dealing more than that amount of concussion damage to a pilot instantly disables its unit until the fight is over.
The bottom part of the panel shows the unit’s current health. The rightmost vertical bar is always its right arm. If it carries a shield, the leftmost bar is the shield’s health, and the second vertical bar from the left is its left arm. Barrier health is represented in green stripes, integrity with grey.
The bar at the very bottom with a percentage shows how much Liquid Fix the unit is still carrying. Liquid Fix is used to regenerate barrier health.

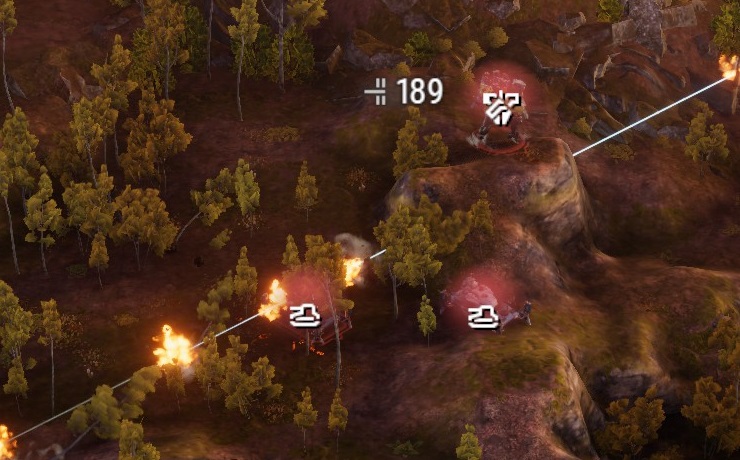
Whenever your unit is targeted by an enemy attack, a ring will appear around its base on the UI. One ring per attack. This unit is being attacked by 3 enemies.
When you are attacking enemy units, blue rings appear underneath them as well.
Delete actions by double-right clicking them.
Move and dash commands will be placed at the earliest possible point in the timeline; you cannot click and drag them to move them around. If you want to change a move location or change its start time, you will have to delete the action and set it up again.
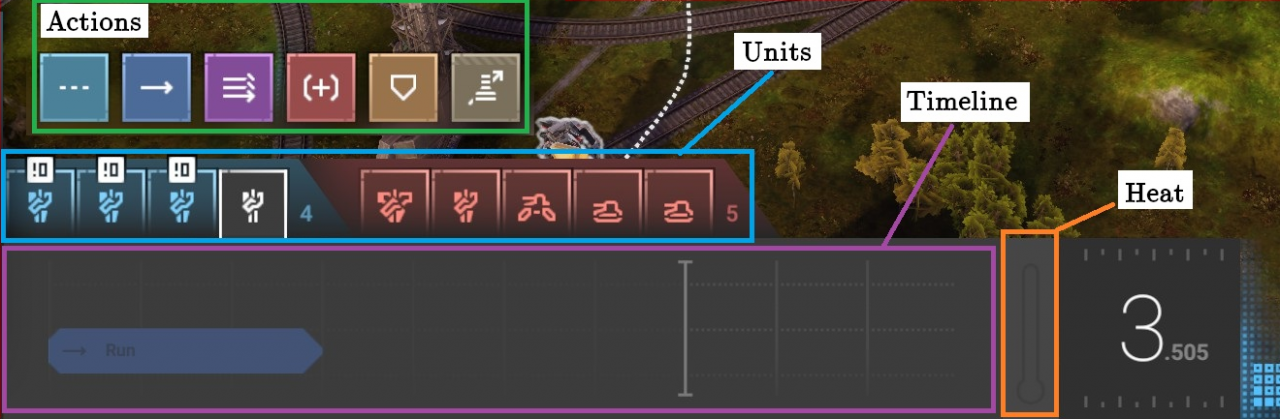
The actions you can command a unit to do are:
– Wait. Draw a longer line to order your unit to wait longer. Currently, the minimum wait time is 0.5 seconds.
– Run. Your unit will run at its top speed. Movement time includes time needed to accelerate and turn around.
– Dash. Remember that you can dash onto roofs and hills, down railings, through other units, and so on. Units cannot shoot or shield during a dash and still take full damage, but have a decent chance of avoiding most damage when moving perpendicular to the line of fire, and dashing at the right time will break missile lock.
– Attack. Explained in more detail later.
– Shield / Secondary attack. Shields must be pointed at a target, either a unit or a location by holding down CTRL.
– Eject pilot.
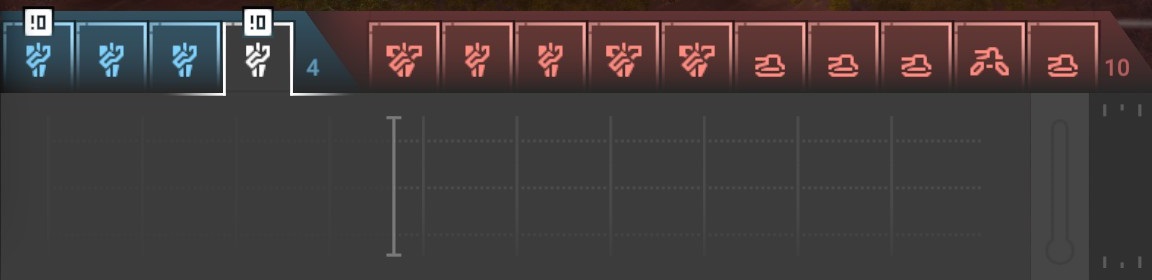
Clicking on a unit will select it. A “!0” icon means that the unit has not yet been assigned any actions for the next 5 seconds. You’ll get another warning if you try to execute a plan with idle units.
When you select a unit, all of its queued actions appear on the timeline.
Enemy units can also be selected, and their actions will appear on the timeline as expected.
The timeline shows all the actions the currently selected unit has queued up, including for enemy units. You can freely scroll around the timeline except when picking targets for certain actions.
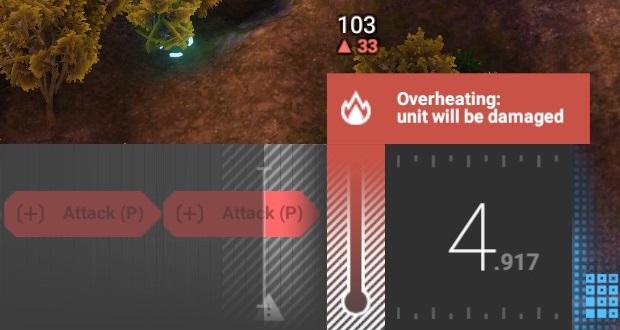
The heat bar shows the unit’s heat at that current moment in time. Overheating directly causes damage to your unit, and shows up on the timeline.
It is possible to overheat slightly even when the timeline does not show the warning due to the granularity of the time calculation.
To wait, you need to click on a “target”. The farther away it is, the longer your unit will wait. Currently the minimum wait time is 0.5 seconds. Waiting cannot be dragged on the timeline and must be deleted / re-added to modify it.
Movement is relatively straightforward. Firing on the move may incur a significant accuracy penalty– you can check that in your weapon stats (idle vs moving). Running cannot be dragged on the timeline and must be deleted / re-added to modify it.
Save the meat, ditch the metal.
— Dash
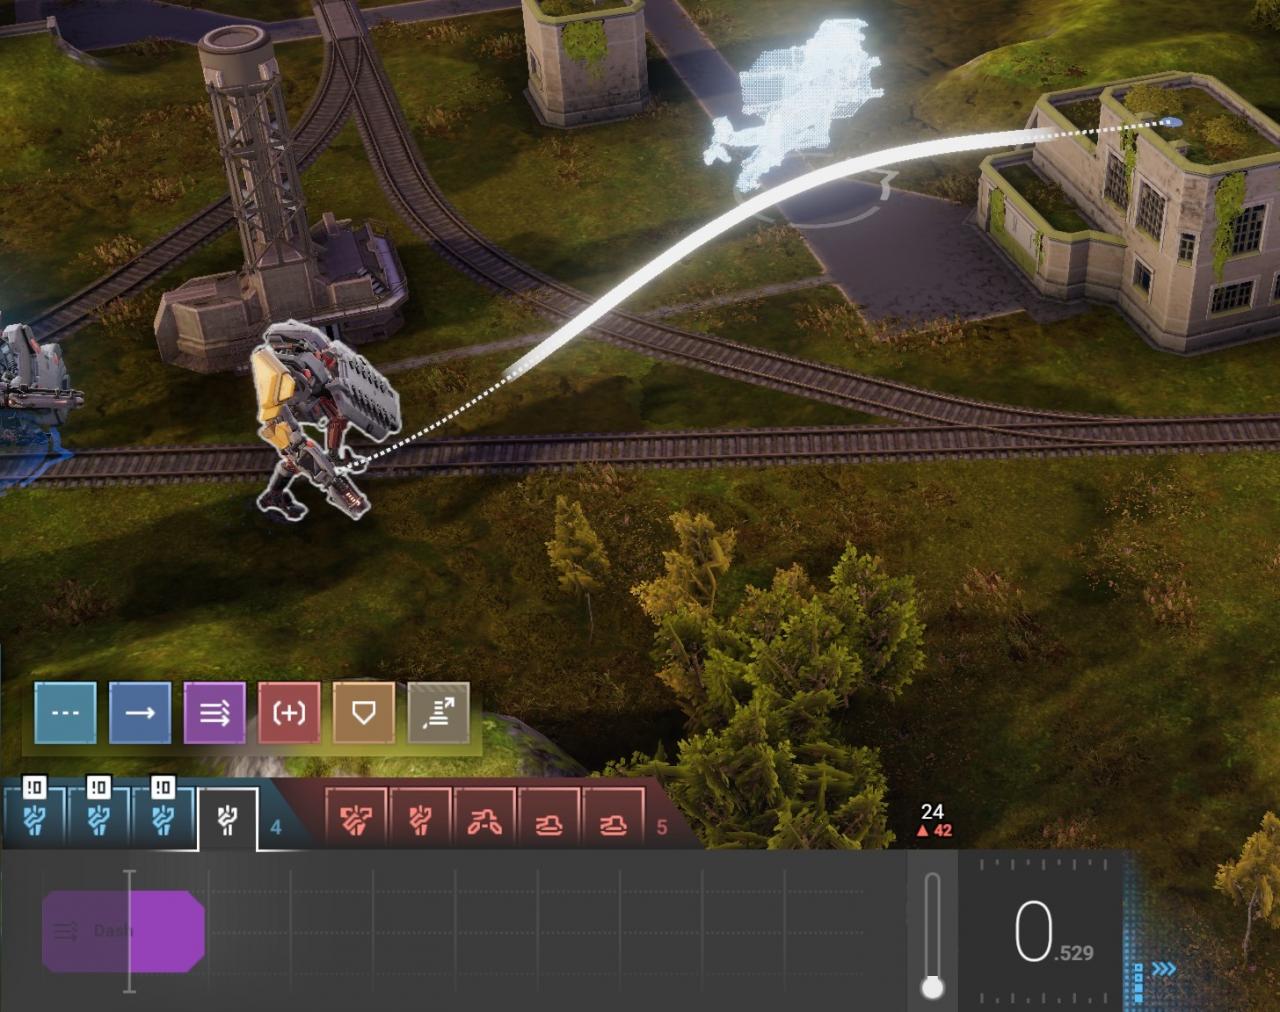
Dashing is an action that generates a fair amount of heat to move a unit a fair distance, potentially over gaps, over railings, and even onto buildings.Dashing always takes 1 second.
A unit’s movement and collision are simulated when planning a dash. Always check that you are not going to unintentionally collide into anything or run into a line of fire.
Unlike attacking and shielding, a unit cannot run while dashing.
In addition to positioning your units, dashes can be used to evade enemy fire when no cover is nearby. Dashing to evade fire is most effective when done at a great distance and perpendicular to the line of fire.
Dashing is also the best way to dodge missiles. The exact timing varies from launcher to launcher and especially with distance, but I give around a 1 second wait time per 30 meters of distance before dashing, and adjust according to what I observe.
Remember that you can measure distances by holding CTRL and also that the exact time is displayed on the timeline.
Dashing cannot be dragged on the timeline and must be deleted / re-added to modify it.
— Shield
A shield action is like an attack action in that it lasts a certain amount of time (determined by your shield), must take a target (either a unit or a location), and a unit can run while shielding.I haven’t tested how far hits on the shield are simulated. That is, whether a shield automatically absorbs everything in front of it, or whether the unit just brings the shield up so that projectiles are more likely to hit it.
Shielding can be dragged on the timeline, which makes it easier to synchronize it with an enemy’s attack.
— Attack
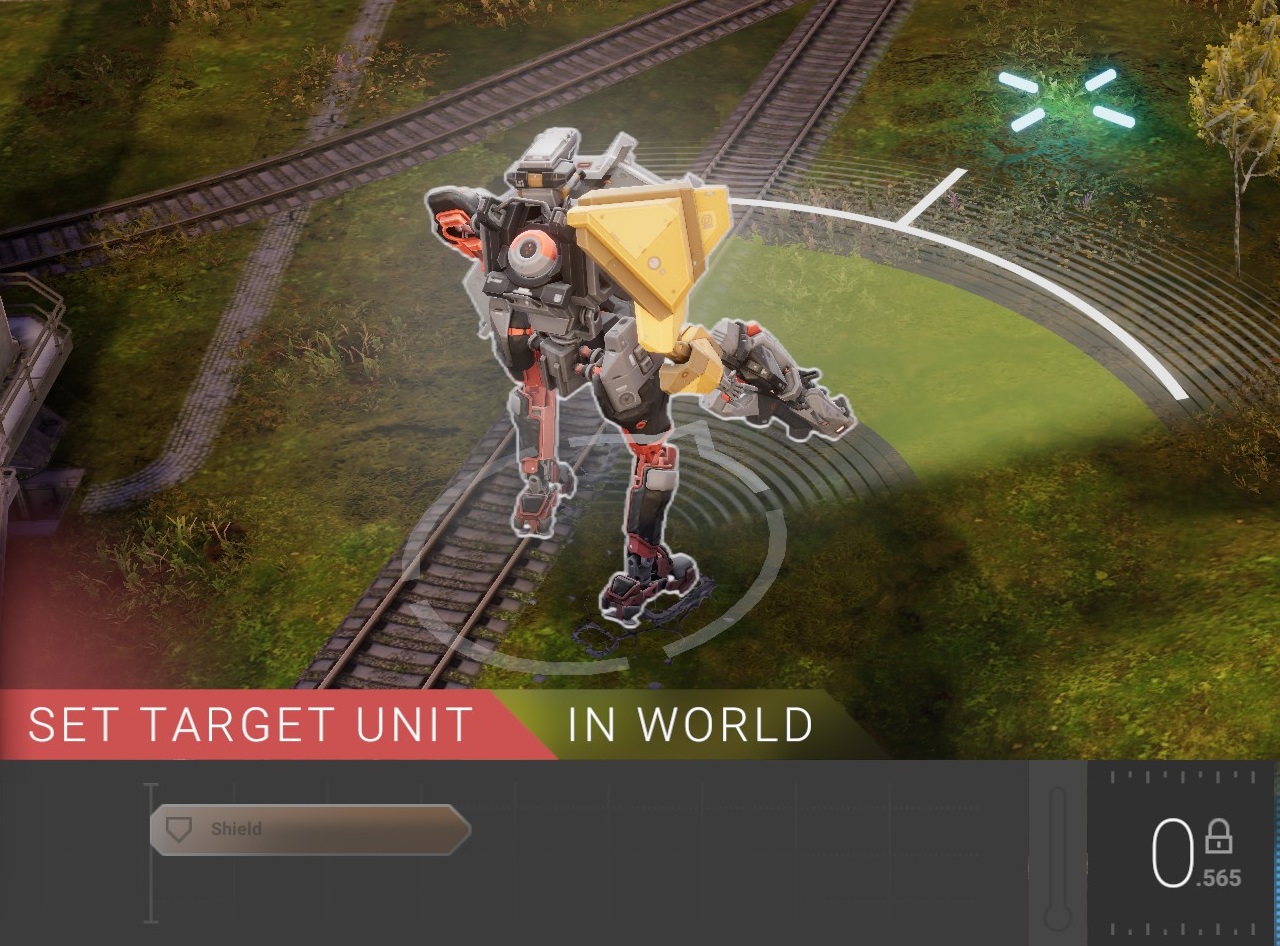
An attack lasts a specific amount of time and is made of three distinct phases: wind-up, shot, and wind-down. A unit can run while attacking, which may incur an accuracy penalty.Wind-up and wind-down are a short periods of time when the unit readies its weapon and prepares to fire, and when it lowers its weapon.
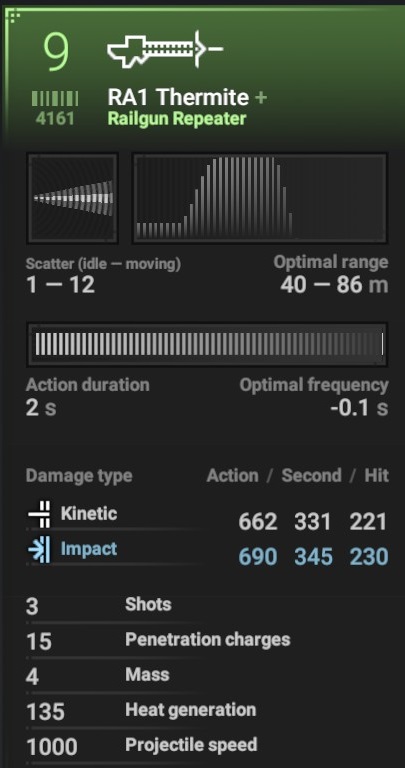
Shot is the period of time when the unit fires the weapon. Different weapons may fire multiple times within the same attack action; this is represented in the weapon’s stats. The RA1 Thermite in the screenshot to the left fires three times per action, reflected in “Shots”.
You cannot change targets in the middle of an attack. This also means that the sweet beam drag in the intro cinematic is impossible to execute in-game.
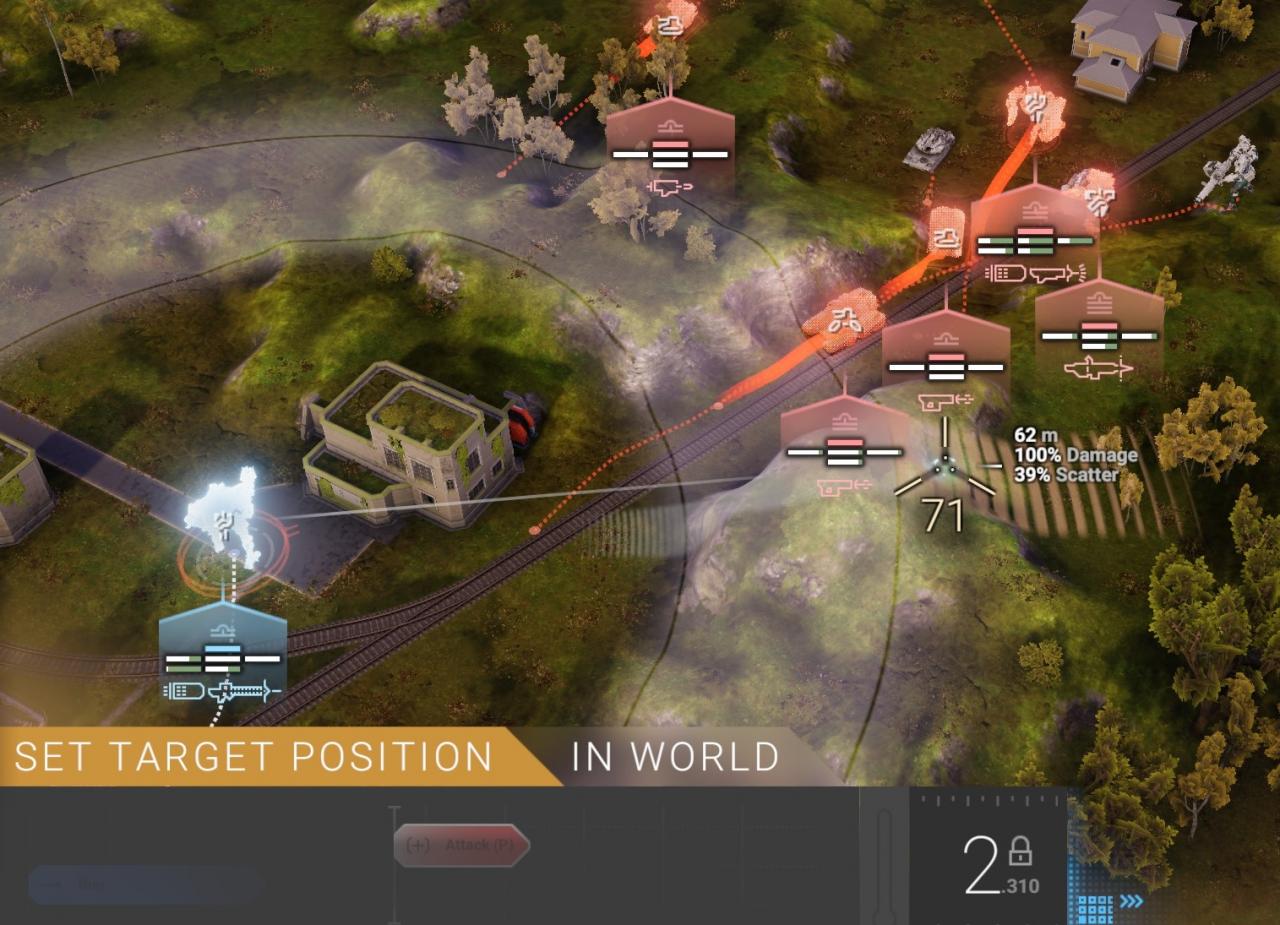
When choosing the attack action, click on the timeline to set a start time, then click on a target, or hold CTRL to target a piece of terrain. Once you have selected a target, you can click and drag the action around. This is very useful to precisely time an attack to hit an enemy between cover, to manage heat buildup, and so on.
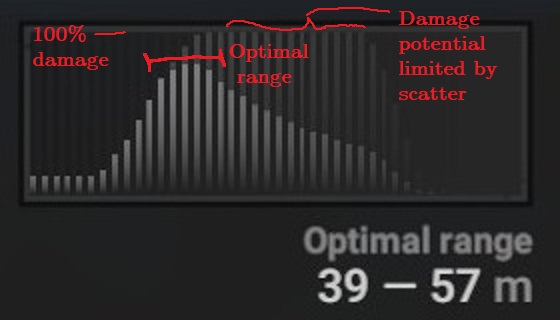
Holding CTRL also shows you the additional details in the above screenshot. This information is key to understanding the calculation behind the optimal range.
The grey ring represents your “optimal” range, but that is just a weighted calculation of your weapon’s damage and scatter at that distance. Your weapon may do 100% damage at a greater range than optimal, but because of scatter, fewer rounds may hit the target.
Machines and pilots are perfectly accurate. The only factor influencing what actually hits the target is the weapon’s scatter value and the distance to the target. This creates a cone that can be seen on the UI when planning an attack.
Whether an attack hits in Phantom Brigade is determined by physics simulation. Every projectile’s path, every piece of terrain, even the position of the target’s parts when the projectile impacts, all determine if and where a unit gets hit.
Kinetic: damage done to barrier and integrity.
Concussion: damage directly dealt to a pilot’s concussion resistance.
Impact: damage to destructible structures.
Stagger: reduces a unit’s effective weight class and makes it more vulnerable to crashing.
Heat: directly applied to a unit.
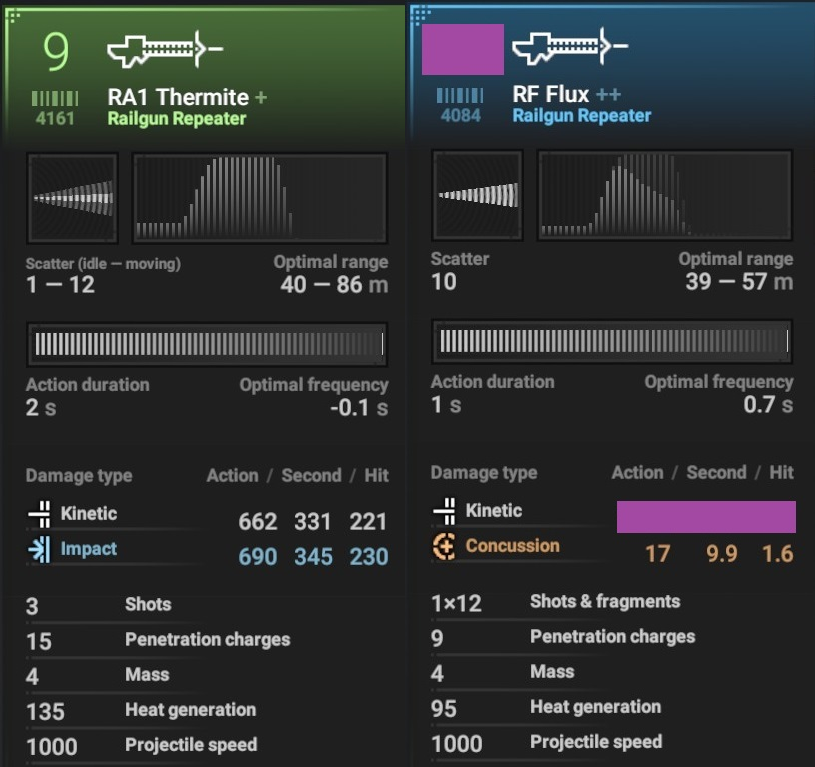
The height of the vertical bars represent damage falloff. The RF1 Thermite does relatively little damage at close range, which sharply increases around the 40m mark to 100%, then falls off again after about 80m.
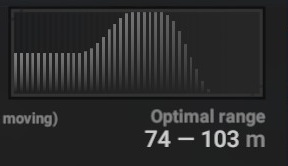
Scatter and damage falloff combine to determine a weapon’s optimal range. For a weapon with excellent scatter, like the RA1 Thermite, the entire graph is in light grey, meaning that its damage at any distance is only limited by damage falloff.
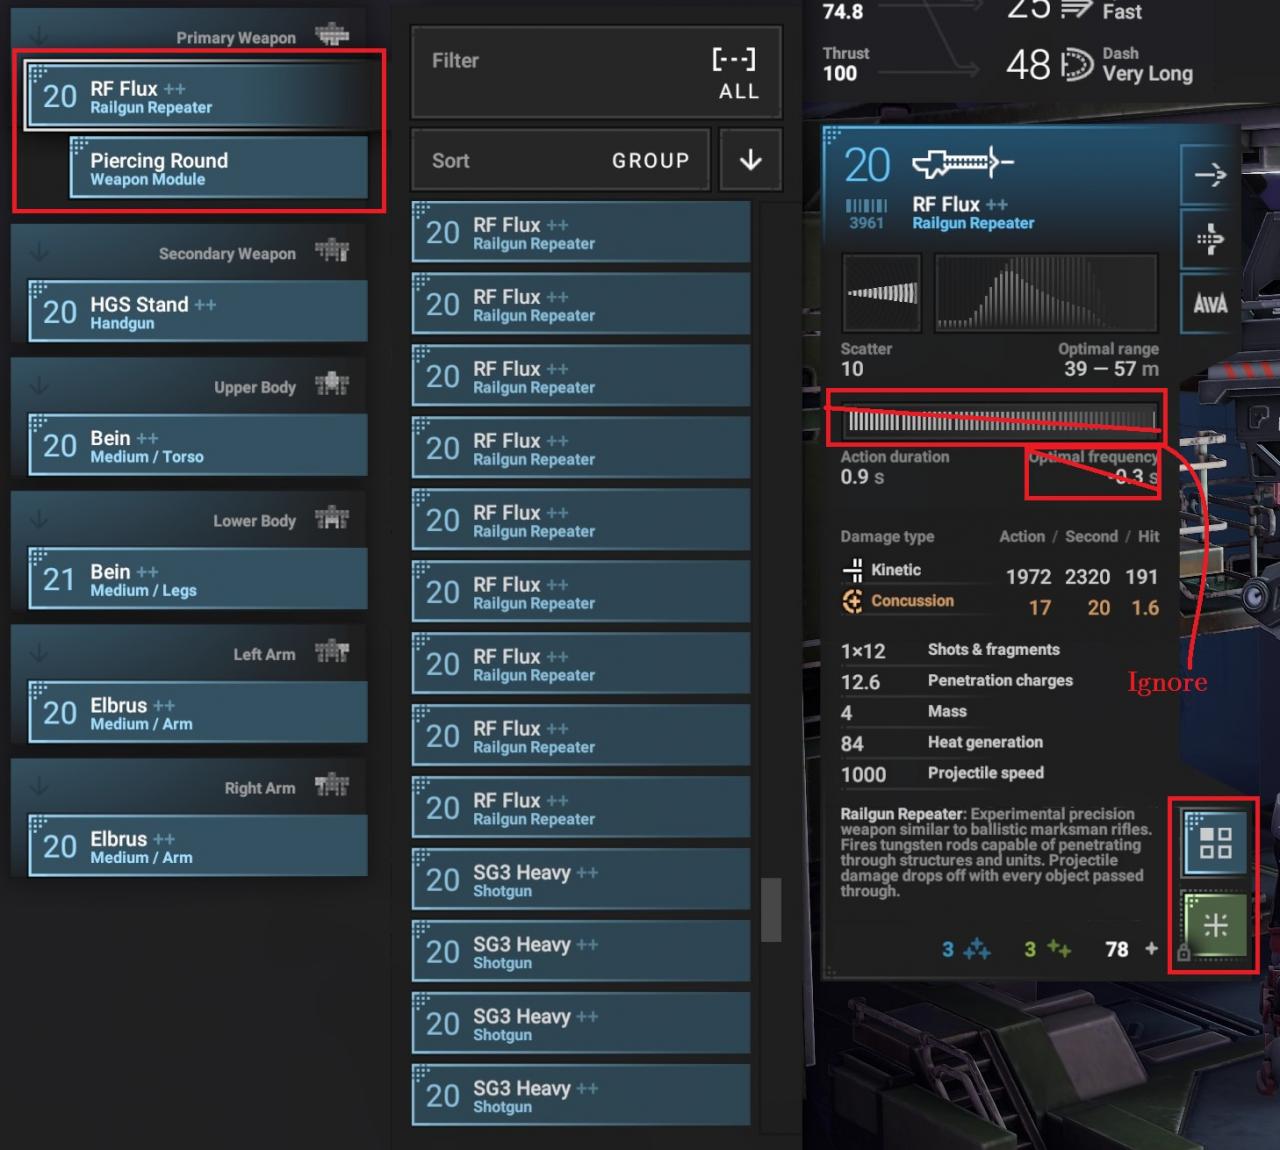
For a weapon like the RF Flux, however, its scatter is significant enough that, at the ranges where it does maximum damage, there is enough scatter such that not all of the shots fired will hit the target. At closer ranges, damage falloff limits its effectiveness, while at longer ranges, the issue is scatter.
Note that for the RF Flux, a significant part of the range graph is in a darker grey. This represents the portion of the damage potential that is wasted because of shots potentially missing their target.
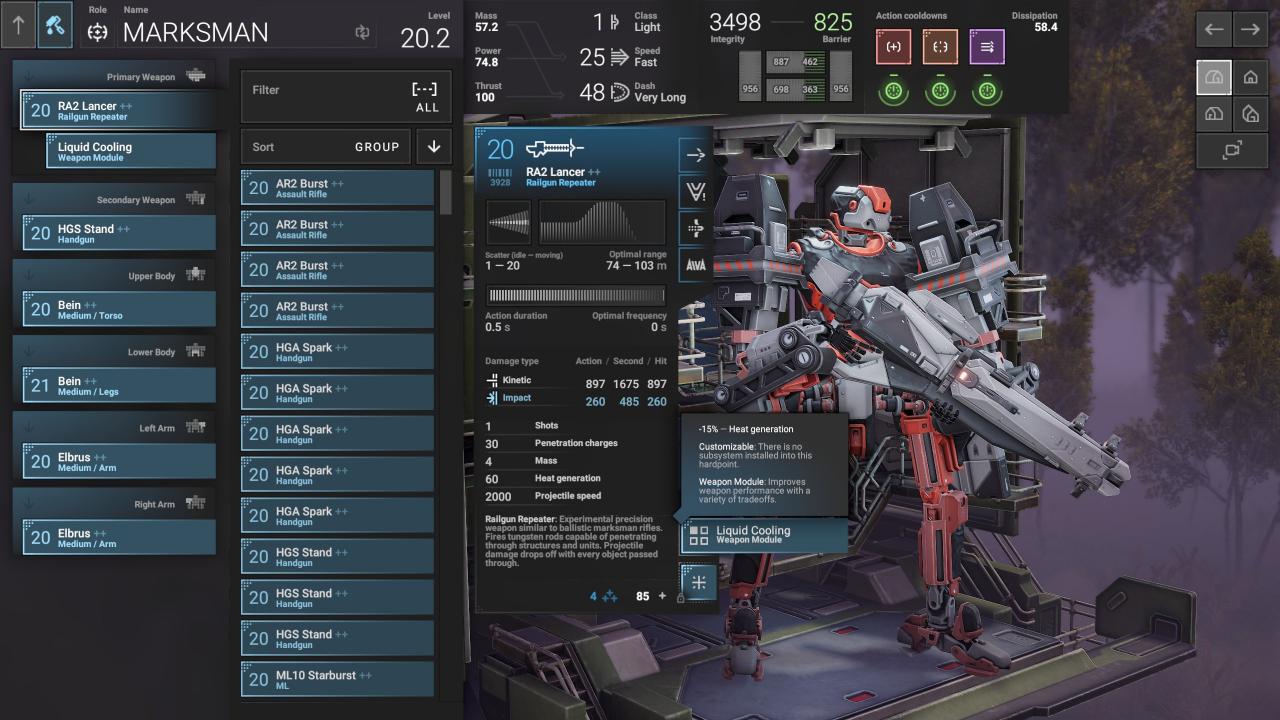
For weapons like the RA2 Lancer, even at point-blank range it will deal 50% damage. This means that its useful radius is much larger than just what is shown on the UI, and you can fire (with pinpoint accuracy) at units within that distance, dealing at the very least 50% damage. This may mean that a backup weapon isn’t necessary for your snipers.
Some weapons have a penalty to scatter while moving. But as always, since scatter is random and every individual projectile’s path is simulated, a high scatter value may not end up being a problem. The “optimal range” calculation is just a weighted calculation of damage falloff and range; what actually works in combat will depend on the target, terrain, and other factors.
— Heat
The formula is very simple: your unit’s heat dissipation rating is how much heat it dissipates per second. Its heat capacity determines how much heat it can safely tolerate. A weapon’s heat generated rating is how much heat it generates per action, split over its action duration.For example a weapon that generates 90 heat per 0.5 second action actually generates 180 heat per second in that short timeframe. A weapon that generates 180 heat over 5 seconds is only generating 36 heat per second, and so a unit with as low as 20 heat dissipation and a base 100 heat capacity can fire it without worrying, since it will build up an excess of 16 heat per second for a total of 80 excess heat at the end of the firing action.
Attacking, dashing, and taking damage from heat-generating weapons all cause your units’ heat to rise. Hovering over a point on the timeline will show you how much heat per second it is generating or dissipating at that exact moment. Attacks and dashing do not generate all their heat at once, but rather generate their heat over the course of the action.
Heat management is key to maximizing your damage output. Since heat continually goes down at a fixed rate, every moment that a unit spends at 0 heat is a moment of cooling wasted. Conversely as long as your unit is constantly above 0 heat, it is being maximally efficient, since being hotter or cooler does not affect its cooling rate.
4. Tactics
The main consideration in your engagements is asymmetry. You will generally be outnumbered and outgunned. You neutralize those advantages by abusing your own– the ability to predict your enemy’s movements.
You cannot put out more damage quicker than them, nor can you stand still and trade blows. Therefore your most useful tactic will be to negate incoming damage, either by taking hard cover, killing priority targets to create safe zones, shielding, or even just dashing in the middle of an incoming burst.
Playing defensively is a good idea when you’re still not confident in the combat mechanics. Instead of taking risky maneuvers like popping out for quick shots, hide in cover for the full duration of an enemy’s attack. Instead of betting that you can kill them before they kill you, leave the gambling to someone else and stand behind a hill.
Generally, keeping your units close to cover and maneuvering cautiously will work decently. But, eventually, you might want to get a little more…
Cover is a wonderful thing. Because of how line of sight works (in real life as well, not just in-game) a closer piece of cover blocks more than one farther away even though getting closer exposes you to more and more accurate fire.
This means you might dash towards an enemy to avoid damage. Instead of running away as a group, you might run to the sides, split up your squad, get them into good positions to shoot at enemies while they’re in cover from the ones shooting at them.
That’s the aggressive part. Avoiding damage is only half of the mission; you must also eliminate all enemies. Eliminating them quicker means that they have less time to shoot at you, and so maximizing your damage output while remaining safe is the best way to play the game.
Mobility is the key to all the above. Remember that Phantom Brigade is a fully 3D game, so use those thrusters to their maximum potential. Dash on top of buildings and off the sides of bridges. Jump off cliffs to break line of sight suddenly. If you’re feeling cheeky, run in front of another enemy to make them take friendly fire in the rear.
Time is your main currency, and being able to move quickly lets you make more efficient use of your time. Increasing your run speed is always good, but not at the expense of other capabilities, and besides, eventually you will want thrusters on every machine to dodge missiles and jump off cliffs.
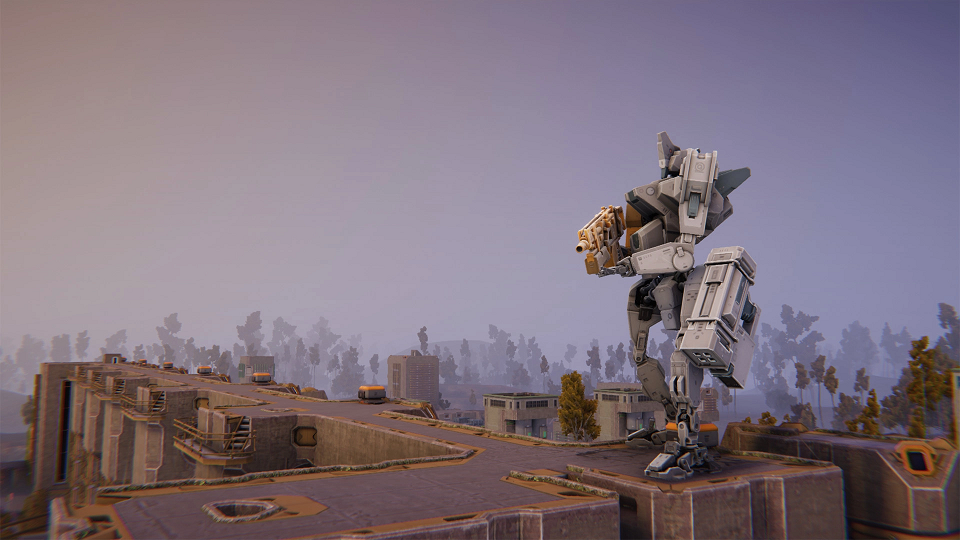
The difference between cover and concealment is subtle but important: cover will stop a projectile. Hills offer excellent cover, as do buildings, but the latter can be destroyed and eventually shot through, as seen on the building to the left.
Keep this in mind when ordering a unit behind cover when under heavy fire– they may not be able to stay there for very long, especially when fired upon by weapons that do high impact damage.
Remember that a unit only needs to be in cover from the enemies currently attacking it. If possible, stand where you are protected from attacks but where you can also shoot at other enemies. Use any lull periods to fire back or reposition to better cover for the next incoming attack, and frequently check the timeline to figure out when and where to move.
The LOS line is drawn straight and true from shooter to target. It does not take into account scatter and the size of the target, so if your head is peeking out from behind a hill and your enemy is firing a machine gun at you from a long distance, there’s a good chance you’ll still take damage.
Watch out for a red cone appearing even if you’re getting the dotted red line. That means you still have a chance of getting hit.
Even if the red cone does not appear, it’s a good idea to visually check your cover to make sure that it can, in fact, shield you from whatever’s shooting at you.
In more than one way. Kill priority targets first– targets which pose the greatest threat. These are usually enemies with missile weapons, plasma weapons, then those with railguns, machine guns, sniper rifles, and anything that does concussive damage.
Why? Those weapons negate your greatest advantages– prediction and cover.
Missiles fly above cover, are slow compared to projectile weapons, and are not predicted on the graph, making them very difficult to dodge without practice while also forcing you to spend more of your precious time evading. Plasma weapons move slowly but track, and one of them can be lobbed as well, making them difficult to evade.
Railguns go through cover. Machineguns have a long burst time, forcing you to stay in cover and waste time, and also deal enough damage to destroy whatever you’re standing behind. Sniper rifles do a lot of damage from a distance. Concussive damage is dealt separately from barrier / integrity damage, making it potentially extremely lethal.
But, on top of that: kill one target at a time. Splitting your fire runs the risk of not disabling an enemy unit, making subsequent turns harder. Say you’re in a 4v8; on your first turn, if you split fire and disable 0 enemies, you still have to dodge 8 enemies’ worth of fire on turn 2. If you focus your fire and disable even 1 enemy, then on the next turn you only have to deal with 7, making it easier to press your advantage.
Sure, you’re going to overkill a lot of enemies while you’re getting used to combat, but that is still better than underkilling and compromising your position.
Since hits are simulated with physics, the facing of a unit matters a huge deal. Primary weapons are always held in the right hand and an enemy unit without any weapons will eject; this instantly suggests a tactic: shoot all enemies from their right to disable their arms and potentially force them to eject.
Getting hit in the rear doubles concussive damage. This is because the pilot capsule is in the rear! This is especially dangerous when retreating down kill funnels like city streets, since even if you dash, you can still be hit by projectiles. If you will be under extremely heavy fire, it might be worth shielding up and walking backwards instead of dashing if you’re caught like that.
— Forced Ejects

An enemy unit with no remaining weapons will eject. A specific icon will appear over its tab, but note that if it is also crashing within the same turn, the crash icon will take priority over the eject icon. It’s always worth clicking on the unit to check.An ejecting enemy will not take any other actions that turn, so ignore it and shoot at other things. You still need to be careful of colliding with it.
Forcing enemies to eject is a great way to get rid of them quicker as well as getting easier salvage, since intact parts cost 10 points less to either salvage or scrap than if the part were destroyed.
Your main options in the open are to make a mad dash for cover or shield and walk. This is actually a tougher decision to make than it sounds.
If you choose to dash, dash perpendicular to the direction of fire. This forces the enemy to rotate to track you, and so any rounds they fired at your previous location will miss. Never dash straight towards anyone shooting at you, for obvious reasons, and avoid dashing in a straight line away as well.
At close ranges, projectiles may travel quickly enough to hit you anyway. The advantage of the shield is that you know it will protect your unit. The downside is that it has a limited durability.
Missiles still can track you if you dash too early. You’ll have to learn the timing yourself, but I generally wait 1 second per 20-30m between my unit and the enemy.
— Weapon Tactics
These weapons (except the SG1 Auto) have zero scatter penalty while moving, so they are invaluable for flankers who can fire without having to stop. Their medium-short action durations start to limit their usefulness as your units get faster, since you have a shorter window while moving between cover, so don’t discount the usefulness of modules that reduce attack duration. Average heat, excellent damage, and low-ish to average range make them good weapons for when you want a general-purpose machine.
Apart from being built for longer-range engagements, sniper rifles also boast high single shot damage, and the SR3 literally has a single shot firing action.
Don’t discount its lower average DPS. If its single-hit damage is high enough, that can guarantee a part destruction on a hit, which will either instantly disable an attack (left or right arm), force an eject (right arm with no secondary weapon), force a crash (legs), or even just kill the target outright (upper body).
Marksman rifles straddle the boundary between assault rifles and sniper rifles. Their main drawback is having a penalty to scatter while on the move.
Railguns generally have lower numerical stats than their counterparts, but gain the incredible ability to shoot through cover, as well as immense projectile speed. This makes it more likely that their shots will land on target, while also allowing you to poke at targets from behind your own cover.
Their usefulness can’t be overstated.
Machine guns generally have huge accuracy penalties while moving as well as long action durations. Put a unit down,
Missiles follow an arc and take a relatively long time to reach their target. Nominally their speed is displayed in meters per second, but since they follow an arc, the distance they travel isn’t straightforward to determine. You’ll have to get a feel for it yourself.
Their ability to deal splash concussive damage, follow a trajectory over cover, and track their targets make them extremely busted, and they amplify one of your greatest advantages by letting you return fire from behind cover.
Remember that you can fire them at any time from any where and still have a good chance of hitting your target, so don’t even walk into the open unless you have to.
TODO
TODO
Not much experience with them.
Looking at the stats, generally decent kinetic damage and excellent heat characteristics. May be a good choice for disabling and bullying enemy units at range. Note that heat damage does not scale with level.
Plasma weapons are rather unconventional. Their projectiles travel relatively slowly (roughly 3x as fast as missiles). The repeater and seeker are the only ranged weapons capable of dealing stagger damage. All three plasma weapons are very capable concussion damage dealers.
Used properly, the plasma launcher is a terrifying tool, capable of concussing any unit from the safety of cover. Just beware of its large blast radius and the corresponding capacity for friendly fire.
The plasma repeater is more situational, but it lets you bully an individual target by staggering and then crashing it. Excellent when paired with a shield to give a light, mobile machine the ability to absolutely bully any target it encounters.
No experience with the seeker. I have heard that its tracking… leaves much to be desired.
Concussive damage is tracked separately from barrier / integrity damage, and represents the pilot’s ability to fight through injury and remain functional. Concussive damage is doubled from the rear, since that’s where the dummy plug pilot module is located.
Since kinetic and concussive damage are completely separate, there’s not much point in optimizing for both on the same team. Stick with one and build your whole team to put out that type of damage. Usually a given weapon type will have at least one model that does concussive damage.
Concussive damage and resistance does not scale with level. This means that a lower-level concussive weapon can remain useful for much longer, at least until the hidden buffs / debuffs to damage based on level difference kick in.
TODO
I don’t play melee much, and I’ve heard that it takes a lot to get used to, so I’ll save this section for later.
Hold CTRL while picking a target to switch sides for the weapon swing.
What I’ve heard is that the simulation silhouette is inaccurate. What actually happens is that in the middle of the melee action, your unit takes a swing, and damages anything in the path of the melee weapon’s hitbox. The simulation silhouette is just a rough guess as to where the weapon will actually travel through.
— Keep In Mind…
Especially important for firing on the move. Your window to shoot an enemy can be very small, so if you have a long action duration, your target may move out of your line of fire in the middle of your action. Keep an eye on the timeline and scroll through it to get a feel of how your attack will hit.
When two units get too close to each other, they may collide. This is distinct from crashing and from melee attacks; this is a good old-fashioned fender bender.
In a collision, a heavier unit will knock down a lighter unit and put it into a crashed state, while the heavier unit continues on unimpeded. Raising a shield raises your weight class for the purposes of calculating collision.
Dashing increases the force behind collision, but does not increase your weight class, so dash into your foes at your own peril.
Crash is just another fancy name for stun. A crashed unit cannot act, whether because its legs were destroyed, or it got rammed by something heavier than it. The stun duration can be seen on its timeline.
If you’re really close to an enemy unit and you have a shield or are heavier than it, consider crashing it instead of (or after) shooting. Especially if it was going to subsequently attack you, this is a great way to disable it for the current turn.
You CAN kill airdropped reinforcements on the turn they arrive, even if they can’t be targeted. Hold down CTRL and target the terrain. This works better with moderate scatter.
Friendly fire is not very friendly. Be very careful when ordering your units to shoot past each other, especially while moving and dashing. After you’ve given all your orders for the turn, slowly scroll through the timeline again and watch for any inadvertent crossing lines of fire.
You take full damage from friendly fire, so avoid it at all costs. On the flip side you can absolutely make enemies shoot each other.
Always be sure that your cover actually covers you. Railguns penetrate cover, missiles arc over, and machine guns spray enough lead to have a decent chance of hitting any part sticking out from behind cover. Machines are taller than the LOS line indicates because it is drawn to center mass.
Concussion damage is tracked entirely separately from kinetic damage. A high-integrity tank can still be disabled by knocking its pilot senseless, leaving the metal mostly intact, but the same applies to you as well.
It’s generally more effective to specialize your entire team in concussive damage if you’re planning to concuss enemies. The “Concussive Payload” weapon module boosts concussive damage and can be hideously effective against tankier and tougher enemies.
Remember that concussive damage is doubled from the rear. Great news for extremely speedy flankers! Also remember that you can “force” an enemy to turn around by moving their target, but just be careful of friendly fire when doing that.
At the end of combat, you get to pick up the pieces… literally. Destroyed enemies leave behind parts that can be salvaged and repaired, or scrapped for supplies and components. Convoys have a good chance of carrying additional supplies, parts, and blueprints for your workshop.
Any damage sustained in combat is not immediately repaired. Repairs happen over time in cruise mode consuming Liquid Fix. Alternately, all your machines will be fully repaired and your Liquid Fix restocked whenever you resupply.
Parts are self-explanatory. You pick up parts from destroyed / disabled enemies or from a convoy’s cargo.
Resources can be found as loot, very commonly batteries to recharge your stealth / overdrive, but also supplies and, if you raid repair convoys, liquid fix.
Blueprints are labeled as “Workshop charge” but are arguably the most important thing you can loot. These unlock new projects for you to build and are key to progressing and upgrading your squad.
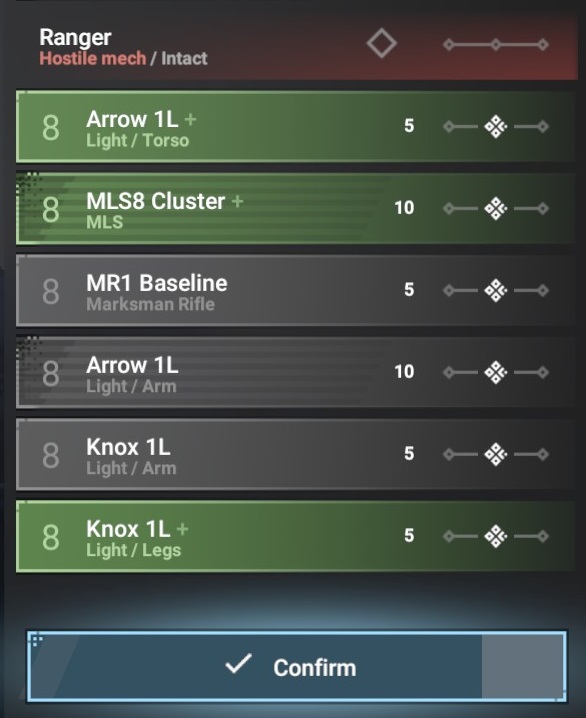
— UI
Clicking the diamonds to the right of a unit’s name quick selects an action for all of its parts. This lets you conveniently dismantle a batch of parts all at once.
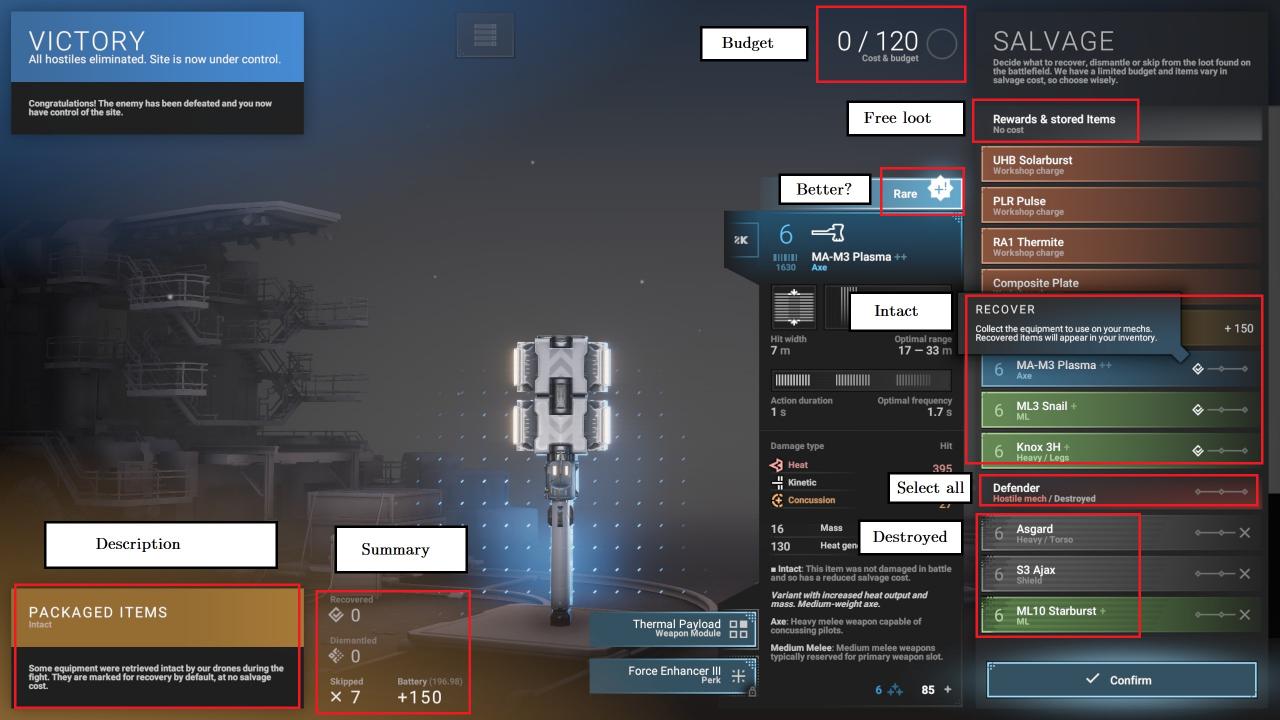
— Salvage
Each part can be either recovered, dismantled, or abandoned. Parts can also either be intact or destroyed.
Usually you will get a small amount of stuff for free. These appear at the very top of the salvage list and are automatically recovered, though you may want to dismantle them if you don’t need the parts and want the resources.
Uncommon (green) parts get a 15% bonus to certain stats, rare (blue) parts get a 30% bonus. For weapons, this is damage; for body parts, only integrity and barrier get the bonus.
Intact parts have a solid coloured background, while destroyed parts have a grey top-left corner and stripes.
Recovering an intact part puts it into your inventory sand costs 15 salvage points.
Dismantling an intact part scraps it (and its modules) for supplies and components and costs 5 salvage points. The supplies you get from its modules are included in the UI display.
Abandoning an intact part costs nothing but gets you nothing either.
Recovering a destroyed part costs 25 salvage points, dismantling it costs 10.
Note that scrapping an item also scraps its modules, so if a part has a module you want, you will have to fully salvage it and then remove the module in the inventory or in the units screen.
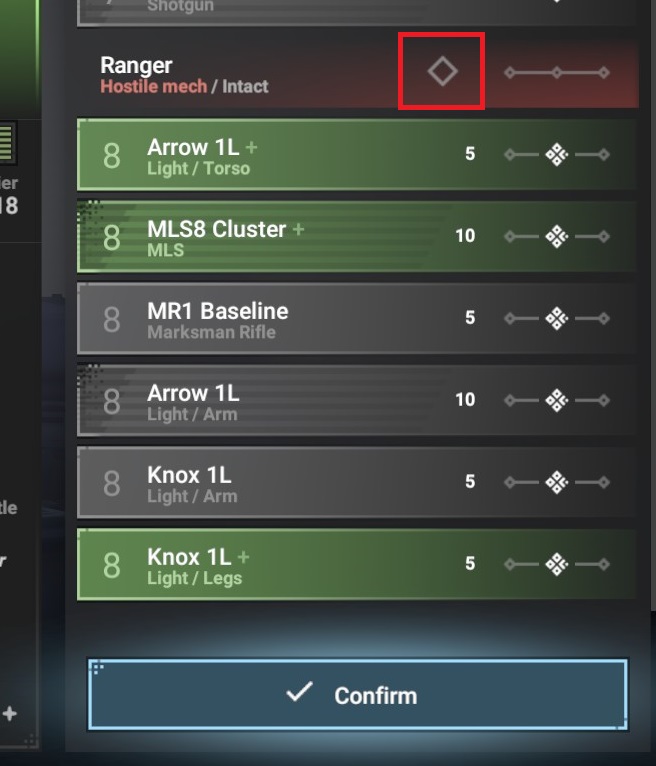
If the option is turned on, sometimes you can salvage a frame from an intact enemy machine. The option appears as a grey diamond to the right of the unit’s name. Salvaging a frame costs 80 supply budget and prevents you from salvaging or dismantling any of the unit’s other parts. You do not get those parts. Frames are placed into your inventory completely unequipped.
— Destroyed Squad Mech Parts
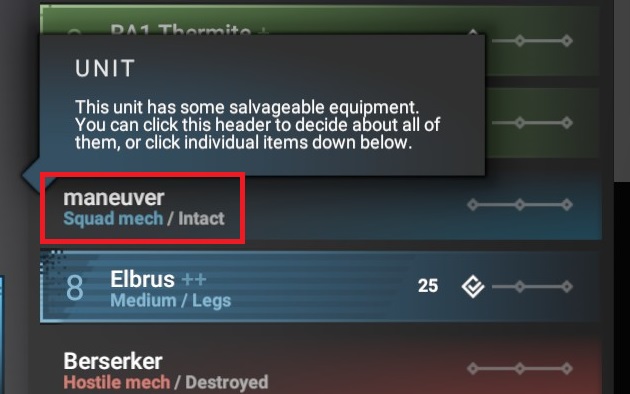
Parts that your squad lost in battle can be recovered or dismantled, costing 25 or 10 salvage points as per normal.
— Keep In Mind…
It’s generally a good idea to prioritize salvaging any parts you lost in battle unless the other options are truly exceptionally good.
Every part costs the same amount to salvage, but gives you different amounts of resources. Hence, prioritize recovering or dismantling rare and uncommon (blue and green) parts, then torsos, weapons and legs, and last of all, arms give you the least amount of supplies. Go for intact ones first.
6. What If I Lose?
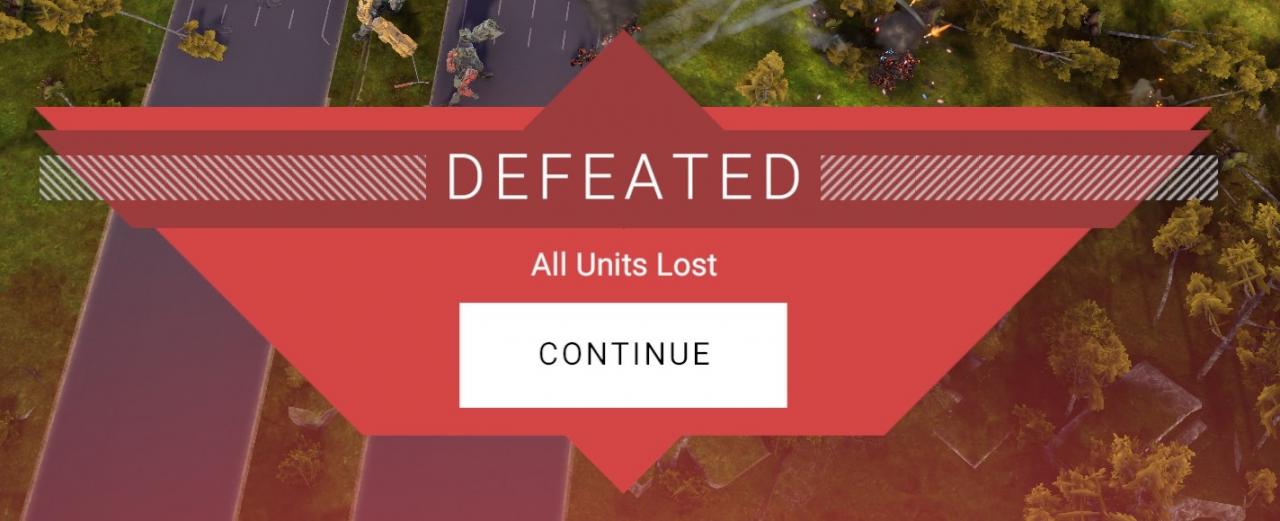
If you lose a battle, you are sent to the combat resolution screen as usual, where you can pick up some of the parts you lost. Then you are sent back to the world map, and the enemy unit that defeated you becomes occupied for a moment.Defeat also lowers the escalation in the region, but that’s barely a consolation at that point.
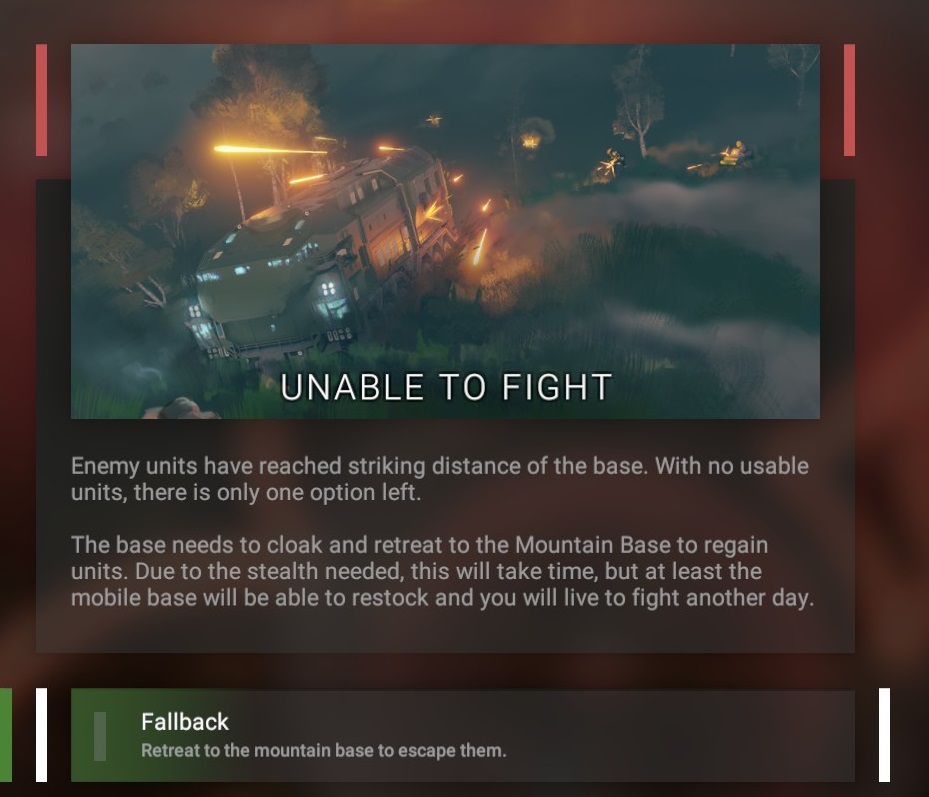
If you encounter an enemy unit with no combat-ready units or pilots, the game automatically sends you back to the nearest resupply point. There is no game over in Phantom Brigade, unlike in XCOM. Neither is there any global time pressure, so take your time.
Note that you can retreat at any time while in hostile territory. If the button appears greyed-out, switch to a different travel mode (overdrive / stealth) and back again. This lets you get out of a potentially dangerous encounter without having to fight and lose all your units first.
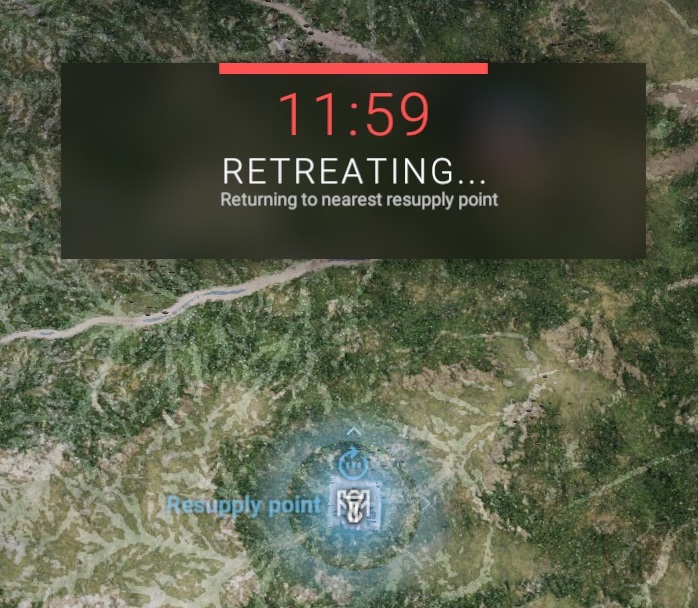
After you complete a retreat, you reappear at the closest resupply point. If you have fewer than 2 combat-ready units and pilots, resupplying will restock you back up to 2, so it’s a good idea to do so.
7. World Map
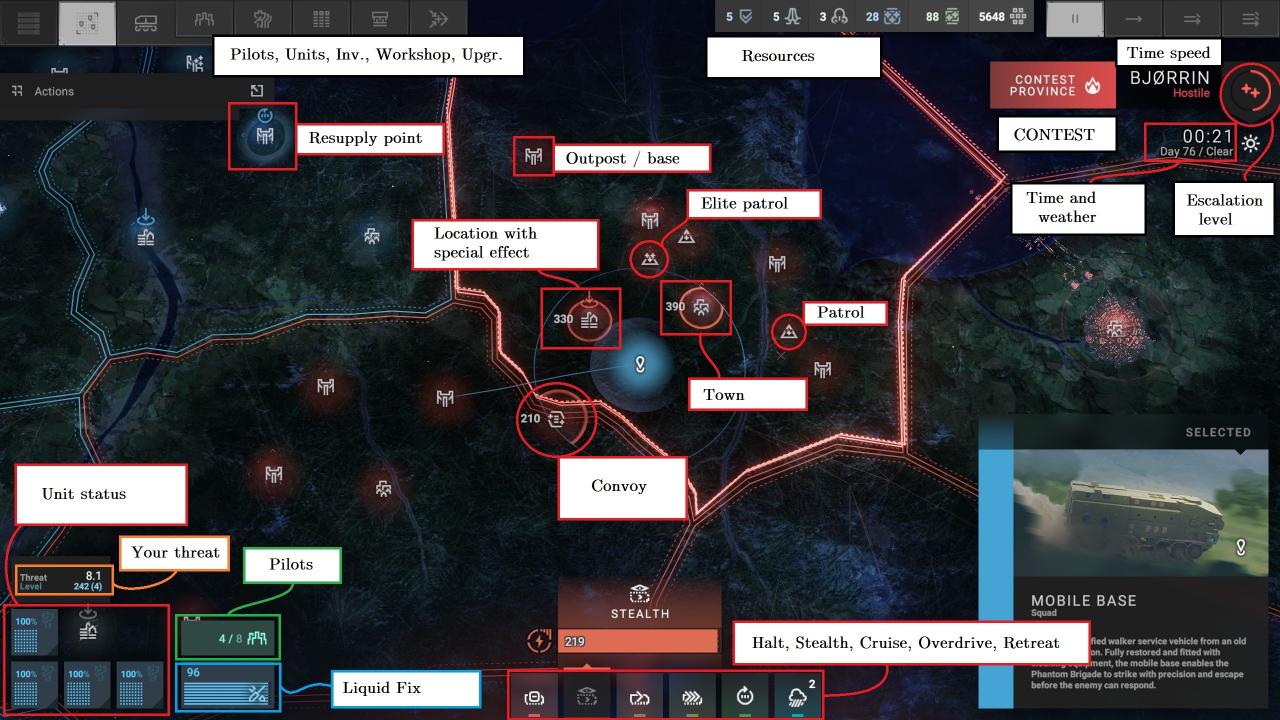
The UI is full of icons, but don’t worry, they’re not very complicated.
Shortcut keys can be viewed on the pause menu.
The top left bar lets you navigate to your management screens where you get to look at your pilots, units, inventory, workshop, and upgrade tree.
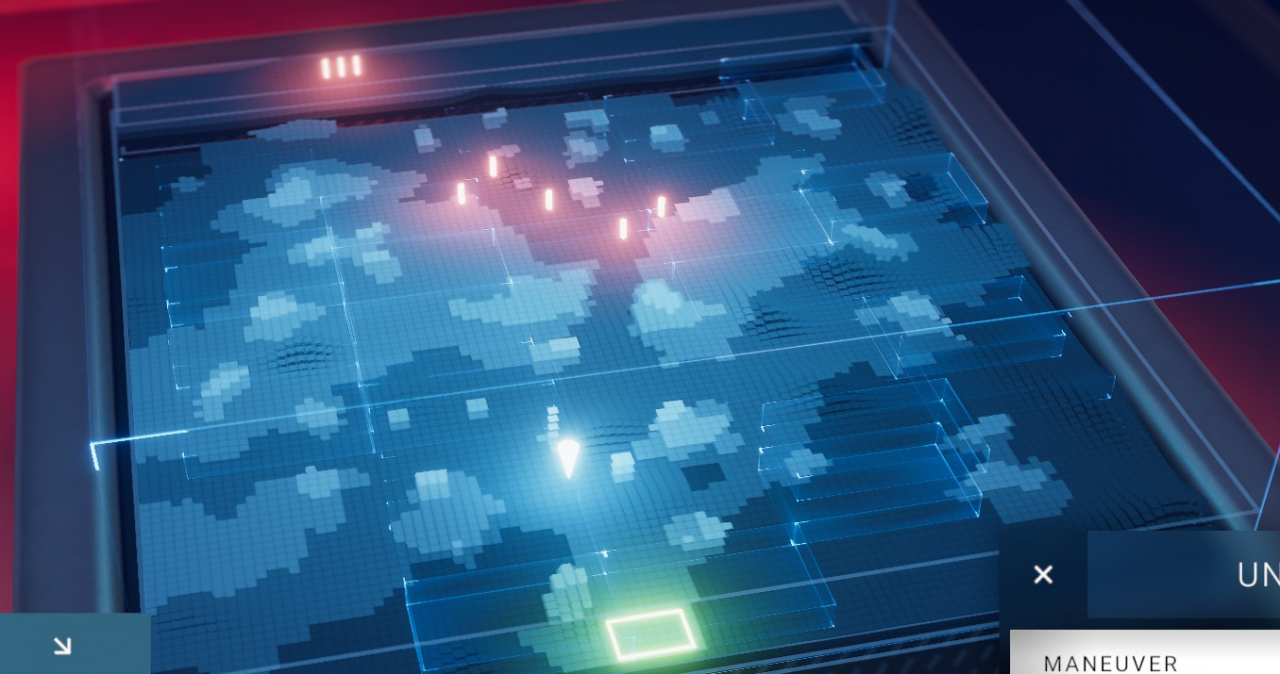
The top right section gives you a summary of the province you’re in, with additional information if it is hostile, and also controls for fast-forwarding time on the overworld.
There are no interface interactions on the world map itself, apart from movement. You interact with a location by moving into it.
Some locations on the map have special effects once liberated, such as reducing the amount of Liquid Fix consumed in the province.
If you can’t interact with a location that should be interactive, try moving away from it and back into its radius again.
The bottom left shows a quick summary of your unit status but not pilot status. Units are repaired with liquid fix, pilots need time to recover but their status isn’t shown on the world map.
Note that repairs only happen while in cruise mode.
Finally, the bottom bar contains your movement controls. Halt, stealth, cruise, overdrive, and retreat.
Cruise is the default mode. It does not consume energy and lets you fix your units.
Stealth reduces enemy detection radius by a significant amount (shown on the map as red rings around sites and patrols) and consumes energy. Your own detection range is also shorter in stealth mode.
Overdrive is Pretty Darn Quick but consumes battery and makes you more easily detected until you build the appropriate upgrades. Your own detection range is also shorter.
Retreat lets you return to the nearest supply base at any time for no penalty.
Every now and then, random events happen on the world map. You can lose resources (hope, reputation, and so on) from them, so don’t just mash the button to skip them.
— Provinces
A provinces’ escalation level determines the frequency and difficulty of enemy patrols. Escalation slowly drops when you leave the province, and rises while you spend time in it and when you defeat enemy units and capture sites.
Taking out a patrol raises escalation by 10. Taking out a convoy raises it by 40.
Escalation also drops when you lose a battle, but this is not generally recommended.
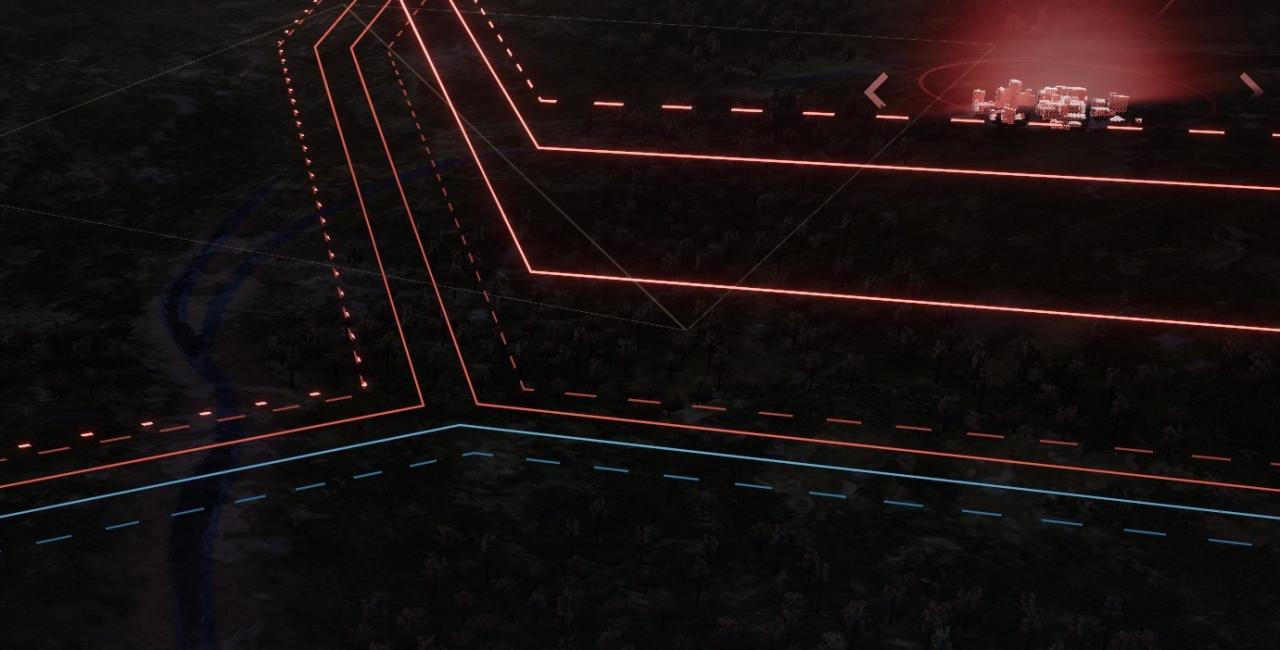
Escalation level can be quickly read from the border around the province. A dotted bright red line means an unfilled escalation level. Solid red lines represent filled escalation levels and that the province is on a higher alert level.
Escalation level rises at 50, 200, and maxes out at (I’m pretty sure) 500.
A province always contains multiple sites. Some of these are lightly-guarded farms, others are part of civilian infrastructure, still others are heavily guarded military installations.
Taking over some sites will get you bonuses in that area, such as battery regeneration for power plants, more efficient Liquid Fix usage for farms, and the almighty Liquid Fix replenishment at logistics centres. Make those a priority!
Sites can be recaptured from you by enemy patrols, unless the province is being contested. When the province is being contested, the Home Guard moves in and guards all the sites you’ve already captured, leaving you to focus on the main objectives.
The difficulty of a site is shown next to its icon.
Sites have a detection radius. Most will send a patrol or two after you if you stay within that radius for too long and get detected. Hence the stealthiest way to capture a site is to approach as close as you can with stealth, then once you are in the detection radius, switch to overdrive.
— Roaming Enemy Units
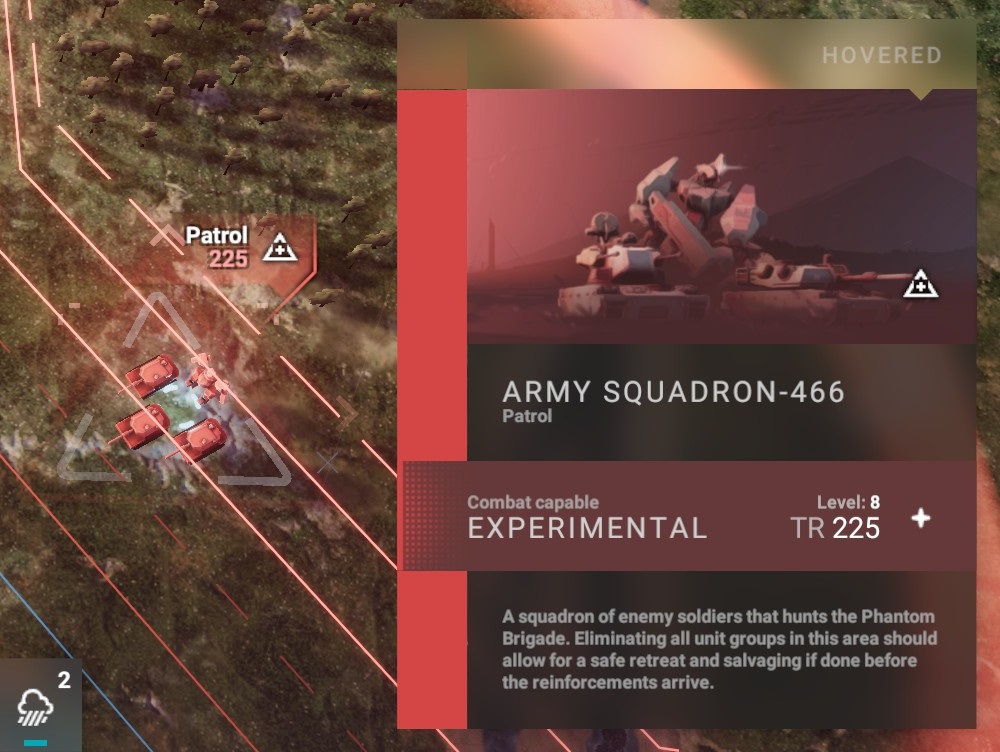
There are two main types of enemy unit that move around the map: patrols and convoys.By hovering over the icon, you get a summary of the unit, its abilities, and even its composition.
These are usually comprised of a single walker alongside two vehicles. Patrols will move between points on the map and will chase you if they detect you. If other sites or units detect you, they may also radio in your location and send patrols after you.
If you enter combat with patrols actively chasing you, they will show up as reinforcements if you take long enough in combat.
Elite patrols are bigger, better, and all-round nastier, with a larger detection radius to boot. The loot is correspondingly better, though.
Convoys flee when they detect you and come in three flavours.
Repair convoys contain supplies like batteries and / or Liquid Gold Fix. Finding batteries can resupply your energy to let you stealth / overdrive just that much longer, whereas finding Liquid Fix lets you repair in the middle of enemy territory.
Equipment convoys carry parts, blueprints, and other such tasty loot. Always a good idea to hunt them down, since they’re the best source of rare and uncommon components.
Finally, reinforced convoys are just like regular convoys, but with more guards.
Since convoys run away from you, it’s necessary to use a bit of planning in your approach. The best way to ambush them is to attack from their front. They will be moving towards you, and so you will spend less time in their detection radius.
Use the same tactic as with sites. Approach in stealth until you get to the edge of their reduced detection bubble, then overdrive the rest of the distance. Remember to approach from their front! It makes things a lot easier.
— Contesting
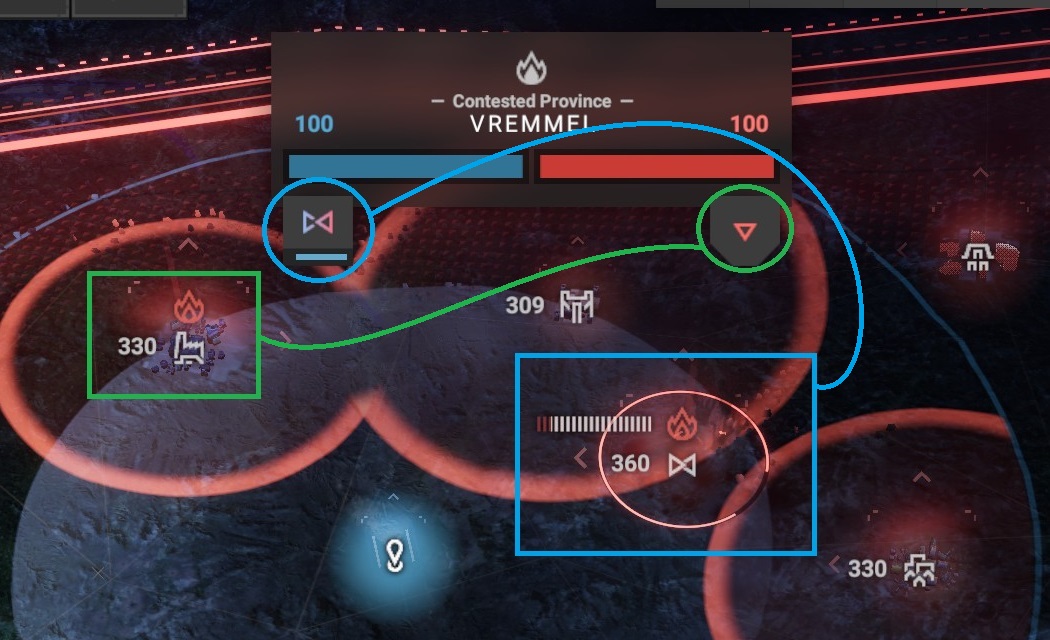
Contesting a province frankly doesn’t change much. If you’ve taken over some sites, more will spawn and act as objectives.After some time, the Home Guard will assign you objectives within the province that will reduce the enemy’s ability to hold the province. These appear as triangle icons on the right side of the escalation popup, and clicking on them will jump the camera to the location. They will also have a flame icon above them. Enemy-held sites and enemy units can both be designated as contest objectives.
Every now and then, the Home Guard will get into a battle. These are timed events that will reduce your ability to contest the province if ignored or failed. Success will reduce the enemy’s ability.
This means that you have a limited amount of time to contest a province. Either you will fail too many warzones and lose, or complete enough objectives quickly enough to win.
When you successfully liberate a province, enemies in all other provinces level up. This is the only way that enemies get permanently stronger.
8. Building Power
From the beginning, you’re outgunned, outtonned, and outnumbered. How do you pump those numbers up and get a fighting chance?First: there is no lose condition in Phantom Brigade. You can take as much time as you want and you will not lose any progress unless your units get destroyed in battle. Even if you lose all your pilots, units, and supplies, resupplying at a friendly base will give you two machines and two pilots for free.
Second: enemy power levels only increase when you liberate a province. They do not scale up when you upgrade your equipment. Thus, it is entirely possible to level up way past enemy levels and stomp them into the dust.
But that won’t be for some time yet. When you’re starting out, you’re very vulnerable and probably still inexperienced with combat. So don’t rush into liberating an enemy province. Hit some convoys and patrols, skip town to the next province over, and always remember you can retreat at any time for no cost whatsoever.

I have to reiterate this. Back away from fights you can’t win. Hit that “run away” button and get out of there. Your equipment and pilots are valuable, so don’t throw them away.
You can only retreat while in a hostile-held province.
If the retreat button isn’t available, try switching quickly between travel modes (overdrive, cruise, stealth). That usually fixes the issue for me.
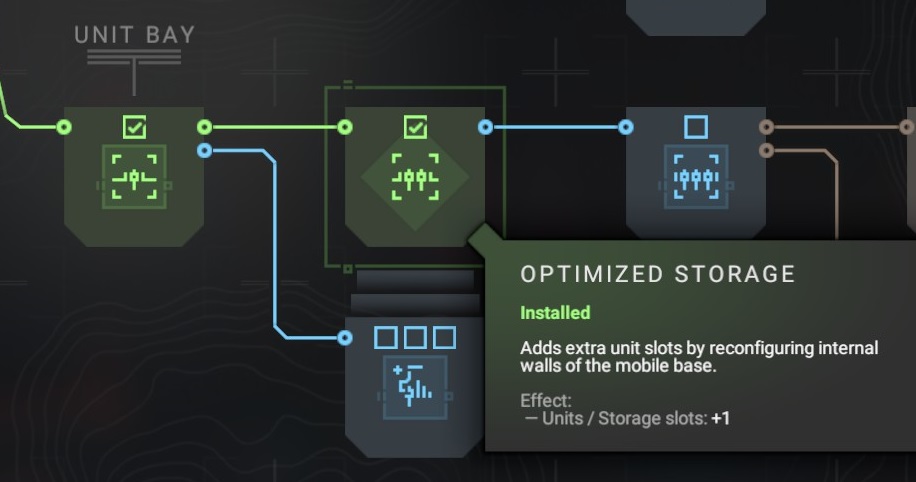
Arguably the most important upgrade you can get is the one that unlocks the fourth unit slot in your base. This lets you deploy four machines to each battle, drastically increasing your firepower, survivability, and tactical options. Save up for it and get it.
The next one after that, however, is quite bad, since the maximum number of units you can deploy is 4. and that upgrade carries with it a significant penalty to movement speed. I find that mobility is far more important than having backup machines.
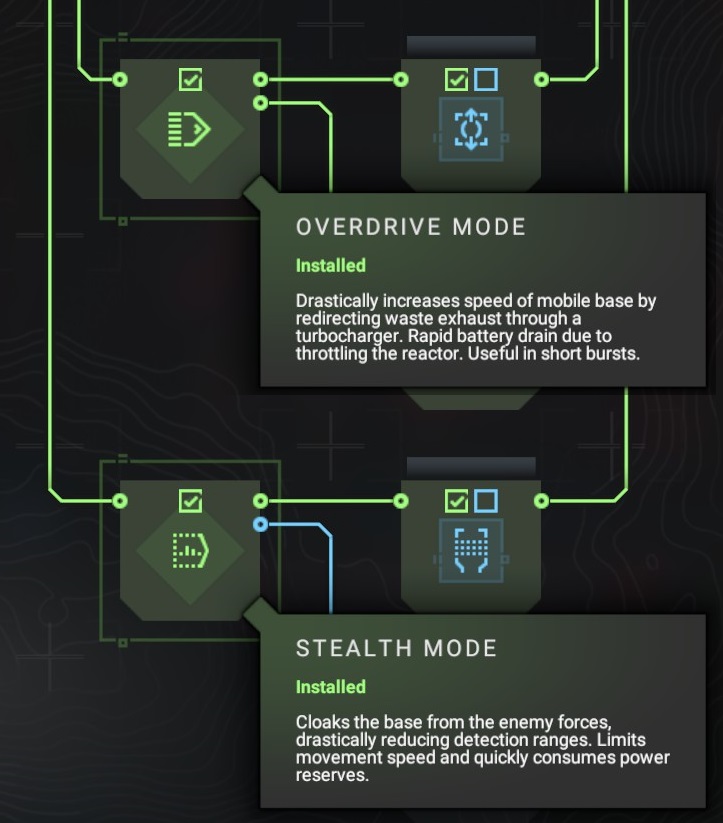
The next most important upgrades you can get are overdrive and stealth. Overdrive is more useful because it reduces travel time, but both combined can let you finally get the drop on those cowardly convoys, or creep up to a base without alerting it and drawing in waves of reinforcements.
With these tools in hand, go break some machines. The only way for you to get more resources is to win combat, so go out and win some.
This is probably the most important concept. Equipment and resources are tough to come by. You can’t rely on replacing losses with salvage– it’s unsustainable. So avoiding loss in the first place is your best way to accumulate power.
The most immediate effect of getting better equipment is better stats. More damage, more integrity, better range, fancier guns, you name it. Better equipment lets you fine-tune your playstyle or optimize for it. Even if you just want to do more of what you’re doing, having better gear never hurts.
The other bonus of getting better gear is that your units’ levels go up.
Level is determined by the average of all equipped parts, rounded off somewhat inconsistently. For example, a unit with level 10 weapons and arms and level 9 body and legs will have an average closer to 10, and so its level will be calculated as 10. If you have a 50-50 split, it’s inconsistent, likely due to floating point shenanigans.
Leveling up has two main benefits. First, it lets you build better equipment. Your workshop’s crafting level is the average level of your units plus 1, but once you reach a certain level, it never drops back down. Yes, the tooltip in the workshop menu is lying to you. Liberating provinces does nothing for workshop level.
Second, a higher-level unit gets hidden buffs to damage and resistance against a lower-level unit. Once the level difference gets high enough, you start to utterly destroy your enemies while taking little to no damage in return even while standing still in the open.
Higher level enemies also get these buffs, so don’t get overconfident.
Enemies only scale with their province difficulty. They do not scale with your own equipment level. This means that you will never become relatively weaker by improving your equipment. Upgrade away!
Finally, unlock blueprints to open up more options in the workshop. The most important effect of this is that you can build rare weapons and parts that you want, rolling for good perks so that you can optimize your builds.
9. What If I’m Stuck?
Retreat and resupply.
Retreat and resupply. You’ll get two pilots and two bare-bones machines. You’ll lose supplies for the privilege, but they will never be taken below 0.
Note that even if you have all the necessary parts in storage to outfit your frames, as long as you complete a resupply with non-combat ready units, they will be outfitted with basic gear at your expense.
Hit easier targets. There’s always an easy target lurking about. If nothing else, hit basic enemy patrols. They come with one walker and two vehicles and are really easy to destroy so long as you go for the lowest level ones.
Remember that there is no time pressure or lose condition, so do not rush into tough battles and bite off more than you can chew.
Once you’re more confident with combat, you’ve got four machines ready to go, and you’ve picked up stealth and overdrive, it’s time to hit a convoy. Approach from the front, stealth right up to the edge of the detection bubble, then overdrive the last little bit, screaming “WITNESS ME” all the way*. Convoys are tougher than basic patrols, but they give much better loot as well. Just avoid reinforced convoys until you’re even stronger.
Finally, to reiterate a point: avoid taking losses. You can recover destroyed parts at the end of a combat engagement, but that cuts into your very limited salvage budget and directly hurts your progress. So play defensively in combat and don’t attack targets out of your league until you know what you’re doing.
* Optional
10. The Base
Your base represents the operational level of the game: how you manage the resources you have in order to win engagements and eventually achieve your strategic goals.You access its functions from the top-left bar. These are Pilots, Units, Inventory, Workshop, and Upgrades.
The main resources you have are Supplies, Uncommon Components, and Rare Components. These allow you to upgrade the base, build new components, and sometimes, pick certain options in random events.
The main way you will get these is by defeating the enemy, whether by raiding convoys, taking over caches and sites, or even just blowing up patrols and scrapping their parts.
Resources cap at 10,000 supplies, 100 uncommon, 100 rare. You can change these values manually by changing the files in <InstallDirectory>\Configs\DataDecomposed\Resources specifically components_r2.yaml, components_r3.yaml, and supplies.yaml.
Reputation determines how many times you can call for Home Guard assistance. Win the fight without losing a single Home Guard unit, and you’ll get the point back for free. Usually one walker and two vehicles will show up.
Hope represents how long you can contest a province. In practice I believe it reduces the penalties for failing warzone objectives, but I haven’t really tested it.
Smoke is a consumable that lets you stun an enemy unit and avoid combat. You need to build the upgrade for the base in order to be able to build and use smoke.
— Pilots
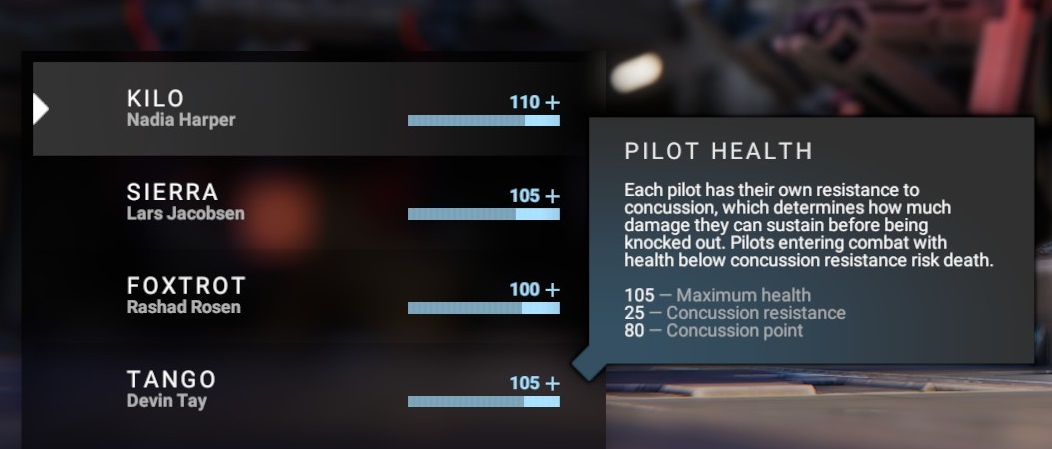
The pilots screen gives you an overview of, well, your pilots. As the screenshot says, each pilot has their own resistance to concussion; this is their concussion health stat in combat. Their maximum is determined separately.Concussion damage carries over after the battle, even if the pilot was not actually knocked unconscious, and slowly heals over time until the pilot is at their maximum health. The next time they go into battle, they will “take into battle” as much health as they can, up to their concussion resistance limit.
So a pilot with less total health than their concussion limit will not enter battle with a full health bar, and if they are reduced to 0 health, they will die.
“Health” in fact also represents morale, and various random events will modify pilot health, either raising or lowering it.
Resting and resupplying will restore all health back to maximum.
On the right side of the pilots screen, you can click “Edit” to change pretty much anything about your pilot short of their personality and hometown.
Fun fact about the random callsign generator: callsigns are taken from the NATO phonetic alphabet, except for “Zero” (what) which does not belong there. Also, you may have heard “Indigo” being used for “I”, but the proper code word is “India”.
11. Units
The main units screen. Gives you an overview of the frames and machines you currently have built. Any warnings or fatal errors, such as damage to the frame or missing parts / weapons, will show up as orange and red warnings over the unit’s name.Double-click a unit to customize it.
A maximum of 4 per mission. You can buy further upgrades to build and store more frames, but they will not be usable in battle. They are there mainly as spares in case you don’t have time to repair your frontline squad between battles.
— Customization
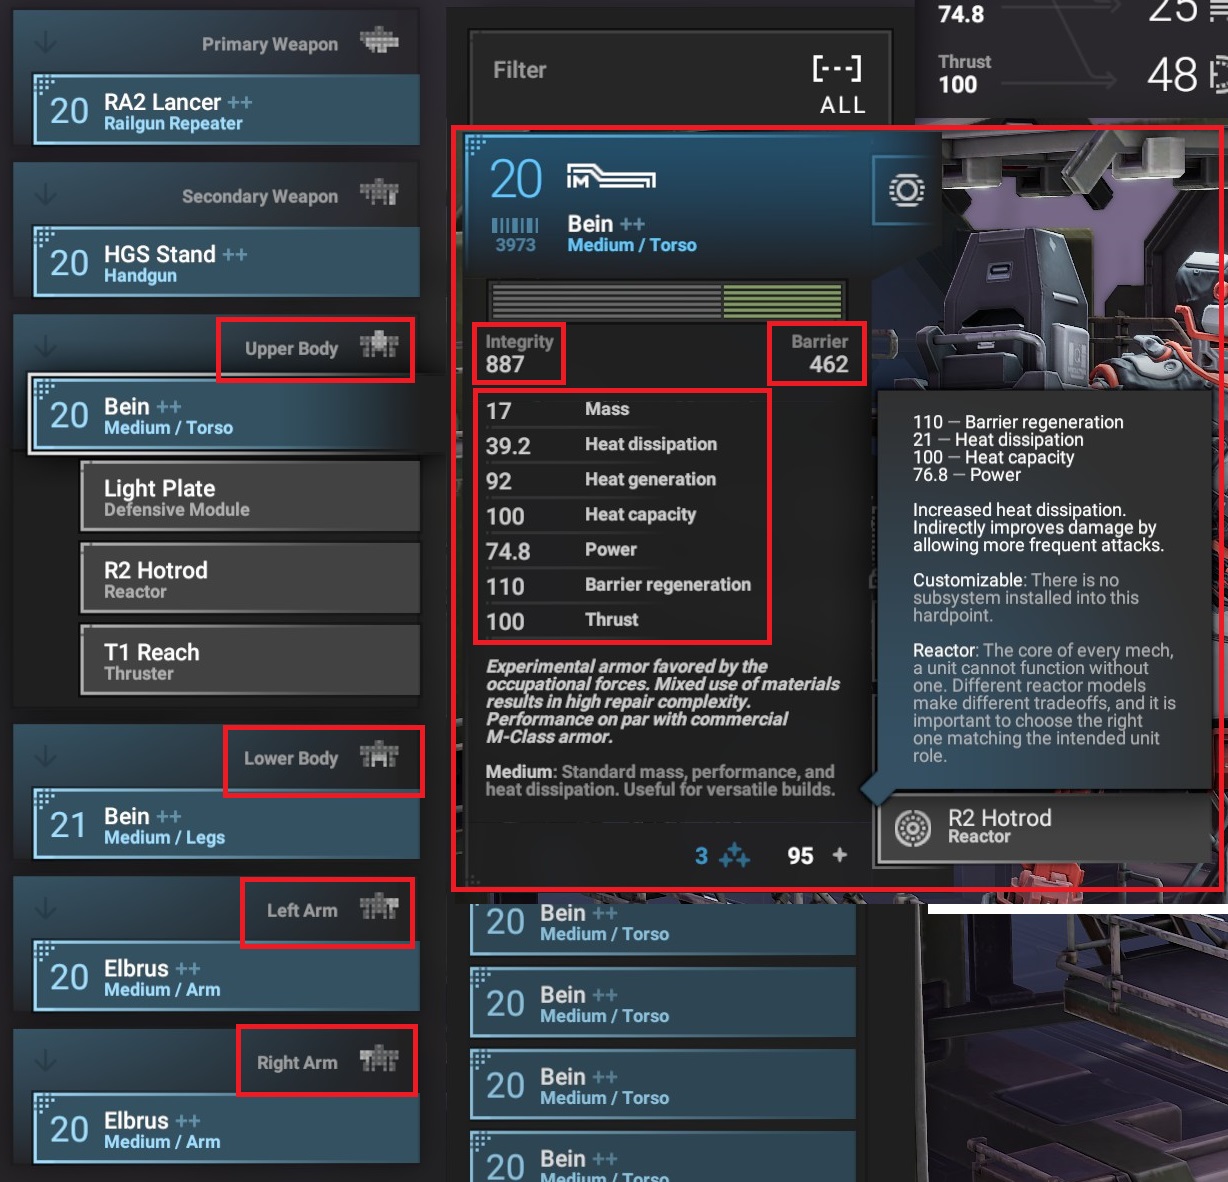
What in the Sam Hill is going on here? Don’t worry, let’s take it bit by bit.On the far left is the list of parts currently equipped. A machine needs all four body parts and at least one weapon in order to be deployed into battle.
The next column is the list of parts that can be equipped to the currently-selected slot.
This list can be sorted by group (type, e.g. assault rifles or Elbrus torsos), quality (rare, uncommon, common), or level, either ascending or descending. Additionally it can be filtered for specific part types or manufacturers.
Right-click or double-click an equipped part to strip it, and double-click a part in storage to equip it to that slot.
When you click on an equipped part, if it has any customizable slots, they pop out underneath it in the far left menu. You can equip and unequip modules in the same way as equipping parts.
Some modules may be locked, meaning that you cannot customize them. Generally, rare equipment will have one locked slot containing a part-specific perk, and have 1-2 customizable slots. Uncommon equipment may have 0-1 customizable slots, and common equipment will almost always have its modules welded in.
This is not dependent on level.
Rarity only affects how many module slots a part has (fixed by type and rarity), your chance of getting a part with good perks, and provides a flat boost to stats.
These slots will always be the same type for the part type and rarity, e.g. a rare Elbrus arm will always have customizable Offensive and Defensive slots.
Some weird stuff goes on with perks– it’s possible to roll weapon perks on body parts. These will not contribute towards actual weapon effectiveness and are quite useless. Generally the most useful body part perks will be Improved Cooling and Composite.

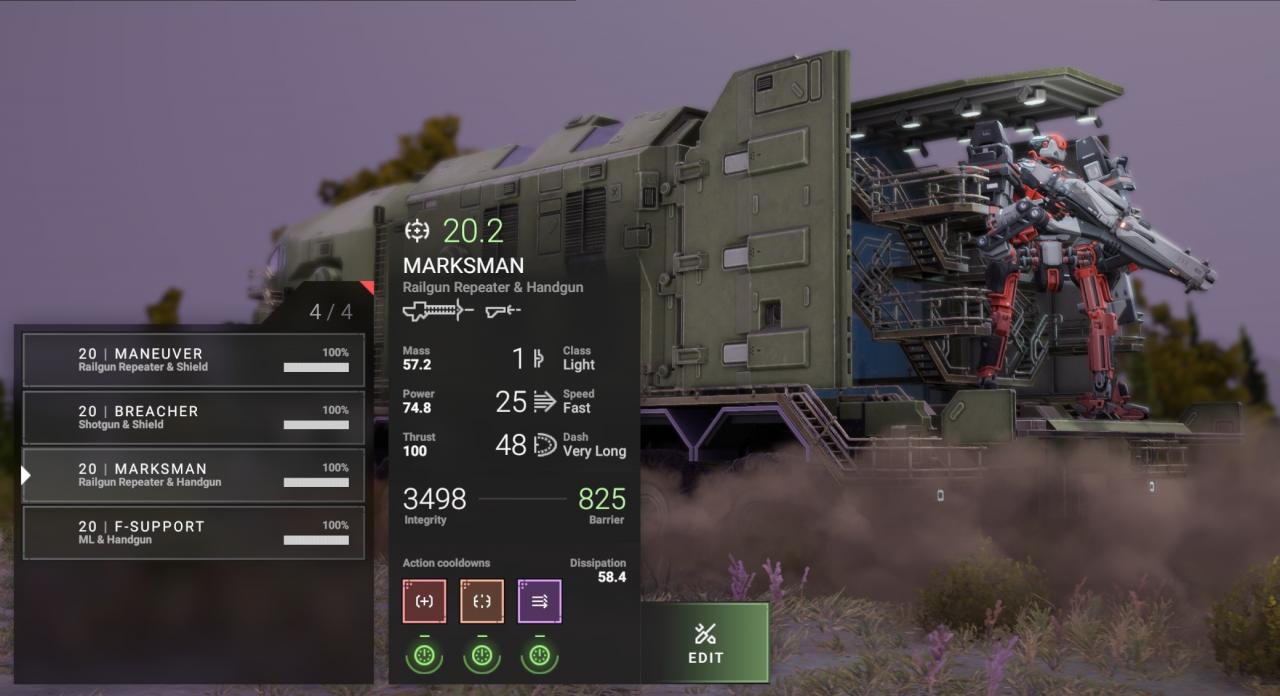
The bar at the top of the screen shows a brief summary of the unit’s current stats.
Level: affects hidden buffs to damage resolution, contributes to workshop crafting level.
Mass, Power, Thrust: contribute to the unit’s mobility. Speed is determined by mass and power (mass = power gives you 16 speed) and maxes out at 28. Dash distance is determined by mass and thrust and maxes out at 48.
Weight class determines how the unit reacts when colliding with something else. A heavier unit ignores collisions with a lighter unit and causes the lighter unit to crash, ending its action. Remember that raising a shield will increase your weight class.
Speed and dash classes have no in-game bearing. Only the numerical value matters.
Integrity and Barrier represent how tough your unit is.
Ignore the action cooldown part– it is inaccurate and the numbers are not calculated correctly. This will be explained in greater detail in the section “Understanding Heat”.
Heat dissipation is how much heat you dissipate per second.
In order to fire a weapon safely, Heat generated – (Dissipation × Action duration) < Heat capacity.
How often you can fire a weapon is simply Heat generated ÷ Dissipation. If this is lower than the action duration, this means that your weapon generates heat slower than you can dissipate it, and so you can continuously fire that weapon without building up any heat.
— Weapon Statistics
All the statistics presented (except for the aforementioned dirty lies) are important to understanding how your weapon behaves. The thing is, slmost of the stats are actual raw numbers.
Let’s start off with “Damage / hit” and “Shots & fragments”. Damage per hit is really damage per projectile, assuming 100% damage. Shots and fragments is how many projectiles are generated; for example a shotgun firing 2 shots with 24 fragments each generates 48 projectiles per firing action.
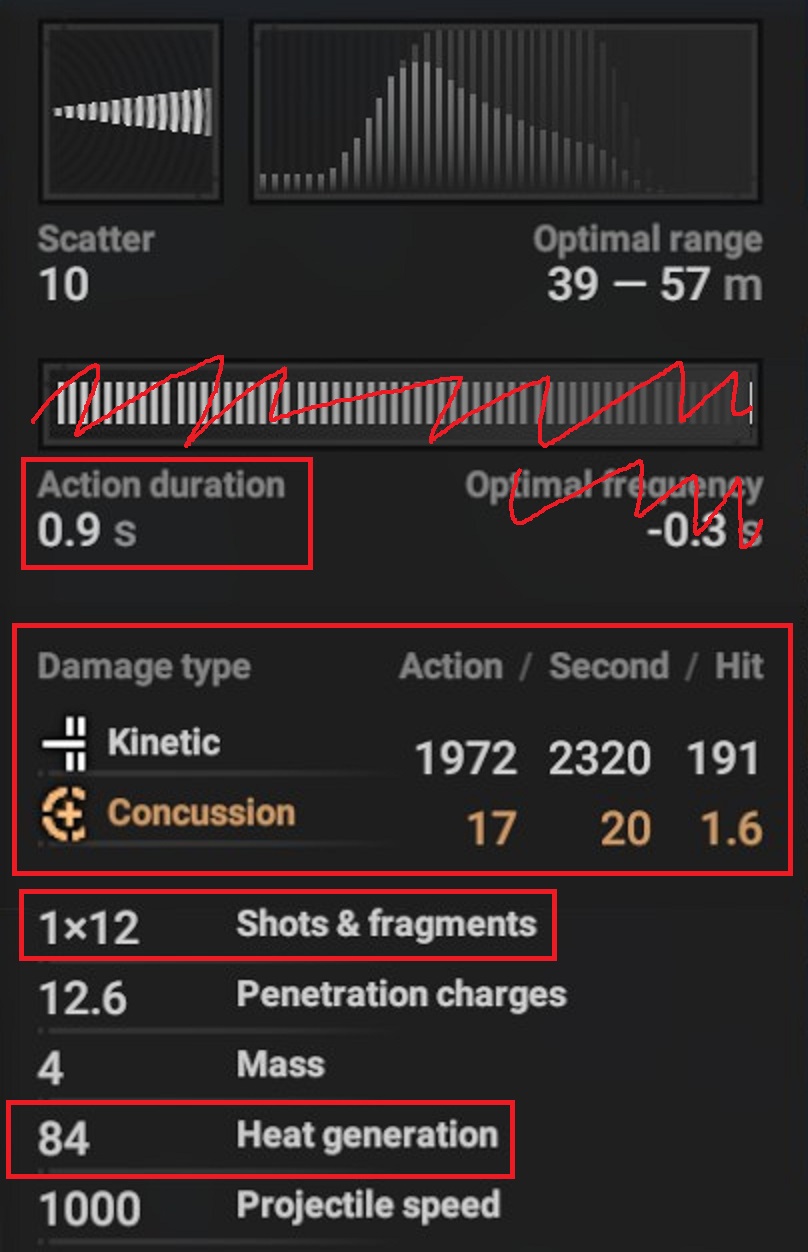
In this case, our RF Flux fires 1×12 projectiles doing 191 damage each, for a total of 2292 damage per action.
“But wait!” I hear you say. The “Damage / action” number shows 1972! What’s going on? Well, that number actually accounts for optimal range and scatter. At the range which it does maximum damage, it will have scattered enough that not all its projectiles are expected to hit its target. So at the optimal range, it’s actually doing 80-90% damage. This is reflected in the “Damage / action” statistic.
What about “Damage / second”? It seems straightforward– 2292 damage in 0.9 seconds means 2… oh. 2546 damage per second. Why is it showing 2320?
First, rounding errors. Phantom brigade only displays so many decimal points, and 0.9 seconds could be anywhere from 0.851 to 0.949 seconds.
Second, the “Damage / second” statistic actually takes into account heat generation and dissipation. If your machine is capable of sinking more heat than the weapon will ever generate, the DPS statistic will show its full value. Otherwise it will be lower than maximum because you will not be able to fire your weapon constantly.
… At least, that’s the idea. In practice, heat calculation in the statistics screen seems to be slightly off, so don’t worry too much about that and do your own math.
Reading the range graph is essential to figuring out what exactly your weapon is doing. Thankfully…
— Range & Scatter
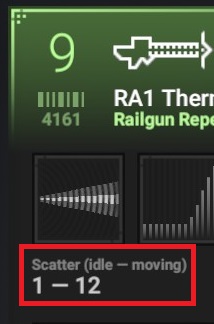
Scatter represents the cone, in degrees, that all shots are randomly shot out in. Some weapons have a separate value for idle and moving scatter, meaning when your unit is stationary and when it is running.A lower scatter value is generally better, letting you put more rounds on target and possibly even on the same part. That said, a high scatter value is not a particularly huge problem at close range, so don’t worry about shooting stuff in your face if you need to. The more important consideration at close range is the optimal range graph.
The optimal range graph is actually two graphs at once: damage falloff, and optimal range accounting for scatter (idle scatter, if there are two values).
The damage falloff graph is the darker grey graph in the background, and represents how much damage a projectile will do at a particular distance, with the top of the graph being 100%.
The light grey graph in the foreground represents your weapon’s optimal range, accounting for how much it will scatter. This RF Flux actually has an optimal range where its projectiles are doing 80-90% damage, since beyond that, you lose more damage to scatter than you gain from increased projectile damage.
Range modules simply stretch out the damage falloff graph. They do not influence scatter.
This means that for high scatter weapons, improving their scatter contributes far more to effectiveness and effective range than actual range modules or even damage modules, for a given range band.
Other weapons affected in this way are the HG2 Firestarter, SG2 Shred, SG3 Heavy, SG4 Semi, and the SR1 Midway(!).
The above graph is for a RA2 Lancer. Note the flat portion of the weapon’s effective range: it will happily do 50% damage to units from point-blank on out.
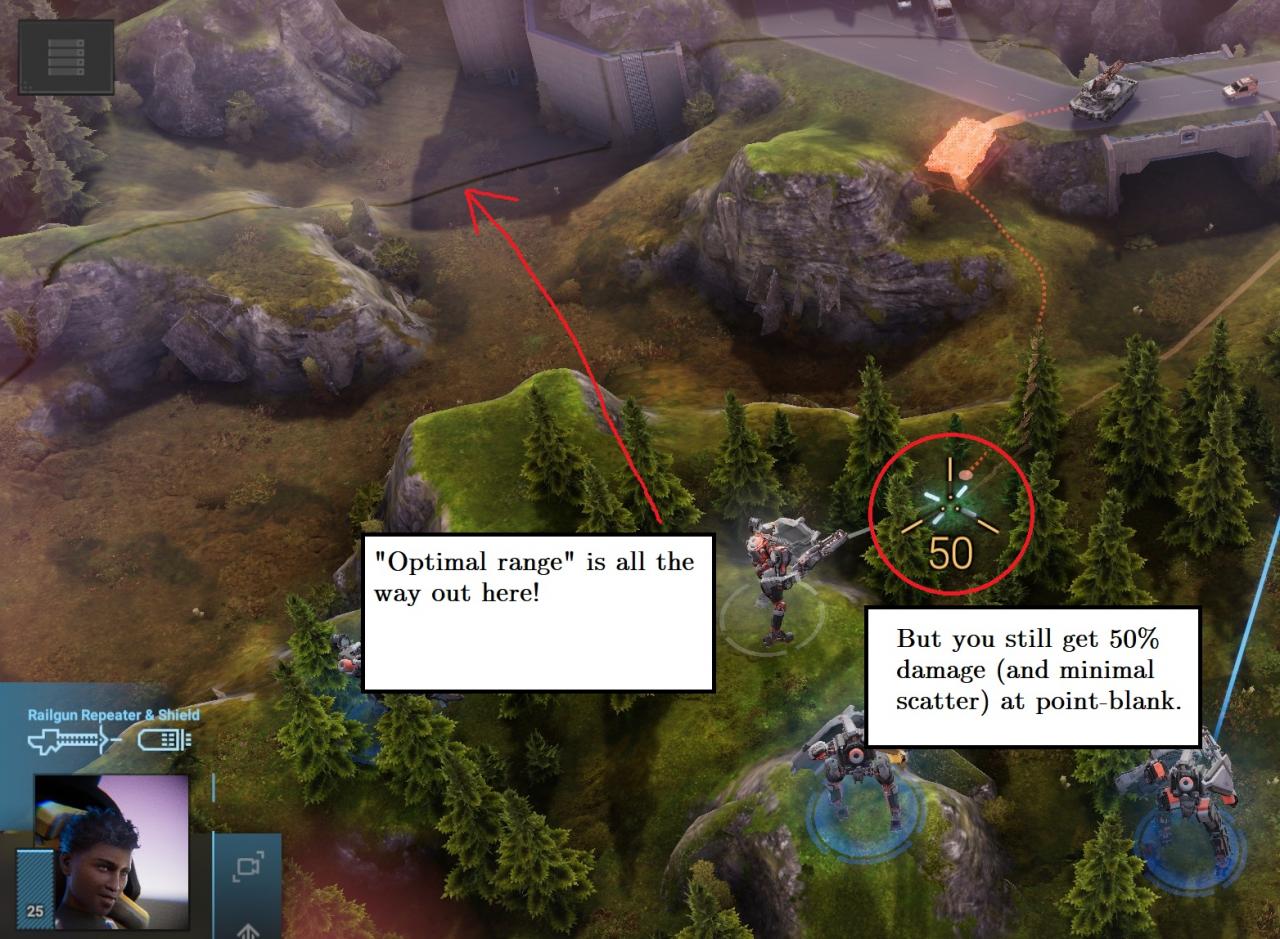
Don’t be afraid to shoot at things outside of the optimal range bands. Hold down CTRL to get detailed statistics and see what you’re actually doing when you fire at something.
— Understanding Heat
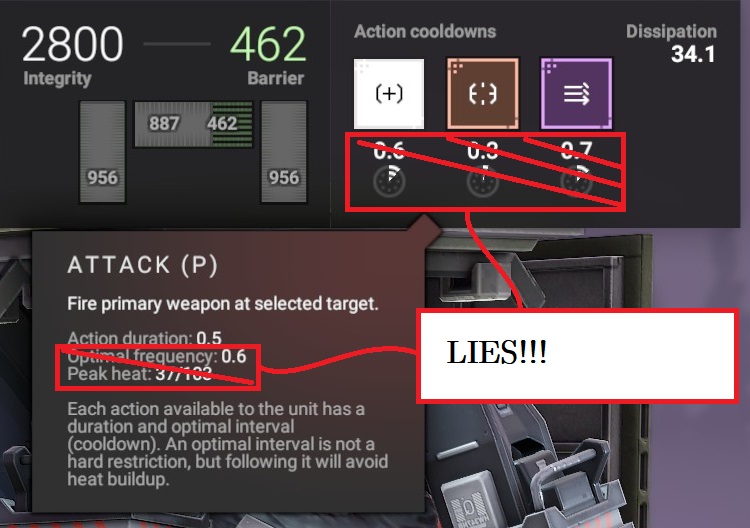
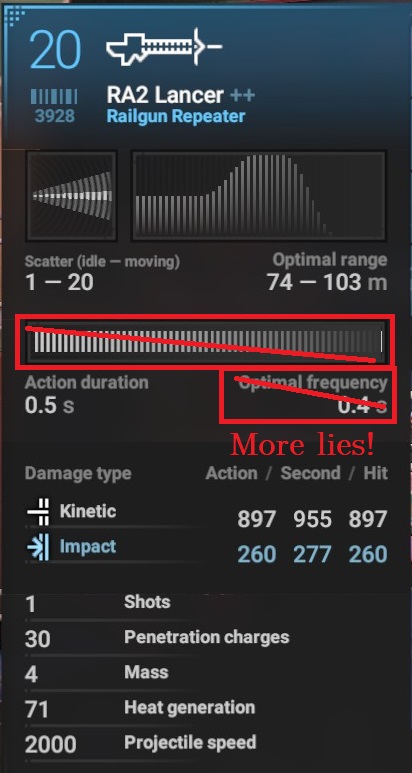
Ignore the heat predictions in the item screen, they’re wrong.I’m not kidding. Thankfully, you can do your own math!
Sustained frequency is an absolutely simple calculation: activation heat divided by heat dissipation. If your action duration is higher, that’s your sustained frequency.
The reasoning is absolutely simple: you need x amount of time to sink x amount of heat generated.
Taking the example above:
This RA2 Lancer generates 71 heat over 0.5s. The unit has a heat dissipation of 34.1 per second. Note that because of the action duration, the weapon effectively generates 142 heat generated per second, for half a second.
71/34.1 ≈ 2.09
You can fire the weapon every 2.09 seconds without net heat buildup. Accounting for the 0.5s action duration, that’s a 1.6s downtime.
However, that’s not the only consideration. You have a maximum heat capacity and will start to take overheating damage when exceeded.
71 – (34.1 × 0.5) = 53.95
Firing the RA2 once generates 53.95 excess heat. Assuming your total heat capacity is 100, you will need to wait until your total heat is 100 – 53.95 = 46.05 to safely fire it again. This requires you to wait (53.95 – 46.05) ÷ 34.1 ≈ 0.23 seconds.
Finally, you will take 100 ÷ 34.1 ≈ 2.93 seconds to fully cool down.
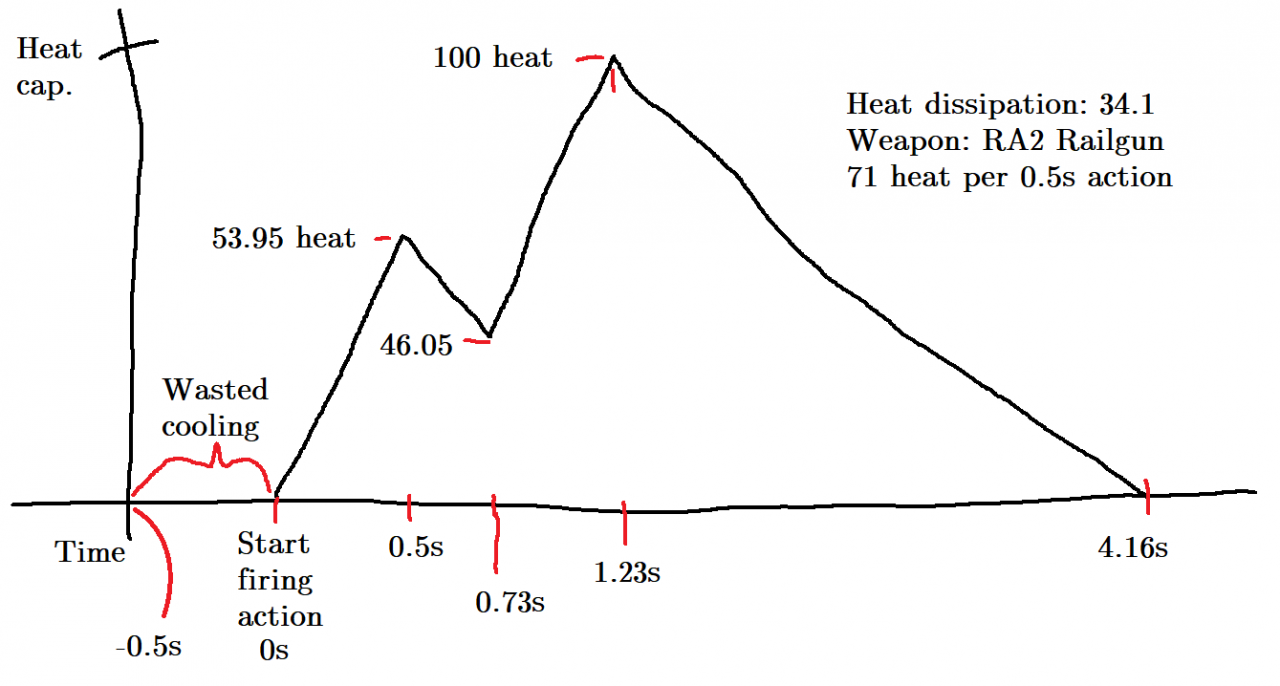
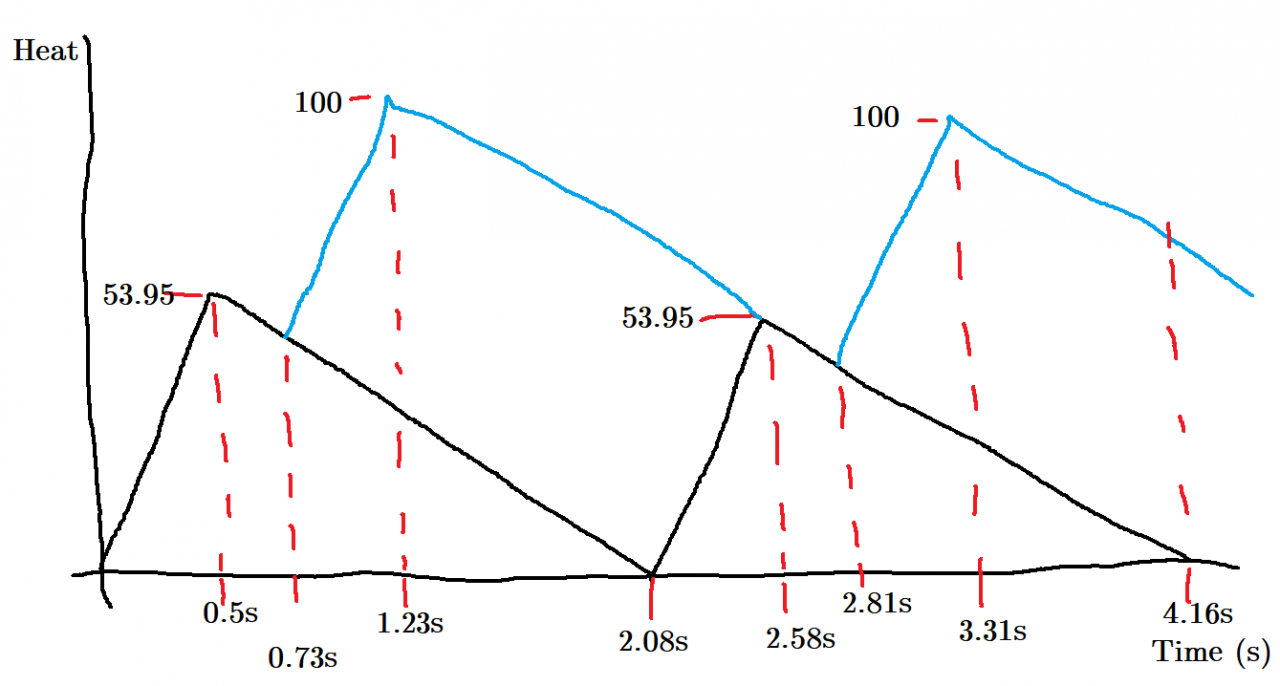
Note that the total time, 4.16 seconds, is (accounting for rounding errors) the same as double the calculated 2.09 seconds from earlier! Because of heat capacity, you don’t need to fire only when your heat reaches 0. You can fire with built-up heat and not waste any cooling, which lets you plan your attack windows and still remain heat-optimal. You just have to eventually pay the piper and cool off.
Many weapons generate more heat per action than your heat capacity, so you will rely on being able to sink enough heat over the weapon’s action duration in order to stay below max heat. Another example, with the UHB Solarburst this time: 296 heat over 4s.
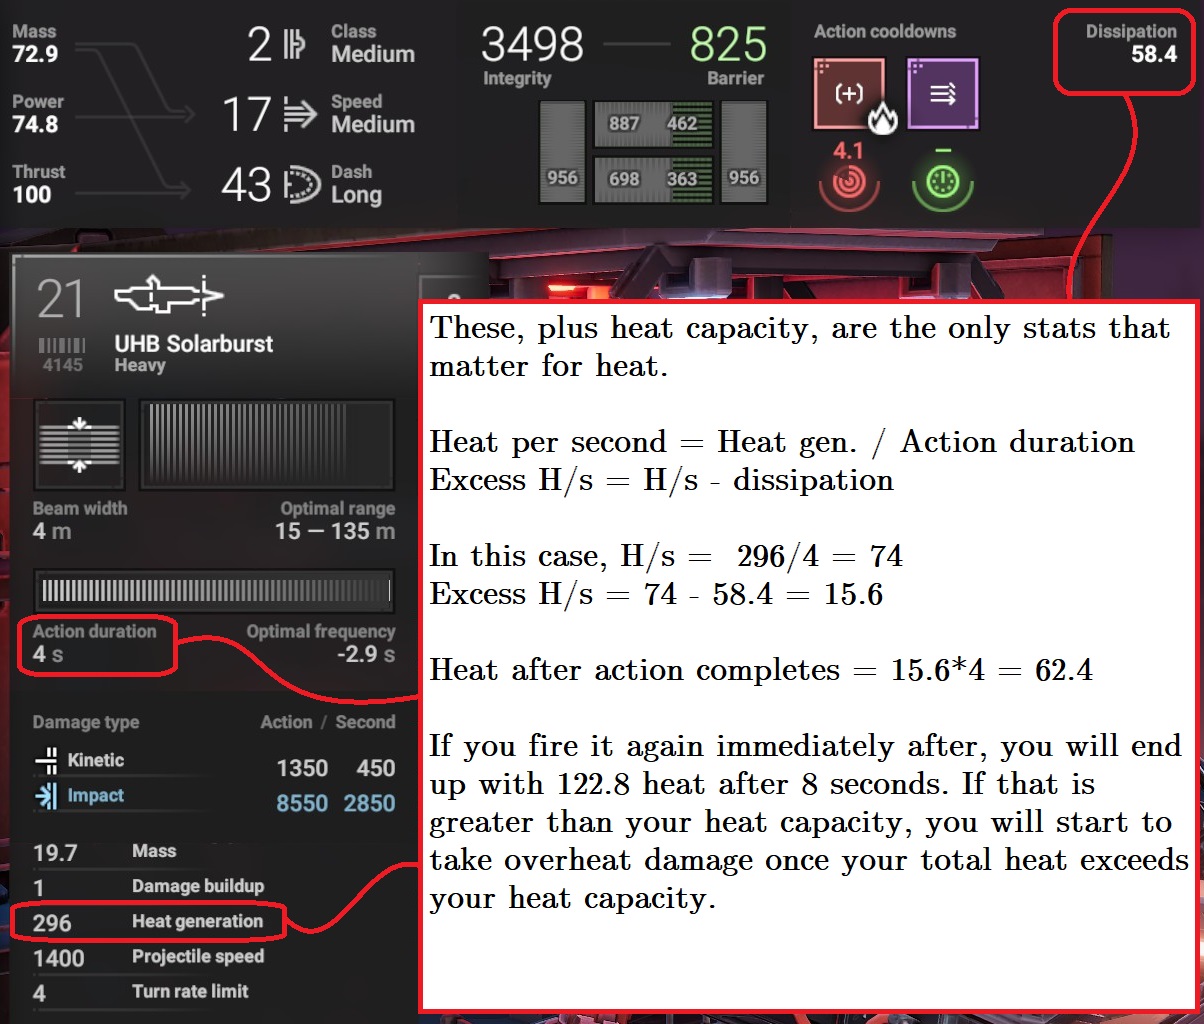
296 heat / 4s = 74 heat per second
Assuming a 100 heat capacity, to avoid overheating, your minimum heat dissipation must be able to get you to 100 total heat at the end of the action, in other words to sink 296 – 100 = 196 heat over 4 seconds. This is 49 heat per second.
We have 58.4 per second, more than enough to avoid damage. Firing the Solarburst will generate an excess of 74 – 58.4 = 15.6 heat per second, ending the action with 15.6 ×4 ≈ 62.4 heat.
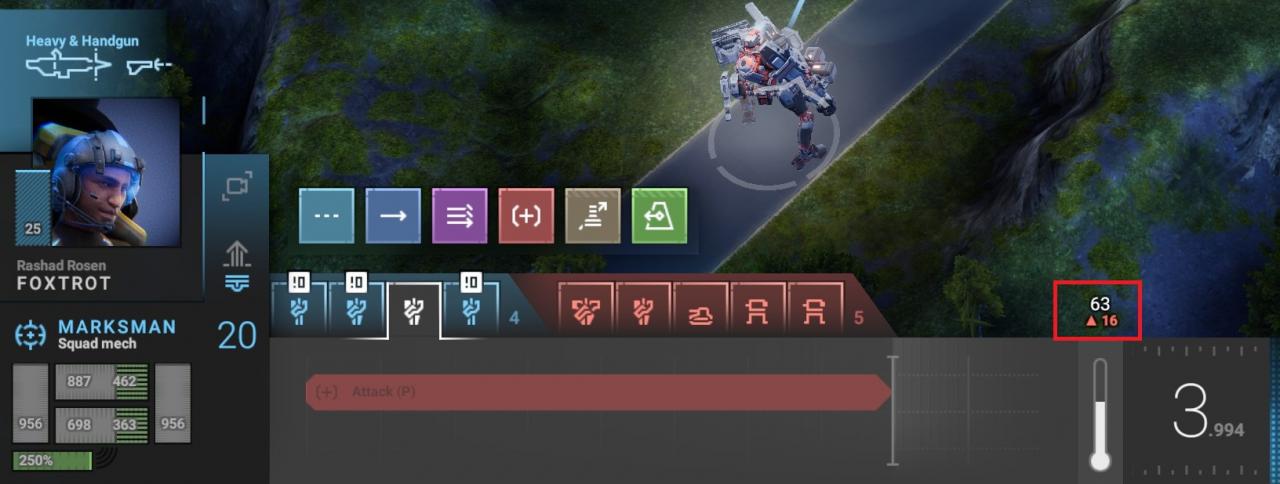
This is the actual calculation used in-game. The overheat warnings in the units tab are quite inaccurate.
If you had only 34 cooling:
1s: 74 – 34 = 40 heat excess
2s: 40 + 40 = 80 heat excess
3s: 120 heat excess, overheating
4s: 160 heat excess, overheating
You would be overheating by the end of the 3rd second and severely ablaze by the end of the firing action.
— Weapon Scaling
Weapons do a certain base amount of kinetic damage per shot. This amount increases by 0.25 of the base amount per level. Uncommon weapons get a flat 15% bonus on top, rare weapons get a 30% bonus.
That’s it. Nothing else goes into damage scaling.
To the best of my knowledge only kinetic damage scales, but I haven’t looked into it too much. Rarity grants a bonus to all damage.
E.g. a common level 1 SGC Blast does 8 damage per fragment over 1 shot and 24 fragments, for a total of 8×1×24 = 192 damage. Per level this increases by 8×0.25 = 2.
At level 2 it will do 8+(1×0.25*8) = 8+2 = 10 damage per fragment for a total of 10×1×24 = 240 damage. An uncommon version would do 11.5 damage per fragment for a total of 276, a rare version would do 13 damage per fragment for a total of 312.
At level 20 the common version will do 8+(19×0.25×8) = 8+38 = 46 damage per fragment for a total of 46×1×24 = 1104 damage.
In other words: Level 1– 100% of base damage, level 5– 200% damage, level 9– 300% damage, level 13– 400% damage, and so on.
TODOBeam scaling follows the same rules, except that instead of firing a certain number of “shots” per action, it fires a certain number of “shots” per second. Mods that reduce a beam weapon’s action duration will also reduce its overall number of shots, making them of questionable utility.
The calculation is not very straightforward. Beams “fire” 30 shots per second whose kinetic damage scales with 0.25 per level as expected. Thus a beam’s raw DPS is simply its scaled kinetic damage multiplied by 30. This is the number you see under “/ Second” if your machine has enough cooling to fire the beam weapon constantly.
Now the numbers get fuzzier once you bring in damage buildup. I’m not sure what the damage buildup number represents, and how exactly it’s affected by action duration mods.
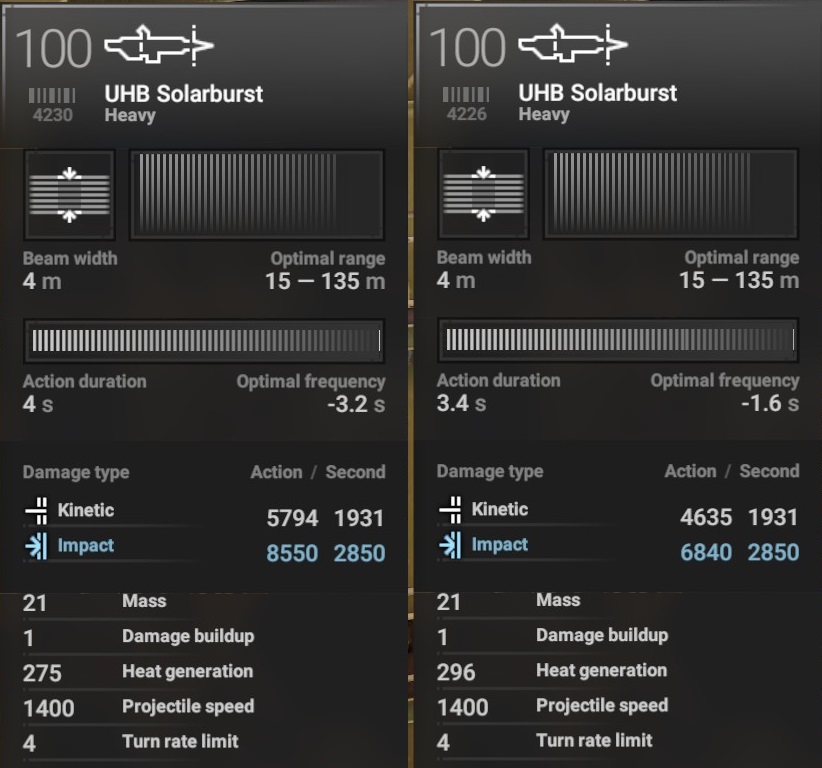
In the example above, the UHB’s base damage is 2.5, which at level 100 is 64.375, and per second is 64.375×30 = 1931.25.
Compare the two UHBs above. The damage for the (left) 4-second action is 1931 multiplied by 3 seconds, and the damage for the (right) 3.4 second action is 1931 multiplied by 2.4 seconds. It appears that shortening the action by 0.6 seconds has cut out 0.6 seconds of full damage time. From this we can guess that after some point, the UHB begins to output full damage constantly.
In contrast, with a BM1 Sunswarm for a 2s action and 2 buildup, the difference between a 2 second action and a 1.7 second action seems to be 0.5625 seconds of full power equivalent versus 0.36 seconds of full power equivalent.
Same for the BM2 Glorydog, which for a 3.5s action and a 8 buildup outputs 0.5625s of full power equivalent.
How does this work? I have a suspicion that the actual damage graph is related to the “Damage buildup” statistic in some way, but honestly I can’t be bothered to do the research. The numbers below cannot be accurate, but they’re a rough illustration of what I’m thinking. A dev should chime in on this.
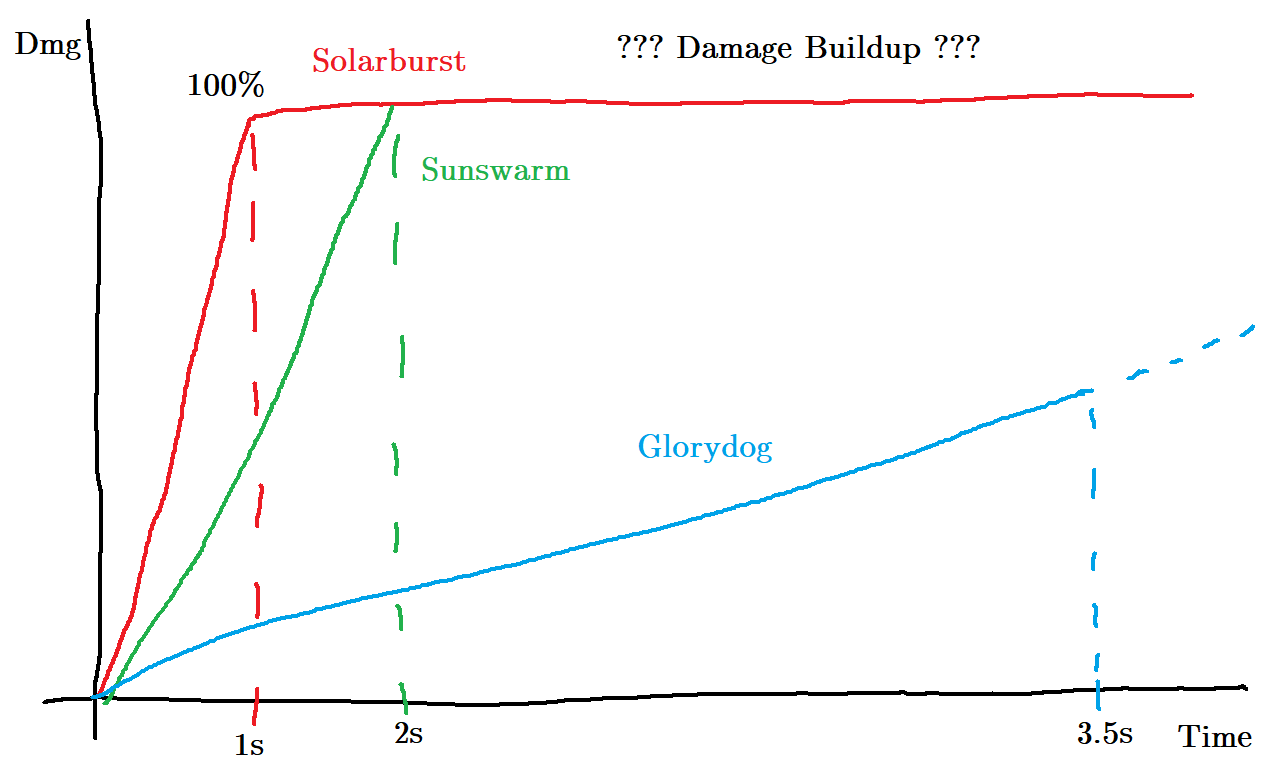
What we can take from this, however, is that perks which shorten a beam’s action time are actually Really Bad. They significantly eat into the amount of damage you do, since damage takes time to build up and shortening the action eats into the full damage period, while massively increasing your heat burden, which remains the same but squeezed into a shorter time.
Since beams fire at a constant 30 “shots” per second, shortening the action does not “compress” the shots, and so you’re dealing far less damage with a shorter action.
When a weapon is generated, first its available slots are laid out. This is solely determined by the weapon type and rarity: a weapon of a specific type and rarity will always have the same slots.
Next, the perk is generated. This is always fixed in place and cannot be removed or customized. Higher rarity gives you a better chance of getting rare perks.
Next, modules are generated. Again, higher rarity gives you a better chance of getting better modules.
For uncommon and common weapons, these modules may be welded in place. Rare weapons will always have their module slot customizable. You can equip any weapon module in any slot, there is no further restriction by rarity.
Some common weapons do not have a second module slot at all.
Finally, the weapon’s level determines its damage, and only its kinetic damage. Scaling is an additional 25% of base per level, and only kinetic damage scales. That is, at level 5 a weapon will deal twice the damage of level 1, three times at level 9, four times at level 13, and so on.
An uncommon weapon gets a 15% bonus to all damage types. A rare weapon gets a 30% bonus.
Dispersing I, II, III: Reduces heat generated. Useful for every build, extremely useful when optimizing for sheer rate of fire.
Force Enhancer I, II, III: Increases kinetic damage. Not as good as Supercharge, but still a great perk.
Precision I, II, III: Reduces idle scatter. Does not affect moving scatter. Strictly inferior to Stabilized.
Quick Loader I, II, III: Reduces action duration and heat generation. Almost always excellent (except on beams). Though it does not increase hard DPS in the way that Force Enhancer does, by reducing action duration it grants an incredible spike to burst damage. Generally inferior to Supercharge outside of extremely specialized builds.
Ranged I, II, III: Increases the minimum and maximum distance of damage falloff, not scatter. A rather bad perk that can be extremely detrimental for certain builds. Note that it does not improve scatter, so weapons with an effective range limited by scatter will be even worse with this perk, since their damage falloff is pushed even farther away.
Stabilized I, II, III: Reduces scatter while idle and moving. Not very useful for most weapons, incredibly good for others (e.g. RF Flux) where scatter is the main limiting factor for damage. Can also improve the spread of an already accurate weapon, making you more likely to hit the same part.
Supercharge I, II, III: Increases kinetic damage, reduces heat generated and action duration. A three-in-one of Dispersing, Force Enhancer, and Quick Loader, though not as efficient as each individual module. Also seems to reduce minimum range and increase maximum range. An incredible perk that can fairly double your DPS and make your more effective in other ways, e.g. by shortening your action window. Almost always the best perk, outside of specialized builds.
Accelerator I, II, III: Increases projectile speed .Situational at best. Since it does not affect scatter, it does not improve the effectiveness of scatter-limited weapons.
Concussive Payload I, II, III: Absolutely hilarious on weapons with high base concussive damage. Make all your foes experience sleepy time. Geneva don’t care ’bout permanent brain damage. Useless on weapons with no concussive damage stat.
Crystal Matrix I, II, III: Increases damage buildup. Only relevant for beams. However, as damage buildup seems to be related to how long it takes for a beam to get to full power, increasing it reduces your damage output. I have no clue how this works.
Demolition Payload I, II, III: Increases impact damage (damage to buildings). Not very useful.
Destabilizing Payload I, II, III: Increases stagger damage. There are so few weapons that deal stagger damage, and it is so rarely useful, that this feels almost like a joke.
Expanded Magazine I, II, III: Increases the number of shots fired by a percentage, rounding off according to banker’s rounding for 0.5– to the closest even number. E.g. on a ML10 Starburst firing 10 shots, Expanded Magazine II fires 12.5 -> 12 shots (12 is the closest even number) while with Expanded Magazine III it fires 13.5 -> 14 (14 is nearer). Does not affect beams or number of fragments on shotguns. Absolutely useless on anything firing 1 shot, boost the damage of anything firing 2 shots (like the SR1) by a hilarious 50%.
Large Payload I, II, III: Increases damage radius and impact radius. Since the increase is by a percentage, it disproportionate improves weapons that already had good blast radii to begin with. Beware the increased potential for friendly fire.
Liquid Cooling I, II, III: Reduce heat generation. Stacks multiplicatively with Supercharge and Dispersing, i.e. 100% * 0.82 (Supercharge III) * 0.85 (Liquid Cooling III). Frequently the best module for general purpose builds, especially on weapons that fire a small number of shots.
Magnetic Bearings I, II, III: Increases turn rate limit for weapons that have them. E.g. with the heavy two-handed weapons and beams. Potentially useful, but only for those weapons, and only against fast-moving targets.
Piercing Round I, II, III: Increases penetration. Only relevant for railguns. Generally overshadowed by other perks.
Reinforced Stock I, II, III: Reduces idle and moving scatter. Situationally useful for most weapons, incredibly good on weapons limited by scatter. For weapons with no damage falloff, this can push their effectiveness far beyond what you might expect. Try it on the SG3 Heavy.
Target Sensor I, II, III: Increases minimum and maximum range. Situationally useful, can be extremely detrimental.
Thermal Payload I, II, III: Increases heat damage to the enemy. Potentially useful on the incendiary weapons, but I don’t use them enough to say.
— Body Parts
Integrity and barrier scale linearly with level, getting a 25% bonus of the base value per level as with weapons. They also gain a 15% bonus for uncommon parts and a 30% bonus for rare parts.Mass affects speed and dash distance, as well as determining how a unit behaves in a collision.
Heat dissipation is simply added up across each individual part.
Heat generation strictly refers to how much heat is generated by using your thrusters, if applicable.
Heat capacity is how much heat the machine can “store” before it begins to take overheating damage.
Power affect speed, along with weight. Who would have thought Jeremy Clarkson was right?
Barrier regeneration governs how much, well, barrier you regenerate per turn. I haven’t done much testing on it, to be honest.
Thrust affects dash distance, along with weight.
Each individual body part contributes differently to these core stats, but the only stats that really matter for individual parts are integrity and barrier. Otherwise they are all summed together and treated as a single statistic for the entire machine.
Modules can further affect these, and torso parts may be able to swap out reactors, which drastically affect a machine’s power and heat characteristics.

Note that Elbrus parts have one more module slot than other models, potentially compensating for their middle-of-the-road stats.
— Body Perks & Modules
Barrier Integration I, II, III: Increases Barrier. Not very useful at low levels, entirely useless at higher levels. It seems to grant a percentage of the base amount rather than the scaled amount, making it even more useless.
Composite I, II, III: Reduces mass. Very useful, especially for machines that do not need additional cooling.
Improved Cooling I, II, III: Incredibly useful. Generally your best choice, unless you need just that bit more mobility to hit 48 dash distance.
Plated I, II, III: Increases Integrity. Not very useful at low levels blah blah.
Modules are divided into Offensive, Defensive, and Mobility. Torsos additionally can mount Thrusters and Reactors.
Capacitor I, II, III: Increases heat capacity. Rarely as useful as simply increasing cooling.
Heatsink I, II, III: Increases heat dissipation at the expense of power. The Mk1 version does not reduce power, and so is numerically the best of the three levels, though if you have excess power, Mk3s can make for some truly busted setups.
Precision Sensor (L/R): Reduces scatter for either the left- (secondary) or right-hand (primary) weapon. Situationally useful, except for certain scatter-limited weapons where it is exceptionally good.
Range Sensor (L/R): Reduces minimum range and increases maximum range. Very good for expanding the range of a weapon in both directions, but does not affect scatter.
Hybrid Sensor (L/R): And there you have it. Improves both scatter and range. Generally the best choice, since it can dramatically expand your tactical options.
Basic Plate: 15% increase to integrity and mass. Not useful, since it does not increase barrier.
Reinforced plate: 40% increase to integrity, 35% increase to mass. The tooltip tells lies. Pass.
Hollow Plate: 15% reduction to integrity, barrier, and mass. Not as useful as Light Plate, but not as punishing either.
Light Plate: Reduces integrity and barrier by 30%, but also lowers weight. Easily the best choice, since mobility almost always trumps durability.
Regenerator I, II, III: Increases barrier regeneration rate. Does not increase the amount of Liquid Fix you can carry into battle.
Booster I, II, III: The holy grail of mobility parts, not the least because they cannot be crafted. The dash distance increase is immense, and the ability to dash 48 units is useful on every single machine, no questions asked.
Generator I, II, III: Increases power generation. Generally worse than Weight Reduction, since power only contributes to speed, whereas reducing mass improves dash distance as well.
Hydraulics I, II, III: Reduces mass in exchanged for reduced heat dissipation as well. Essentially always overshadowed by Weight Reduction.
Weight Reduction I, II, III: Usually the best option if you haven’t maxed out dash distance yet. Reducing mass improves both speed and dash distance. This is a flat reduction as well, not a percentage, so it works equally well on all parts.
TODO
There aren’t that many anyway, go figure it out yourself.
I like my R2 Hotrod reactors and T1 Reach thrusters.
— Body Part Scaling
Body parts follow a different generation scheme from weapons. They are all descended from the Ur-Part, in <InstallDirectory>\Configs\DataDecomposed\Equipment\Subsystems\mech_base.yaml:
Barrier: 675
Heat dissipation: 25
HP: 675
Mass: 74
Then, you go through armor.yaml, which simply multiplies those numbers by 1 (i.e. leaves them unchanged).
Next, every body part is really part of an armor sets, which applies a multiplier to those default values.
E.g. armor_bein_m.yaml:
Barrier: 0.276 × 675 = 186.3
Heat: 1.13 × 25 = 28.25
HP: 0.53 × 675 = 357.75
Mass: 0.94 × 74 = 69.56
And finally, each individual component in an armor part is tracked, but generally they once again apply a universal multiplier to the armor set stats.
Torsos are made of a head, torso, and pelvis. Each arm is made of a shoulder and forearm. Legs are made of two thighs and two, well, legs.
This example is for Bein:
TORSO:
Head: 0.06
Torso: 0.16
Pelvis: 0.13
Total: 0.35
LEGS:
Thigh: 0.0625
Leg: 0.0625
– Subtotal per leg: 0.125
Total: 0.25
ARM:
Forearm: 0.1
Shoulder: 0.1
Total: 0.2
For a grand total of 0.35 + 0.25 + 0.2 + 0.2 = 1.00 of the value of the entire set.
As with weapons, scaling gives a 25% bonus of base integrity and barrier per level.
E.g. in this case, a level 1 common Bein arm would have 0.2×186.3 = 37.26 barrier.
At level 100, it would have [186.3 + (186.3×0.25×99)] × 0.2 ≈ 959 barrier.
A level 100 common Bein torso would have [357.75 + (357.75×0.25×99)] × 0.35 ≈ 3224 integrity.
Mass and heat dissipation do not scale with level. Rarity grants a flat boost to integrity and barrier (15% for uncommon, 30% for rare).
— Optimization
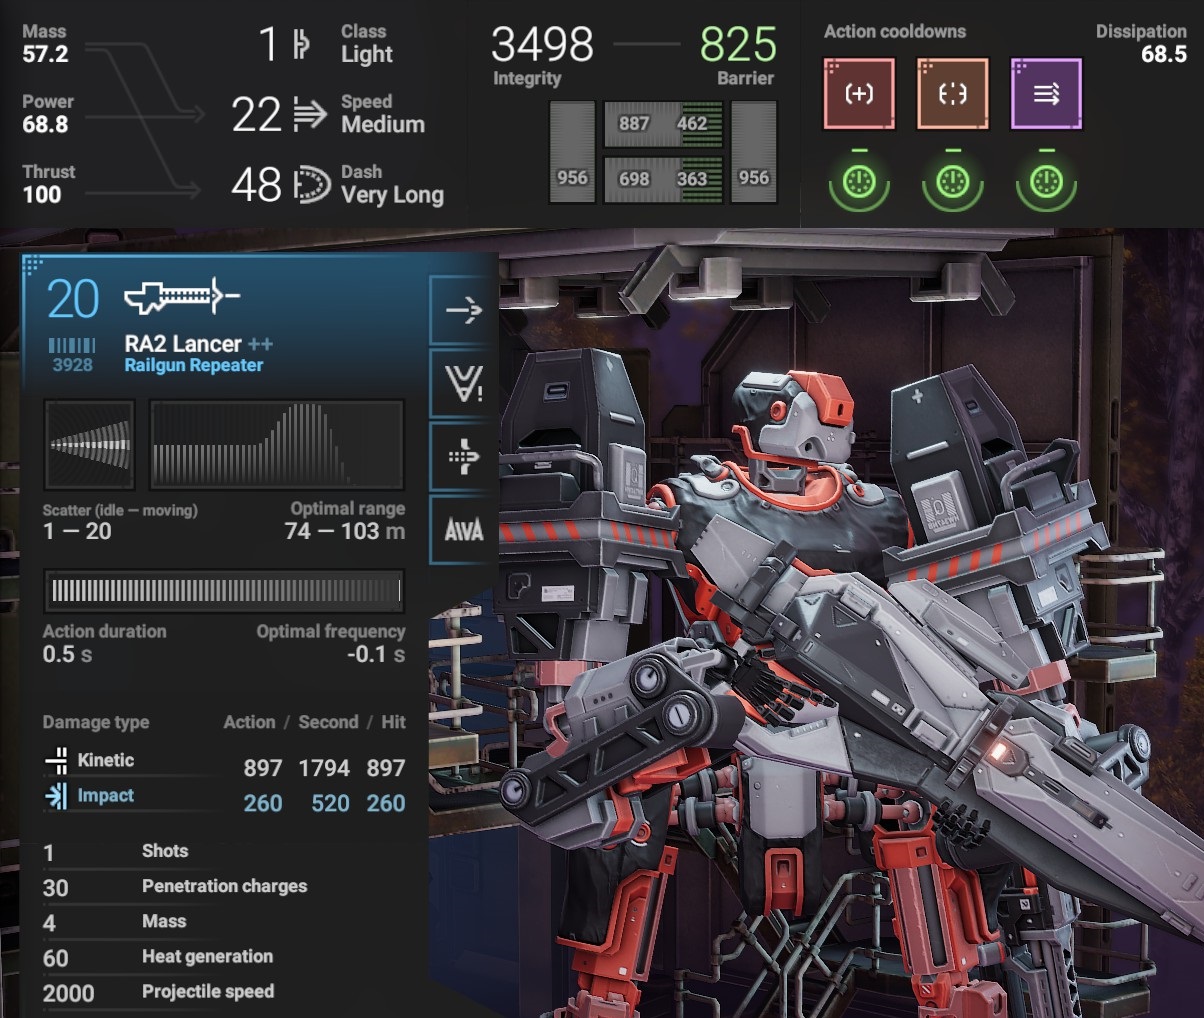
With the right parts and combinations of parts, it’s possible to build some truly wack-out busted machines. This usually relies on combining strengths together to amplify them, rather than spreading them out across multiple areas.For example, this sniper is capable of running quite quickly and dashing the maximum distance, while firing its railgun sniper rifle more than once a second. This was achieved by stacking together Dispersing and Liquid Cooling on the weapon for a 36% heat reduction, alongside a Bein torso and legs with a R2 Hotrod reactor, and then Elbrus arms with Light Plate and Heatsink Mk3. All body parts have Improved Cooling III.
Optimization must be for a goal; there is no such thing as “optimal” in a vacuum. The role you intend the machine to play informs how you build and optimize it.
Want a mobile, responsive flanker? Set it up with weapons that have a wide effective range and no accuracy penalty while moving. Since it’ll spend a lot of time at the front and therefore in cover, you might decide to skimp a little on cooling in favour of range or even concussion. Too much mass and it won’t be able to run and gun properly.
Want a back-row sniper? They probably won’t be running much, but you’ll want them to put out as much damage as possible while still being able to dodge missiles. This means powerful thrusters, massive cooling, and possibly range or hybrid modules.
What about something for machine-gunning down entire city blocks units of enemies? They’ll likely be standing still in the middle of a firefight, so they’ll need additional integrity. Cooling is going to be important, as well as the ability to get out of dodge once your burst is over, so more thrust is always a good idea.
In short: once you get a feel for battle, you’ll understand what you want out of your machines, and hence what to look out for when building them.
In general, Bein parts have the best cooling. Elbrus parts have one additional module slot to offset their average stats, and this can make them the best choice for a slow, e.g. using Elbrus arms to mount heatsinks.
— Tables
TODO
Frankly, I’d rather leave this to someone else to maintain a cloud sheet or something that lets you plug in the values and it’ll calculate all the relevant numbers for you.
Basically, read in the data from <InstallDirectory>\Configs\DataDecomposed\Equipment\Subsystems. Everything you need is in there in the form of YAML (why) files.
Scaling is hideously simple, add 25% of base stats per level. The simplest way to code it is:
scaledStat = baseStat * (level + 3) * 0.25
Uncommon gives a flat 15% bonus, Rare gives a 30% bonus to Integrity and Barrier for body parts, Kinetic damage for weapons.
Calculating armour values is a little less straightforward. Armour parts are descended from a lineage:
mech_base.yaml -> armor.yaml -> armor_<type>_<class>.yaml -> armor_<type>_<class>_<component>.yaml.
mech_base.yaml contains the base stats for all armour pieces:
Barrier: 675
Heat dissipation: 25
HP: 675
Mass: 74
Each stage applies a multiplier to the stage before it. E.g. armor_bein_m.yaml:
Barrier: 0.276 × 675 = 186.3
Heat: 1.13 × 25 = 28.25
HP: 0.53 × 675 = 357.75
Mass: 0.94 × 74 = 69.56
armor_bein_m_shoulder.yaml:
Barrier: 0.1 × 0.276 × 675 = 18.63
Heat: 0.1 × 1.13 × 25 = 2.825
HP: 0.1 × 0.53 × 675 = 35.775
Mass: 0.1 × 0.94 × 74 = 6.956
A torso is made of a head, torso, and pelvis for a total of 0.35. Each arm is made of a shoulder and forearm for a total of 0.2. The legs are made of two thighs and two legs for a total of 0.25.
Heat is equally simple, a weapon generates its “heat generation” amount over the course of its action duration. Heat dissipation is per second.
12. Inventory
It’s possible to play the entire game without ever entering the inventory screen. Heck, I didn’t even know it existed until I wanted to scrap a part and realized that I couldn’t do it from the units screen.
This really is the main use of this screen– to scrap old parts and detach modules in bulk.
All the relevant controls are at the bottom of the screen. There’s not much to say about it.
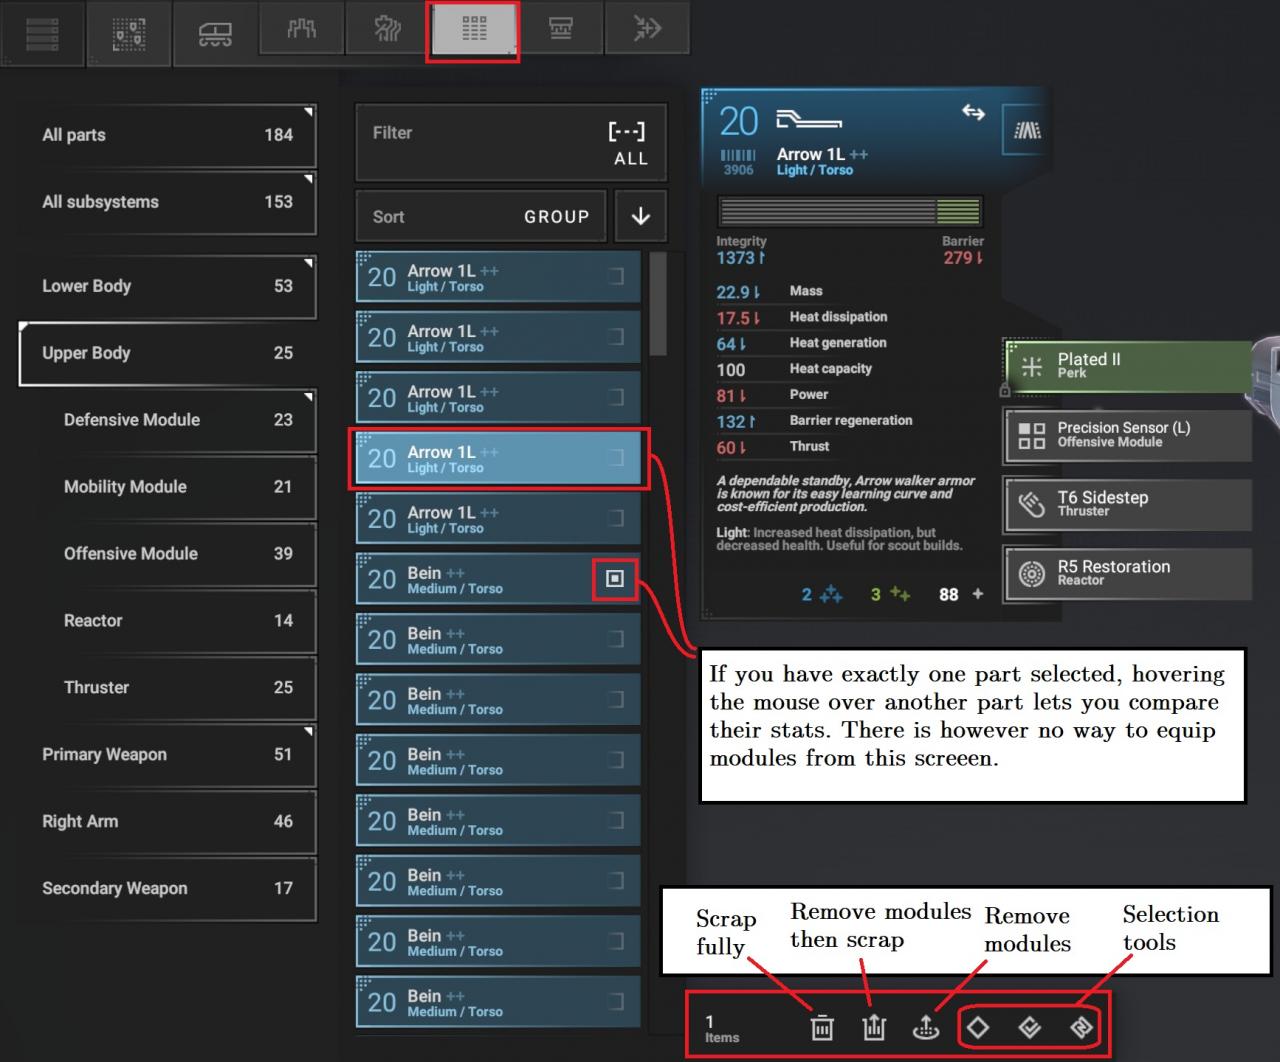
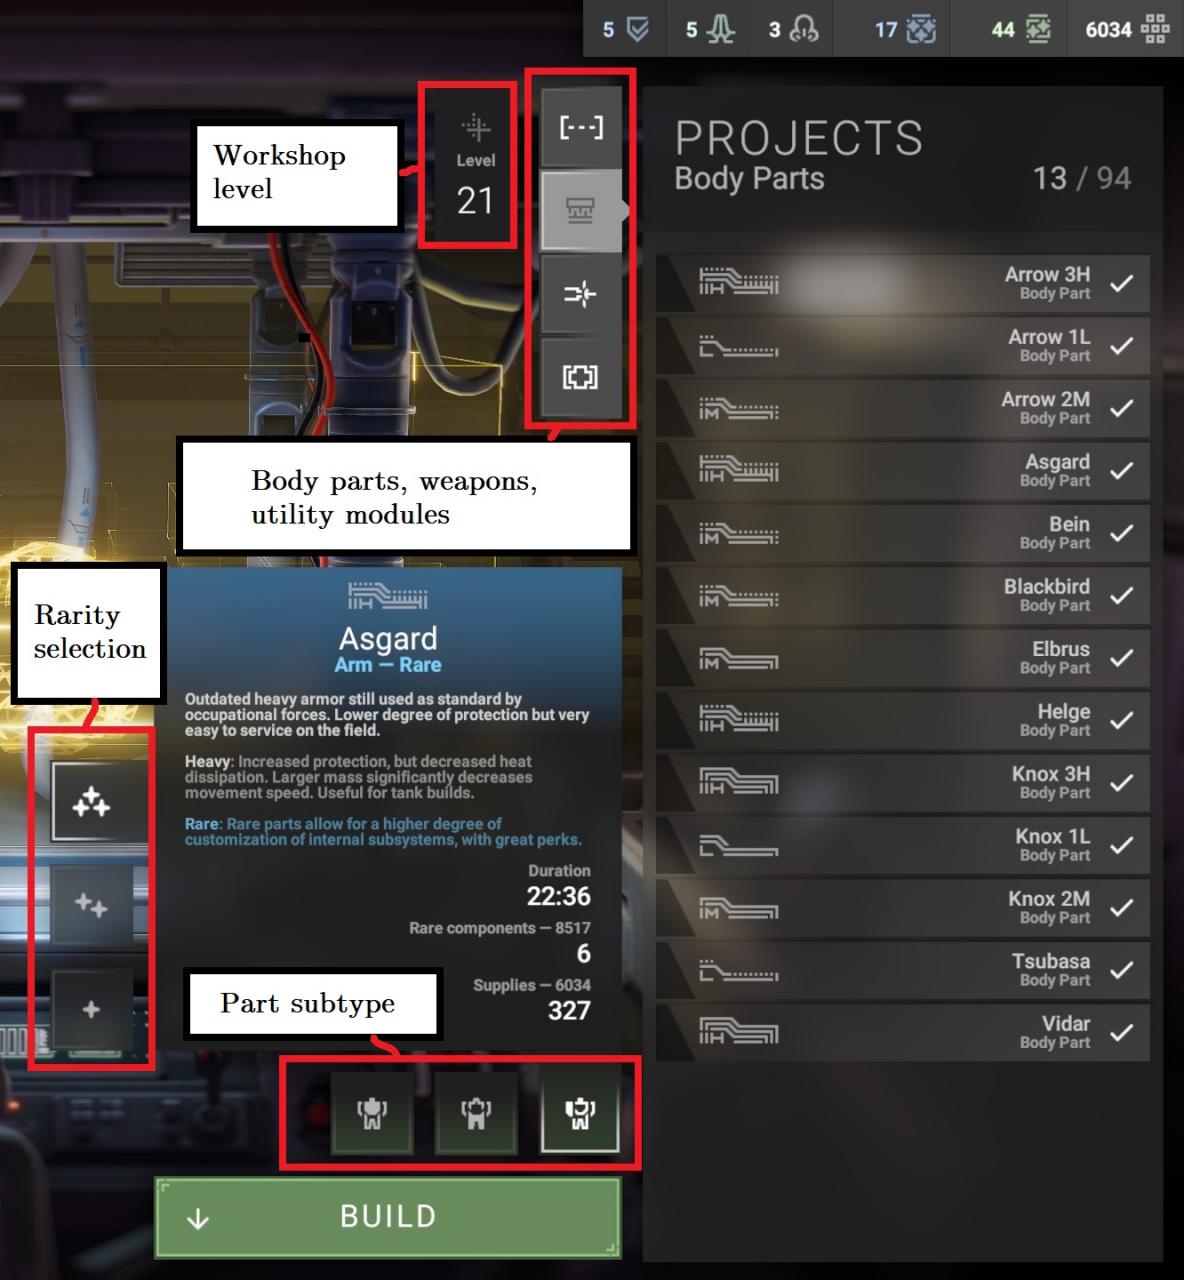
The workshop isn’t really important until you understand all the other combat and construction mechanics in the game. What it does is let you build specific parts at a certain level, and thus outfit your machines the way you want to build them.Parts cost resources and take time to build. The abilities to build uncommon and rare parts must unlocked by building two separate base upgrades.
Parts also can only be built once you have discovered their blueprints. The easiest way to get blueprints is to raid enemy convoys.
When you select a part to build, you can further select its subtype (if applicable) and its rarity (also if applicable). Some workshop projects give you random results, e.g. building thrusters gives you a random one from the pool you choose, and building weapon / body parts rolls a random perk for them.
Workshop level is the average level of your machines. The average level of a machine, in turn, is the average level of all equipped parts. Once you have unlocked a higher workshop level, it stays at its maximum no matter how you re-equip your machines.
The max workshop level goes beyond 100. Ask me how I know…
— Workshop Grind
Since workshop level is the average of your machines’ overall levels plus 1, that means it is possible to increase your level simply by building more equipment.
Now workshop level goes past 100, and your resources max out at 10,000/100/100, so don’t worry about saving up for the level cap. Just build parts as you need new ones, and have fun with them.
But if you really want to level grind, here’s the best way to do it.
DO NOT DO THIS WHILE RESUPPLYING
The key observation is that your machine’s level is the average level of all its equipped parts. That means you do not have to completely furnish it with parts in order to raise its level; you can simply remove every other part and then equip a single high-level one.
Also note that workshop level takes the average level of your machines. This is subject to banker’s rounding, but that means you won’t need to completely equip all your machines in order to raise your workshop level.
So, assuming you have 4 frames:
- DO NOT DO THIS WHILE RESUPPLYING
- Strip every single part off every one of your machines
- Build 4 Elbrus arms (the single cheapest component at 70 supplies)
- Equip 1 arm onto each frame
- Workshop level goes up
- If currently at an even level, build 3 parts (banker’s rounding means level 6.5 will be rounded down to 6, so you need to push it up to 6.75 in order to be rounded up to 7)
- If currently at an odd level, build 2 parts (7.5 will be rounded off to 8)
- Replace lowest-level parts
- Repeat as desired
This costs an average of 2.5 parts per level, or 175, minus the refund you get, which is 82, for a disgustingly cheap 93 supplies per level.
As an exercise, determine why doing this is a bad idea while resupplying.
14. Base Upgrades
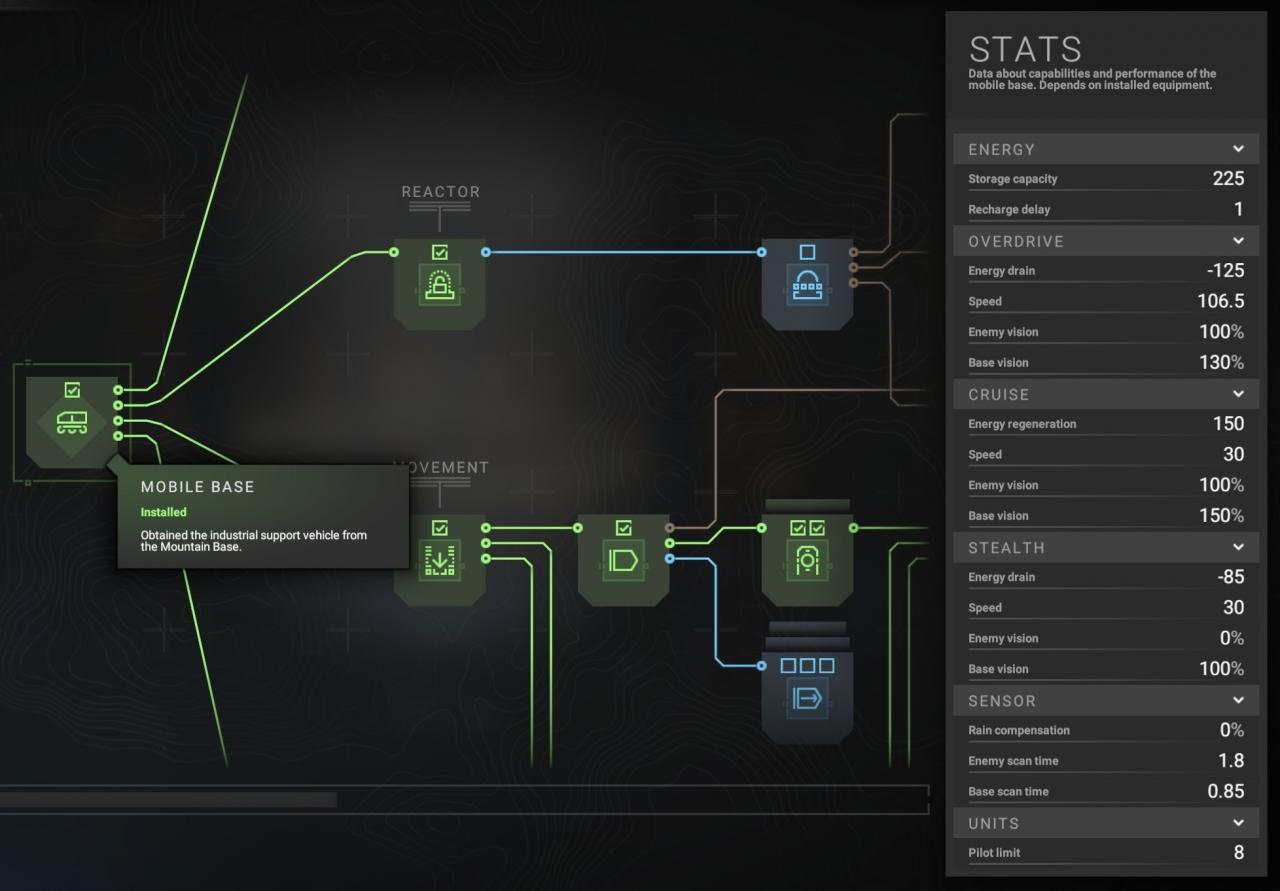
Base upgrades are split into Workshop, Reactor, Movement, and Unit Bay upgrades.Some of these upgrades are essential for improving your effectiveness; others come with massive downsides that make them almost universally bad picks.
I strongly recommend prioritizing the fourth unit bay, then overdrive and stealth, then getting the ability to build rare items, and then slowly filling out the rest of your mobility upgrades. I don’t recommend getting any of the upgrades with negative effects, especially the unit bays after number 4.
— Workshop Upgrades
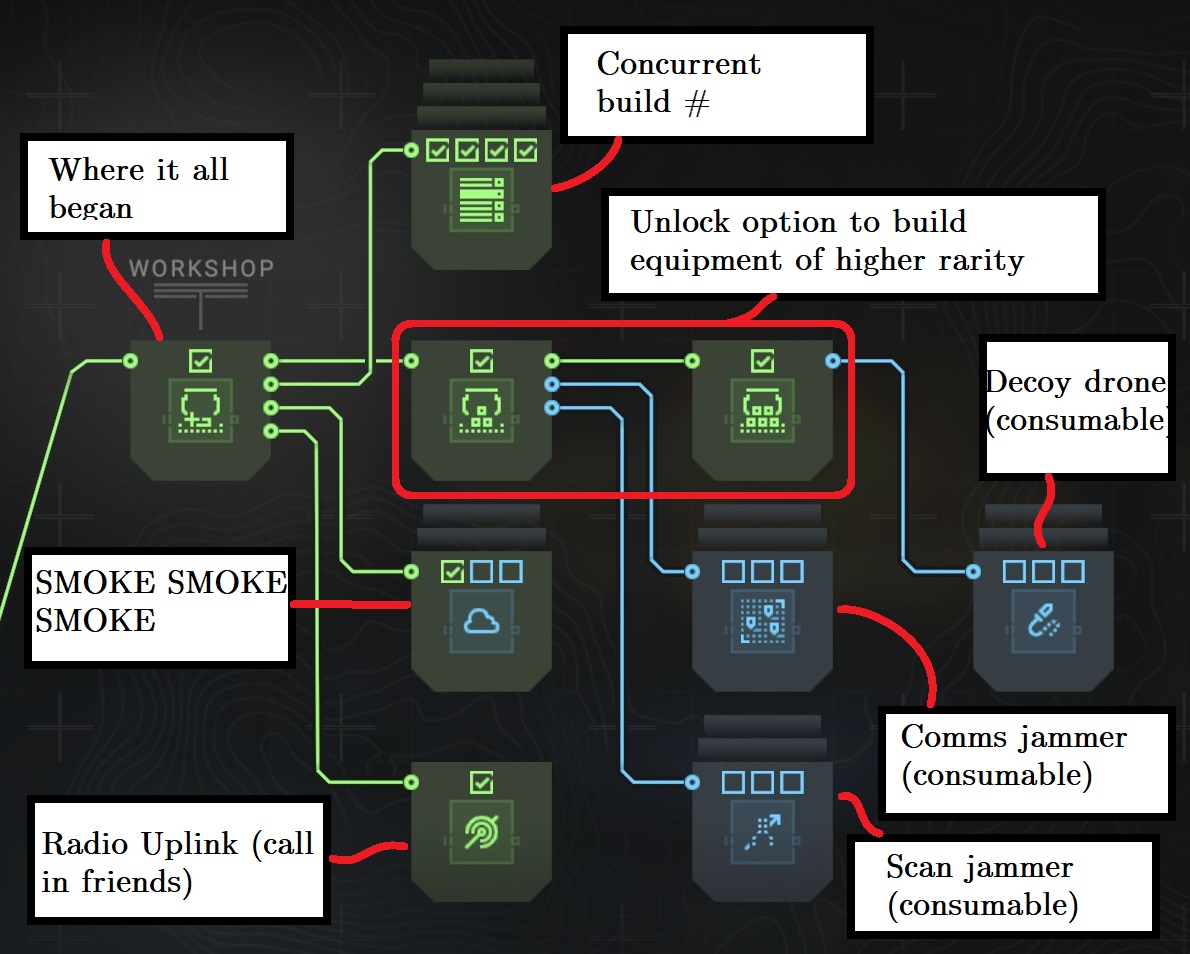
Not much to say here. None of the upgrades have any bad side effects. The most important ones to get are Advanced and Experimental Assembly, letting you build uncommon and rare parts respectively. Radio Uplink lets you call in Home Guard reinforcements for a laugh or two.
— Reactor Upgrades
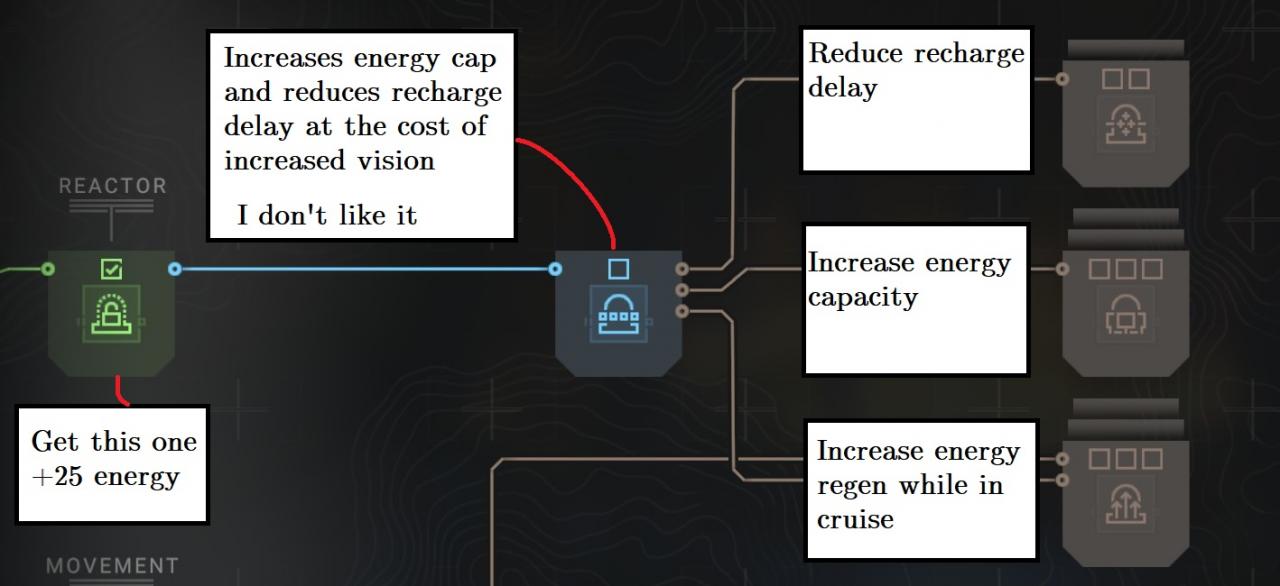
Reactor upgrades are pretty simple and self-explanatory. However, the big one in the centre– Expanded Reactor– comes with the huge downside of making you more visible to enemies (30%! It’s huge!). This means that sneaking up on convoys will be even more difficult.For that reason I avoid this upgrade, even though the upgrades after it are very useful and don’t come with any downsides. So the only upgrade in the Reactor tree I build is the very first one, Unlocked Reactor.
That said, when fully upgraded, Overdrive actually makes you less detectable than cruise mode, and combined with this reactor upgrade, leaves you at 80% enemy vision in overdrive and 130% in cruise. Without this upgrade, you would be at 50% in overdrive and 100% in cruise.
Worth it? That’ll be up to you.
— Mobility Upgrades
There’s too many upgrades to fit into a single screen, so I’ll just give you the rundown.
Overdrive and Stealth are excellent and will become core parts of your strategy. Pick them up when you can.
Only one upgrade comes with a significant downside: Cruise Speed, ironically enough. You might think that being able to move faster negates the penalty to vision, but that’s not all. The increase in enemy vision can make the difference being able to slip between bases or having to switch to stealth to do so.
All the other upgrades come with no downsides and should be eventually picked up.
— Unit Bay Upgrades
Don’t get “Expanded Storage”. You can only deploy 4 units per battle, and the penalty to movement speed is just too rough to be worth it.
That just leaves you with Optimized Storage and Accelerated Repair, which are good enough on their own.
I’d like to upload a picture but I can’t seem to do so, so oh well.
15. Modding and Save Editing
Yes, all the relevant files are exposed at <InstallDirectory>\Configs\DataDecomposed.
All equipment (weapons, body parts, subsystems) is found under \Equipment\Subsystems. Modding body parts can be done either at a global level or an individual part level, explained under the Body Part Scaling section.
Resource limits are under, well, \Resources.
Scaling information is found under \UnitStats. Currently it is limited to Integrity, Barrier, and Kinetic damage at 25% of base stat per level.
Yes, absolutely. Phantom Brigade is a single-player game, so you’re not hurting anybody by modifying your game files. Play the way you want to.
Save files are stored in plain text in zip files in <User>\AppData\Local\Phantom Brigade\Saves.
Your current resources are stored in \OverworldEntities\squad_mobilebase.yaml.
Thanks to whythecynic for his excellent guide, all credits belong to his effort. if this guide helps you, please support and rate it via Steam Community. enjoy the game.
Related Posts:
- Phantom Brigade: Protector Mid-game Build Recommended
- Phantom Brigade: Weapons Guide (Variants and Damage Types)
- Phantom Brigade: How to Edit Your Save Game
- Phantom Brigade: Superior Salvaging Guide
- Phantom Brigade: Save File Location (New V1.0)