Quick guide to get you up and flying in Nuclear Option
Guide is still a work in progress, please comment any ideas/tactics to add to the guide
Controls & Settings
Nuclear Option can be played with Hotas, Controller or Mouse and keyboard.
Keyboard & Mouse
The default controls on keyboard are a little spread out so I would recommend taking a few moments to rebind some keys closer to Wasd. Namely; Target select/cancel, Countermeasures & Map are worth rebinding. Keep in mind ‘freelook’ is not currently bind-able and is locket to Left mouse button.
Controller
Some binds depending on the controller you have may not be bound. Eg: Eject set as “Home” by default. Controls you may want to consider rebinding: Flight assist, Eject, Map. The right stick by default seems to be trim control. Currently no bind for free-look. Would recommend re-binding this when the option is available.
Hotas
wip
Pitch inversion
By default this is turned on. This setting can be found on the left side under “Invert virtual joystick pitch”
Graphics settings
“Cinematic mode simply disables all UI messages to allow recording of gameplay without overlays” – B25Mitch (Developer)
Flying Basics
From the main menu select “Missions” on the bottom left side. Left side of the screen there is a drop down menu for all missions available. Select Tutorial at the bottom of the list, then “start mission”Tutorial Mission – Taxi & Takeoff
There is tutorial text in the top left of the screen.
in this section you will use the following controls;
Flight HUD
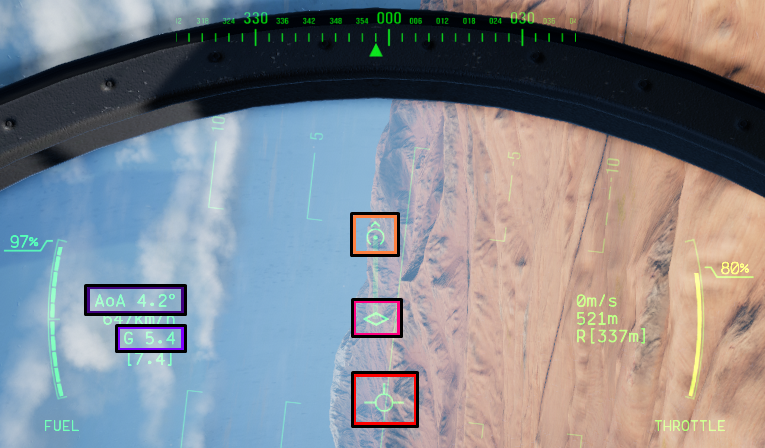
In the below image from left to right is your speed, rate of climb & throttle.

In flight you will need to reference additional info seen colour coded in the below image;
Dark Purple: AoA = Angle of attack | How aggressive of a turn you are making.
Light Purple: G-force | force exerted from acceleration. High AoA turns at high speeds will put more force on the aircraft and pilot causing the pilot to loose consciousness or the air frame to break apart.
Orange: Direction indicator | Pitch & Yaw control inputs
Pink: Centre Cross-hair | Middle of screen & where the aircraft tries to point towards
Red: Aircraft Direction | Where the nose of the aircraft is facing
Aircraft

Short description:
IG: Description
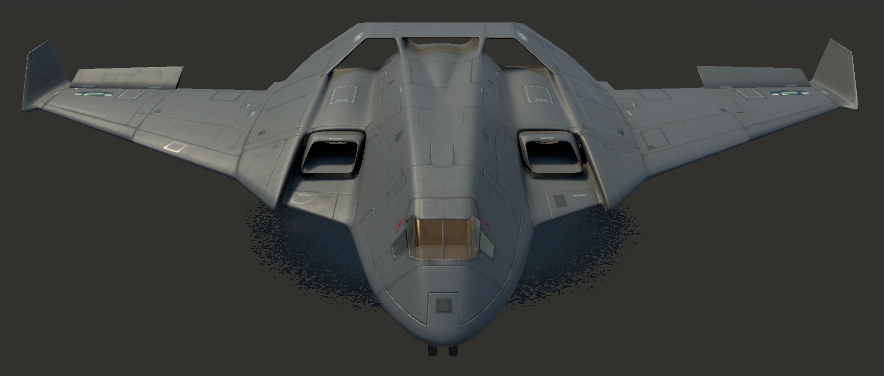
Designed for conter insurgency operations and low intensity battlefields, the CI-22 Cricked features robust landing gear and short takeoff and landing capability, allowing it to operate from unprepared fields. While lacking in speed and survivability, the CI-22 possesses remarkable agility and the ability to mount an array of weapon types.
Weapons mountable:
T/A-30 Compass

Short description:
FS-12 Revoker

Short description:
SFB-81 Darkreach
Short description:
Weapons
Enemies
AFV-8 Mobile Air Defense
The AFV-8 fires a the IRM-S1 heat seeking missile with a range of up to 5 km. It has 8 of these missiles.
Linebreaker SAM
Just like the AFV-8, the Linebreaker fires the IRM-S1, however it has 12 of the 5 km missiles instead of eight.
T9K41 Boltstrike
The anvil fires the RAM-45 missile, it has a range of up to 15 km. The vehicle has its own radar system incorporated in it.
HLT Radar Truck
The truck has a tracking range of 20 km.
AeroSentry SPAAG
Range: 4000 m +
FGA-57 Anvil
Ground Vehicles not listed are either not capable of attacking aircraft or only able to damage the CI-22 Cricket
Missions & Objectives
Multiplayer
Tactics & Equipment use
1.) using the radar jammer significantly raises the radar floor below which your aircraft is undetectable
2.) using the radar jammer makes “notching” much more effective, in which you fly perpendicular to the radar (put it at your 3 or 9 o’clock) to break the lock
if you are being target by a radar SAM both those techniques are helpful
since the radar SAMs are only semi-active homing, breaking the radar lock will neutralise all missiles tracking you simultaneously from the same launcher.” – B25Mitch (Developer)
Guide is still a work in progress, please comment any ideas/tactics to add to the guide
See you in game ~ Nokkt
Thanks to Nokkt g4skins Caseopening.com for his excellent guide, all credits belong to his effort. if this guide helps you, please support and rate it via Steam Community. enjoy the game.