This guide will give you a base understanding on how the game will work and general tips on items, etc…
Getting Started
Welcome to Holocure. If you already played Vampire Survive or equivalent you already have a decent understanding of this game so congrats. Regardless of past experience, I’m here to give you a bit of in-depth guide of how the game works and some of it’s mechanics for new and old gamers!
This guide will be for the current 0.6 content. Will update if any changes have been made!
I will divide each section to give abit of indepth guide to what to look out for. So good luck out there gamers.
The Shop
First we will go indepth to the shop so you have a good understanding of what is what. We will start off with the Character Gacha
You have several things to note in the shop such as Character Gacha, Upgrades, and Armory. Armory just gives up a description of any weapons,items, and Collab items you have acquire throughout your game sessions so we will ignore this. First thing we will go over is the Character Gacha.
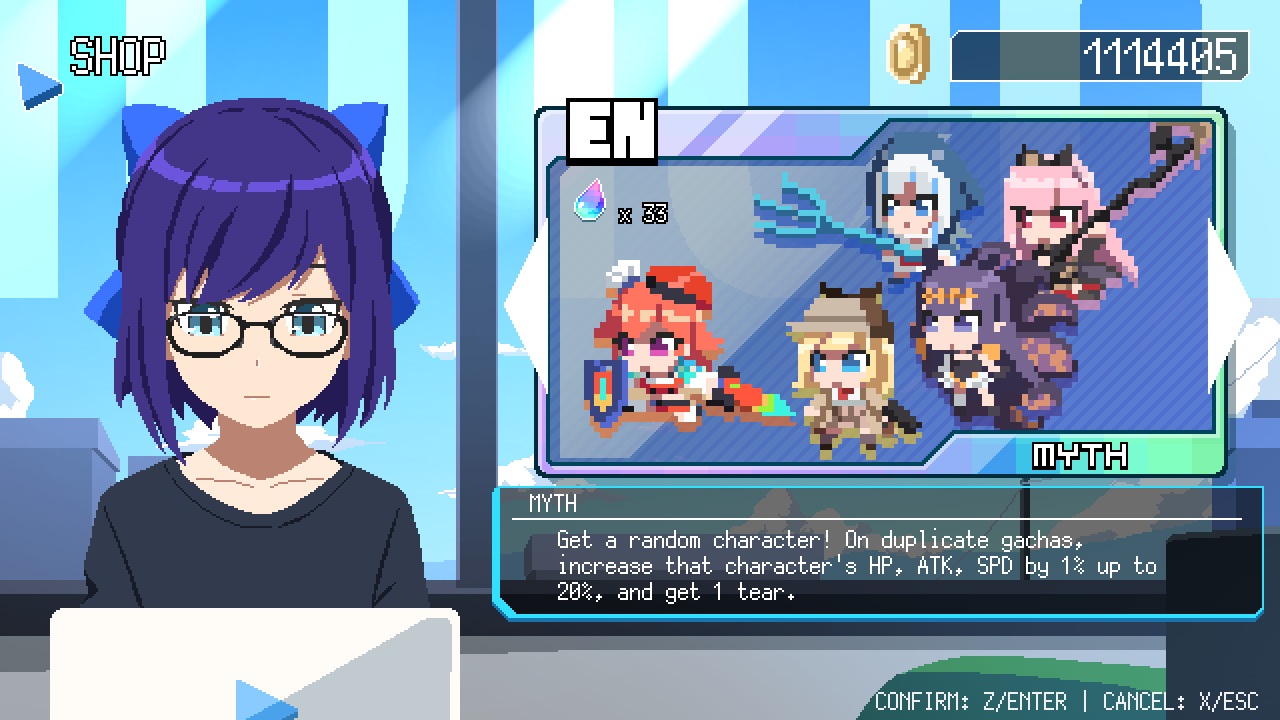
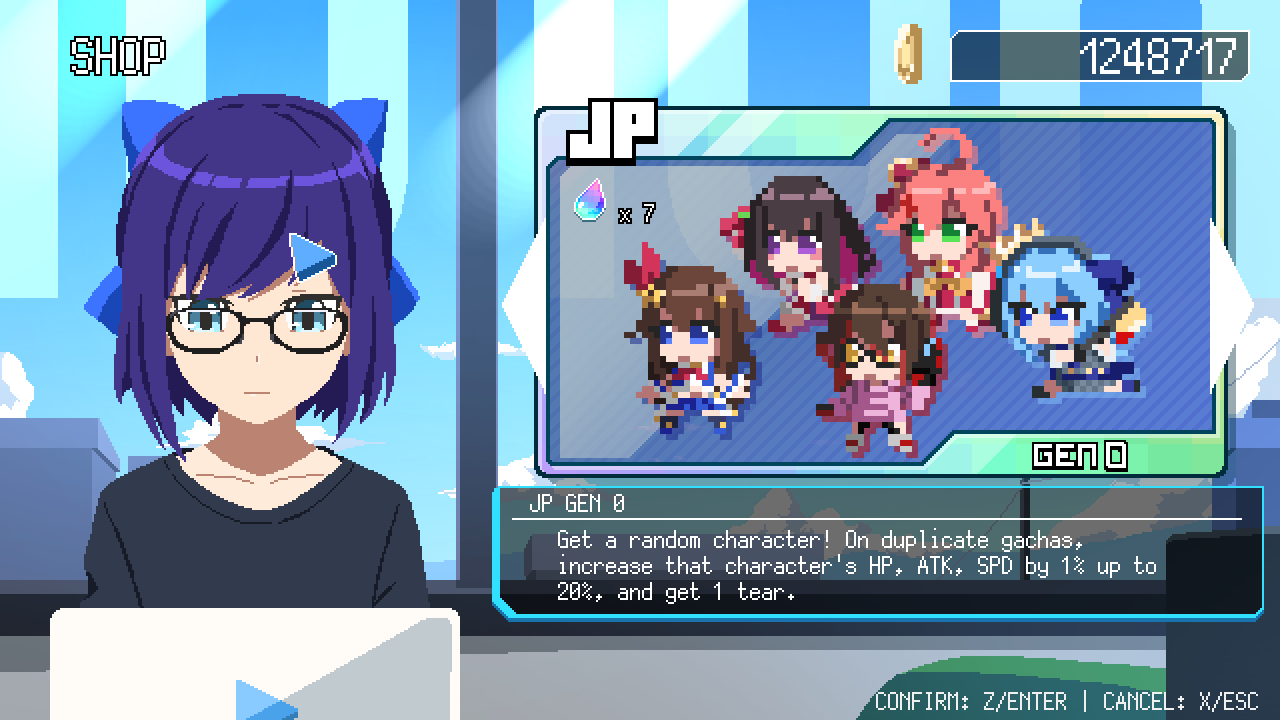
When you start the game you have 5 base characters to start off with. In Character Gacha you can roll for a chance for new characters or upgrade any owned characters to increase HP, ATK, and SPD by 1% capped at 20%(Note: Characters with duplicates will have a G-Rank to signify how many duplicates you have of the characters). Currently as of 0.6 there is currently 9 different character gacha banners each belonging to the Vtuber’s “group”. As you play the game you earn currency called Holocoin and you use it to spend on certain things such as the gacha banners. If you happen to get any duplicate characters, you accumulate tears which will allow you to get a free character or alternate skin in exchange for tears. However tears will only accumulate to the gacha banners that you roll in. It will NOT carry over for other banners.
Now we will take a look at the Upgrade Section of the shop
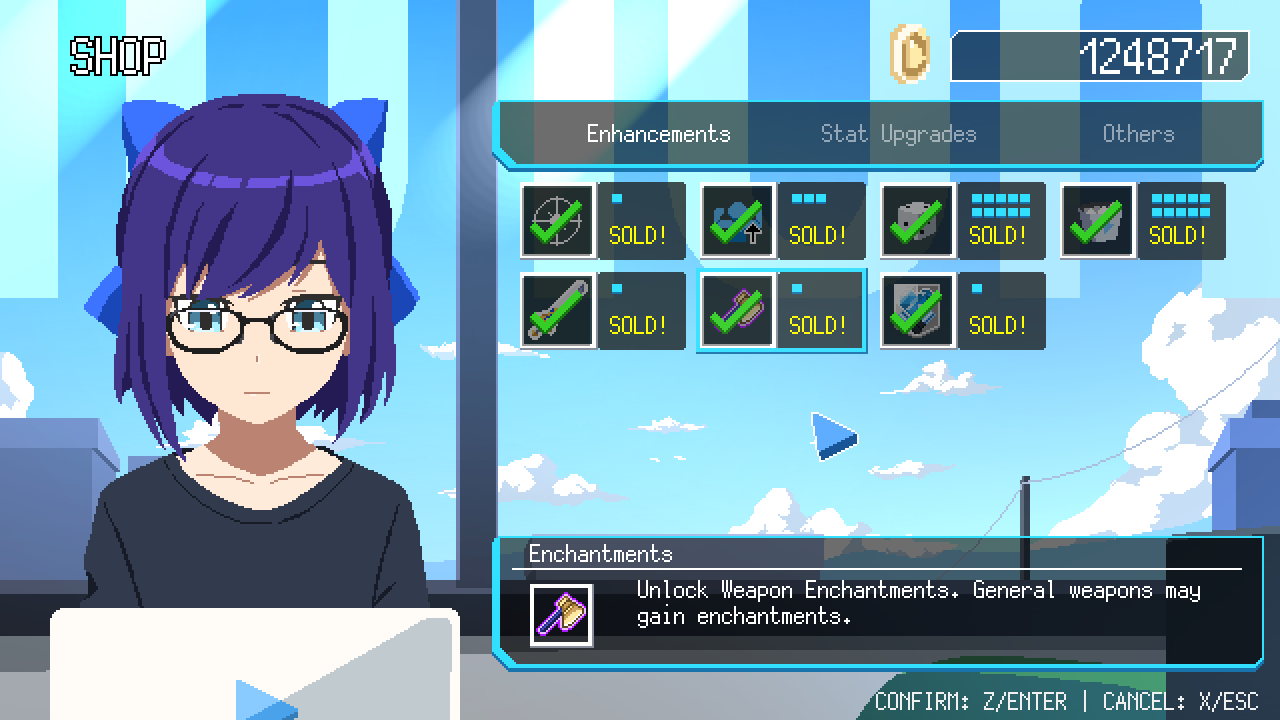
First thing to note that everything here in this section requires Holocoin so get to farming first before starting on this section. The first tab here is the Enhancement section which is the most important one since the major mechanics of the game will be unlocked through here. The PRIORITY items that you should unlock first are Special Attack, Stamps, Enchantments, and Fandom after you unlock these 4 items first, your free to unlock whatever you want after that.
Why should you unlock these first? Well i’ll tell you lads!
First thing is Special Attack. Special Attack lets you…..well it’s pretty self explanatory…..lets you use your characters special attack. This unlocks for every character so once you buy it don’t worry about it ever again.
Second is Stamp System. I’ll go more in-depth to it later in the guide but the TLDR version is that it lets you augment your character’s Main Attack.
Third is the Enchantment System. Again i’ll go more in-depth to it later as well but essentially it lets you augment your weapons that you pick up in the current game session.
Fourth is the Fandom system. Again i’ll go into it more in-depth but essentially it’s like a personal leveling system for each character. By owning multiple characters and/or completing stages you level this up. By leveling it up you have increased base stats and start off stronger than you would normally.
Aside from the four priority items the remaining items on this tab is self explanatory. Growth increase Main Weapon DMG and Special Attack, Reroll lets you….well Reroll/shuffle items on the leveling up screen, and Eliminate lets you remove an item option from the leveling up screen for the duration of the game session.(Note: You can have a Max of 10 Reroll and Eliminate. You can Reroll several times in a leveling up screen but Eliminate a item once per level up.)
Next is the Stat Upgrade Tab.
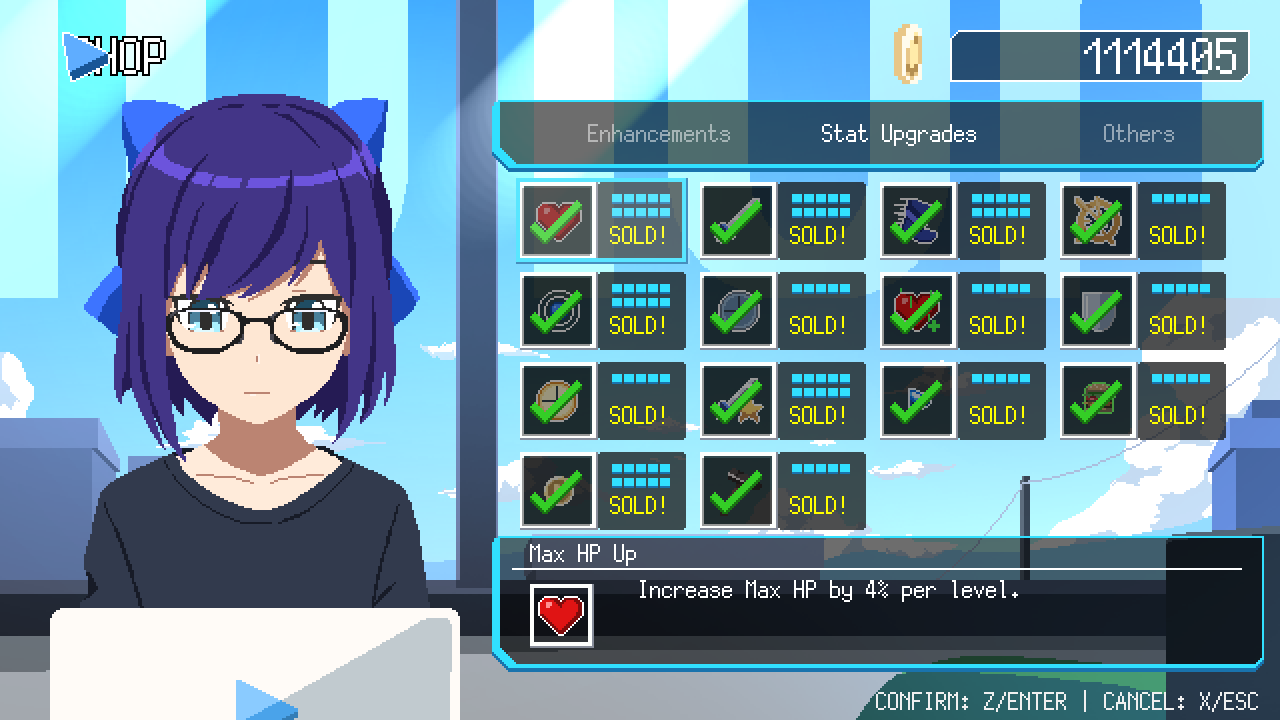
Well it’s self explanatory. Lets you augment characters HP, ATK, SPD, CRIT, Pick Up, Haste, Health Regen, Defense. The others reduce Special Cooldown Timer, Increase potency of Character Skills, EXP Gain, Health Drops, Money Up, and Enchantment Success Rate Up.
The last Tab is the Others section.
There isn’t anything worth getting here except for Marketing which increases spawn rate of enemies by 1 per upgrade. Everything else here just limits your weapons and items. If you’re chasing for an Achievement that needs certain conditions than this is where you want to be, otherwise ignore it.
Achievements and Fandom
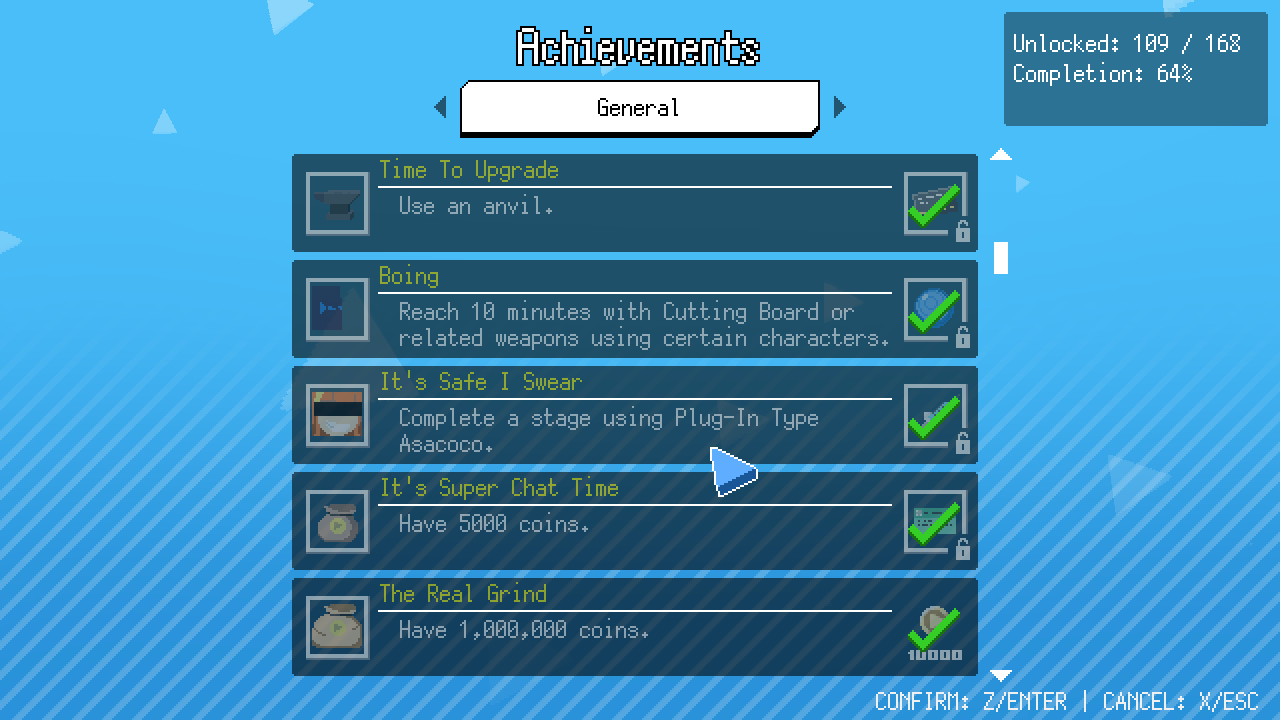
Achievements is well….Achievements…..don’t know what else to say here…..
By completing achievements you get holocoins but also unlock weapons and items. Usually weapons and items require completing tasks using certain characters or completing certain conditions. If you need to figure out the conditions I recommend looking at this tab or the wiki for further information.Now the most important part of this section which is the Fandom
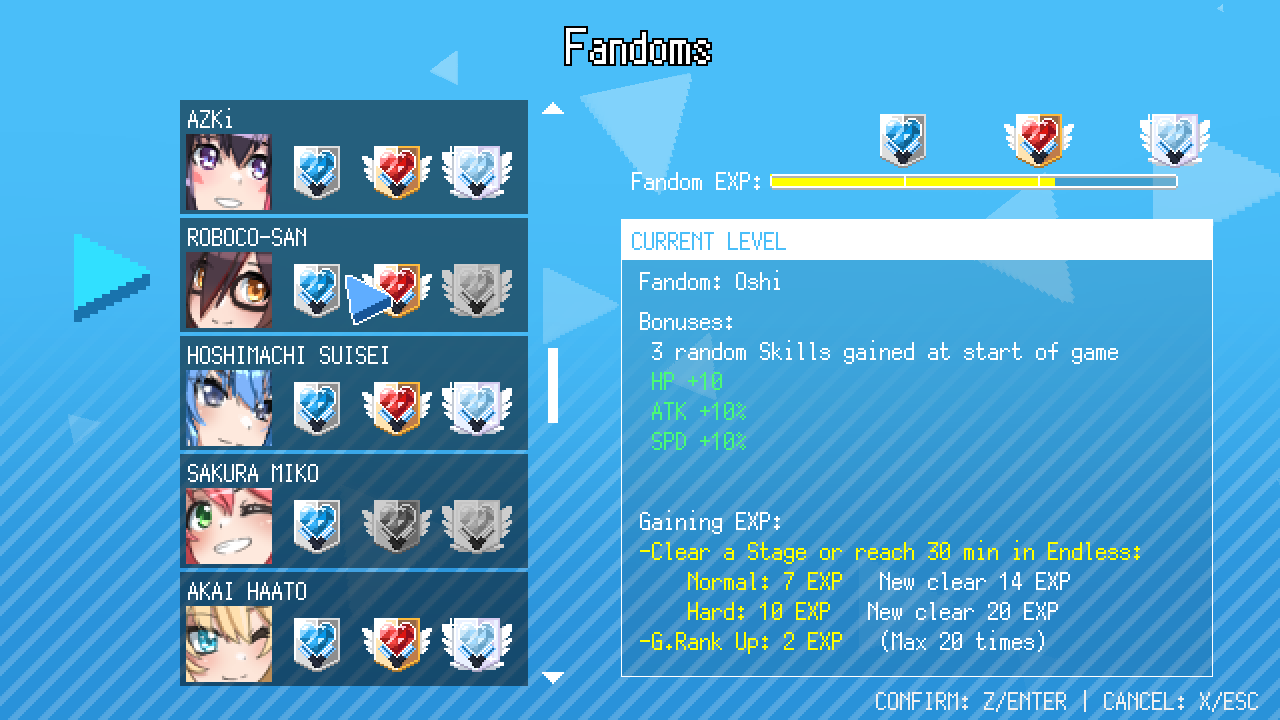 As i stated in the previous section, Fandom is a personal leveling system for each and every character. Previous 0.5 version there was a stage completion system but with the new update, they added an leveling system for this, in order to level your fandom you either Beat a Stage mode on Normal or Hard(Note: Bonus EXP for the characters first time on the stage), play Endless mode or get duplicate characters from gacha.
There are three different tiers of Fandom. Each level gives you stat upgrades and lets you start off the session with the characters personal skill upgraded. I’ll go over all the tiers below:Tier 0: No Stat Bonus or Skills
Tier 1: +5 HP/ 5% ATK & SPD/Start with 1 Random Character Skill at Level 1
Tier 2: +10HP/ 10% ATK & SPD/Start with All 3 Character skills at Level 1
Tier 3: +20HP/ 25% ATK & SPD/ 5% CRIT/ Start with All 3 Character skills at Max Level
If your going to be playing on the more difficult modes, I would recommend focusing on upgrading the fandom of your favorite characters. Will give you a good head start and more of a fighting chance at the start.
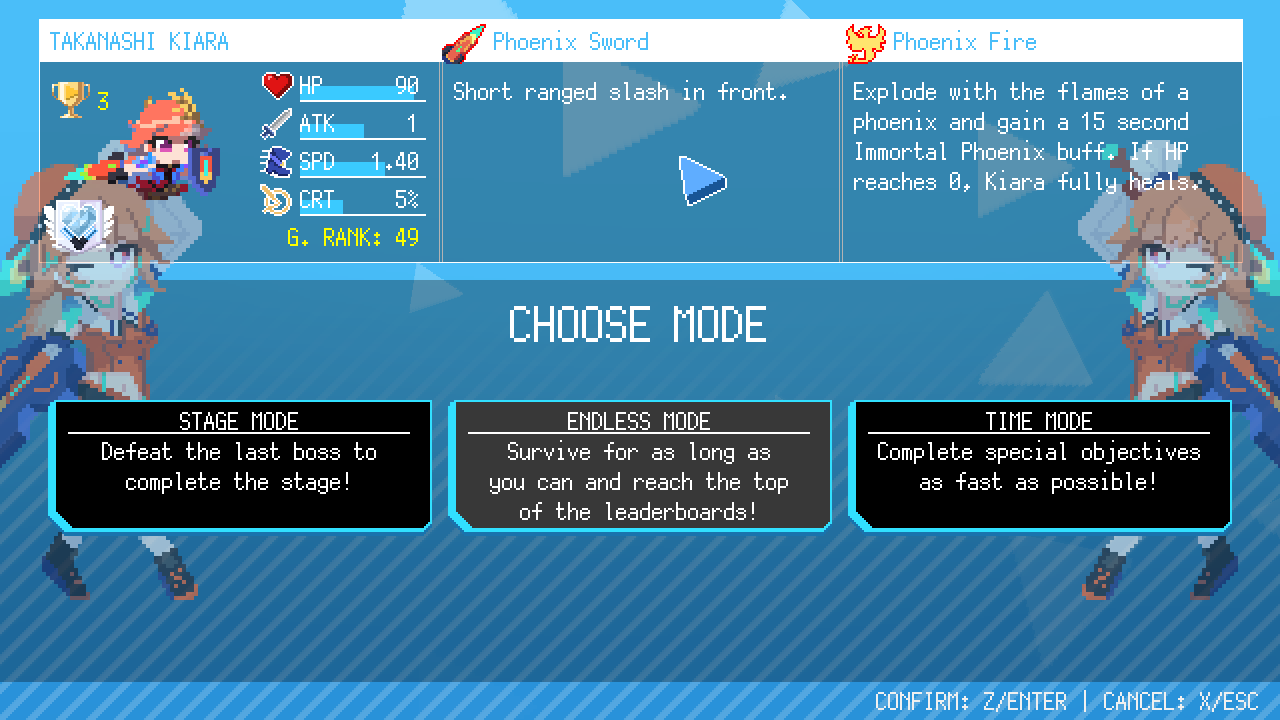
Character Selection & Stage
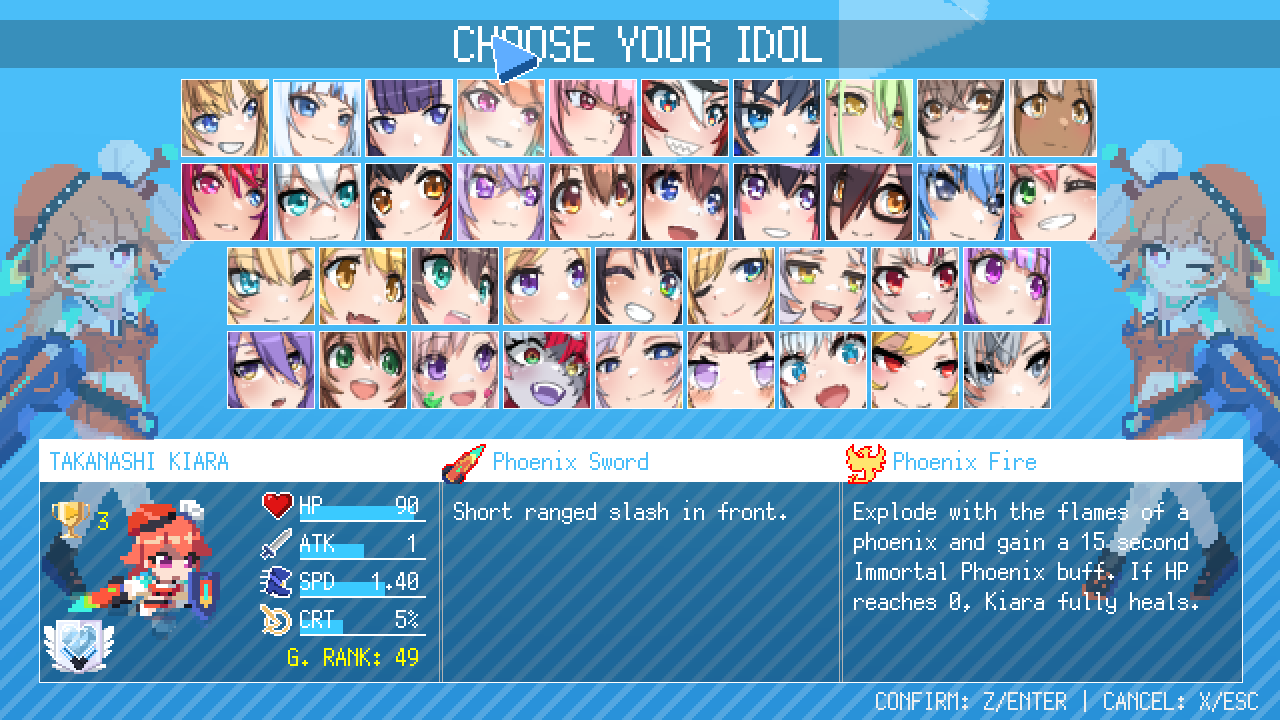 Pretty straight forward a character select screen of all the characters you currently own. The information that is relevant is the character’s base HP, ATK, SPD, & CRT. Every character has a different set of base stats with the Haste and Pick Up Range stat being the same across the board for everyone. G-Rank/Fandom bonus stats will not display here, this is only the base starting stats. The only two stats that really need explaining is CRT and HasteCritical or CRT is the percentage change that the attack will be a critical hit(Note: DMG increase by 1.5x). Don’t confuse this with Critical DMG as both stats are completely different. Critical DMG can only be upgrade through items/Stickers/Character Skills.Haste is another stat that may be confusing. Although Haste is the same across the board for all characters, not all characters have the same attack properties. You may notice certain characters launch attacks faster/slower than others that’s usually due to a number of factors. Attack is divided into 3 sections: Attack Time, Hit Cooldown, and Attack delay. Attack time is the only stat Haste will improve, basically increase frequency of all attacks. Some characters make have a longer or short delay so if you notice that your attacks come out slower/faster that is usually why.
Apart from those two stats, the character screen will also show you the characters Main Attack, Special Attack, G-Rank, Fandom Tier, and how many stage completion.
Stage Selection is divided into 3 sections: Stage, Endless, and Time
Think of Stage mode as your objective based mode. The game session goes up to a max of 20+ minutes of in-game timer and you win once you beat the boss(or bosses) that shows up at the 20 Minute Marker.
Endless is well…..endless. Think of this as your money making mode where you can earn alot of coins if you play your cards right. Endless mode goes up to 30+ minutes of in-game timer. No Victory conditions and the Grim reaper equivalent, Yagoo, shows up at 30 Minutes to kill you. You can survive past 30+ minutes but every minute Yagoo get a DMG/HP/SPD Buff.
Timer is basically a time attack mode. All stats are returned to their base, no bonuses, no collabs, no super items. Just defeat 4000 enemies as fast as you can in a separate stage.
Going back to Stage Mode
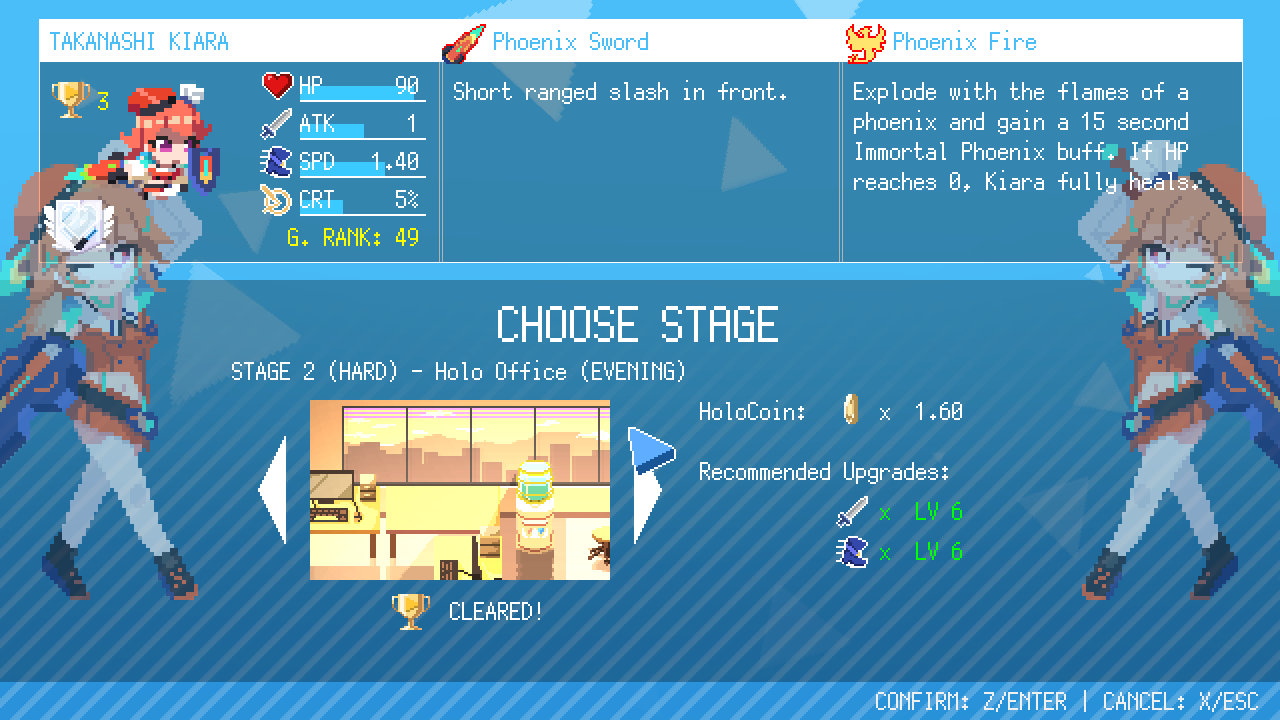
Each stage has a recommended ATK and SPD upgrade that you should be at before going into it. Recommend you level your characters up before playing hard mode as it will be difficult. Each stage also has a Holocoin Multiplier so the harder the stage is, the more coins you can get.
In-Game Mechanics
We are gonna get into the meat of the gameplay mechanics.
If you played Vampire survivor or an equivalent, the idea is simple. Defeat mobs, level up, earn items, survive, and defeat bosses.
When you start a game you can pause for a moment and take a look at your characters skill.
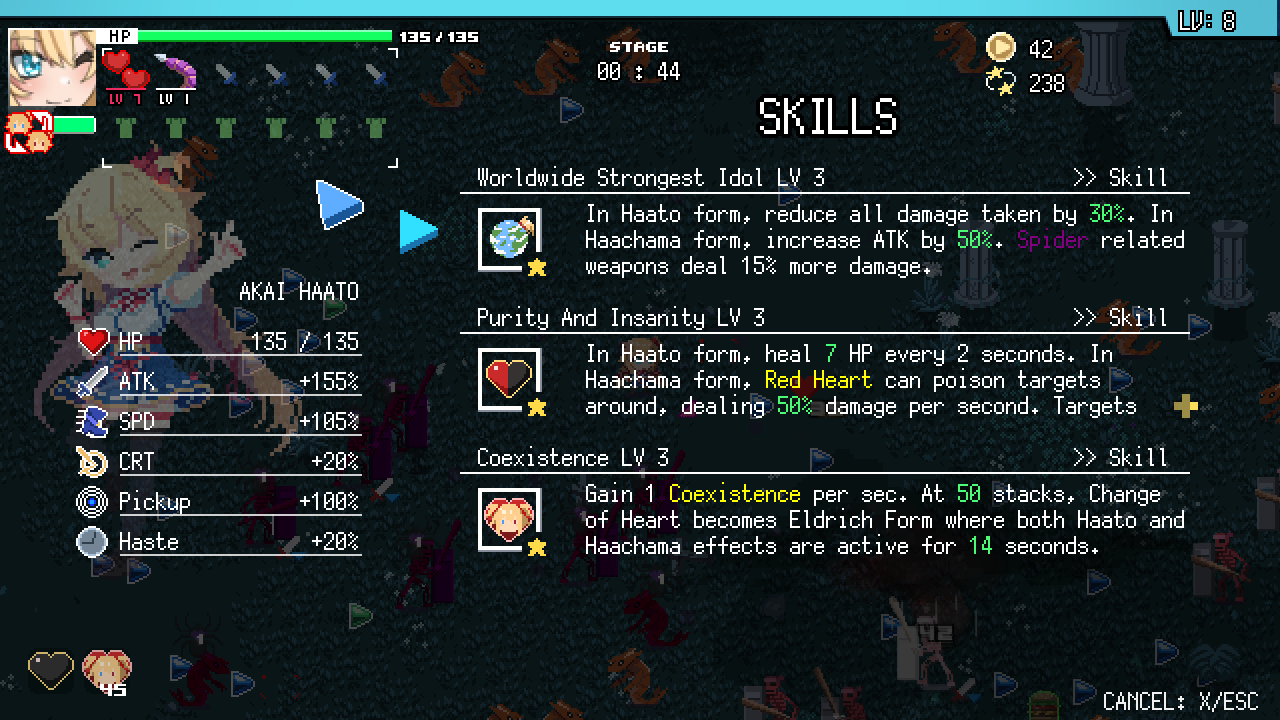
This screen will display all 6 of your stats as well as your characters personal skill. Each character has a personalized set of skills so one character will not play the same as another. All skills can be upgrade to Level 3.
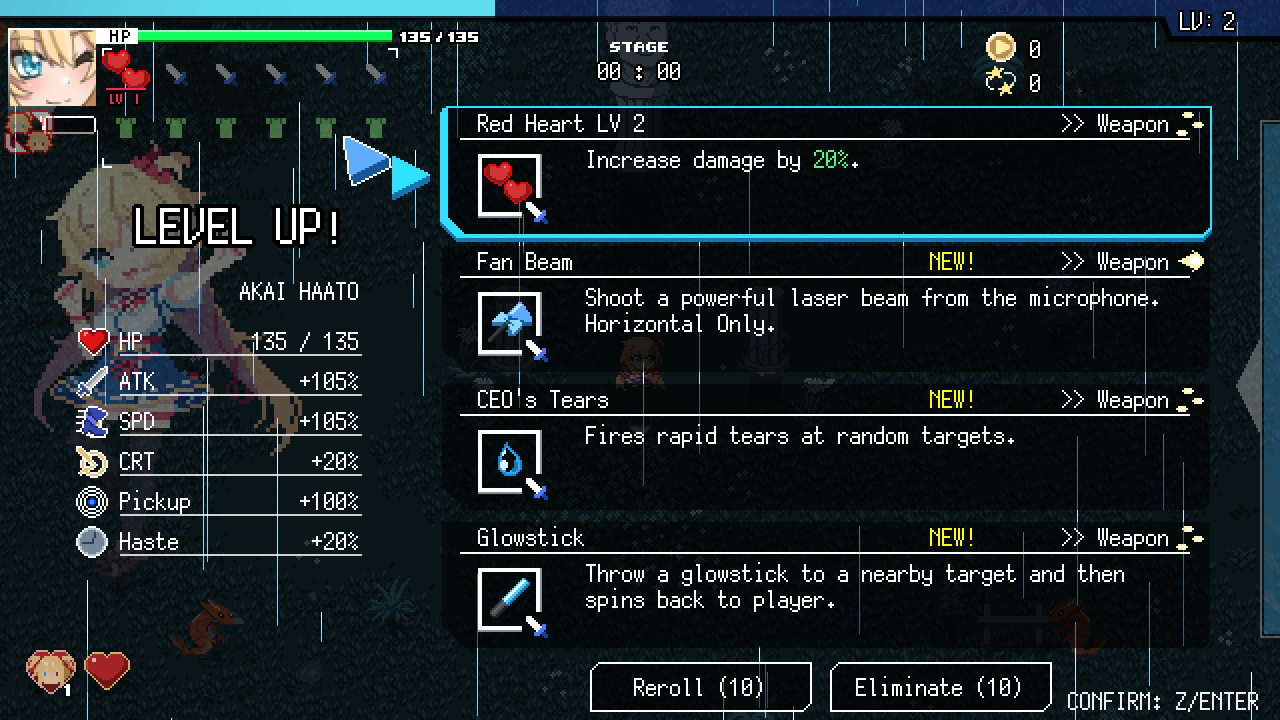
As you collect EXP from the mobs you will level up. Your EXP meter is displayed on the top of the screen and will fill up. When you level up you will have a chance to pick out a category of weapons, items, stats, skills. Every Character can equip up to 5 additional weapons included your characters main weapon and 6 Passive items.(Note: You can restrict the equip slots from the shop for both item and weapons) You also have a chance to Reroll the items if you don’t like what is on the screen and Eliminate any items which will remove one item from the drop table for the current match.
All weapons can be upgrade to Level 7 which is the max level. ONLY the character Main weapon will change when Max level is achieved, Main weapon will become Awakened dealing more damage and may change properties/effects/etc…..
Apart from weapons, Items can also appear on the Level Up screen. Items provided passive buff’s and bonuses that assist the player. Note that some items can also have negative status so be careful in picking your items. Items can have either a Level 3 or Level 5 Max level, depends on the item. Items range from Life Steal, Bonus EXP/Money, or Increase Stats.
Skills can also appear on the Level up screen. I would prioritize your character personal skills and Main Weapon first as that’s usually what you will rely on for consistent damage in the start of matches.
Last to appear is Stat Bonuses. Stat Bonuses are uncommon to appear in the early game session as the system will prioritize everything else. However if you happen to max out and have nothing to upgrade you can increase your stats for the round as shown below:
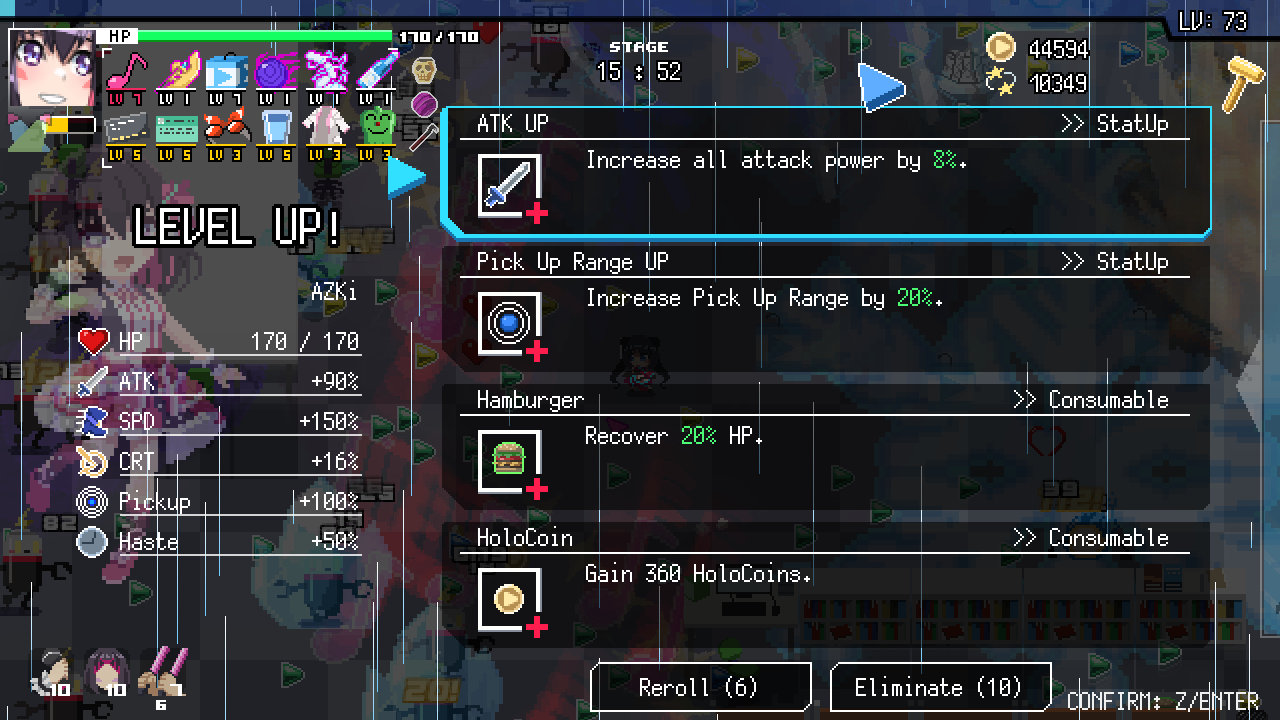
You can directly upgrade stats any of the 6 stats, get HP back, or more Coins. CRT and Haste stats being the more uncommon ones appearing.
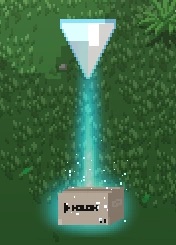
Apart from leveling up, there is also a chance for a Holozone Box to appear. This basically guarantee’s an Item or Weapon for free along with some HoloCoins. If your lucky there’s a chance that you will get a triple Holozone box to appear giving you more Weapons or Items and more Coins. If your luck is through the roof, you have chance for a Super Item that will provided massive stat bonuses IF you have an open item slot.
Anvils, Gold, and You!
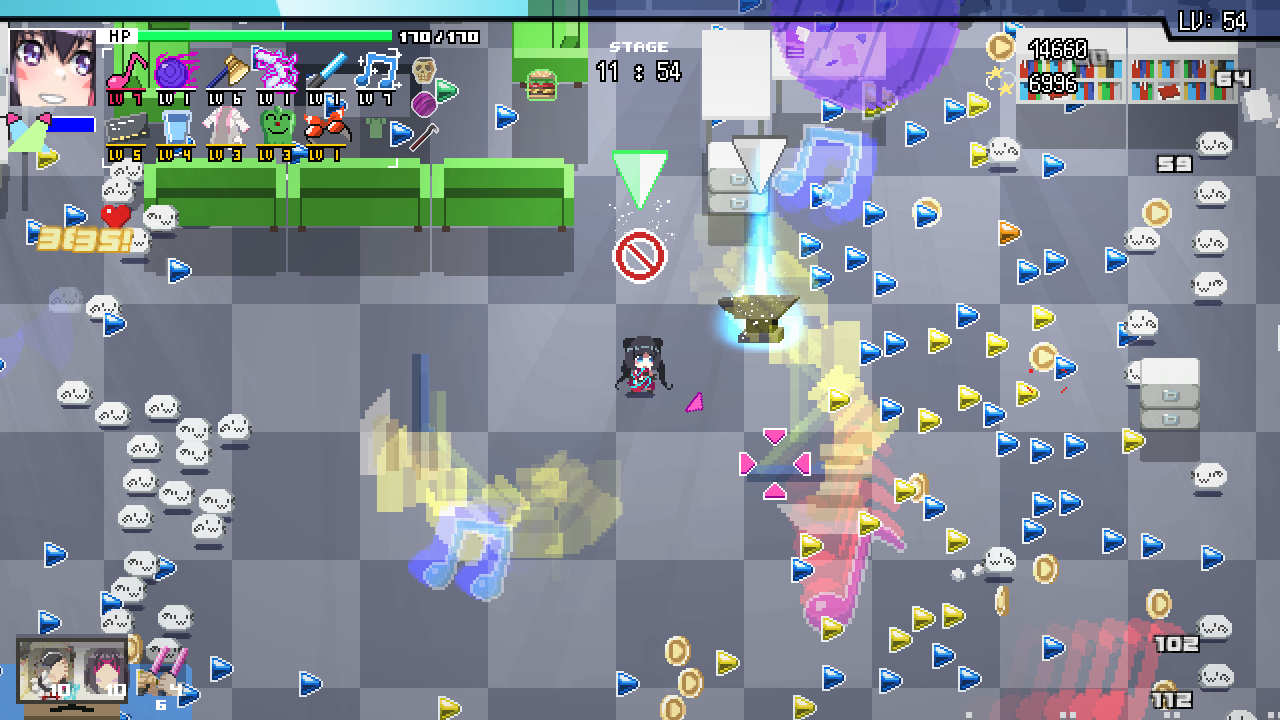 In a match you have a chance for an Anvil or Stamps to drop. Anvil are indicated by a grey arrow and Stamps by a Light Green Arrow.First lets talk about Anvils
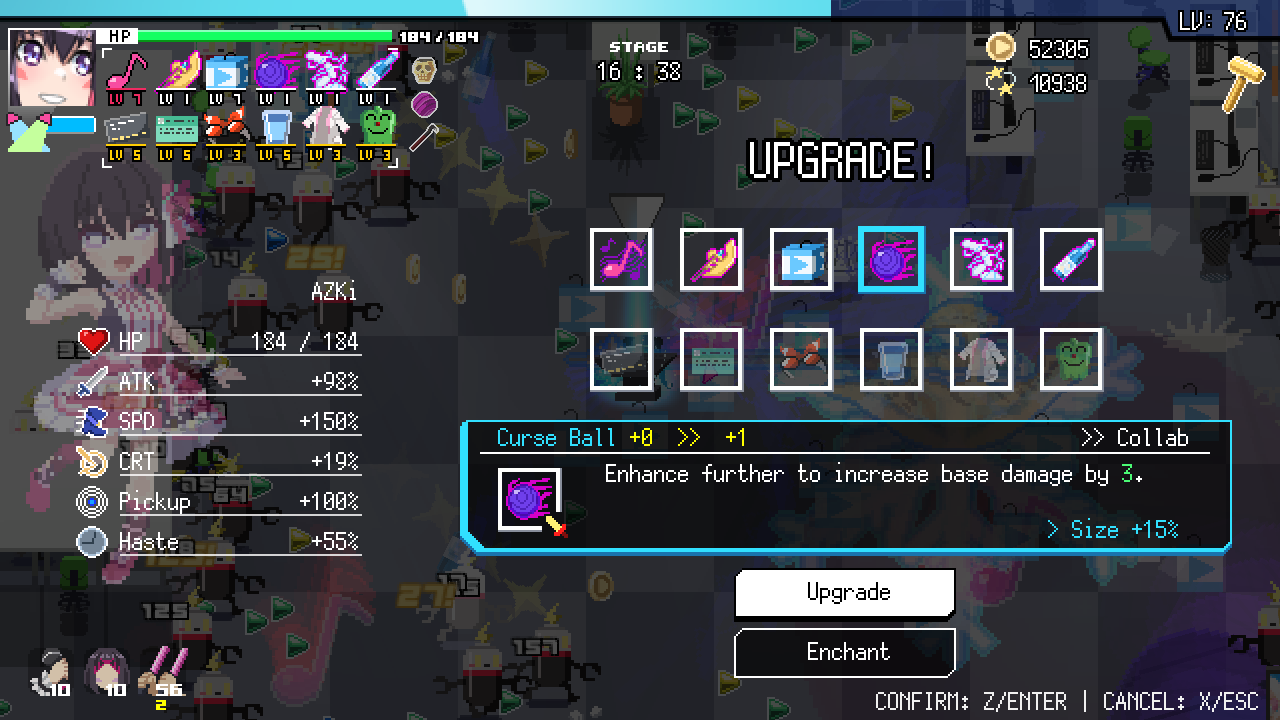
Anvils allow you to upgrade and enchant your current weapons. As stated previously weapons can be upgraded to a Max Level of 7 but another tier of weapons exist know as Collab weapons and even another tier added for 0.6 known as Super Collabs. When you use two specific weapons and a Golden Anvil, they will combine to create a “Collab” Weapon.
Mind you if you fuse an item or Weapon, you will free up that slot. One thing to note is that a Golden Anvil will only drop if you have any weapons to fuse and that they are both a max level!
If you need a cheat sheet for Collab and Super Collab look at the Guide Index for it!
Going back on topic, regular anvils lets you level up, enchant and increase Damage of your current weapons including Main Weapons(Note: Main Weapon can’t be enchanted) Please note that the Anvil is a one time use drop(Note: You can use an Anvil Twice if you have a certain item)
Below is the following Enchantment Buffs:
Damage +15%: All Weapons
Size +15%: All Weapons except Bounce Ball, Plug Type Asacoco, and Ring of Fitness
Cooldown -10%: All Weapons except Spider Cooking
HitRate +20%: Only Elite Lave Bucket and Spider Cooking
Crit Damage +10%: All Weapons
+Knockback Effect: Only Psycho Axe, Glowstick,Spider Cooking, HoloBomb, Wamy Water
+1 Projectile: All Multishot Weapons excluding Elite Lava Bucket and HoloBomb
If your weapon is not currently at Max level, you can do a free level up at no cost. If your current weapon is at max level, you can upgrade the damage of the weapon but will cost HoloCoins you earned in-game and will have a chance to fail the more you upgrade. Enchant lets your weapon have a stat boost in-exhange for Holocoins. The stat boost is random and if you don’t like the current enchantment you can swap it out for another random boost IF you have another Anvil. One thing to note about enchanting weapons is that if you create a collab weapon, the collab weapon will have both stat boosts. Be aware if you only have one enchantment when you fuse, you will only have one, you can’t add a second once the fuse is done!!
Personal Stamp Collection
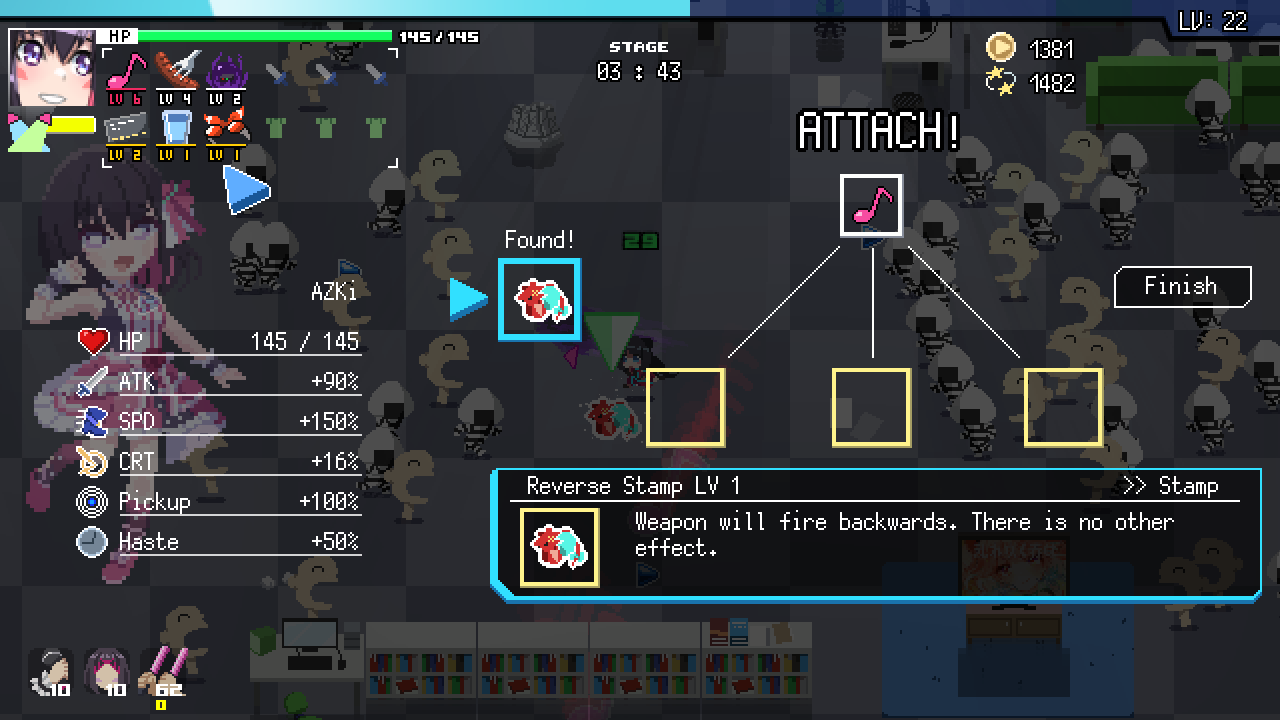
Just like Anvil, Stamps are an item drop that you can equip to your character to give their Main Weapon and ONLY the Main weapon a stat bonus. You can equip 3 stamps at once and upgrade stamps to a max of level 3. Some stamps are useful, others not so much…… I’ll list all the Stamps so you have a general idea of what is what at max level
The 3 Stamps I didn’t include are Reverse, RGB, and Trumpet Stamps. These stamps are just “meme” stamps so you can either sell them or use them as upgrade tools. Each character has different play styles so it’s up to you to decide what stamps to bring.
If your gonna go for a Coin Farming Build I would recommend the following:
Greed + Haste Up + Size Up/Projectile Up
Greed Stamp is the obvious one cause you need to make that gold. Haste Up for faster attacks and the last one you can debate between bigger attacks or more projectiles per attack. Either one is good.
Items, Items, and more Items
Items are also integral to survive in a session. They provided a number of benefits from stat buffs, Utility, and Healing. Some items do a better job than others but all depends on what your really want and need.
Below is a list of items in the game as of 0.6 at Max Level:
There’s alot of Information in this table over so i’ll break down the more important things to look out for.
The Three big things that stand out the most are Halu, Blacksmith Gear, and Kusogaki Shackles. Halu is the main item for coin farming but it’s also the biggest double edge sword. Spawn rate of enemies shoot up as well as HP and DMG in exchange for coins. Coin are given at the end of the stage or upon defeat.
Apart from Halu being the Coin Farmer, These next two are the best items in the game but also have the lowest drop rate. Blacksmith Gear lets you use Normal Anvils twice and increase DMG upgrade for weapons by 3. Combine this with Credit Card which increases drop rate for Anvils, it’s basically 2 free levels every anvil drop and can speed up your endgame build.
Kusogaki shackles negates all negative status for all items in the game. Items that you would normally won’t take like Injection Type Asacoco or Membership suddenly become viable in your build.
Both Blacksmith gear and Kusogaki Shackles are very good items but due to the drop rate, you won’t see them very often but if you do i would recommend picking them up. One thing to note however is if you pick one, don’t pick up the other one up. Only have so many item slots so you have to figure out what you want as you play.
Apart from those you also have the Coin Farming items as well
Halu + Stolen Piggy Bank + Super Chatto Time
Stolen Piggy is kinda meh. Personally I don’t like it but the option is there.
Super Items
Apart from these items you also have Super items. They only spawn in Holozone Boxes and have a small chance for them to appear. You must have a free item slot available for them to appear as well. Don’t rely on these too much since the drop rate is very very low but if RNG is on your side, picking them up is advised.
Here are the following Super items and effects:
Super Study Glasses: Increase EXP gain by 40%, Double Rainbow EXP drop chance
Super Idol Costume: Reduce Special Cooldown by 45% Give Special another charge.
Super Super Chatto Time: Drop 150% more Holocoin. Auto pickup and 1% ATK per 10 Coins picked
Super Gorilla’s Paw: ATK DMG multiplied by 1.5x
Super Body Pillow: Gain shield that absorbs 40 DMG. Refreshes every 15 Seconds, DMG reduced by 30%. When shield is heal 10HP per 3 seconds.
Super Knightly Milk: Increase attack size of weapons by 30%, Pick Up Range by 100%, Increase Max HP by 20
Super Energy Drink: Increase Haste by 30% and SPD by 60%
Super Credit Card: Cost of enhancing reduced by 50% anvils appear twice as often. Every Minute an Anvil will appear
Super Chicken’s Feather: Gain 5 revives. Permanently gain +20% ATK and 10% SPD. Heals 50% upon revive, defeat all non-boss enemies when revived
Super Sake: Gain 30% Crit but aiming direction becomes unstable
Super Limiter: Gain 500% Pick Up Range. EXP and Holocoin gain increased by 15%
Super Nurse’s Home: When Defeat a target, 30% chance to lifesteal 8 HP then a further 5% of Max HP. If taking a hit while less than 15%, chance to heal 30% HP
Super Headphones: 40% Chance to negate 1 Hit and heal 10% Max HP. Create Shockwave that knockbacks all targets.
Super Hope Soda: Increase CRIT DMG by 50%. Every 10th hit is guaranteed to by a CRIT.
Stage End
Last thing to note is the Score Screen
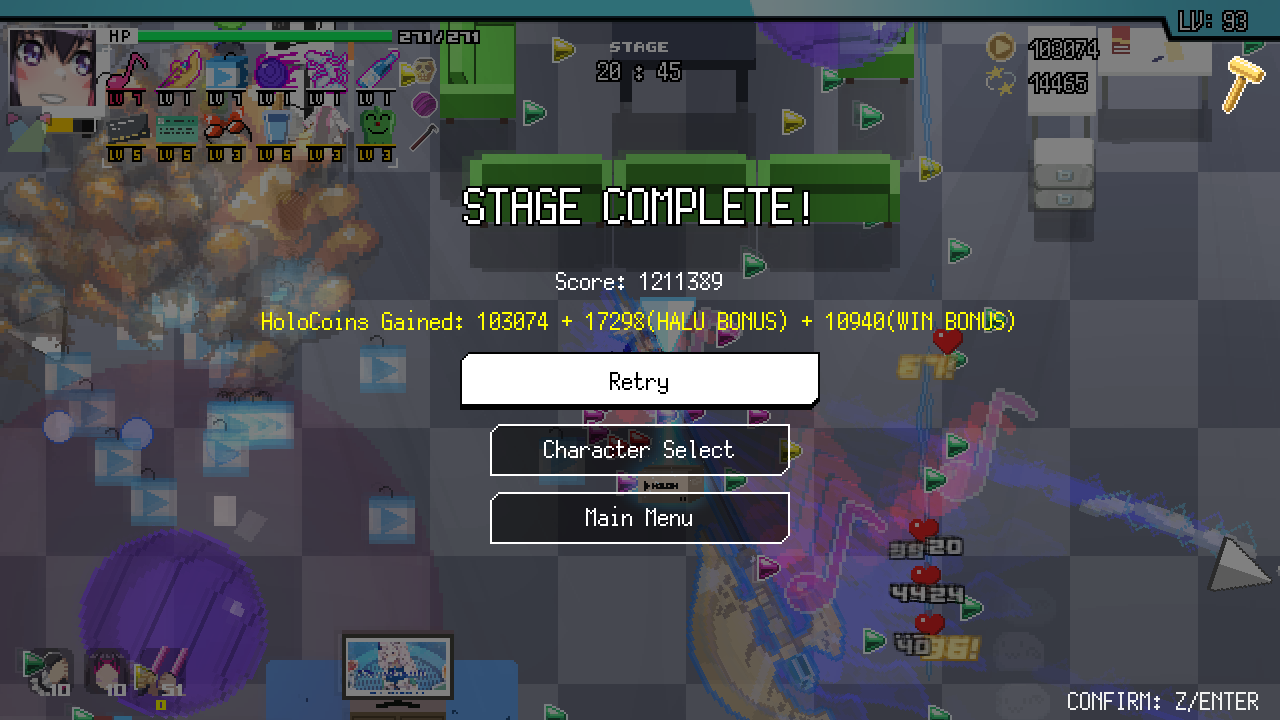
Straight forward here. When you finish a match, (regardless of win or loss) all the coins you collected will be awarded to you. If you manage to successfully defeat the 20 Min boss in stage mode, you get a Win Coin Bonus as a reward. If you have the Item Halu equipped, you will be given all the coins you accumulated since picking Halu up.
Final Notes
I plan to do a guide for all characters as well so expect that soon.
Collab Cheat Sheet
Cheat Sheet for all Collabs and Super Collab Items
Collab Weapons Combo’s
Absolute Wall = Bounce Ball + Cutting Board
BL Fujoshi = BL Book + Psycho Axe
Bone Bros. = Cutting Board + EN’s Curse
Breathe-in Type Asacoco = Holo Bomb + Plug Type Asacoco
Broken Dreams = CEO’s Tears + Spider Cooking
Dragon Fire = Fan Beam + Plug Type Asacoco
Eldritch Horror = EN’s Curse + Spider Cooking
Elite Cooking = Elite Lava Bucket + Spider Cooking
Flattening Board = Cutting Board + Holo Bomb
Frozen Sea = BL Book + Wamy Water
Idol Concert = Glowstick + Idol Song
I’m Die, Thank you Forever = Holo Bomb + X-Potato
Light Beam = Fan Beam + Glowstick
MiComet = Elite Lava Bucket + Pyscho Axe
MiKorone = Elite Lava Bucket + X-Potato
Rap Dog = Idol Song + X-Potato
Ring of Fitness = Bounce Ball + CEO’s Tears
Snow Flower Sake = Glow Stick + Wamy Water
Stream of Tears = CEO’s Tears + Fan Beam
Crescent Bardiche = Idol Song + Psycho Axe
Curse Ball = Bounce Ball + EN’s Curse
Legendary Sausage = BL Book + Sausage
Lightning Wiener = Plug Type Asacoco + Sausage
________________________________________________________________
Super Collab Weapon
Requires a Collab Weapon + Item and (1)golden hammer acquired in-game.
Holy Fire = Dragon Fire + Gorilla’s Paw
Idol Live = Idol Concert + Idol Costume
Jingisukan = Elite Cooking + Uber Sheep
Snow Queen = Snow Flower Sake + Sake
Thanks to MadLad for his excellent guide; all credits belong to his effort. If this guide helps you, please support and rate it via Steam Community. Enjoy the game.
Related Posts:
- HoloCure – Save the Fans!: Tank Class Achievement Guide (500 HP in 1 Run)
- HoloCure – Save the Fans: How to Move Your Save to Steam (Bug Fixed)