I always make music replacement mods for the workshop because it’s the only thing i know how to mod in the game and because it’s fun
but I think that it can be better if everyone else knew how to make some too because that’ll make the workshop better
the only way to learn how to mod from scratch is by looking at the document in the dead cells installation folder but no one wants to read that, so this guide will simplify that document just into how to replace the music files and make a mod out of it
Finding The Dead Cells Directory
A directory is a sequence of file locations, ones that are inside folders inside folders.
They are the things that are always here:

To copy paste one, just select it with your mouse and it’ll highlight the entire thing.
Your Dead Cells directory usually found a “C:\Program Files (x86)\Steam\steamapps\common\Dead Cells”, but it’s not like that for everyone, so:
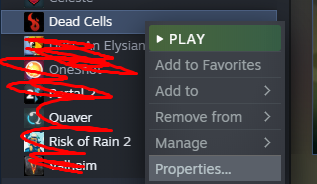
Right click the Dead Cells game icon in your steam library and click “Properties”.
Next, click on “Local Files” and then click “Browse…”
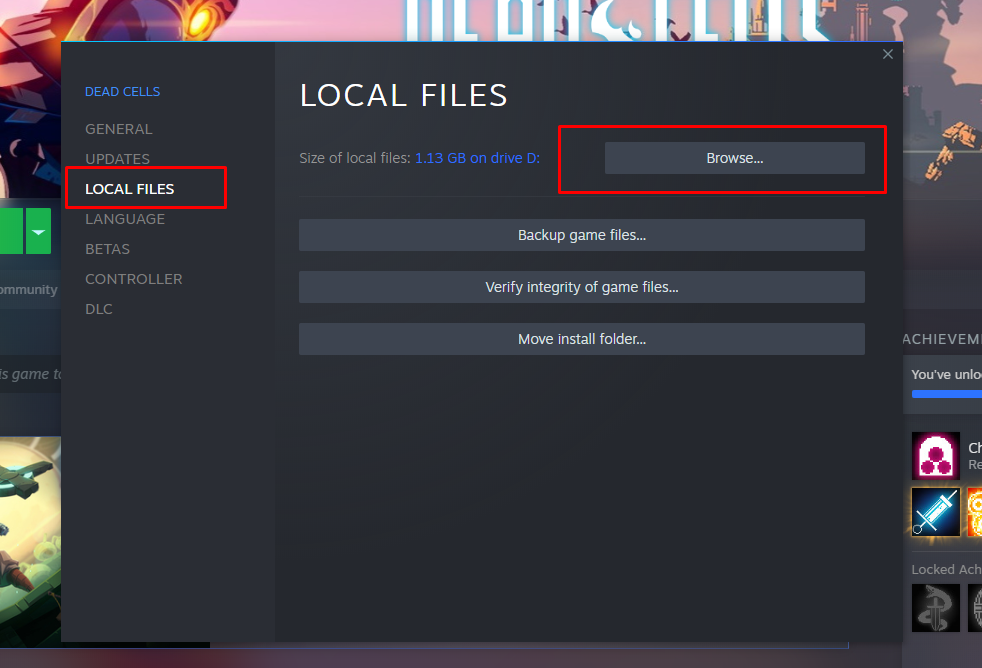
Whatever folder it brings you to is the directory of the game.
Unpacking The Files
“Unpacking” is basically extracting the files out of “res.pak” because it contains all the files that is normally hidden away. These files will be the ones we’ll edit so we can mod the game.
Open “Command Prompt” by using the Windows Search 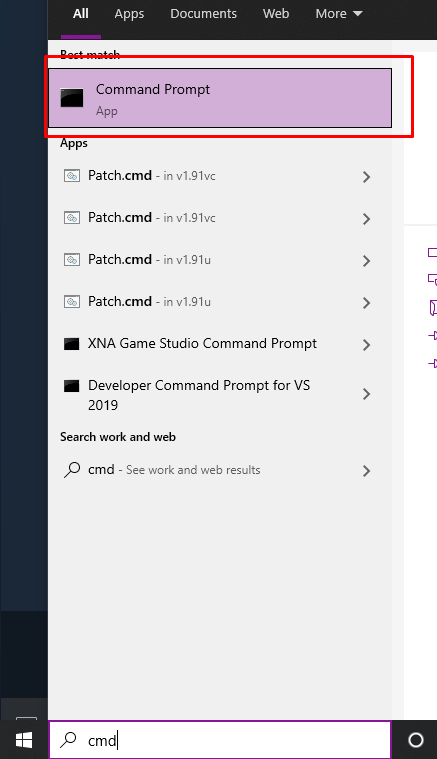
First, depending on the drive your Dead Cells directory is in, input that letter into cmd and then press enter.
D: Drive Example:
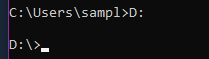
THE CMD LINE BEFORE COPY PASTING THE CODE MUST BE ONLY THE LETTER OF YOUR DRIVE, NOTHING ELSE. If there is something else, it’ll execute the code from whatever extra is added, and not from the beginning of your drive.
——-
Copy paste this into cmd:
Deadcells\ModTools\PAKTool -Expand -OutDir (Output Directory) -RefPak “(Your Dead Cells Directory)\res.pak”
——
Put quotation marks (” “) on both sides of the any directory you copy paste into cmd because if
you don’t, cmd will count them all as separate commands and then this will not work.
(Output Directory): This is where the files will unpak, you can make any folder on your computer for this, just copy paste the directory of wherever you put it.
(Your Dead Cells Directory): Exactly what it says, use the directory you got from earlier in this guide.
[Don’t forget the quotation marks!]
Example:
![]()
If this is all done correctly, this line should show up:

If that line did not show up, recheck all the steps on this section and make sure you didn’t forget anything.
Modding The Music
Navigate to your output directory and locate the “music” folder
You can mess around with the other files if you want to, and if you accidentally ruin the files, just repeat the unpak steps and all the files will replace and overwrite each other. This can also be used if you want to make more than one mod and need clean files.
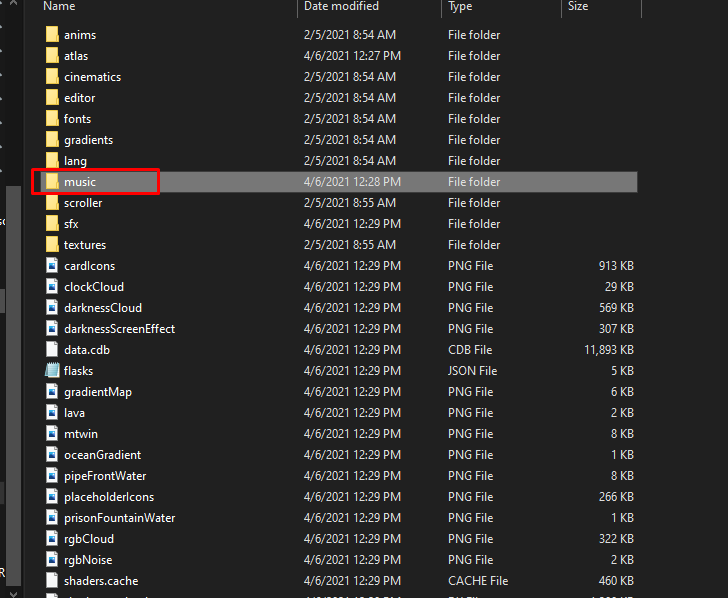
All the files in the music folder are named weirdly and most of the names aren’t even related to what it’s used for, so here is what all the important files represent.
ALL SONG FILES HAVE TO BE .OGG
(I recommend you use audacity to edit the songs to work in the game. For instance, delete any fading or silence at the beginning or end of the song because it’ll make it sound smoother in-game.
Note: “loop” and “intro” at the end of file names represent when they play. For example, loop plays when intro ends, but once intro ends, loop plays forever. Though, not every song has a intro for some reason and it’s just loop. Loops will be described with ^, which means it’s pointing to the file name above it because that’s what it’s linked to.
Extras:
DC_Main: Title Screen
dc_colletor2: This is for the transition area where you would give your cells to the Collector.
shop_loop1: Skill Shop
shop_loop_forge: Weapons Shop
shop_loop_food: Food Shop
First Stage:
PrisonIntro: ] Both are used for Prisoner’s Quarters, but I’m unsure which one is actually
Prisonstart_intro: ] used for Prisoner’s Quarters, so I just make both files the same song.
PrisonLoop: ^
prisonstart_loop: ^
Second Stage:
Promenade: Promenade of the Condemned
Sewers: Toxic Sewers
greenhouse_intro: Dilapidated Arboretum
greenhouse_loop: ^
Optional Stages:
PrisonDepth: ] Once again both are used for Prison Depths but I’m unsure of
DC_Prison: ] which one is the right one, so make both files the same song.
prisoncorrupt_intro: Corrupted Prison
prisoncorrupt_loop: ^
Third Stage:
music4_intro: Ramparts
music4_loop: ^
OldSewers: Ancient Sewers
Ossuary: Ossuary
swamp: Morass of the Banished
First Boss:
Bridge: Black Bridge
Watcher: Insufferable Crypt
swamp_heart: Nest
Fourth Stage:
Village: Stilt Village
templecutpart1: Slumbering Sanctuary
templecutpart2: Slumbering Sanctuary (Awakened) [Awakened meaning when you activate the pillar]
Cemetery: Graveyard
Tumulus_intro: Fractured Shrines
Tumulus_loop: ^
Fifth Stage:
clocktower: Clock Tower
crypt: Forgotten Sepulcher
crypt_loop: ^
truecavern: Cavern
Cliff: Undying Shores
Second Boss:
assassin: Clock Room
giant_rtc: Guardian’s Haven (ambiance before encountering The Giant)
giant_intro: Guardian’s Haven (The Giant Fight)
giant_loop: ^
gardener_music_intro: Mausoleum
gardener_music_loop: ^
Sixth Stage:
castle_intro: High Peak Castle
castle_loop: ^
Distillery_intro: Derelict Distillery
Distillery_loop: ^
Final Boss:
throne: Throne Room
Seventh Stage:
astrolab_intro: Astrolab
astrolab_loop: ^
True Final Boss:
observatory_ambiance_full: The music that plays before encountering The Collector
boss_collector1_intro: The Collector
boss_collector1_loop: ^
observatory_ambiance_short: Song that plays after you defeat The Collector
obesvatory_end_loop: Song that plays after finishing off The Collector
(tip: make these final tracks bad ass)
Those are all the important file names, but you probably noticed I didn’t list a lot of files, well, that’s because they are either unused or pointless to change.
Repaking
Go to the Dead Cells workshop and download the “Dummy Mod”. This mod is used to play-test your mods to make sure everything is working. It can be found here.
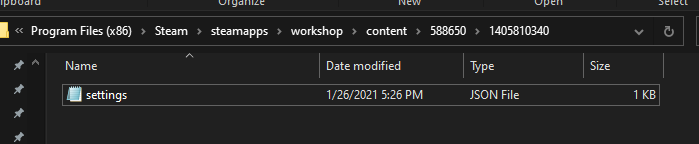
Once done downloading, navigate to its install directory: Steam\steamapps\workshop\content\588650\1405810340
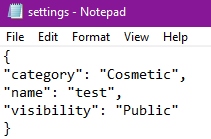
Delete everything other than the settings. Make sure it looks like this:
Once done with that, move the settings file to another folder. This new folder will be used to upload the mod to the workshop.
Moving the files to another location is optional. I never move the files until I’m done creating the mod because you can use the Dummy Mod to play test your mod and make sure all the songs are working because it’s still detected as an uploaded workshop mod. Just note that if you move it somewhere else, you will not be able to play test your mod.
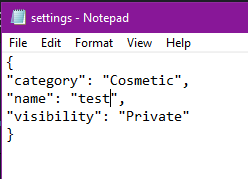
Edit the settings file with notepad or any text editor and name the mod based on what you want it to be. Change the category to whatever you think fits your music mod, but normally it should be listed as Cosmetic. When we upload the mod later, you can change the “Private” to “Public”.
Repaking is just the opposite of unpaking, meaning, the files you edited will be converted into a res.pak so that you can upload it to the workshop.
Same idea as unpaking with cmd, but this time you need to start off from the Dead Cells directory instead of just the drive itself.
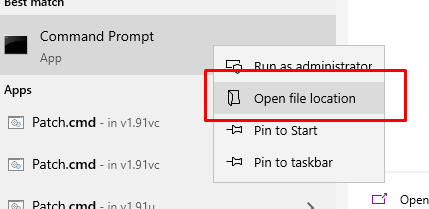
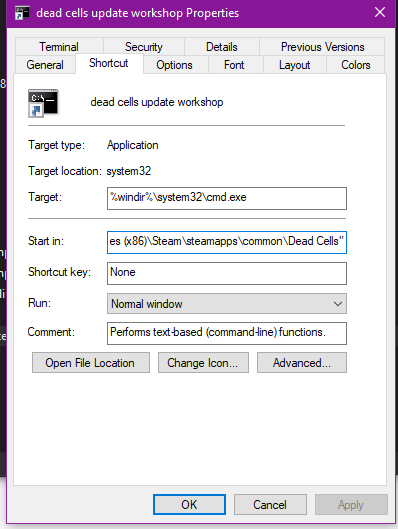
1.) There’s probably an easier way to do this that I don’t know of (comment if there’s an easier alternative way to do this), but for now, find Command Prompt on windows search again, but this time right click it and go to Open File Location
2.) Copy paste the Command Prompt because we are gonna edit its properties.

3.) Go to “Shortcut” in the Command Prompt Copy’s properties and find “Start in”
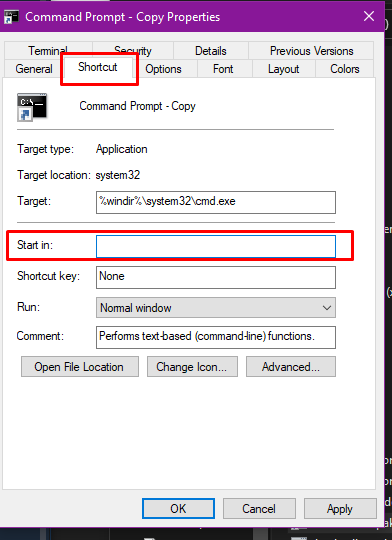
4.) Now, copy paste your Dead Cells directory into it, but this time, add “\ModTools” to the end of it. This is so Command Prompt can access the repakker tool inside it.
Example: “D:\Program Files (x86)\Steam\steamapps\common\Dead Cells\ModTools”
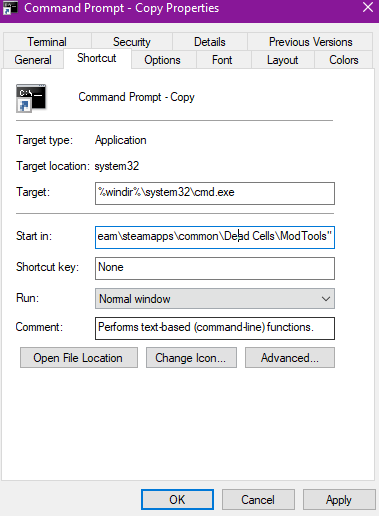
5.) Press “Apply” then hit “OK”
6.) Open the Command Prompt Copy you just edited and it should start up from your ModTools folder.
Example: 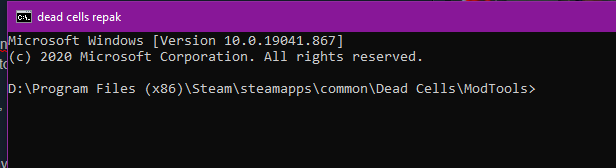
7.) Once it looks like that, copy paste into cmd:
PAKTool -CreateDiffPak -RefPak “(Dead Cels Directory)\res.pak” -InDir “(Output Directory)” -OutPak “[Dummy Mod Directory (Or any directory you want)]\res.pak”
8.) If done correctly, this line should show up again

Now, navigate to the Dummy Mod directory or whatever folder you chose the repak to extract at and there should now be a res.pak

Depending on how much songs you modded in, the res.pak size should be at least between 300 MB to 1.5 GB
The image shows 84 KB on the res.pak because it’s just an example.
Customization
Before uploading to the workshop, you have to customize the settings and a preview image of your mod.
Go back to where ever you put the folder with the settings.json and res.pak.
You can change the settings.json name, category, and visibility if you haven’t yet.
Set the name to whatever you want, category to cosmetic, and visibility to public.
Note: The name of your mod is permanent. You can change its visible name on the workshop when you upload it, but its internal name is permanent. For example, if someone wants to select your mod to use in the game, it’ll appear as what you named it in the settings.json, not the workshop title.
Save and close that once done.
Now you need to upload a preview image as the cover art of your mod.
You can use whatever picture or drawing program you want, but there are some specifications for this image.
1.) Image must be .jpg
2.) Maximum image size is 1024×1024
3.) Must be named “preview”
Uploading to Workshop
Once again, like unpaking and repaking, we need to use Command Prompt again, but it won’t be as confusing as the others.
However, before doing that, if the folder containing your res.pak, settings, and preview image are still in the Dummy Mod workshop directory, place them somewhere else now because it’ll conflict with the Dummy Mod itself if you try to upload your mod to the workshop from there
1.) Make another copy of Command Prompt and go to its properties, shortcut, and “start in” again.
2.) Replace “Start in” with just the Dead Cells directory this time. Nothing special at the end of the directory this time.
3.) Apply and OK
4.) Open it and make sure it starts off with your Dead Cells directory.
Example:

(Make sure you have Dead Cells installed… but why wouldn’t you)
5.) Now put in the code: deadcells.exe –workshop
6.) You’ll probably hear a ding noise and then Steam will give you a popup that looks like this:
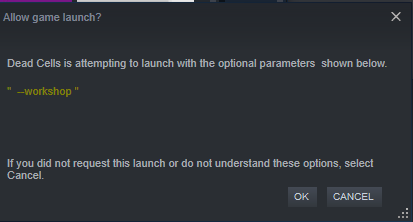
7.) Click Ok and a new command prompt will open:

This is where you’ll upload your mod.
8.) Type n then press enter. It’ll ask you if you agree to the workshop terms of service and then ask you to input the “Local path”
The local path is where you have your settings, res.pak, and preview image stored.
![]()
9.) Copy paste the directory of that folder into the prompt and press enter.
10.) It will confirm with you of the mod you’re about to upload, if it’s correct then enter yes and if it’s wrong then enter no.
![]()
11.) It’ll begin uploading the mod to the workshop which you’ll eventually find on your profile.
That’s all, your mod is uploaded and now anyone can download it.
At first, it might say your mod is on private for the first couple of minutes once you upload it. It’ll eventually make itself go public because it’s still processing the mod to the workshop.
Updating a Mod
This is a format for the description of your mod. You don’t have to use this format, but I personally use it for all my music mods:
——————————————————-
1. subscribe to this mod so it can download
2. in options > sounds > alternative soundtracks, make sure your OST is set to default
3. go to options > gameplay > then scroll down until you see “Enable Mod Interface” then enable that
4. start a new normal mode run (NOT NORMAL MODE (CONTINUE) ) and then the mod interface will appear
5. enable this mod by finding its name ([REPLACE TEXT HERE WITH YOUR MOD NAME])
6. have fun
Main Menu:
Transitions:
Weapons Shop:
Skills Shop:
Food Shop:
Prisoner’s Quarters:
Promenade of the Condemned:
Toxic Sewers:
(Bad Seed DLC) Dilapidated Arboretum:
Prison Depths:
Corrupted Prison:
Ramparts:
Ancient Sewers:
Ossuary:
(Bad Seed DLC) Morass of the Banished:
Black Bridge:
Insufferable Crypt:
(Bad Seed DLC) Nest:
Stilt Village:
Graveyard:
Slumbering Sanctuary:
Slumbering Sanctuary (Awakened):
(Fatal Falls DLC) Fractured Shrines:
Forgotten Sepulcher:
Clock Tower:
(Rise of the Giant DLC) Cavern:
(Fatal Falls DLC) Undying Shores:
Clock Room:
(Rise of the Giant DLC) Guardians’ Haven:
(Fatal Falls DLC) Mausoleum:
High Peak Castle:
Derelict Distillery:
Throne Room:
Related Posts:
- Dead Cells: Fatal Falls DLC Achievements Guide
- Dead Cells: How to Unlock the New 3.2 Crossover Outfits
- Dead Cells: New Achievements Guide (Bank Update)
- Dead Cells: New Achievements Guide (Queen And The Sea DLC)