
Guide to creating and adding custom furniture to Cattails Wildwood Story without the official modding docs.
No coding knowledge required. You will only need to know how to create images and edit text.
Introduction
This does not require any coding knowledge. I tried to elaborate on everything as much as I could; skip what you don’t need, and if you’re having trouble understanding just ask!
Modding like this is unstable, temporary, and may cause issues! This method should become obsolete when official modding support is added.
Also note: I am using Windows 10. I don’t know if this would be different for any other systems.
Accessing Game Files
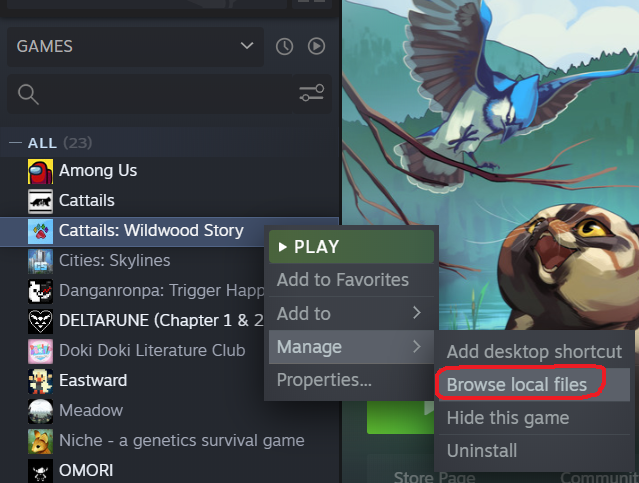
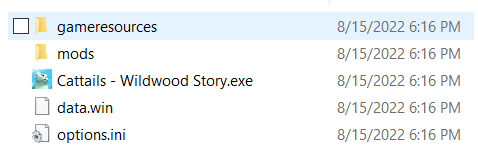
You should be met with these files:
Click the “gameresources” folder, and then the “furniture” folder.
File directory if you’re on Windows should be: C:\Program Files (x86)\Steam\steamapps\common\Cattails Wildwood Story\gameresources\furniture
Creating a Sprite
You will need some kind of image editing software; I used Krita but you can use whatever you want as long as it allows for transparency.
If you’re unsure how big to make your image, I suggest looking at the image dimensions of all the other sprites and copying the dimensions of whichever is closest to the size you want your furniture to be. You may also have to take rotation and seasons into account, which I will explain next.
(Also note that one tile is 32×32 pixels)
This will be my example sprite:
![]()
Some furniture can be rotated, change with the seasons, or have animation.
If you want your furniture to just be one static image (no rotation, no animation, etc), you can just leave the image as is and skip to saving it.
Rotation
If you want your furniture to be rotate-able, make your image width four times as long.
Your sprite will be cut into 4 equal sections:
![]()
In each of those spaces you will draw your furniture in a different direction. The game will cut it into fourths automatically, so that is all you’ll need to do. Make sure each version stays in its own equal width space or it will be cut incorrectly.
Here is my example sprite with rotation:
![]()
Seasonal
This is similar to the rotation. Make your image four times as long, split it into fourths, and make 4 versions of your furniture.
Again: make sure each version stays in its own equal width space or it will be cut incorrectly.
Each space will correspond to a certain season:
![]()
1. Spring
2. Summer
3. Fall
4. Winter
Make sure it is in that order or you will get the wrong sprite at the wrong time.
You can also make furniture rotational AND seasonal at the same time. To do this, you need to make your base image 16 times as long.
![]()
The first four are spring, next four are summer, then fall, then winter, as so:
![]()
Animated
For animation you will make multiple images rather than just one.
You will make one image per frame. When you save your image you will have to save each image as [name]#.png. # should start at 0 and then increase by 1 for each frame.
Example:
Frame One: ![]() testobject0.png
testobject0.png
Frame Two: ![]() testobject1.png
testobject1.png
Frame Three: ![]() testobject2.png
testobject2.png
And so forth.
You can also do this with seasonal/rotational furniture!
Save
When you are done with your sprite, save it as a .PNG into the sprites folder. You can name your image whatever you want, just make sure you remember it because you’re gonna need it later!
Adding a .meta File
When you open up a .meta file, it may ask you to choose a program to open it with. Any basic text editor should work, but I used Notepad.
First copy and paste any of the other meta files (doesn’t matter which, it will be changed), and rename it to your furniture name. This is so that you don’t have to type all of the text out manually.
Here are the (as far as I know) required parameters:
- “attachment”: “freestanding”,
- “unlocked”: true,
- “is_rotatable”: false,
- “is_seasonal”: false,
- “sprite”: “spritename”,
- “function”: “none”,
- “is_solid”: false,
- “blocker_width”: 32,
- “blocker_height”: 32,
- “blocker_x_mod”: 0,
- “blocker_y_mod”: 0,
If you have an animated sprite you will also need to add “animation_speed”: #,
Also Note: Do not delete any of the spaces, quotations, colons, or commas, or else the game will not be able to read the file correctly.
“attatchment”:
Options: “freestanding”, “floor”, “wall” (Make sure these are in quotes or it will break)
Freestanding means you can put your object anywhere other than walls, and on top of floor objects.
Floor objects can only be placed on the floor, and cannot intersect with other floor objects, but freestanding objects can be placed on top of them.
Wall objects can only be placed on the wall.
“unlocked”:
This is whether the furniture is unlocked at the start of the game or not.
true = you will be able to access this item by default.
false = it would have to be bought/obtained in some way.
“is_rotatable”:
Can your object be rotated?
true = yes
false = no
“is_seasonal”:
Does your object change with the seasons?
true = yes
false = no
“sprite”:
This corresponds to the name of your sprite file.
I named my sprite image file “testobject.png” so for sprite I would put “testobject” (no need to include .png as it is assumed).
Make sure the name is in quotes or it will break!
“function”:
If your object has a function or not.
Options: “none”, “bed”, “storage”, “recordplayer”, “pond” (Make sure these are in quotes or it will break)
Pretty self explanitory.
none = it does nothing.
bed = it can be used to save or sleep.
storage = it can be used to access storage
recordplayer = it can be used as a recordplayer
pond = it can be used like the crystal clear pond
“is_solid”:
Can you walk through this object?
true = no, you cannot walk through this, it is a solid object
false = yes, you can walk through this, it is not solid
“blocker width” and “blocker_height”:
Tells the game how big your object’s hitbox is. If is_solid is true then your player cat will not be able to walk through this region.
blocker_width is how wide the object hitbox is in pixels, and blocker_height is the same for how tall it is.
For my example furniture I set both blocker_width and blocker_height to 32 because that is the dimensions of my sprite image:
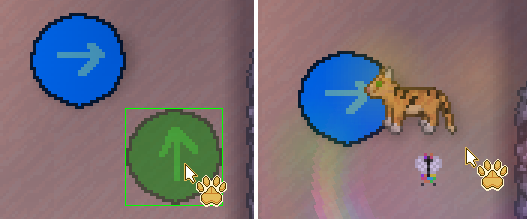
“blocker_x_mod” and “blocker_y_mod”:
This offsets the blocker from the origin.
If you set both to 0 it will be in the middle of your object (like the above image).
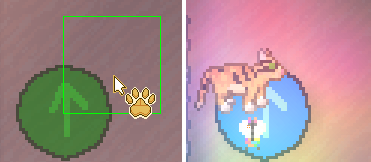
If blocker_x_mod is a negative number, it will move the box to the left, if it is a positive number it will move it to the right.
A negative number for blocker_y_mod will move it up, and a positive number will move it down.
Here I set blocker_x_mod to 16, and blocker_y_mod to -16. My player cat can move over the actual image, but not where the box is (see on the left).
“animation_speed”:
How fast the frames change.
Higher number = slower
Lower number = faster
Now there are still more options to cover but you can leave them out and skip to the next section if you don’t need them.
Light Options
Use these if you want your object to give off light.
“is_light”:
Self explanatory. Does the object give off light? (Defaults to false)
true = yes, show light
false = no, do not show light
“light_color”:
What color is your light? Uses RGB color system.
Input it like this:
“light_color”: [255, 255, 255],
Numbers must be on a scale of 0 to 255
Setting all three numbers to 255 will make the light white.
“light_radius”:
How far does the light extend from the middle of your furniture sprite in pixels
“light_intensity”:
How intense (bright) is your light?
The higher the number the brighter the light!
Must be on a scale of 0 to 1.
“light_x_mod”: and “light_y_mod”:
Like with the blocker mods, this offsets the origin of the light from your sprite by the given number value in pixels.
HOWEVER, unlike the blocker mods, if you leave both at 0 the light will come from the top left corner of your sprite rather than the middle.
If you want the light’s origin to be in the middle of your sprite then you’d have to set light_x_mod to your sprite’s width divided by 2, and light_y_mod to your sprite’s height divided by 2.
Here is part of my furniture’s .meta for reference:
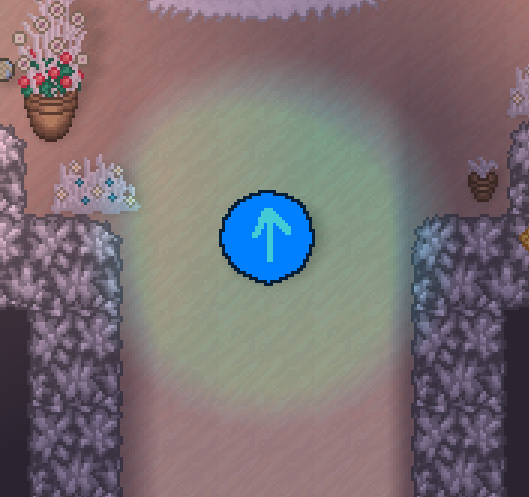
- “is_light”: true,
- “light_color”: [0, 255, 255],
- “light_radius”: 64,
- “light_intensity”: 1,
- “light_x_mod”: 16,
- “light_y_mod”: 16,
Table Options
“tabletop_placement”:
Can this be placed on a table? (Defaults to false)
true = yes, it can be placed on a table
false = no, it cannot be placed on a table
“is_table”:
Is this object a table? (Defaults to false)
true = anything with tabletop_placement as true can be placed on this furniture object
false = no other objects cannot be placed on this furniture object
Rotational Blocker Options
If you have a furniture object that can be rotated, you can use these to make the blocker settings change when it’s rotated
If you want your object to have a specific hitbox ONLY when facing north, you can set these:
“blocker width_north”: and “blocker_height_north”:
“blocker_x_mod_north”: and “blocker_y_mod_north”:
Or for any other direction replace “north” with “east”, “south”, or “west”.
Here are the blocker options for the stone table for reference (only showing north and west to keep it short):
- “blocker_width_north”: 56,
- “blocker_height_north”: 24,
- “blocker_x_mod_north”: 4,
- “blocker_y_mod_north”: 40,
- “blocker_width_west”: 24,
- “blocker_height_west”: 56,
- “blocker_x_mod_west”: 20,
- “blocker_y_mod_west”: 4,
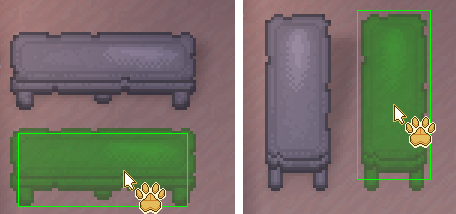
(Left showing North, right showing West)
That should be all for .meta. Now you can continue to the next part! 🙂
Adding a .lang File
(Windows Directory: C:\Program Files (x86)\Steam\steamapps\common\Cattails Wildwood Story\gameresources\furniture\lang\english\)
Inside that folder is a bunch of .lang files. Copy and paste any of the other lang files (doesn’t matter which), and rename it to your furniture name. This is so that you don’t have to type all of the text out manually.
Now open the file. When you open up the file, it may ask you to choose a program to open it with. Any basic text editor should work, but I used Notepad.
It will have these options:
“lang_furniture_name”: “name”,
“lang_furniture_description”: “description”
Like with the meta files, make sure you don’t delete any of the punctuation or it will break your game.
Replace the name and description with whatever you want.
Example:
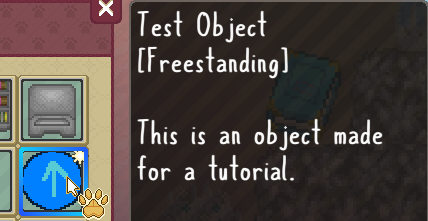
“lang_furniture_name”: “Test Object”,
“lang_furniture_description”: “This is an object made for a tutorial.”
Thanks to god for his excellent guide, all credit to his effort. if this guide helps you, please support it via Steam Community. enjoy the game.
Related Posts:
- Cattails: Wildwood Story – Cat Recruitment Guide
- Cattails: Wildwood Story – Main Story Ruin Guide (WIP)
- Cattails: Wildwood Story – Power Paw Completion Guide
- Cattails: Wildwood Story – Complete Herb Locations Guide
- Cattails: Wildwood Story – Herb Location Guide