This is an official walkthrough written by the developer. It includes instructions for unlocking all endings and bonus content.
The first two important choices occur on the first two days of the story when the Keeper shows you the light, and when the Keeper shows you the rest of the island. It doesn’t matter which activity you choose to do first, as you’ll just do the other one the next day, but it does matter what you choose during those activities.
After choosing to see the rest of the island:
Try to come up with another conversation topic. (good)
Stay quiet. (bad)
After choosing to look at the light:
Offer to help. (good)
Leave. (bad)
The third choice that matters comes a while later, after you’ve returned to the Lighthouse from the Archives:
Ask her when the man with the boat will arrive. (bad)
Ask her about her past. (bad)
Ask her what she wants to do today. (good)
If you picked the bad option for any of those choices, you’re now headed straight to the bad ending. If you picked three good options, then you’ll unlock this last choice instead:
Leave. (bad)
Stay a little longer. (good)
Choosing to stay leads to an important realization, and you’re now on track for the true ending. If you choose to leave instead, you’ll just get the same bad ending.
Once you’ve seen both the bad ending and the true ending, you’ve unlocked a special bonus: Elle’s ending!
The Moonstone (bad)
Surfacing (good)
The English Patient (bad)
Other than that, just do what would otherwise get you the bad ending. If you’ve already seen the true ending and you correctly picked Elle’s favourite book, you’ll get her ending instead. This will also unlock another fun extra which you can find the extras menu.
Days 1 & 2: Kitchen, Guest’s Room, and Keeper’s Room

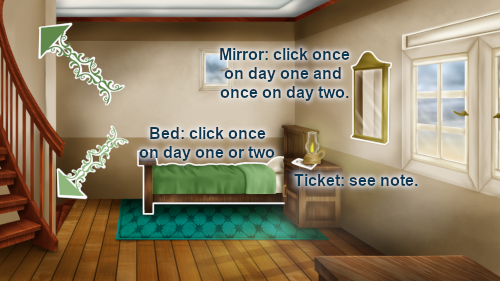
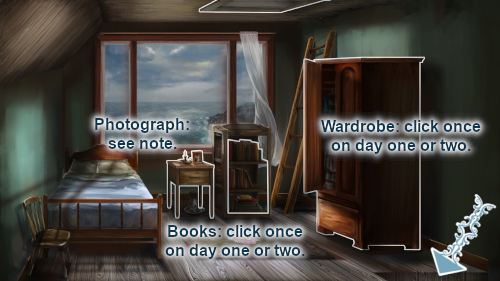
Note: As you’ll have figured out if this isn’t your first playthrough, clicking either the ticket in the Guest’s room or the photograph in the Keeper’s room will trigger an event that ends the point-and-click segment. So don’t click on either of those until you’re done investigating everything else you need to click on that day. On day two, you should also click on whichever once you already clicked on the previous day again, to get more flavour text, before eventually clicking on the other one to trigger the next scene.
Days 3 & 4: Hall, Archives, Elle’s Room, and Jewelry Box
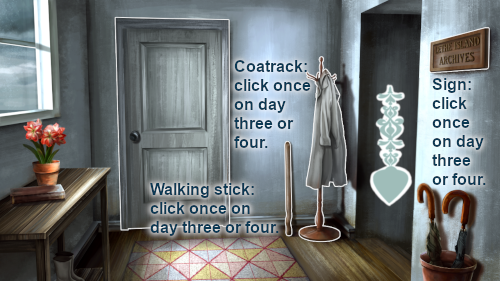

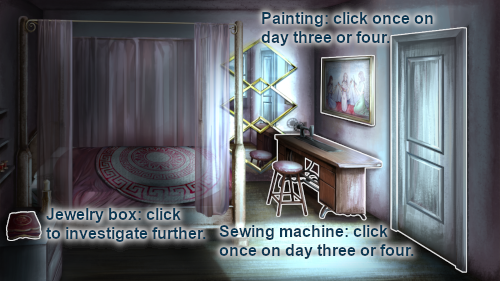
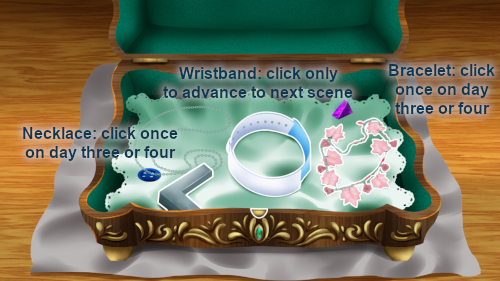
Note: Here, the objects that trigger new scenes are the hospital wristband in the jewelry box and the bookshelf in the archives. However, this time you don’t need to click on either of those again the next day.
Day 5: Cellar
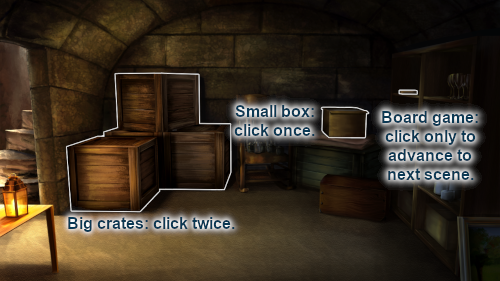
Note: The only object that will trigger the next scene here is the board game.
Day ???: Guest’s Room, Kitchen
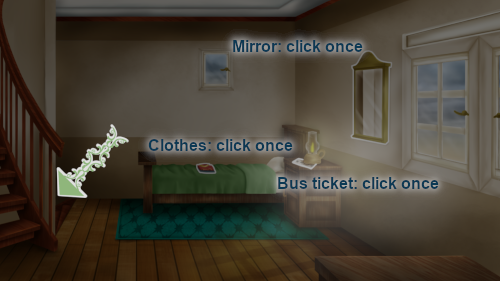
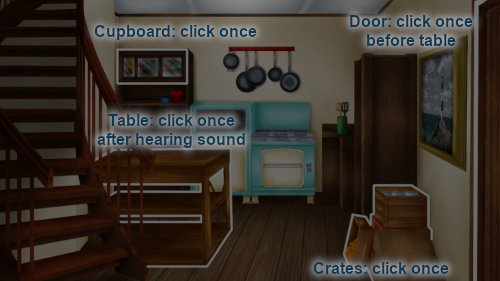
Note: make sure you click on everything in the guest’s room before going downstairs to the kitchen, and then in the kitchen, click on the door once before clicking on the table. After you’ve clicked on the table, clicking on the door again will trigger the next scene.
If you follow all of these instructions carefully, you should unlock the bonus CG! Thanks so much for spending time exploring all the nooks and crannies of my little game. I hope you had fun.

