
This guide will walk you through setting up a vanilla co-op Morrowind experience using OpenMW, TES3MP, Hamachi, and a couple community scripts. It will include everything you need to play through Morrowind and its story with some friends, for free, in a vanilla like manner while modernizing the graphics and terrain distance without extensive modding.
While aimed for people wanting to play the Morrowind story with friends on a private server. It can also be used as a reference for setting up OpenMW for single player or using TES3MP to make multiplayer servers and join publicly available ones.
Introduction
First, you’ll need a clean install of Morrowind with all DLC because they are cheap, they come with it, they are fun, and it’s the only way to purchase in 2020. Since you’ll be using OpenMW things like MGE XE won’t work, however, a wide majority of mods that don’t alter the engine will.
If you are setting up the server you will need to follow all the steps of the guide. If you are a lucky friend simply hoping on to the server you just need to get through to step 4. Step 5 and 6 are for customizing the server itself. Please read all needed sections in depth.

1. OpenMW and TES3MP
Conveniently, TES3MP download comes with OpenMW and thus you’ll just be downloading one package from TES3MP’s website*.
*Note, this is not the latest edition of OpenMW as TES3MP uses an older edition to run. The edition on OpenMW will be newer, however, to my knowledge you need to use the same as TES3MP for it to work. As such, downloading the TES3MP package is the easiest and most reliable way to go about this for the purpose of co-op.
1. Download the most recent package from GitHub through TES3MP’s link:
https://tes3mp.com/
They have a quick start guide on setting up both TES3MP and OpenMW. Below is roughly the same, with the assumption of a clean install.
2. Extract the download to its own folder, personally I would do this to a folder on the desktop.
3. Run openmw-wizard from that new folder. You will have to select your Morrowind install folder. If using steam this will be in your drive/Steam/SteamApps/common/Morrowind . This location can also be found by right clicking Morrowind in your Steam Library selecting properties>local files>browse local files. (You can turn all graphics to the highest setting, this game is from 2002).
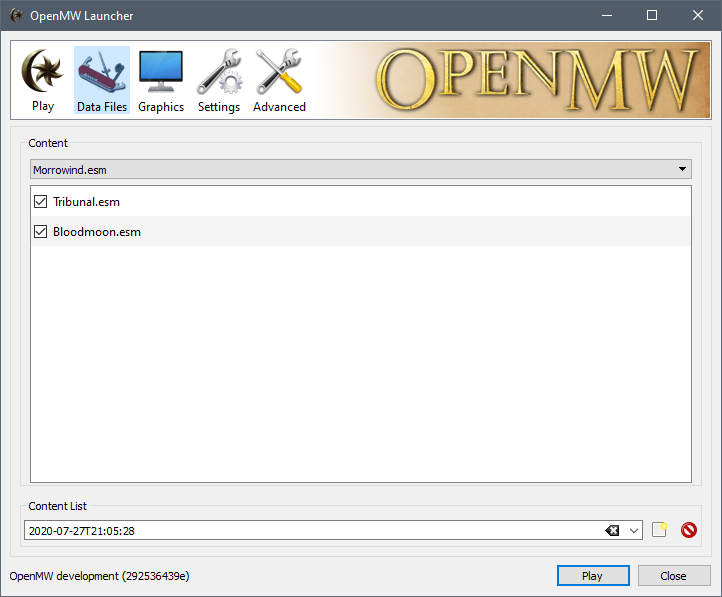
4. Run openmw-launcher from that same folder. Go to the Data Files tab and ensure all your DLC (and any plugins) are checked.
You are now able to play Morrowind single player by running openmw-launcher and hitting play or Morrowind multiplayer through TES3MP Server Browser. The rest of the guide will talk about settings to tweak and running your own custom private server so that you can play through Morrowind’s story with some friends. I advise before continuing to check that you can start up Morrowind through openmw-launcher and that you can browse servers through TES3MP to ensure the install was successful.
2. OpenMW Settings
1. Run openmw-launcher again. This time take a look at the graphics tab. Unless your on a potato or computer that is somehow also from 2002, do your self a favour and turn all settings to max.
2. Now select the Advanced tab. Here is where you can edit a lot of gameplay settings to suit your preferences. I would recommend turning followers attack on sight off if you plan on playing co-op the rest under game mechanics is your choice. Under user interface I would probably turn them all on, since they make life easier and help you understand the game’s systems. This is more important under co-op as unlike single player there are no saves, thus mistakes are more long lasting so it helps to know what’s going on.
3. Now let’s increase the view distance from its 6 ft original radius. This can have more impact on fps, however, you can change the setting as you like until it is right for you. The setting I will give are conservative and should be fine for most without sacrificing nearly anything from in game appearance.
Go to: your documents/My Games/OpenMW
Here there will be a lua file called settings. Open it with notepad.
at the bottom add these lines (in the box):
╭—————————————————————————————————–╮
[Camera]
viewing distance = 66666.0 #Determines how much land is rendered. Add another 6 or 66 to it.
small feature culling pixel size = 2.0 #The default is 2, but you may want to change it to 16 at the highest. Improves performance.
[Cells]
exterior cell load distance = 2 #This loads statics, NPCs and scripts around you. You may want to set this to 2, 3 or 4.
[Terrain]
distant terrain = True #The on-switch to distant terrain. Set this to True.
[Map]
global = true
╰—————————————————————————————————–╯
The original post and values about doing this is are on the OpenMW forums: https://openmw.org/2017/distant-terrain/
*the #notes are from DestinedToDie the original poster. I have changed all the values to ones that I believe will work the best.
Thank you DestinedToDie

3. Hamachi
1. Dowload Hamachi from their website here: https://www.vpn.net/
Run through their setup and load it up. The free version will only allow you and 4 friends to connect. However, this is probably more than enough for a story playthough of Morrowind which is likely best for 1-3 people without custom scripts to scale difficulty.
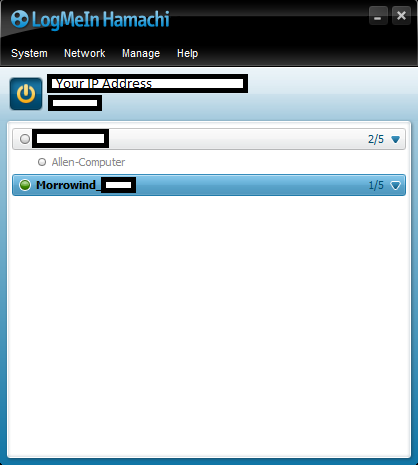
2. Once Hamachi is running. Click the power button to turn on their VPN service. Select the network tab and then create a new network if you are the host or join existing network if you are a friend. You will need to make an ID and a password. The ID is used by your friends to find it and the password to join. Once they have they will become “members” and belong to the network.
Ensure the network is on by double clicking it (a green dot will appear if so).
The next step will talk about changing your server settings so that it uses this Hamachi network. These settings need to be edited by the host and their friends so that they can join your TES3MP server.
4. TES3MP Connecting to the Server w/ Hamachi
To Host:
Open tes3mp-server-default with notepad.
Set: LocalAddress = [Your Hamachi IPv4 Address]
Here you can also set the server password.
To make your server private under Master Server. Set: enabled = false
Now your server will use the Hamachi VPN network.
To Join (Required by Host as well to play on their server):
Open tes3mp-client-default with notepad.
Set: destinationAddress = [Your Hamachi IPv4 Address]
If there is a server password put that ere as well.
To Play:
Your server is now using your Hamachi VPN. You can start your server by running tes3mp-server.exe from your TES3MP folder. You and your friends can join by running tes3mp.exe. Remember, your Hamachi network must also be running and include anyone who wants to join for them to be able to connect to your server via the VPN.
I would recommend trying to run and join your server now before continuing to make sure it all works. Upon start you will need to create your character and a password for you to use so that you can access this character in future. Note, you will spawn in Balmora without the usual starting items and no quest in your journal. We will fix this in the sections below to be as close to Vanilla as possible.
5. TES3MP Base Server Settings
1. Go to your TES3MP folder. Open server>scripts
Open config.lua with notepad.
Here are many server options you can change as you see fit. I will give you soem of my preferences and recommendations.
-You should increase the difficulty level. As more people will naturally make the game far easier. 80-100 is probably good, however, you could also go back and raise this throughout the playthrough as needed.
-You can keep tilde key as false to prevent cheating and make yourself an admin to use it when needed. Its use as well as admin commands will be needed on rare occasions to do some heavily scripted quests. Usually you can simply teleport yourself and your party as needed.
-You should keep faction and quests synced up among players. Morrowind was designed as a single player game and as such not syncing these up can lead to many problems in future.
-Crime bounties can be individual this is fine.
-If you want to be able to exploit buffs to stats as in the original game you should increase the skill and attribute limits. I personally set max attribute to 200 and max skill to 1200.
-The number of days spent in jail upon death can be set to zero and that should prevent the 5 skill loss if you would like. Personally I leave it on, as later we will add scripts to allow for reviving making death far easier to evade. While the punishment of doing so is actually marginally weighted.
-Most others are self-explanatory and can be set as you like.
2. Correcting Start Location
-Open the same config.lua as above
-Due to the way TES3MP and Morrowind work you cannot enter the Census and Excise Office you would normally start off at to make your character. As such, the next best alternative is to set your start location right outside.
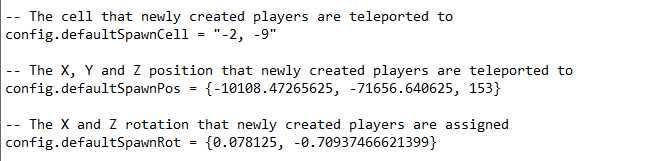
-You can do this by editing the cell of new characters, as well as X,Y,Z coordinates and X,Z rotation. The coordinates for right outside the Census and Excise Office are below:
╭—————————————————————————————————–╮
— The cell that newly created players are teleported to
config.defaultSpawnCell = “-2, -9”
— The X, Y and Z position that newly created players are teleported to
config.defaultSpawnPos = {-10108.47265625, -71656.640625, 153}
— The X and Z rotation that newly created players are assigned
config.defaultSpawnRot = {0.078125, -0.70937466621399}
╰—————————————————————————————————–╯
3. Correcting the Starting Inventory
-The starting inventory can be changed to include Fargoth’s ring and 200 coins to better match starting value of what the character would normally receive from the Census and Excise Office. This also allows them to purchase a weapon, as they no longer get the free dagger.
-Open your TES3MP folder. Go to server>scripts>player
-Open base.lua
-scroll down to “function BasePlayer:EndCharGen()” section
-before the last end in this section add:
╭—————————————————————————————————–╮
local item2 = { refId = “Gold_001”, count = 200, charge = -1 }
table.insert(self.data.inventory, item2)
local item2 = { refId = “ring_keley”, count = 1, charge = -1 }
table.insert(self.data.inventory, item2)
self:LoadInventory()
self:LoadEquipment()
╰—————————————————————————————————–╯
-see image below for more details
-credits to freakysteo101 on reddit from: https://www.reddit.com/r/tes3mp/comments/6rhivx/change_new_player_position_and_items/
Thank you freakysteo101
As always try running your server and joining. Test creating a new character and seeing that these new changes take effect before moving on.
6. TES3MP Community Custom Scripts for Vanilla Experience
1. Fixing the Journal to include the first journal entry.
I got this from Nkfree39 on reddit: https://www.reddit.com/r/tes3mp/comments/hz1lcy/complete_lua_noob_how_would_i_go_about_setting/
Open notepad. Paste in this code:
╭—————————————————————————————————–╮
local function My_OnPlayerEndCharGen(eventStatus, pid)
logicHandler.RunConsoleCommandOnPlayer(pid, ‘Journal, “A1_1_FindSpymaster”, 1’, false)
end
customEventHooks.registerHandler(“OnPlayerEndCharGen”, My_OnPlayerEndCharGen)
╰—————————————————————————————————–╯
Save this as my_endchargen.lua to TES3MP folder server>scripts>custom
*ensure that when you save you select all files and include the .lua to make it a lua file
go to server>script and open customscripts.lua
paste this inside:
╭—————————————————————————————————–╮
require(“custom/my_endchargen”)
╰—————————————————————————————————–╯
The other two custom scripts are installed in much the same way.
2. Atkana’s KanaRevive Script
This script allows you and your friends to revive each other.
github link: https://github.com/Atkana/tes3mp-scripts/tree/master/0.7/kanaRevive
This link contains Atkana’s install and settings instructions. The install is basically the same as the Journal fixing script. First you need to copy his script into notepad and save to server>scripts>custom, then you need to add:
╭—————————————————————————————————–╮
kanaRevive = require(“custom.kanaRevive”)
╰—————————————————————————————————–╯
to server>scripts>customscripts.lua
Then change any settings in his custom script via his instructions on github.
3. Atkana’s CellReset Script
This can be used with some modifications to reset all exterior cells. In vanilla Morrowind creatures respawn in areas once you have left them and come back in some time. While using TES3MP in its default state this does not happen. While not horrible, it does feel more lonely to run along paths you’ve already been and not have any living creatures or enemies to look out for. Atkana has built this script that automatically deletes cell data stored in the server to reset them in a stable way. I have added in all interior cells to his blacklist so that they will not be deleted as most interior cells you do not want to refresh. I have not tested this out heavily, however, I will try it more and it may suit you well in bringing back “respawns”. Keep in mind you should try not to leave things in exterior cells while using as they will refresh. And while it should not be necessary I would recommend trying to to leave your character indoors upon exiting the server.
github link: https://github.com/Atkana/tes3mp-scripts/tree/master/0.7/CellReset
Again, the link contains Atkna;s install and settings instructions. They are the same as above. First you need to copy his script into notepad and save to server>scripts>custom, then you need to add:
╭—————————————————————————————————–╮
CellReset = require(“custom.CellReset”)
╰—————————————————————————————————–╯
to server>scripts>customscripts.lua
Then change any settings in his custom script via his instructions on github. Personally I use a refresh time of 3600 seconds.
Big Thank You to Atkana making Morrowind co-op far more feasible, immersive, and fun.
*Important*: To get it so that it only deletes exterior cells you need to add all interior cells to the blacklist. To do so I have compiled a list of hopefully all interior cells in Morrowind. This list does not include cells for Bloodmoon or Tribunal DLC. If I find one I will add it. For now you can simply deactivate this script when going to these areas.
The list is found in this github link due to Steam character restrictions. (I am not a github expert, hopefully this works)
https://github.com/kellbuck/Morrowind-Co-op-Guide-Files/tree/Blacklistv1
Copy this^ and paste it behind the curly bracket found in Atkana’s CellREset script on the line:
“–Cells entered in the blacklist are exempt from cell resets.
scriptConfig.blacklist = { ”
You can use any of these scripts you like. I would highly recommend the first two, with the third being optional due to its ability to perhaps cause quest problems. If once you have finished installing these scripts your server does not boot up you can try deleting the call line in TES3MP folder>server>scripts>customscripts.lua for each script and running to isolate the issue. It is most likely that you made a mistake or typo while editing settings or copy pasting.