
Guide written while playing.
I will try to unlock all achievements.
Starting a new Game
For the guide I will keep the default names.Youcan skip the opening scene (intro).
Items: 500 G, Healing Herb
You can rest for free in your bed.
The book on the table has the most common game controls for Keyboard, Mouse and Controller.
Note that the TAB-Key on the keyboard is the only means to fast forward texts.
Check out the remaining inventory before you open the door.
Main Quest: Smollel Flowers for Marsha
Items (village): Healing Potion, Revival Herb,
Items (Lister Inn): Antidote
Items (Vaster’s House): 200 G
Items (Marsha’s House): Healing Potion
Items (Villager’s House): Small Bomb
Items (Training Hall): Ointment
Items (Lister Shop): Antidote
Vaster joins the party.
Your destination is the Southern Forest, but best explore the village first.
In the Lister Inn you can buy temporary stat boosts or rest for 10 G (remember that you can rest for free at home or Vaster’s House).
Play the piano to find an Attack Up!
In the Training Hall you can learn about weapons, guarding (halve damage, no death when guarding, 30 TP), the effects of the stats and status effects.
In the Lister Puzzle House, read the left book (“If your name”) and talk to the Puzzle Master.
Return to him after you have solved 4 Puzzles.
In the Lister Shop, buy each weapon type (each type has other skills).
Items:
Mobs: Bat (Healing Herb), Hornet
TP will reset after each battle and start with 0.
To the SE is a pond where you can recover your health.
The path to the south is blocked, so head east when you feel strong enough an pick the Smollel Flowers.
To the NE is the Puzzle #1.
Return to the village to finish the first main quest.
Reward: Smollel Power and Healing Herb x10
Main Quest: Deliver Smollel Powder to Tenton
Upgrade your equipment and leave to the north.
Mobs: Bat, Hornet, Spider (Antidote)
You cannot travel to Remburton yet, but you can visit the Capital of Kandaria or the Clayn Mountains.
You cannot enter yet.
Items (Cave 1): Rusty Shield, Rusty Sword, Rusty Helmet, Rusty Armor
Items (Cave 3): Rage Potion, Healing Dust
Items (Mountain Peak): Rusty Dagger, Healing Powder, Burn Guard (vine)
Mobs: Rat (Healing Herb), Spider
You cannot opend the not solid wall near the entrance yet.
In Cave 1 you can only get the first two treasures.
Cave 2 contains the Riddle #4.
Reach the Mountain Peak.
In Cave 4 you can see the vine to reach the remaining treasures of Cave 1 as well as the short cut back down.
In Cave 5 is another strange wall.
Head down and step onto the red button.
Boss Thug (optional, but necessary for a side quest and achievement): best have one character wear a staff and be level 10 to learn the first AoE Healing Spell. The boss has a high crit chance (see all Dagger Skills). Debuffs don’t stack. Drops 500 EXP and 2000 G.
Items (outside): Ointment, 300G
Items (houses): Revival Potion, Healing Potion, Healing Dust, Small Explosive
In the inn you can still buy stat boosts and rest for 10G.
Play the Piano and find a Defense Up!
The Puzzle House is not available yet, but you can find another clue (“you will enter Puzzle Mode”).
You cannot open Draeg’s chest yet.
Enter the Tenton Shop to deliver the Smollel Powder.
The weapon shop has only the stone equipment.
Now you have a bit free time but you cannot enter the Clayn Mountain anymore.
So return home.
Main Quest: More Smollel Flowers
Your next destination is the Lister Forest again.
But you can still do the optional stuff at Clayn Mountains.
Pick the Smollel Flowers (same place).
Boss Shadow Wolf: Attack until it flees.
Follow it to the south.
Mobs: Rat, Spider
The 2nd map is a little maze behind the stone tablet.
White flowers will lead to treasures, blue flowers to healing ponds and pink flowers will lead you to your destination.
At the first intersection you can only go south (the eastern white flowers is blocked by a log).
At the 2nd intersection find a Healing Potion to the east, Poison Guard and Revival Herb to the west.
You will reach the 3rd intersection going further south or following the west path to the end.
Going east (blue flowers) will lead to a healing pond.
At the 4th intersection head west for Puzzle #2.
Boss Shadow Wolf (2nd battle): this time it will buff itself, so a healer is recommended. Drops 700 EXP.
You enter the dark lab.
Collect Notes x 3 to obtain the Age of Darkness (Key Item).
Investigate the blinking tile to obtain the Mysterious Scale.
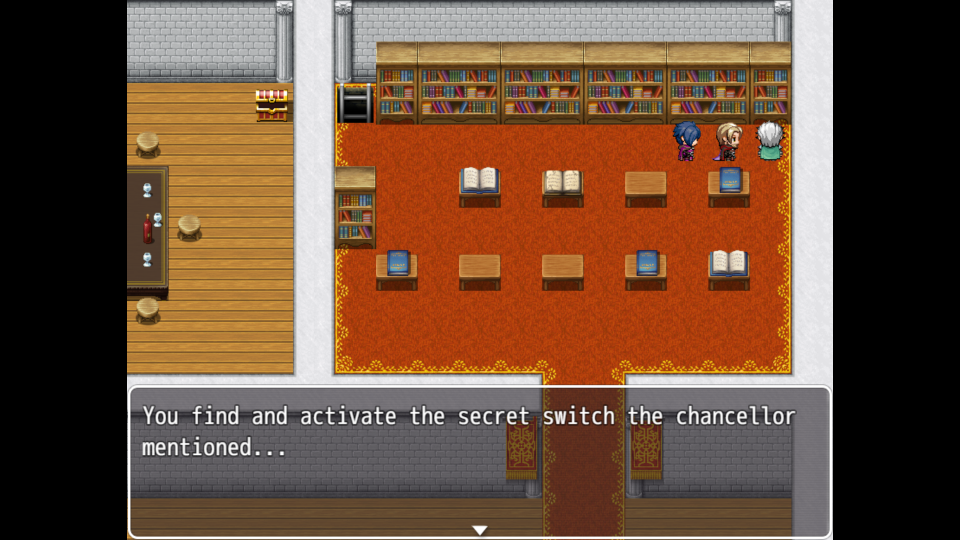
Once the light is on, you can enter the other room and solve Puzzle #3.
Leave the lab and the stone tablets will restore your health and teleport you back.
You finish your quest…
Main Quest: Attack on Tenton
This is the earliest you can talk to the Puzzle Master in Lister’s Puzzle House.
Try to leave Lister to the World Map.
There is still a (shorter) line…
Items:
Mobs: Fire Spirit (Ointment)
In case you missed some treasures earlier, you will find them in front of those houses (no, not the treasure from Draeg).
The boss is near the former pond.
Boss Monster (Draeg?): Protection against Burns and a Healer is recommended. Guard when he collects Mana (or you die).
Rheyn learn magic spells and casts Absorb automatically (or you will die for real).
Once the boss falls asleep you have nearly survived and both will revert back.
Drops 900 EXP.
Follow Draeg to his “house” and then leave Tenton.
Rheyn will learn Welcoming Presence and Fearsome Presence
Main Quest: Report to the King
The villagers and survivors have new dialogues and Draeg is not here.
Items (Merchant District): Energy Potion,
The service in the inn is the same as Lister, so play the piano to find a M. Attack Up!
In the Puzzle House find another clue (“is Puzzle”) and note you need to solve 9 puzzles to proceed.
Buy Rusty equipment and accessories.
Enter the train to proceed.
Items (Castle Courtyard): Revival Herb, Bronze Shield
Items (Castle 1F): Big Rage Potion (kitchen), Eye Drops (dining room)
Items (Castle 2F): Bronze Spear (barracks), Bronze Armor (barrracks),
Note the log in the courtyard as well as the treasure in the pond.
Enter the castle.
In the dungeon next to the kitchen you can find the brother of the Thug from Clayn Mountains (but cannot fight him yet).
Reach the throne room.
Once you are prepared, meet the councellor in the library and enter the catacombs.
Items (Castle Catacombs 1): Blind Guard, Bronze Claws, Bow (Bronze Arrows), Bronze Helmet
Mobs: Lost Spirit, Slime (Eye Drops), Gazer
Slime and Gazer can multiply and blind and are a nice grinding partner.
Note another weird wall.
To the south is Puzzle #6.
Heal (and activate) at the teleporter before you investigate the statue.
Boss Gargoyle: Transform and cast Darkness to shatter. Dispel Shock (or have the correspondending accessory) or guard. You can even gamble with Absorb. Drops 1700 EXP.
Heal at the teleporter before you proceed into the Ancient Laboratorium.
Collect 3x Notes to obtain the Age of Dragons (Key Item) and read the remaining note with the access code (4186).
One maschine is missing a part.
In the room solve Puzzle #7.
Investigate the blinking terminal and enter the access code to proceed.
Read from to top to bottom.
Before you return to the throne room, you can explore the town.
Items (Port): Healing Potion x2, Dragon’s Tear
A trip ticked to Parwan Resort costs 100G.
Items (Residental District): Healing Dust, 300 G, Healing Potion x2, Small Bomb, Small Explosive
Items (courtyard): 500 Parwan Coins (behind the building), 100 Parwan Coins (behind the building), 100 Parwan Coins (east fountain)
Inside you can exchange Gold to Parwan Coins in the ration 10:1.
All services (bar, inn, shops etc) are paid in Parwan Coins.
There are currently no VIP slots left.
The shops have steel tier equipement.
Upstairs is the casino and downstairs the arena.
The fire is extinguised and the mobs are gone.
Talk to the NPC at the pond to start the side quest “Rebuilding Tenton”.
Talk to the King to obtain a Ship to Bareel.
Rest in the inn to proceed.
Main Quest: Desert Vacation
Ride the train.
Next day, head to the port and sail to Bareel.
Items: Energy Potion, 500 G
Restock or upgrade your equipment to bronze tier.
West is the Endless Desert, East the Jungle
Items (Entrance): Smelling Salts
Items (Kenzan’s Tent): 700G
Down the vine to the west is Puzzle #9.
As the entry is forbidden, you can’t do more.
After some tries you will return to the world map.
At the bar you will meet now Draeg who joins the party.
Mobs: Scorpion, Snake, Desert Behemoth
Follow Draeg’s direction to the west, west, west, north, west, south, east, west, north.
Investigate the skeleton to get other directions: up, up, left, right, left, right to Puzzle #8.
Now is your first chance to do enter the 2nd puzzle trial in Kandaria.
Jump into the pit.
Mobs: Snake, Scorpion,
The underground lake has restorative effects.
Boss Fire Dragon: weak to darkness and water, but absorb when he gathers mana for the 1st time. Next hope Draeg uses his scale. After the 3rd time you will be saved by Ellaria. Attack the boss until he yealds. Drops 2500 EXP.
Draeg obtains the Dragon Egg and Ellaria joins the party.
Main Quest: Scale Hunting in the Jungle
Items: Steel Armor, Steel Helmet, Old Necklace (Key Item), Steel Staff, Steel Sword
You cannot destroy the weird wall behind the fire dragon yet.
Show the Old Necklace to the village chief and you are allowed to enter the jungle.
Ellaria won’t enter the castle.
Talk to Kenzan. If you lose this spar, you won’t unlock the achievement.
Boss Kenzan: use the first two rounds to prepare, like drinking a Big Rage Potion (Casino) and Debuffing Kenzan who is guarding or buffing Vaster. The Jungle Fury debuff cannot be healed with Dragon Tear! This not only deals DoT but even explodes at the end, dealing massive damage depending on the physical damage received during the debuff. Kenzan’s moves are scripted, so you can think about a tactic.
You can even feed Vaster the permament stat ups from the pianos!
Possible tactic with Steel Daggers & Equipment, Ring of Speed (you will act first) and Ring of Defense / Ring of Mountains at level 20 (Tactic works with level 12, too):
- Kenzan guards, use Big Rage Potion
- Kenzan guards, cast Sense Weakness
- Kenzan casts Jungle Fury, cast Finishing Stab
- Kenzan attacks, cast Lucky Stab
- Kenzan attacks twice, guard against the explosion
- Kenzan guards, use Healing Elixir (or Big Healing Potion)
- Kenzan guards, cast Sense Weakness
- Kenzan cast Jungle Fury, cast Critical Strike
- Kenzan attacks, cast Critical Strike
- Kenzan attacks twice, guard against the explosion
- Kenzan guards, use Healing Elixir
- Kenzan guards, cast Sense Weakness
- Kenazn casts Jungle Fury, cast Lucky Stab (victory)
Drops 3000 EXP, Striager’s Fang + Achievement “Who’re you calling weak?”
Note: Until this point it is possible to win those Healing Elixirs in the Arena.
Vaster will return to Bareel until you have finished your business in the jungle.
Follow Kenzan into his tent to meet his pet Striager.
Follow them.
Items: Steel Axe, Smelling Salts, Healing Powder, Dragon’s Tear
Mobs: Cockatrice, Monstrous Plant, Jungle Spider, Jungle Bat, Jungle Hornet,
Notice the teleporter (not active) at the start of the maze.
If you run around the block west from the teleporter, you will return there.
Proceed NW of the teleporter, then east (west is a log blocking the path).
Heal and activate the teleporter before you reach Kenzan.
Boss Chimera: Kenzan and Striager (can’t ge controlled) will join for the battle. Don’t use the action that is forbidden during stances (Skill, Attack, Magic)! It will use blind, poison, shock… Drops 3300 EXP.
Restore at the teleporter and follow Kenzan into the Ancient Laboratorium.
Boss Nort & 2x Underling: Draeg will start with active scale. The others should activate their scales too and attack with their strongest AoE and Ingite (even if the boss guards)! Kenzan should guard and use a skill the next turn. Nort will escape once his Underlings are defeated and drop 3000 EXP.
Name the Dragon Cup (I will use my avatar name) and unlock the Achievement “My very own Dragon!” as well as the pet menu.
Collect 3x Notes to obtain the End of an Age (Key Item) and find Puzzle #11.
The other door is currently locked.
Reunite with Vaster and then start breaking some walls (see chapter pet).
Try to enter the throne room and report to the chancellor.
Reward: Ring of Longevity and Ring of Energy
The barricade to the west is open now.
Main Quest: Scale Hunting on the Mainland
Mobs: Lost Spirit, Imp, Ogre, Minotaur, Orc, Werewolf
All shops sell steel tier equipment or medium potions.
Items: Healing Powder, M. Defense Up (Piano), Medium Bomb, Healing Elixir, Revival Dust, Dragon’s Tear, Crystal Shield, Energy Elixir
Men are endangered in the Tarusk Forest…
You need to finish 14 puzzles to do the trial in the Remburton Puzzle House (see all optional puzzles in the area).
The next clue “and without ever leaving your house”.
Items: Rage Elixir, Revival Herb, Healing Potion x3, Healing Powder, Luck Up (Piano), Medium Explosive
You need to be Rank E to even get a reaction from the Puzzle Master here.
Clue: “you do a full clockwise”
Mobs: Minotaur, Werewolf, Ogre
Cave 1 is the exit from the shortcut and further east is only the weird wall and a bit hidden behind the trees a Dragon’s Tear.
Enter Cave 2, head west to obtain the Crystal Armor, solve Puzzle #18 and then head east.
Before you enter Cave 3, collect Crystal Sword and Crystal Shield.
In Cave 3 find Crystal Helmet, a weird wall.
Take the lower west exit to reach another weird wall, the Yellow Button (press it) and the shortcut.
Walk back (don’t take the shortcut) and take the next exit to reach Medium Explosive and Crystal Axe.
Exit to the far west and enter Cave 4 with Puzzle #19.
Leave via the shortcut.
Items: Crystal Armor, Crystal Shield
NW of Tarusk Manor
Behind the tree find puzzle #16 and inside is a log blocking the treasures.
items: Agility Up (Piano), Healing Powder, Revival Herb, Dragon’s Tear, 500G, Medium Bomb, Rage Potion, Energy Potion, 1000G, Medium Explosive
Items (Council Hall 2F): Dragon’s Tear, Healing Potion
The Puzzle Master only talks to Rank F members that have finished 19 puzzles.
Clue: “or touch anything”
You can reach the city wall next to the council hall.
The council is currently focused on the election.
Items (courtyard): Crystal Dagger, Crystal Shield
Items (1F): Dragon’s Tear, Big Healing Potion, 500 Gold, Confusion Guard
Items (2F): Crystal Claws, Crystal Rod,
The northern path is blocked by a tree, so enter the manor.
Don’t follow the steward directly, but explore the manor first.
Notice the content of the inventory there or food.
Last meet with Lady Meriden at the central 2nd floor.
The party will dissolve (Girls and Boys are distributed)
Explore the house again and talk to stewards.
Try to leave the manor to the south…
You find Vaster and Draeg, but Ellaria is nowhere.
Rest in the remaining room on the 2nd floor.
You can rest in your cell and solve the Puzzle #12.
Break out with your dragon (open all cells, see pet for the optional ones, only possible until you defeat the final boss here).
Save Ellaria from the Lost Spirits and defeat the Slave.
Right to the east find Puzzle #13.
Follow the path to return to the courtyard.
Enter the manor and after your talk to Meriden head upstairs into the Lister Forest Ancient Laboratorium.
Head west.
Boss Vaster (Shadow Scale Form): Guard one turn, then transform but then defeat him with multiple hit skills like the Spear skills. You earn 1000 EXP.
You cannot do more for Vaster now, so enter the north room (Draeg’s House).
Boss Draeg (Fire Scale Form) & 2 Slaves: The slaves will boost Draeg, so defeat them ASAP or use your Scale Forms to deal AoE Water damage. You earn 1600 EXP and 100G.
Best return to the dungeon for healing and protect against confusion before you follow Meriden upstairs.
Boss Meriden (Illusion Scale Form) and 2 Slaves: Same as against Draeg until the slaves are defeated, then hope you hit the real Meriden. Hitting the wrong will deal massive AoE damage.
Best only then let Rheyn transform and cast Absorb! Elliera keeps the HP up and Rheyn will defeat Meridan with an Eclipse.
The party is complete again.
Enter the Ancient Laboratorium in the basement.
Collect 3x Notes to obtain the Darkness Returns (Key Item).
Solve Puzzle #14 and activate the terminal.
Your Dragon learns the Lightning Element and unlocks the Achievement “A Shocking Development“.
The last room cannot be entered yet.
The Dungeon is empty now but the former slave is interested to move to Tenton.
Leave the Manor.
Main Quest: Blizzard on the Mainland
Talk to the saved slaved…
Cross the ice bridge at the lake next to the Manor.
Behind the northen dragon statue is Puzzle #17.
After solving that Puzzle you can challenge the trial in Dansvar Puzzle House at the earliest.
Use the teleporter, save and prepare for the next boss battle with Achievement.
Boss Glanier (?): Weak to fire. Glanier’s turns:
- Freezing Wind (Tranquil Guard/Freezing Guard)
- Blizzard (deals over 2000 damage), best counter with Absorb
- Attack
- Wide Arc (guard)
- Attack
- Wide Arc (guard)
- Guard if the “…” reaction had happened
- Freezing Wind
- Guard
- Royal Dezimation (guard!!!)
- Attack
- Attack
- Wide Arc
- Attack…
Bludgeon deals a MAT debuff, immune to most physical attacks but weak to witch hunt, Piercing Thrust/Jungle Fury, Fire Weapon & multiple hit skills. Have high MDF and DEF, some Rage/Energy/Revival Elixiers.
If you manage to win against him, you will earn 10.000 EXP, Elrion’s Blade and unlock the Achievement “It’s Winnable!?”
Boss Glanier (2nd battle): You can absorb the first Glanier’s Fall, but Glanier has a permament HP Regen and the next turn is another Blizzard, annihilating the party.
Vaster will absorb the Type 2 Scale and be kidnapped by Glanier.
The party recovers at the inn.
Elleria will return to Kandaria for research.
Check your gear and then follow your dragon to the council hall.
You find it in the east room.
Until you meet Haley in the inn, you can do some optional stuff.
The Lake Shrine is currently not available.
And no, you cannot visit Ellaria in Kandarian Castle.
Meet Haley in the inn.
Main Quest: Dansvar Council Selection
Haley joins the party.
You cannot leave the town.
Investigate the office in the council hall and read the letter (Evidence).
Interrogate the other councilors and NPC in the hall.
Then witness an event on the west 1F.
Now you can eavesdrop at the window outside.
Follow the suspect and find the hidden passage.
Mobs: Sewer Rat, Sewer Slime, Sahagin
At the first intersection cross the east bridge to gather the Mythril Sword.
Return and proceed to the next intersection.
Head SE and reach Mythril Armor and Mythril Helmet.
Return and head north.
East you find Mythril Shield and Puzzle 21.
Pull the red lever near the NW door to create a shortcut back.
Boss Lamia: weak to lightning, Haley should cast Regen and Draeg attack with a Ignite/Inferno combo. The Lamia can wrap around a party member, disabling him from all actions. Attack until she releases him. Drops 3000 EXP.
Breack the cell door and save Will.
Leave the sewers.
Confront Councilor Jon and leave the council hall.
Main Quest: Vaster’s Rematch
Note that you only have 5x Healing Potion and the equipment Vaster wore during the boss battle at the Lake Shrine.
Vaster is in a party with Elrion.
Buy at least more healing items.
Most likely you have now found exactly 150 treasures, so the recruitment of the treasure hunter is in petto.
Enter Kenzan’s tent.
Talk to Kenzan to start the rematch.
Boss Kenzan: Kenzan’s turns are the same as before. Depending on the items you bought, Guard or use a Rage Potion and then cast Spike Shield. Then attack twice (level 30). If he is still standing then, guard again. Drops 3000 EXP.
Kenzan and Striager join the party.
If you had already defeated Kenzan during your first visit, he only wears a Crystal Spear (the Striager one is unique).
You can rest for free in Kenzan’s tent.
Teleport to the Ancient Laboratory and try to cross the lasers and walk a bit back until Striager learns his first field skill, Stalk Prey.
Cross that door!
Items: Mythril Claws, Healing Potion x2, Mythril Helmet, Mythril Armor, Mythril Shield
Mobs: Jungle Spider, Jungle Bat, Jungle Hornet, Cockatriece, Monstrous Plant, Ferocious Plant
First explore the east side of the map with Puzzle #22!
Near the ladder at the west side will wait a boss.
Boss Chimera: like the other Chimera, avoid using skills, attack of magic depending on the stance. A Freezing Wind/Blizzard Combo deals heavy damage. Drops 3300 EXP.
Enter the Ancient Laboratorium 2 and Striager learns the Water element and unlocks the Achievement “That’s One Cool Cat“.
Collect 3x Notes to obtain the Prelude to War (Key Item).
Solve Puzzle #23 and take the Lightning Scale to unlock the Achievement “King of the Jungle“.
Leave the Lab.
Main Quest: Where is Ellaria?
The NPCs have new dialogues.
Enter the Castle to proceed.
The first guard and the one at the throne room tell you that Ellaria is grounded and is not allowed to get visitors.
If you haven’t yet, open the Ancient Door in the Ancient Lab and enter the royal chambers via the secret passages (see Pets).
You can read Ellaria’s letter to her father or rest for free in her bed.
Leave via the secret passage (you cannot enter the castle for the time beeing).
Boss Vaster and Kenzan (Scale Form): Just defeat them (depending on the equipment they are immune to ignite).
Prepare (heal with potions) and challenge Ellaria.
Boss Ellaria: weak to lightning but remember that your Draeg is weak to water! Depending on her equipment she is probably immune to ignite, too. Defeat her.
Rest.
Main Quest: A Ship, a Ship, a Kingdom for a Ship!
As the Combra Port is destroyed, return to the only left port.
Don’t get caught by the guards on your way to the port.
Ask all the NPCs about a ship and then return to the train to the merchant district.
You obtain a ship from the king to travel to an island to the SE.
The ship can currently only sail in shallow waters.
Mobs: Sea Snake, Drowned Pirate, Water Spirit
Water is weak to lightning.
Mobs: Succubus, Vampire
This place is found east of Combra, a small cave in the mountains.
Right at the entrance collect the Bow (Mythril Arrows) and then choose one of 3 paths.
Lower one: Mythril Shield, Puzzle #24
Upper east: exit from shortcut
Upper west: weird wall, 2 more paths.
East path: Mythril Rod, Green Button (press it)
Stairs: Mythril Helmet, shortcut
Found NW of Bareel behind an island with a reminder to save often.
Most of the area will need swimming to proceed.
Teleport and reach Puzzle #26.
Further north is slippery ice and the Earth Scale.
Note: Secondary Scales have the same skills as primary scales but can be exchanged.
Your destination is the island SE of Kandaria.
Mobs (SE island): Haywire Robot, Malfunctioning Drone
Items: Mythril Armor, Familiar Looking Pipe, Mythril Helmet,
The story proceed once you are near the chest in the house, so you can put the Pipe to use (see Pet).
Meet Shaela, take the last treasure and leave the hut.
Main Quest: Vaster’s Icy Adventure
Items (West Path): Freeze Guard
Mobs: Ice Spirit, Snow Orc, Albino Werewolf, Cave Scorpion
You start right at the healing pond.
Haley has joined Vaster’s party but Elrion leaves and takes the east path..
You cannot leave the cave, so proceed with the west path.
Thanks go your Striager can swim now.
First swim east and gather a Mythril Dagger.
To the west you find Puzzle #27, Healing Powder, Mythril Helm.
Reach the Slippery Ice, north you reach the Big Energy Potion, Dragon’s Tear and Mythril Armor.
South is the exit.
Mobs: Tundra Cockatrice, Snow Orc, Ice Spirit
The labs are to the west, SE
East and NW is a village, NE the igloo, SW the Southern Snow Tree.
Items: Orichalcum Staff, Orichalcum Shield
In the north is the Puzzle #31.
Items: Large Explosive
Items: Healing Elixir, Big Energy Potion, Revival Dust, Dragon’s Tear
Note that there is no Piano and the night in the inn cost double than near the mainland.
The armor shops sells some crystal tier armor.
Items: Energy Elixir, Revival Potion, Freeze Guard, Rage Powder
Same for the inn like in Ental.
This village sells only crystal tier weapons.
The little girl at the snowman is your possible Puzzle Master for Tenton.
Find her treasure in the village (in the snowman, 1G).
Items: Orichalcum Helmet
Collect 3x Notes to obtain the War of the Heavens (Key item).
Upstairs is Puzzle #28.
Pass the laser door, read the notes about the NW island and collect the Fire Scale.
You meet the boss from the Bareel Jungle Ancient Lab again.
Boss Nort & 2 Underlings: They are a bit stronger, but with some AoEs and then focused attacks they should be defeated soon. You earn 5000 EXP.
Items: Orichalcum Armor,
Collect 3x Notes to obtain the Capture of Sleppek (Key item).
Read the other notes about the NW island.
Upstairs is Puzzle #29.
You need the dragon to open the last door, so leave and end this adventure.
Main Quest: The Train-Ship to Tyenar
Mobs: Ocean Sahagin
Mobs (Snowy Island): Snow Angel (Revival Elixir)
Mobs (Syltz Island): Watcher, Troll, Cerberus
Your destination is Yezur, the port town of Tyenar
The is a small snowy island with a save sign east of Ental.
The Snow Angels give only 1 EXP but 2000 Gold each and are super strong and fast.
Items: Revival Elixir, Healing Elixier
Directly east/west from the Yezur is another island – the one mentioned in the notes.
The shops sell Mythril Tear weapons.
No Piano in the inn and one rest cost 20G.
You need to be Rank C to start the Puzzle Trial.
New clue: “while hugging the walls”.
Items:
Mobs: Troll, Cerberus,
Listen to the villagers and don’t enter without Tranquil Guards and a high level.
It gets darker the deeper you go and at one point you will turn around.
Items: Big Healing Potion, Freeze Guard, Big Energy Potion, Revival Elixir, Orichalcum Helmet, Orichalcum Armor
No Piano, same shops as in Syltz.
The Puzzle House is available with Rank D and 29 solved puzzles.
Clue: “loop of the inside”
You will have it much easier when your dragon has learned the ice element.
After the slippery ice head east to reach Puzzle #32.
Then head west, collect the Orichalcum Sword and reach the healing pond.
You cannot swim now so take the east path.
Reach the bridge.
Boss Elrion: weak to fire but remember he wears gear with immunity to status effects.
Freezing Winds, Blizzard, etc.
He has the same turns like your first encounter. As long as you Absorb the Blizzard, and don’t mess up with the buffs, you can defeat him. Especially with those extra scales or extra skills. Just hope, that his Royal Decimaler won’t wipe you out.
Drops 10.000 EXP.
Main Quest: The dangerous Island
You switch back to Vaster and his party steals your ship.
Now that you can revisit old locations, check under pets if there are places you can do something.
You should especially get the extra scales!
Reach the floor Rheyn had to turn back earlier (optional) and Striager will use his light skill as a lamp.
Right behind you is Puzzle #36.
Further south see all those skeletons.
Boss Shadow Wolf: Striager should be the light element. With combos like burn/inferno, shock/thunderstorm and HP/MP Regen you can easily win the first phase. Then it starts summoning your shadows. If it has summoned Haley’s Shadow, cast Dispel to get rid of her regen effects. Defeat the summons ASAP (only the Scales are copied, not the equipment). Vaster’s and Kenzan’s summons will cast their AoE very often. Drop 10.000 EXP.
Striager learns the Shadow Element and unlocks the Achievement “Tall, Dark and Handsome“.
Main Quest: Confronting the Emperor
After Ellaria has calmed down, you can explore the inn.
The prices here are 5x of Kandaria.
Play the Organ and take to the fan to obtain Attack Up, Defense Up, M.Attack Up, M.Defense Up, Agility Up and Luck Up.
Items: Large Explosive, Big Rage Potion, Bit Healing Potion, Big Energy Potion, Revival Potion, Dragon’s Tear, 1000 G,
You cannot reach the chest in the pond.
The first doctor you meet is not your recruit.
For the Puzzle Trial you need to be Rank B and have solved 39 puzzles.
Clue: “before finally touching”
The shops sell orichalcum tier equipment.
As your ship has been stolen by Vaster, you can only proceed.
When you try to enter Tyenar Castle, you have your 3rd bout with Nolt.
Boss Nolt & 2 Underlings: same tactic as before. Drop 7000 EXP.
Enter the castle.
The soldiers are not cooperative and attack you (but don’t respawn).
At the entrance you need a Red Key for the West Wing.
Explore the East Wing 1F: You need the Green Key and reach the East Tower.
Exit the East Tower to the south to find the Coil of Rope.
Enter East Tower 2F, but you need the Red Key.
Return to the Entrance and go up to F2.
All 4 doors behind you need either the Red, Yellow or Green Key.
Go up to F3.
The door to the north needs a Blue Key.
Enter the balcony, take the Revival Elixir and use the Coil of Rope to climb down to the city wall.
The chests on the city wall are guarded by a bit stronger Lieutenants.
Obtain the Red Key and reenter the castle via the gate, not the rope.
Unlock the West Wing 1F and find another door for the Blue Key.
Reach the West Tower 1F, exit to the south and obtain the Diamond Axe.
Enter West Tower 2F but you need the Yellow Key.
Return to East Tower 2F and unlock the door.
In the Storage find the Yellow Key and Puzzle #37.
At the end of the passage unlock the door and you return to the 2F above the entrance hall.
Return to West Tower 2F and unlock the door.
In the Storage find the Green Key.
At the end of the passage unlock the door and you return to 2F above the entrance hall.
Unlock the door to the eastern city wall and obtain the Blue Key.
Unlock the Storage in the East Wing and gather Diamond Shield, Diamond Helmet and Diamond Armor.
Unlock the Storage in the West Wing and find Diamond Dagger, Diamond Staff and Puzzle #38.
Unlock the Throne Room at 3F and proceed.
Boss Emperor Tyebold III: Under the Type 3 Scale you have to prepared for everything,. Keep the Regen-Buffs active, and use ignite/inferno combo or magic weapon skills. Once he targets a character, he will die the next turn. Best protect your Healer with the 2nd Chance Pendant. Drops 12.000 EXP.
Main Quest: Reunion
After getting thrown into the Shadow World by Striager, Rheyn is alone first.
Head north to the Shadow Dragon Lune.
You can now build your party from Rheyn, Vaster, Draeg, Ellaria, Kenzan and Haley.
Striager learns to find Memories, which can be used by Lune to train the party.
Both Striager and Dragonbaby will now active party pets but only one can help in battles.
As you are searching for Elrion next, you should take Ellaria with you.
Return.
The side quests “Saving Elrion” and “Kenzan’s Past” are now possible.
Enter the Ancient Laboratorium behind the throne.
Items: Lightning Scale
Collect 4x Notes to obtain the Age of Humanity (Key item).
Solve Puzzle #39 and activate the Ancient Maschine so that your dragon learn the Wind Element.
You can now revisit old places (see pets) or find new locations.
Items: 5000 Gold
Items (button bridge): Defense Up, M.Defense Up, Attack Up, Super Explosive, Aegis, Yggdrasil’s Branch, Super Bomb, M.Attack Up
Mobs: Trickster, Lilith, Rabid Cerberus
At the first intersection find Puzzle #41.
You can only proceed here if you have pushed all buttons in the Clayn Mountains.
Solve Puzzle #42 and reach Veratigon’s Throne Room.
Ex-Councilor’s assistant is now here.
Bring him to Jon in the Dansvar Sewers and you can recruit Jon.
Once Tenton is fully rebuilt, talk to Granny about the Antidote to SLOW DOWN.
If you somehow have lost your ship, talk to a new NPC at the left dock.
 With this location you have 3 places to grind, one for EXP, one for Gold and one for Stat Ups.
Main Quest: Follow Sleppek
Side Quest: Haesovys, Queen of the Sky, should visit a place over the clouds.
Enter the Sky Shrine with Haley in the party to obtain the Memory of Wind.
Enter the west passage and find the bird there.
Behind it is the Puzzle #43.
Boss Western Guardian: weak to physical attacks.
Enter the eastern passage and find a robot there.
Behind it is the Puzzle #44.
Boss Eastern Guardian: weak to magic.
But the teleporter is still not activated.
Defeat the Western Guardian again and return to the Eastern Guardian.
Now the Group will spilt up!
Talk to Luna about it.
Return to one of the bosses and split.
Have strong party members fight the Western Guardian with Striager (Water) and the others fight the other with your Dragon (Lightning).
Your original group will reassemble at the teleporter, but get the Agis (West) and Energy Conductor (East) first.
The teleporter marks a Point of No Return until Sleppek is defeated.
Make certain that your pet has the Shadow-Element.
Boss Nort (Scale-Transformed): The Tentacle is similar to the Lamia. Keep the HP of the wrapped character high until he gets released or devoured. Destruction can kill a character – so 2x water scale and 2nd Chance Pendants (Tenton rebuilt) are recommended.
You cannot heal between battles.
As long as you haven’t defeated Sol in his prison, you can only choose “…”.
You can save on another slot.
Boss Sleppek, Physical Nullifier and Magic Nullifier: Best get rid of the Magic Nullifier with physical attacks first. It can drain MP as the Physical Nullifier can drain TP.
Once the magic one is defeated, transform and take out the Physical Nullifier.
Sleppek will attack with Light Arrows (all) and other light skills you already know from Striager. He is weak to darkness.
Dispel is not effective!
Once Sleepek has died once, he will revive with 5000 HP and absorbs Sol’s Power.
Save and equip 2nd Chance Pendants!
Boss Sleppek (transformed): You cannot use your scales in turn 1, best guard and survive the Starfall. 2nd turn is Starfall again, but you can use your scales to bring up your buffs. 3rd turn is Authority (buffs/debuffs), dispel is in the next turn. 4th turn Starfall, 5th Flurry of Blows, 6th Starfall, 7th Nightmare (sleep AoE), 8th Authority, 9th Starfall, Battle ends.
Your scales shatter!
Boss Sleppek (transformed) and Physical Nullifier: You cannot defeat the Physical Nullifier and after an Nightmare, the battle stops again.
Lune intervenes and the dead dragons transfer their last power to the party.
Boss Sleppek and Physical Nullifier: You cannot revert and have 9999 HP and 100 MP. Having Haley is not necessary as you will have a huge Regen effect. The Pet will be deated first. Dispel his Authority and defeat him.
See the bad ending and unlock the Achievement “The End?”
If you have already defeated Sol in his Prison:
Boss Sleppek, Physical Nullifier and Magic Nullifier: Best get rid of the Magic Nullifier with physical attacks first. It can drain MP as the Physical Nullifier can drain TP.
Once the magic one is defeated, transform and take out the Physical Nullifier.
Sleppek will attack with Light Arrows (all) and other light skills you already know from Striager. He is weak to darkness.
Dispel is not effective!
Once Sleepek has died once, he will revive with 5000 HP and absorbs Sol’s Power.
Save and equip 2nd Chance Pendants!
Boss Sleppek (transformed): You cannot use your scales in turn 1, best guard and survive the Catastrophe. 2nd turn is Authority (opposite of Providence), but you can use your scales to bring up your buffs. 3rd turn is Judgement, and he will summon a Physical Nullifier. 4th turn is Catastrophe and he will summon a Magic Nullifier. 5th turn is Authoriy and Physical Nullifier and so on.
Survive until Sleppek will end this round.
Your scales shatter!
Boss Sleppek (transformed) and Physical Nullifier: You cannot defeat the Physical Nullifier and he can still cast his Catastrophe, but after a Nightmare, the battle stops again.
Lune intervenes and the dead dragons transfer their last power to the party.
Boss Sleppek and Physical Nullifier: You cannot revert and have 9999 HP and 100 MP. Having Haley is not necessary as you will have a huge Regen effect that even revives. The Pet will be deated first again.
Sleppek will summon a Magic Nullifier at the 1st turn. Dispel his Authority and defeat him.
He will summon his Nullifiers again.
Enjoy the good ending and unlock the Achievement “Reunited at Last”
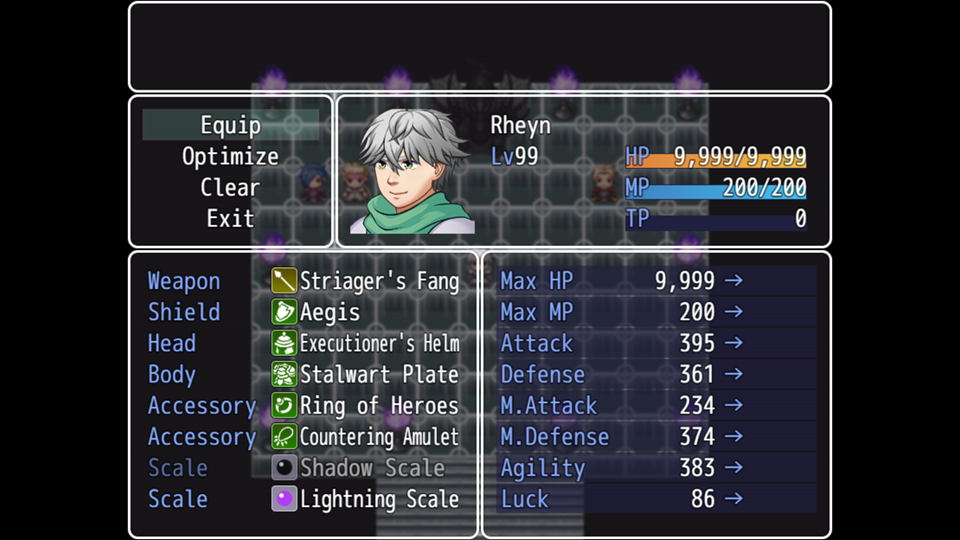
Character: Rheyn
Note that you will learn multiple skills when levelling up, but you will only see those for which you wear the correspondending weapon.
Character: Vaster
Vaster is the best friend of Rheyn and joins you for the first Main Quest.
Scale Skills
Character: Draeg
After some hurtful meetings Draeg joins the party in Bareel at level 12.
Character: Ellaria
The princess of Kandaria joins you during the battle against the Fire Dragon with level 12.
Character: Kenzan
After Vaster’s rematch, Kenzan joins Vaster’s party.
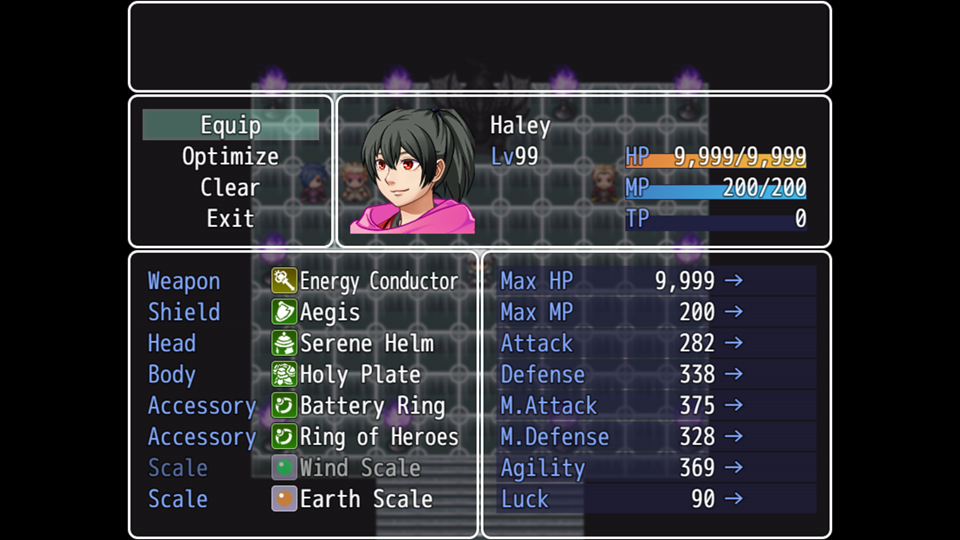
Character: Haley
Haley joins the party in Dansvar after Vaster has been kidnapped in the Lake Shrine at level 20.
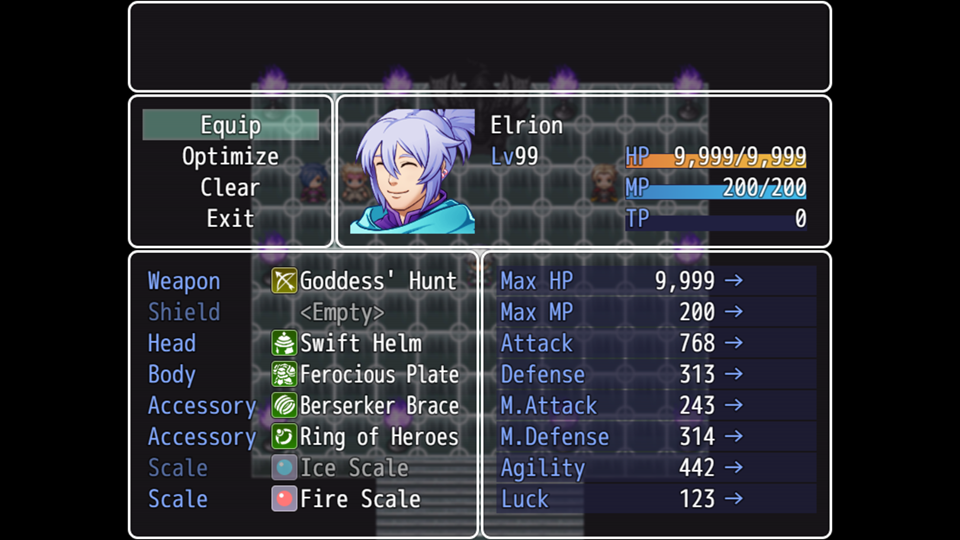
Character: Elrion
As long as Elrion is under the control of Glanier, he is only a guest.
Pet: DragonBaby (aka Firefly)
It cannot be controlled in battle like Striager.
Its Element is Earth and it can destroy unstable walls!
It will learn more elements later.
- Desert Cave: The Fire Dragon has perished but you will find the Bow (Crystal Arrows).
- Kandarian Catacombs: Crystal Staff
- Kandarian Castle Dungeon: break the cells and and the thug will escape to Eastern Clayn Mountain Peak. Defeat him to obtain 1000 EXP, 10.000G and unlock the Achievement “Crime doesn’t pay” but don’t underestimate him. That battle gets much more difficult if you have ignored his brother earlier.
- Eastern Clayn Mountains (2x): Tenton Barkeeper, Crystal Helmet, Crystal Armor, Ring of Sturdiness, Ring of Resist
- Western Clayn Mountains: Healing Elixir (Entrance), Energy Elixir x2 (Cave 3, cliff outside cave 3)
- Tarusk Dungeon (optional, not essential): Revival Potion (NW cell), no reward in the north cell, Crystal Helmet (NE cell), Big Energy Potion (SE cell)
- Southern Clayn Mountains, upper west path: Mythril Armor
- Forest Ancient Laboratorium: activate the terminal and your dragon learns Ice Element and unlocks the Achievement “Cold as Ice“.
- Kandarian Castle Catacombs, Ancient Laboratorium: open the door to reach Big Healing Herb, Healing Powder, Dragon’s Tear, Revival Dust (Castle 1F). Pull the lever at the 2nd floor to extinguish the fire and steal 5000 Gold, Ring of Scales, Tranquil Guard and Revival Elixir from the royal family.
- Kandarian Castle Catacombs, Ancient Laboratorium: repair and activate the ancient maschine with the Familiar Looking Pipe from Shaela’s House to obtain the Wind Scale
- Ocean Shrine: Earth Scale
- Ice Cave (Yuzer Entrance): Orichalcum Spear
- Ice Cave, west path
Dragon can fly on the world map with F (take off / land).
Pet: Striager
Like the dragon it cannot be controlled but can learn more elements during the game.
It will join the party after Vaster’s rematch.

- Western Tundra Ancient Laboratory: Notes, Fire Scale
- Tarusk Manor Ancient Laboratory: Striager learns the Fire Element
- Ice Cave, West Path (Main Story)
- Lister Forest, healing pond: Bewitched Hat, Bewitched Garb
- Desert Cave, healing pond: Agile Hat, Agile Garb
- Ocean Shrine: Puzzle #33, Shadow Scale
- Lake Shrine: Puzzle #34, Water Scale
- Tyenar City, pond: Sol’s Talon
- Kandarian Castle pond: Warrior’s Hat

- North Clayn Mountains, reach Veratigon’s throne room after the button bridge: Memory of Earth
- Side Quest: Saving Elrion
- Lister Forest, maze NE: Inverse Helmet, Inverse Armor
- Kandarian Castle: Warrior’s Garb
- Bareel Jungle: Evasive Garb, Evasive Hat
- North West Tree: Healthy Garb, Healthy Hat
Weapon Skills
You will only see the skill in combination with the weapon type.
Those Skills will hit to 100%!
- Striager’s Fang: Jungle Fury
- Fist of Midas: Gold Rush
Damage dealt is 10% of current money.
When the money ends with a 7, the damage is doubled.
Maximal damage is 9999 HP, so either you have over 99.000 Gold or a total of 49.997 Gold. - Elrion’s Blade: Royal Decimation
- Sol’s Talon: Slaughter
- Goddess Hunt: Designate Prey
- Labrys of the Lost: Vengeance
- Yggdrasil’s Branch: Echo of Chaos
- Energy Conductor: Limiter Release
Puzzles #1 – #15
You will only get rewards during the main story mode.
Location: Lister Forest, NE of the healing pond.
Reward: Ring of Strength
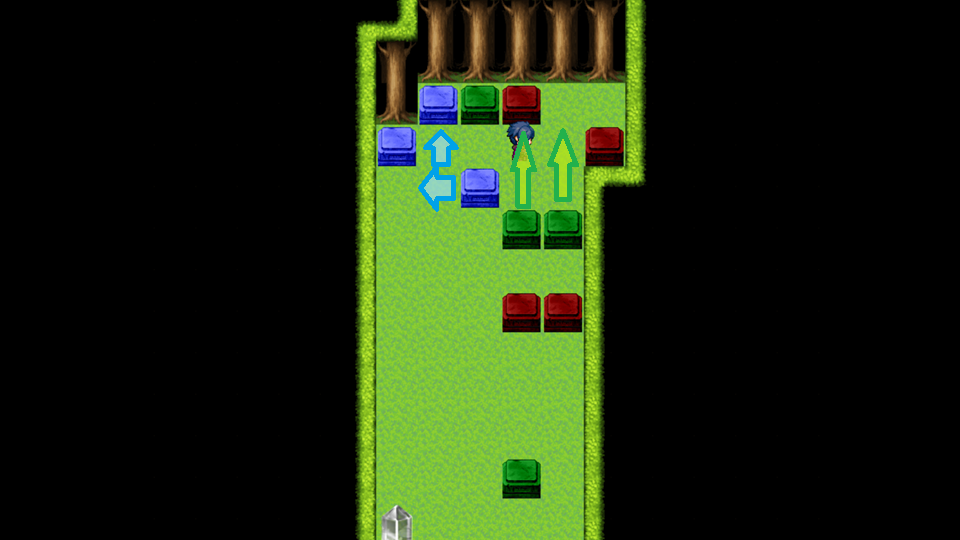
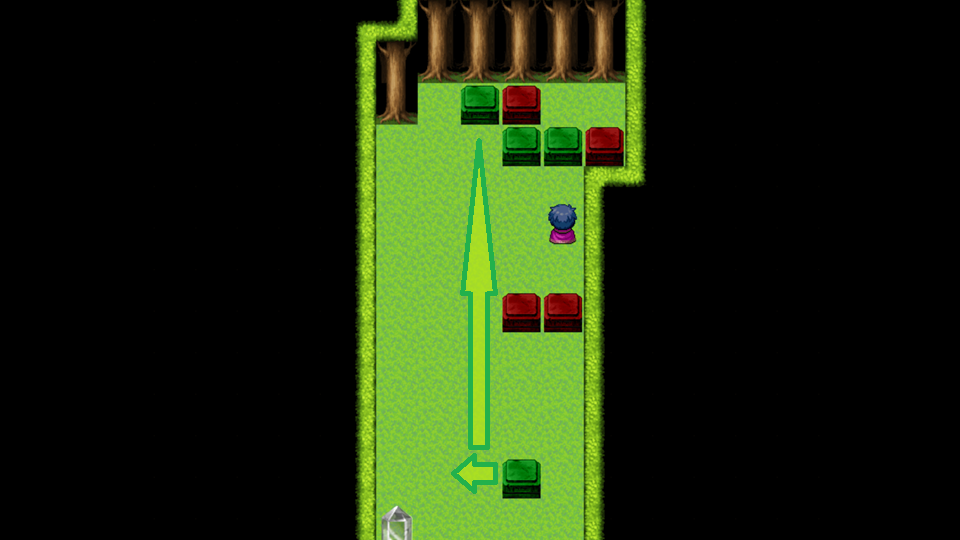
Location: Lister Forest, southern path, 4th intersection to the west
Reward: Ring of Defense
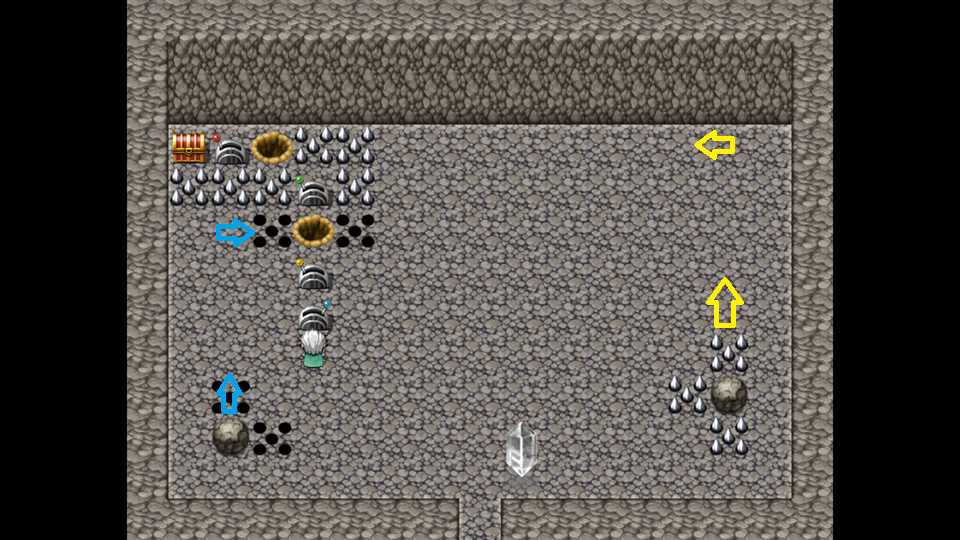
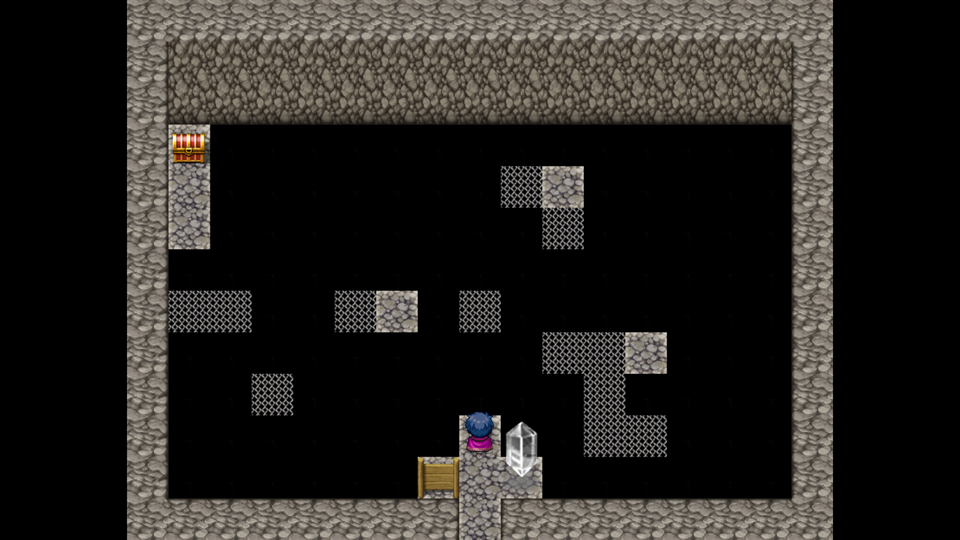
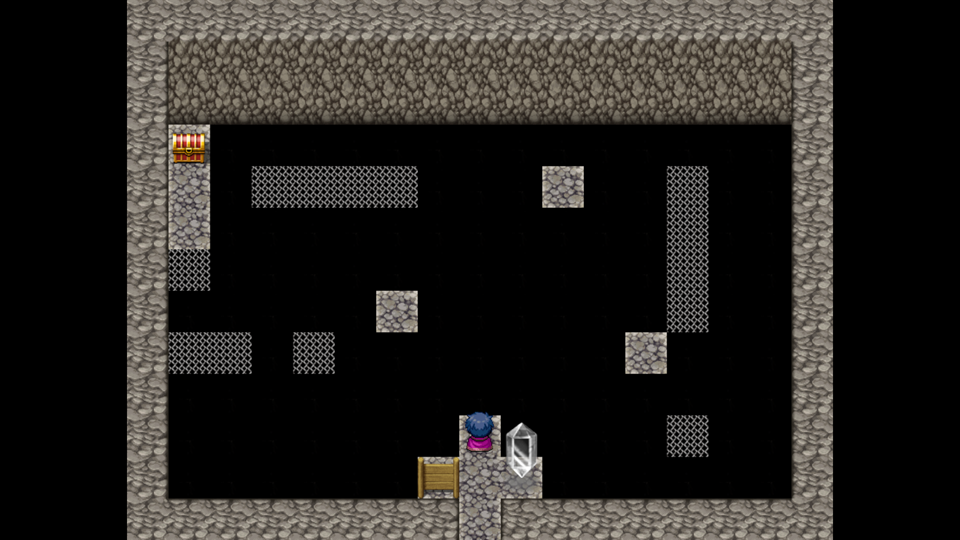
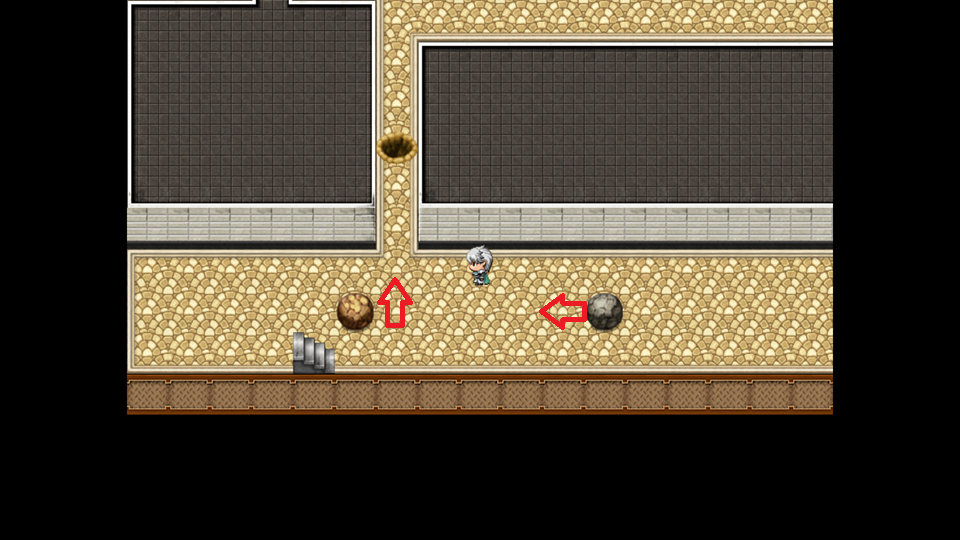
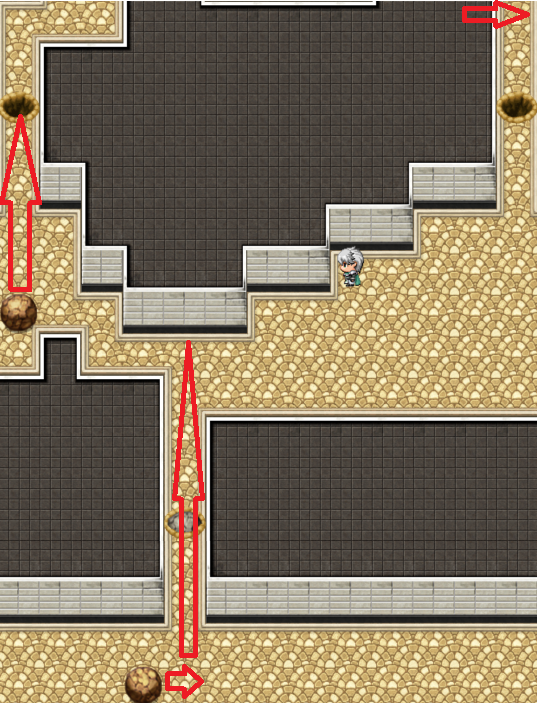
First move the light boulder like shown on the screenshot.

Location: Lister Forest, Ancient Laboratorium (light on)
Reward: 1000G
Solution see screenshot.
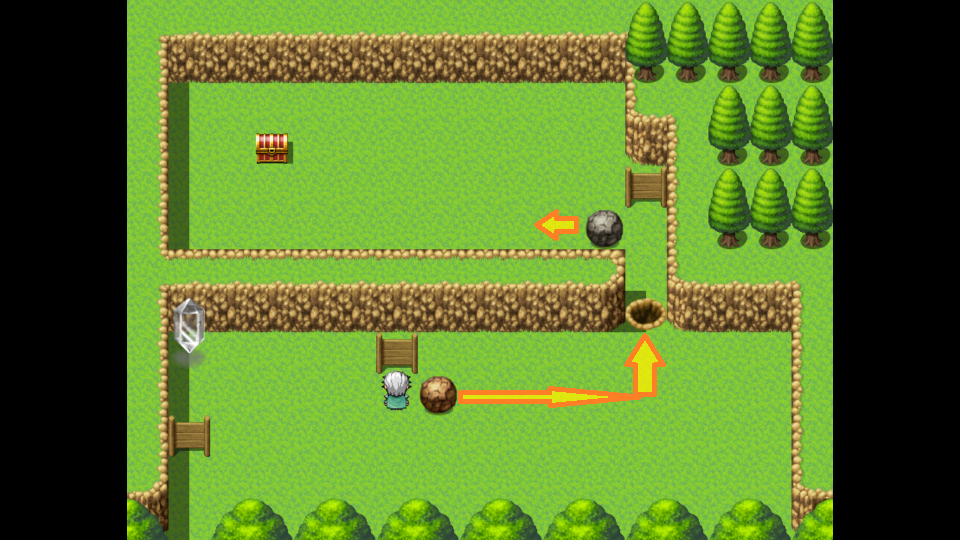
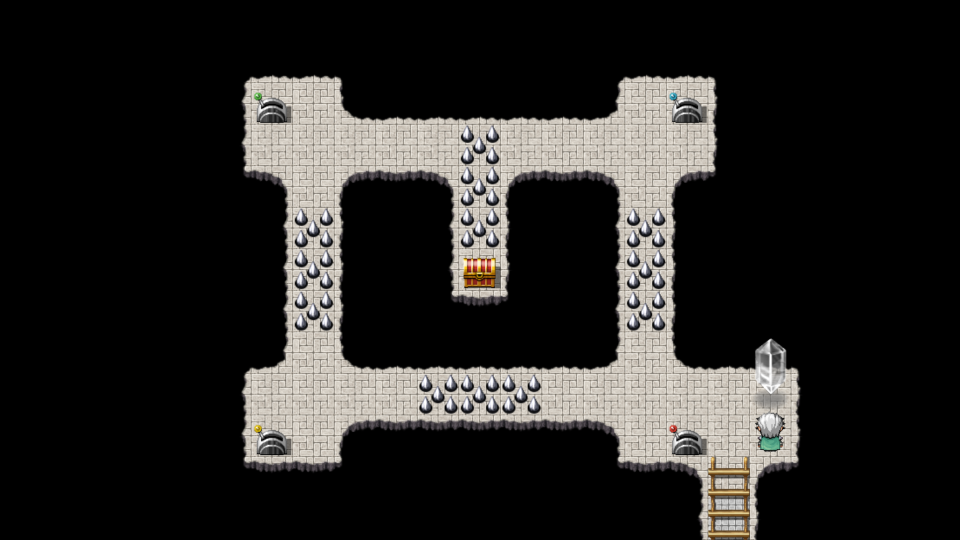
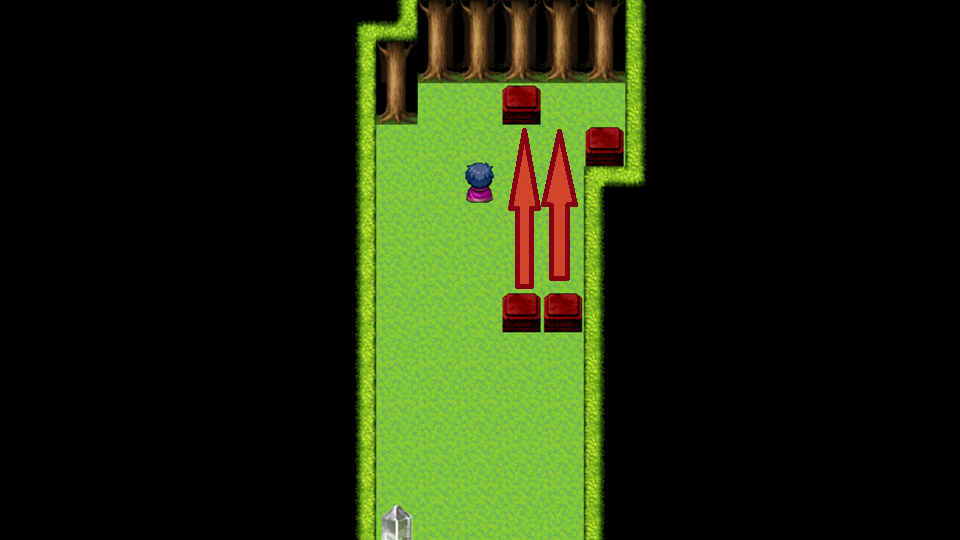
Location: Clayn Mountains (East), Cave 2
Reward: Ring of Speed
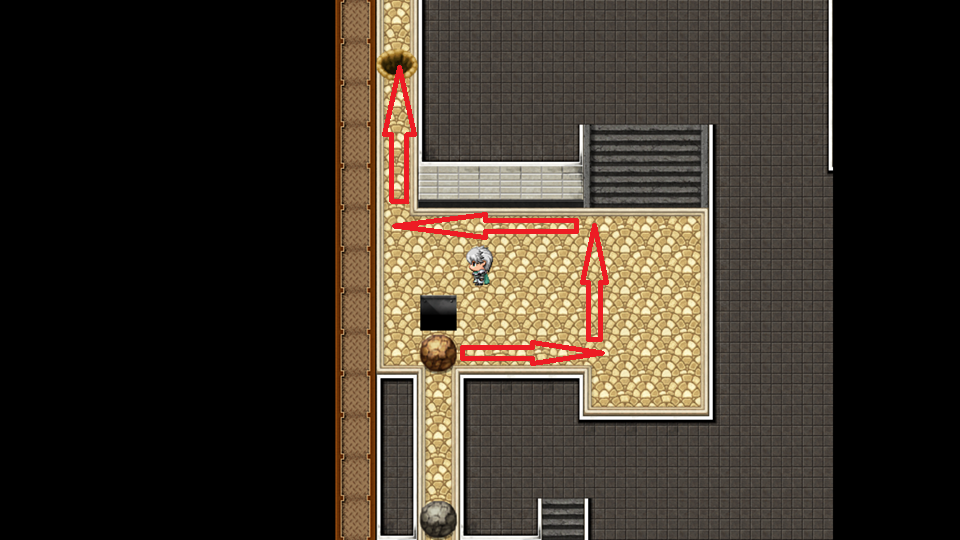
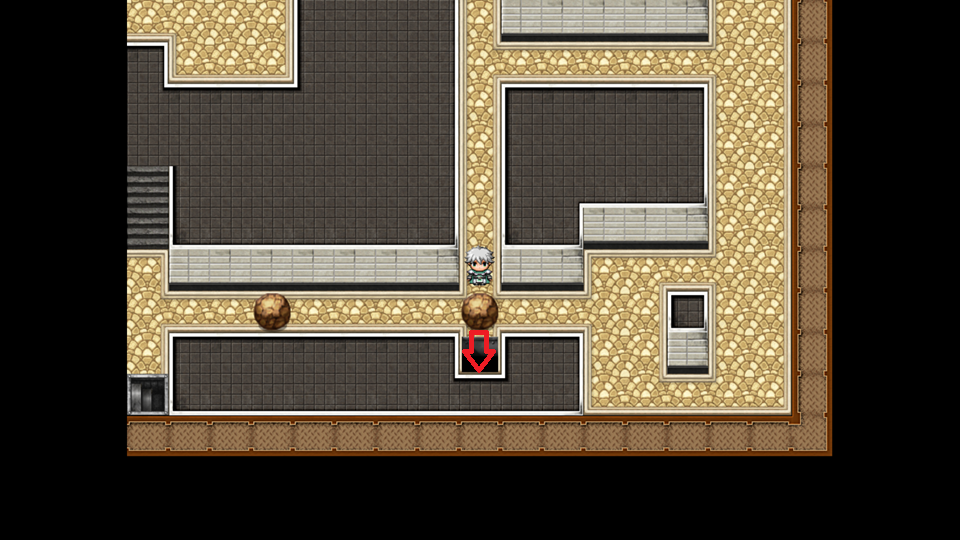
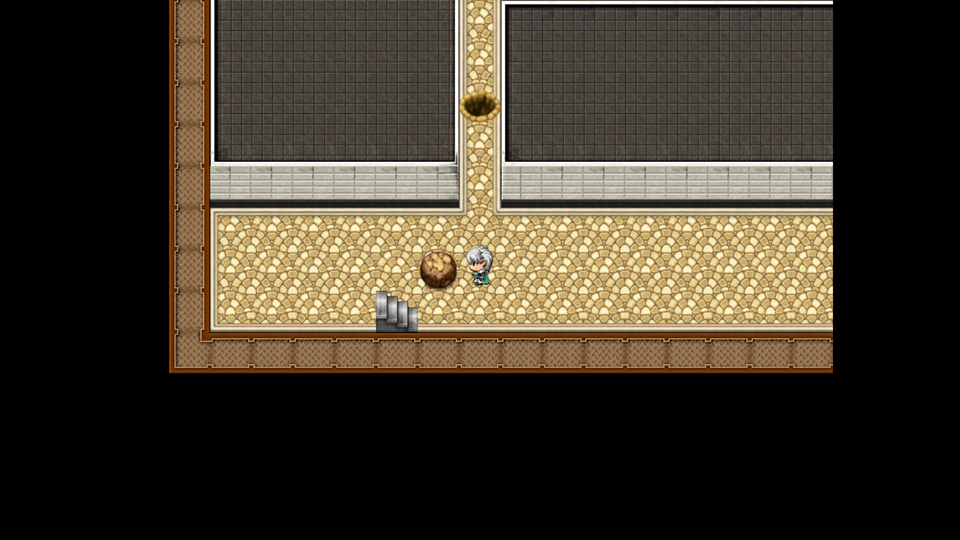
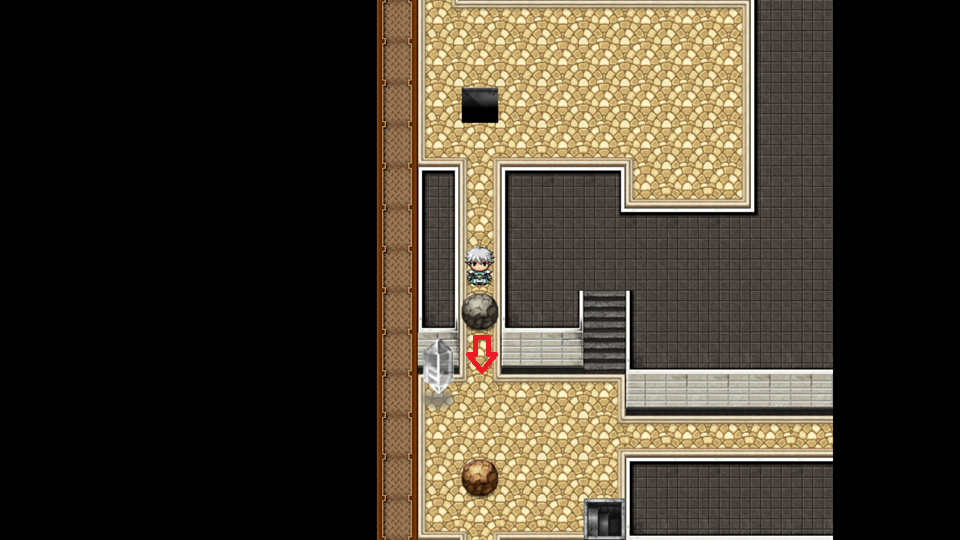
First move the heavy boulders as shown on the screenshot.
Then push the light boulders into the remaining holes.
Location: Lister Puzzle House
Condition: Solve 4 puzzles
Solution: Red, Blue, Green, Blue, Red, Yellow, Red, Blue
Reward: Membership Card (Beginner), Berserker Brace (from the Puzzle Master)
 Next Rank is in Kandaria.
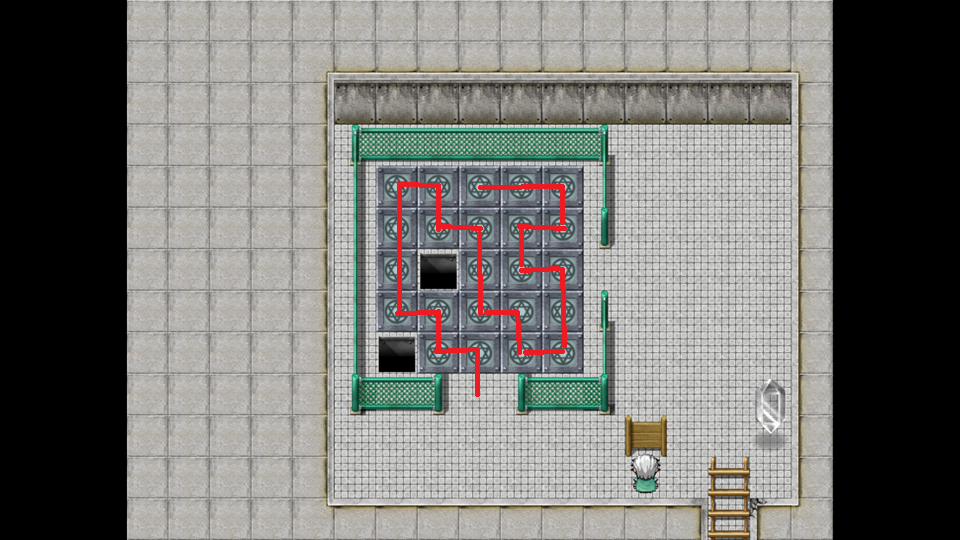
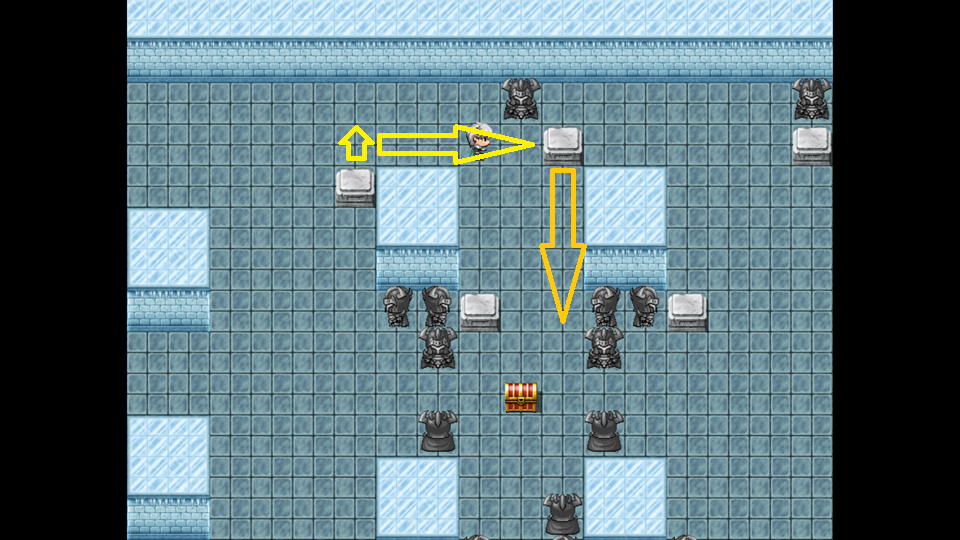
Location: Royal Capital of Kandaria, Castle Catacombs
Reward: Ring of Health
Solution: Follow the path on the screenshot and don’t forget to pull the lever!
 There is no other treasure in the pit.
Location: Royal Capital of Kandaria, Castle Catacombs, Ancient Laboratorium
Reward: Ring of Mana
Solution: East, North, West, South, West, North, East

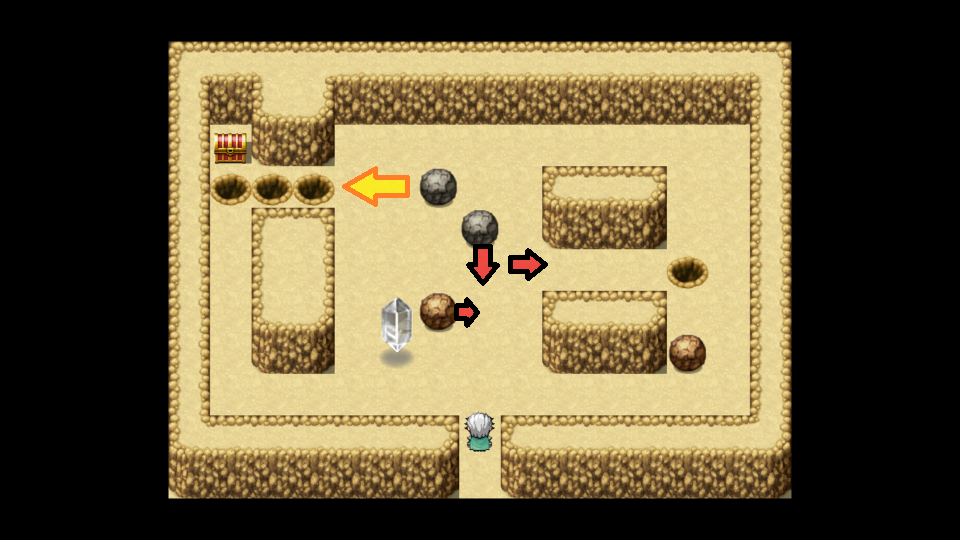
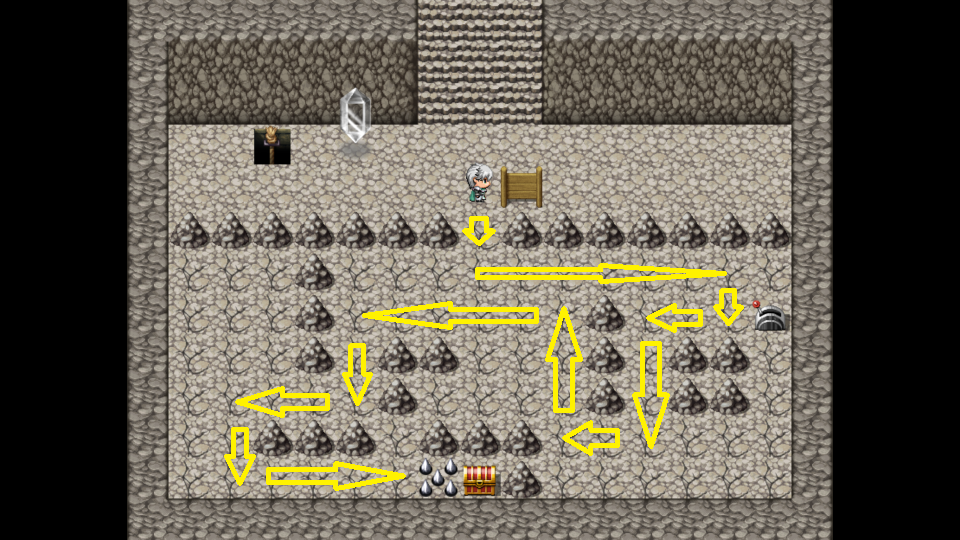
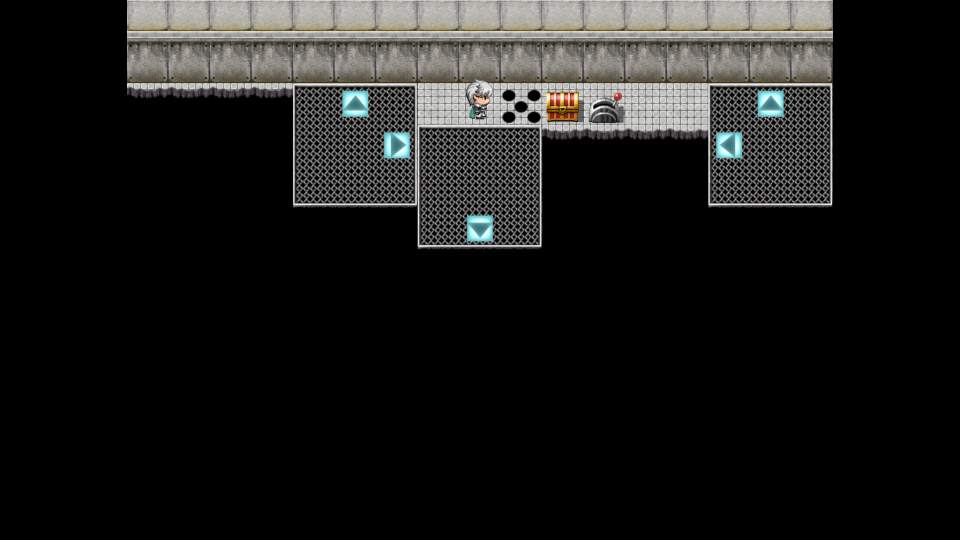
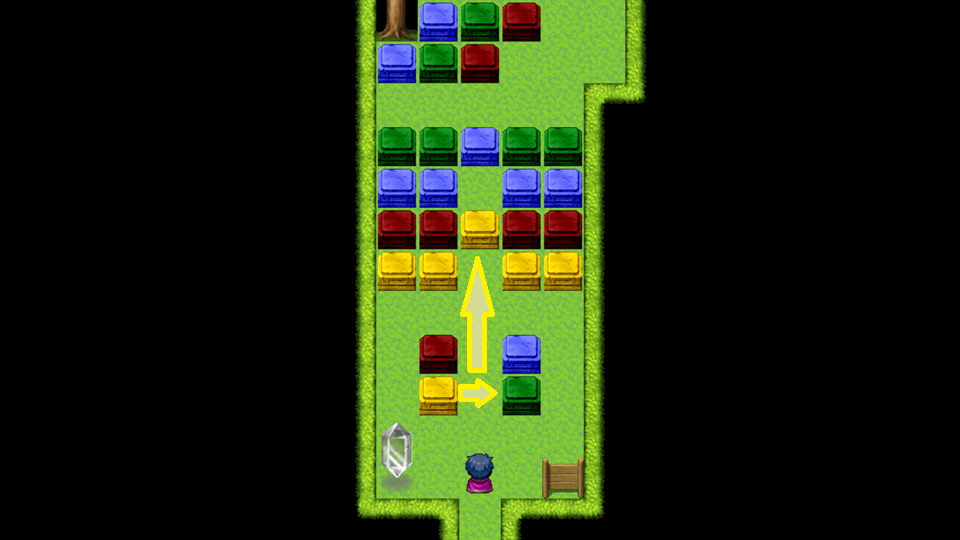
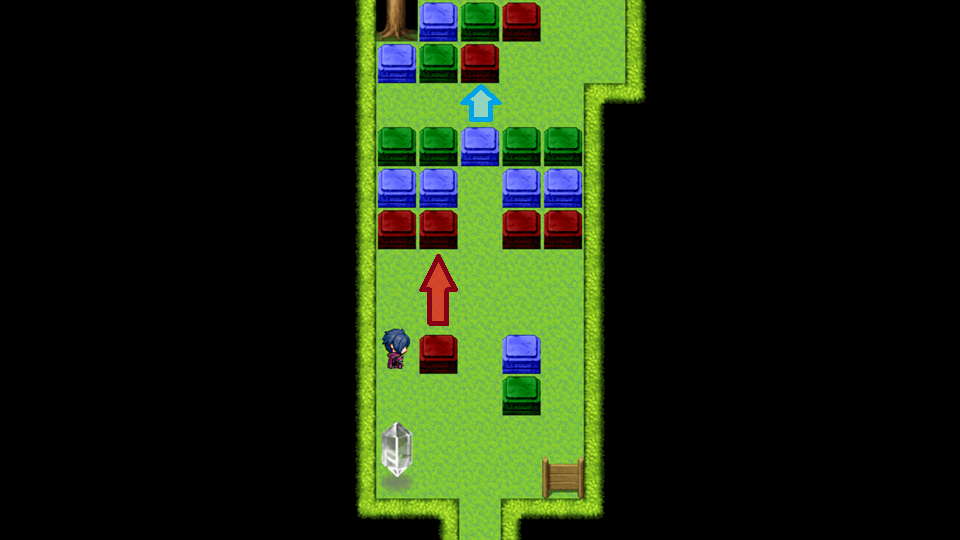
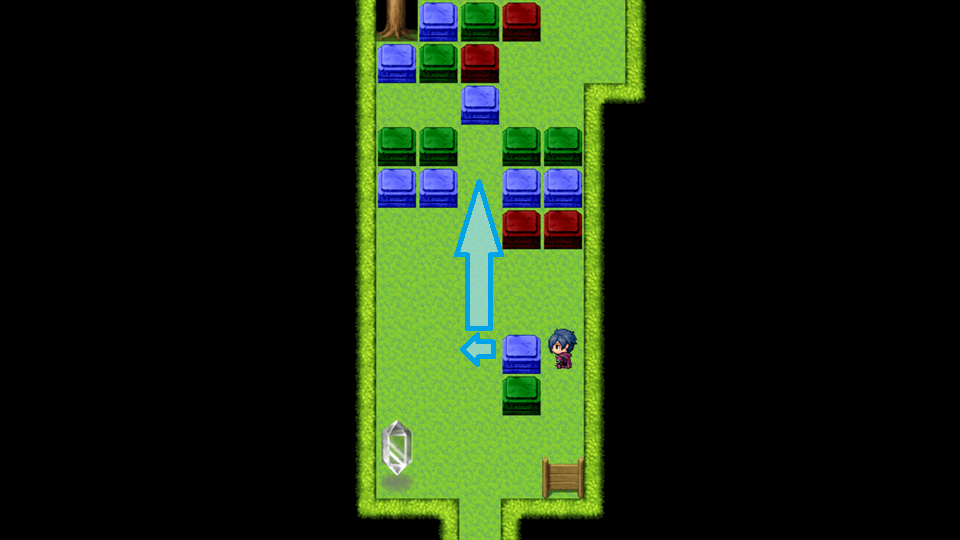
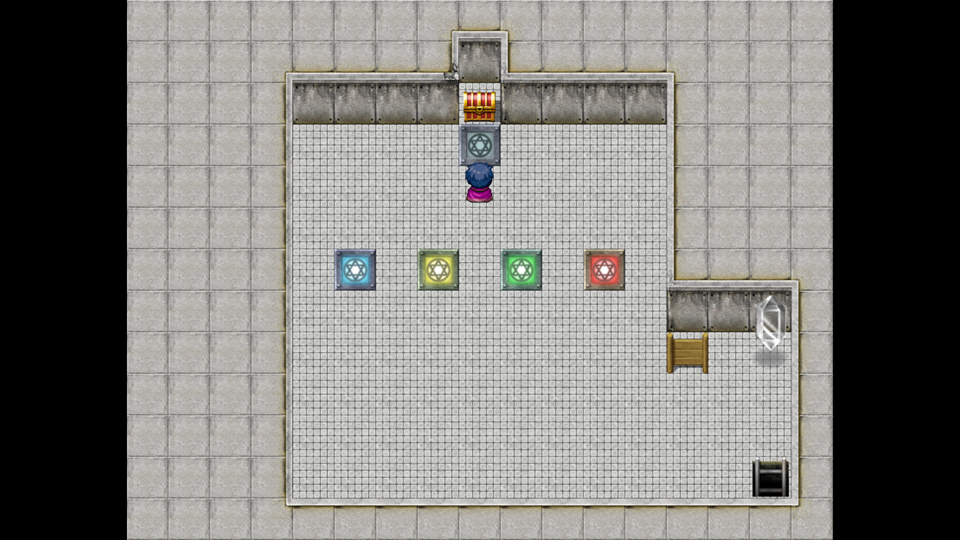
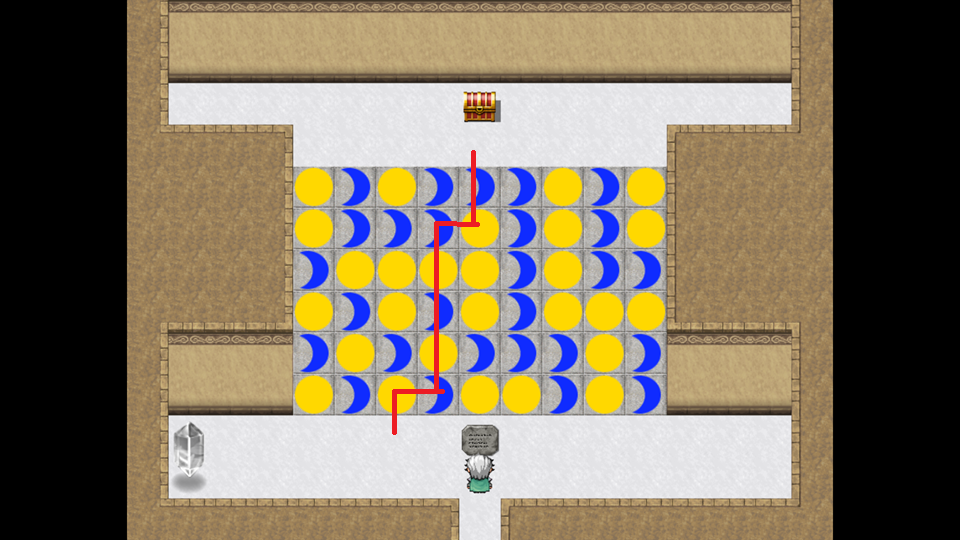
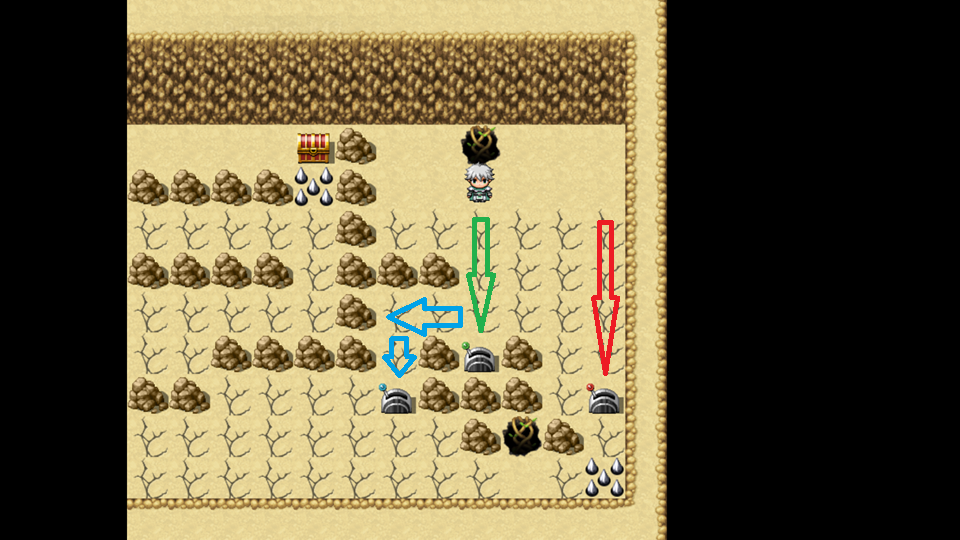
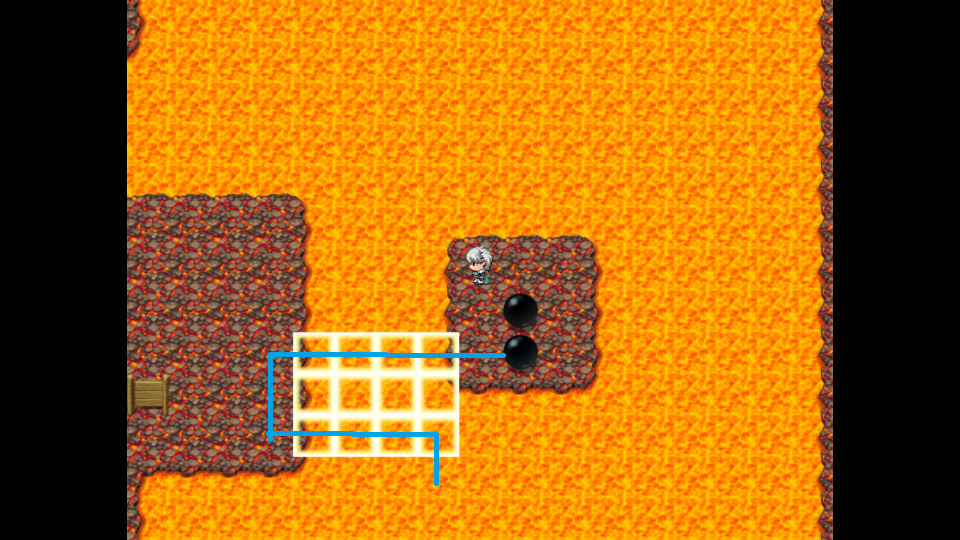
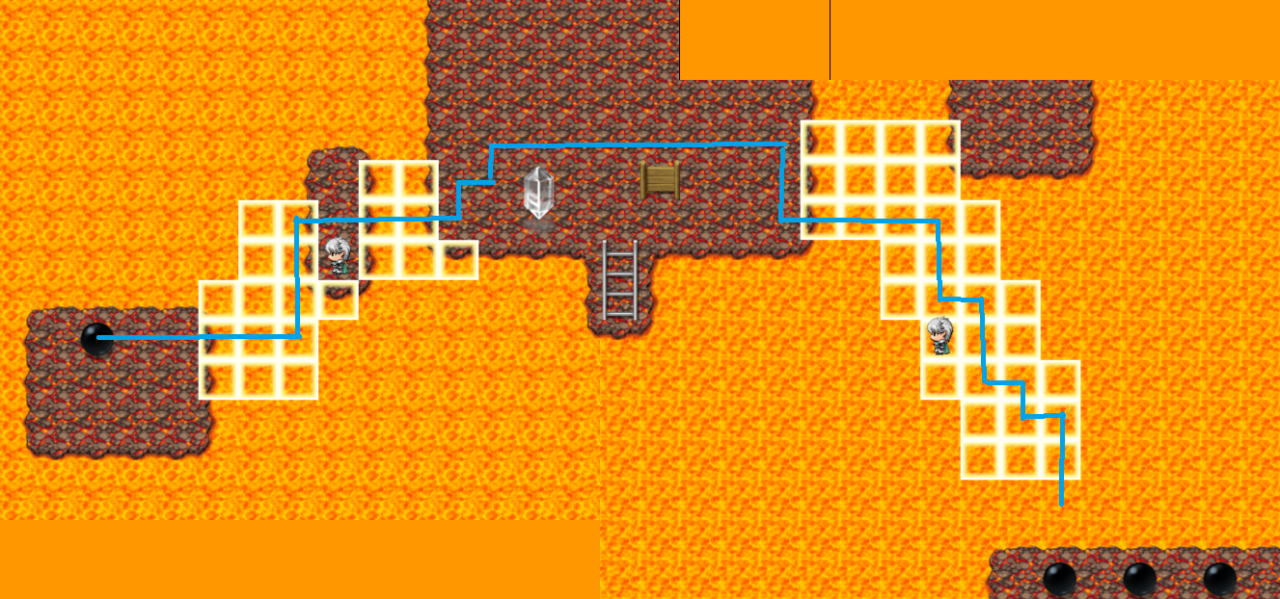
Location: Endless Desert, follow skeleton note.
Reward: Covering Pendant
Solution: first remove blue, green and red. Last push the yellow blocks like shown in the screenshot.

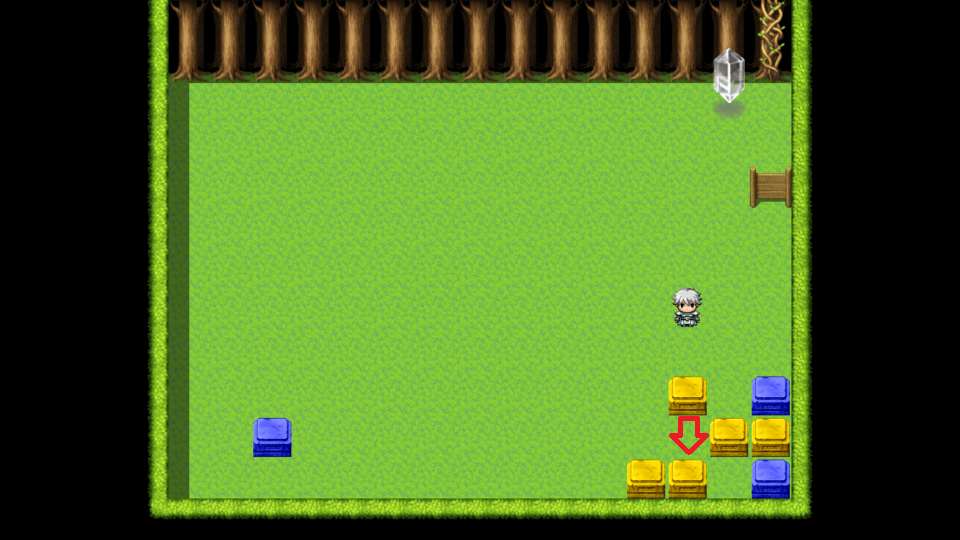
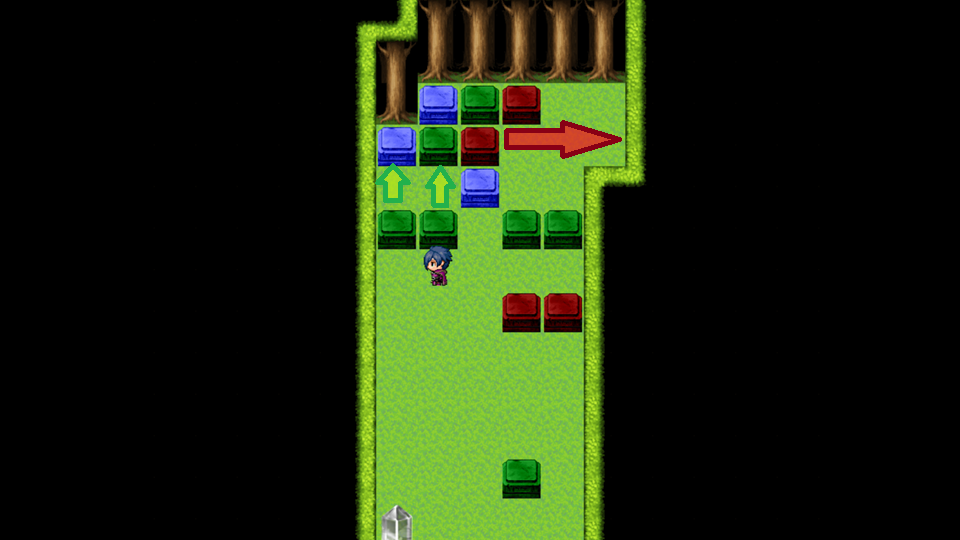
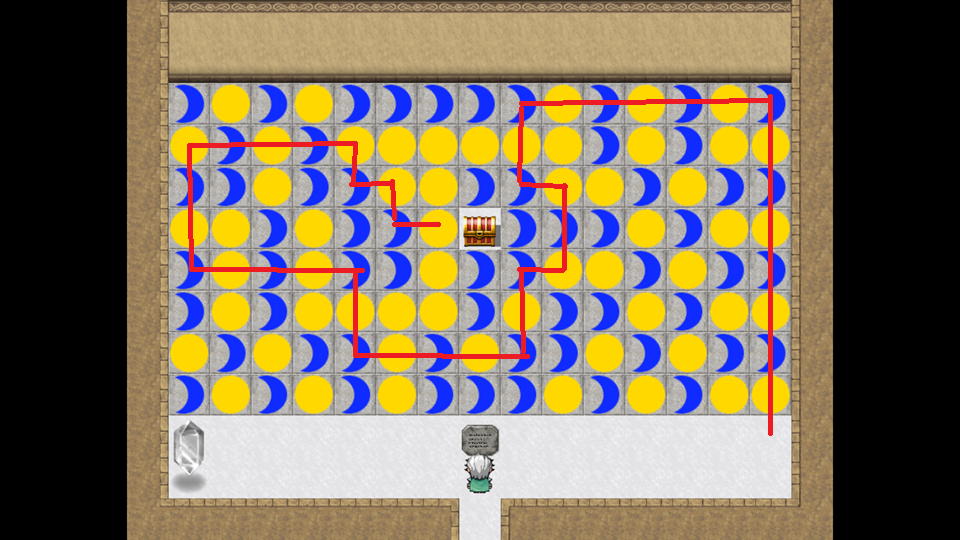
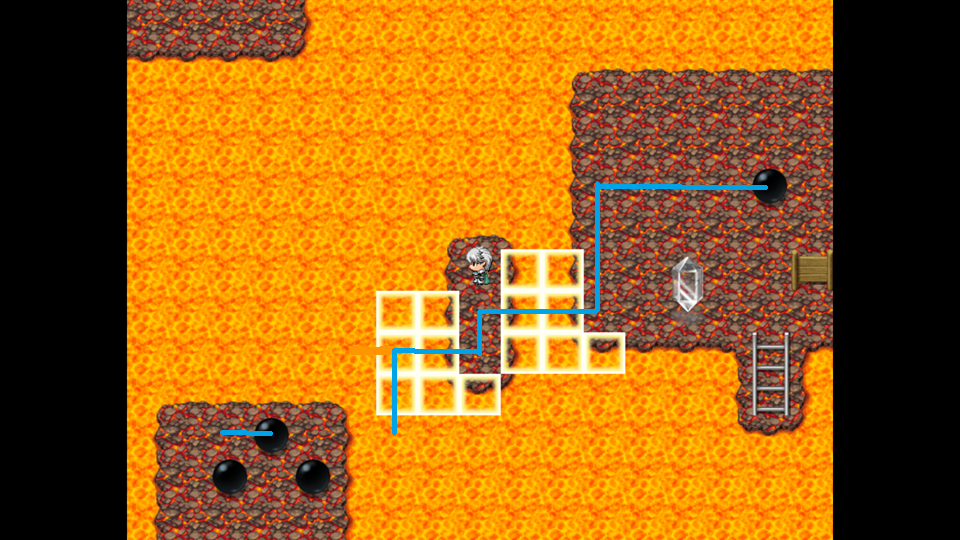
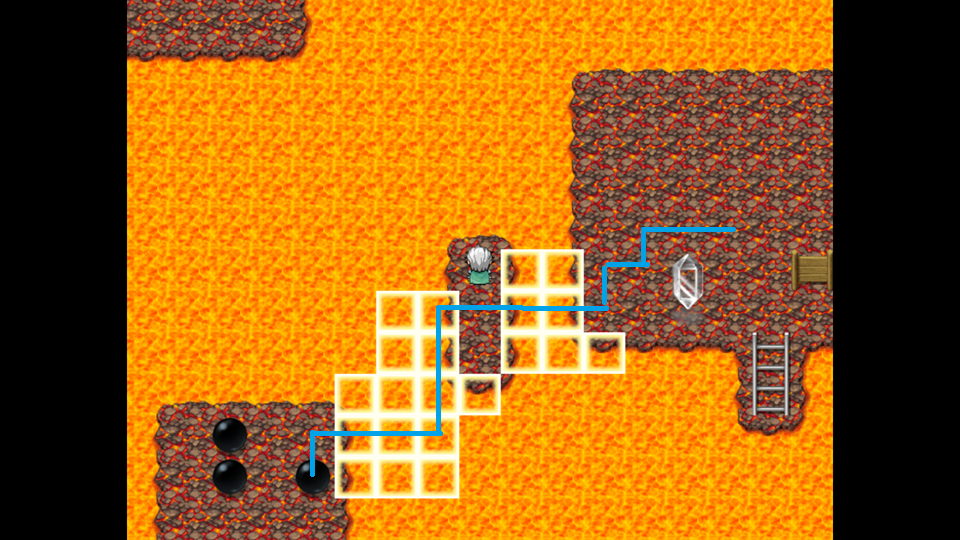
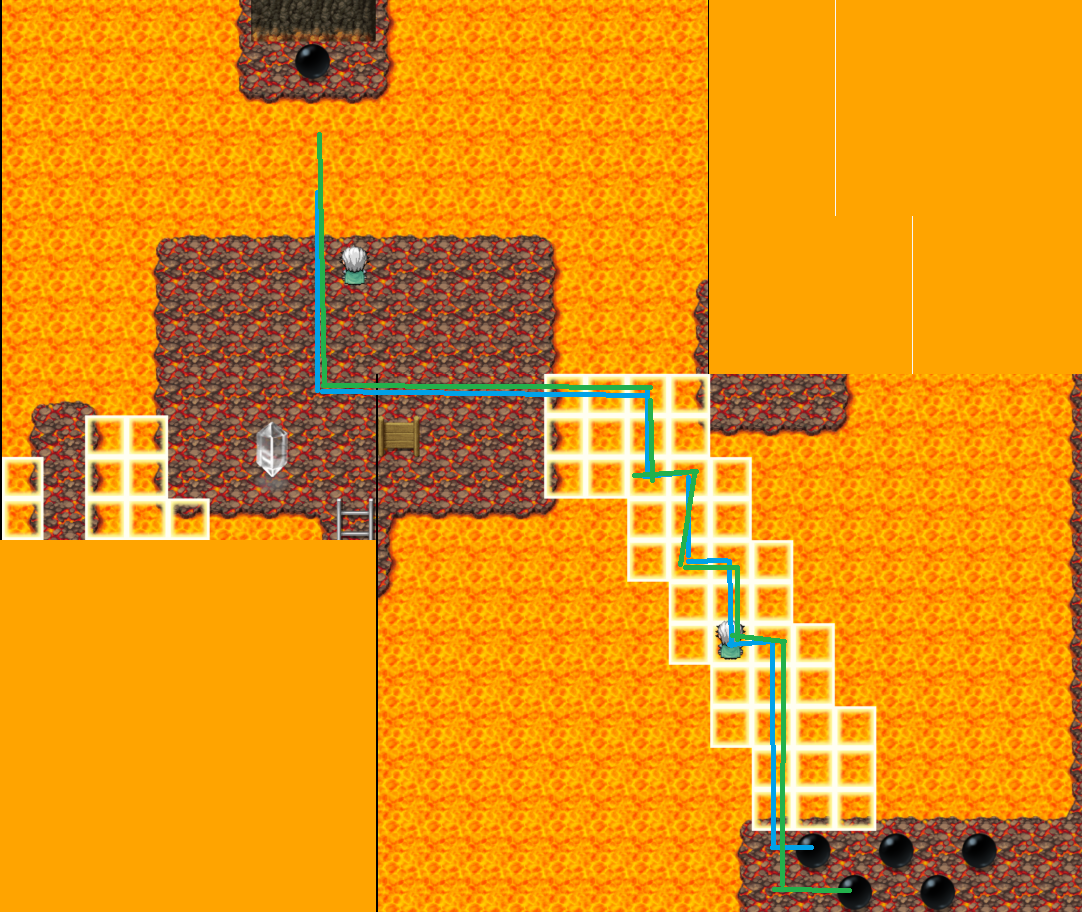
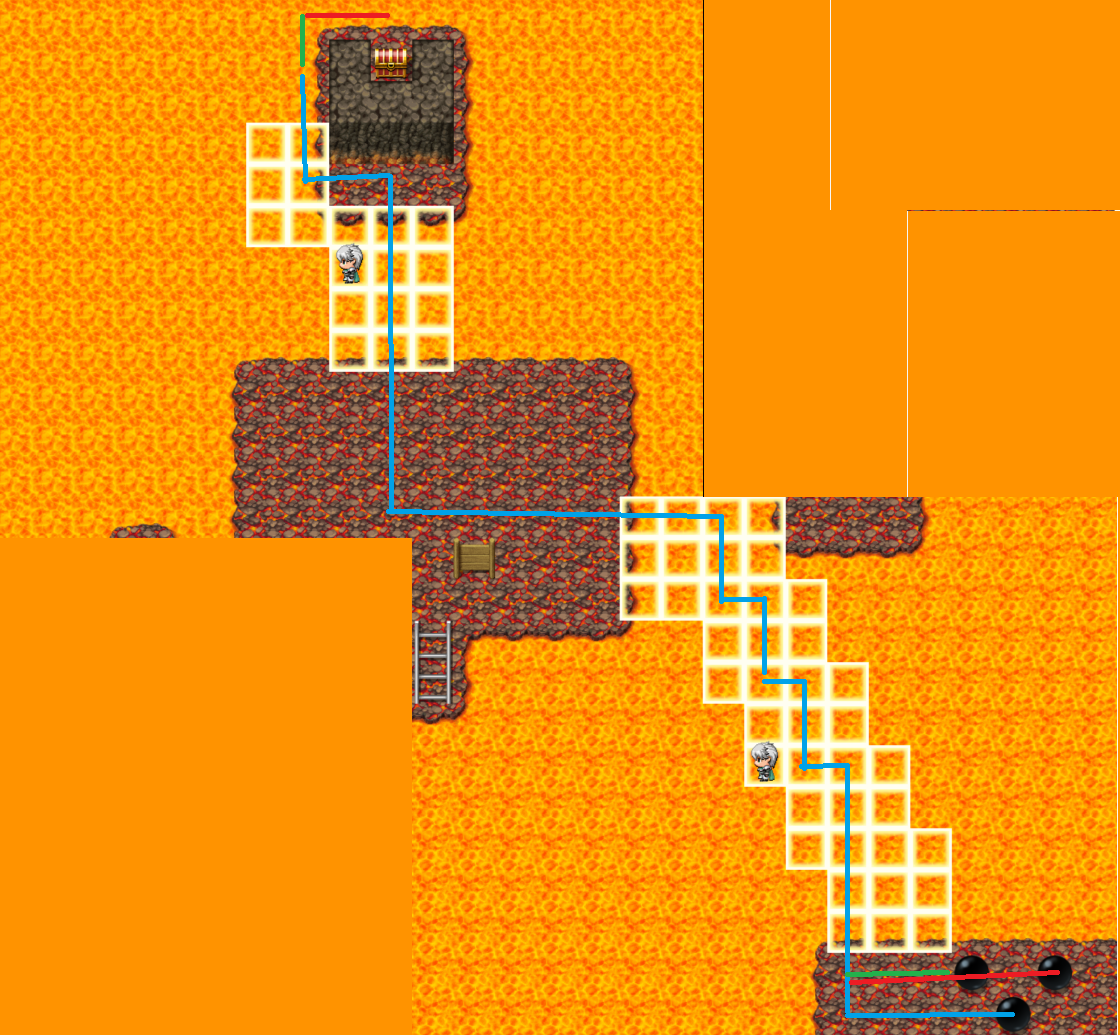
Location: Jungle of Bareel, vine west of hut.
Reward: Dispersing Pendant
Solution: First remove the red tiles, then the green ones. Next push yellow as shown in the screenshot. The rest should be clear.
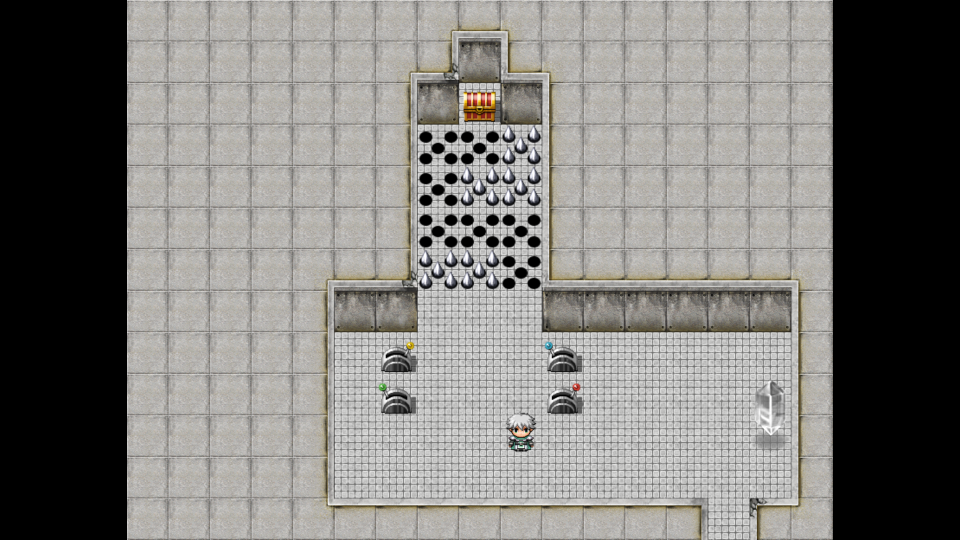
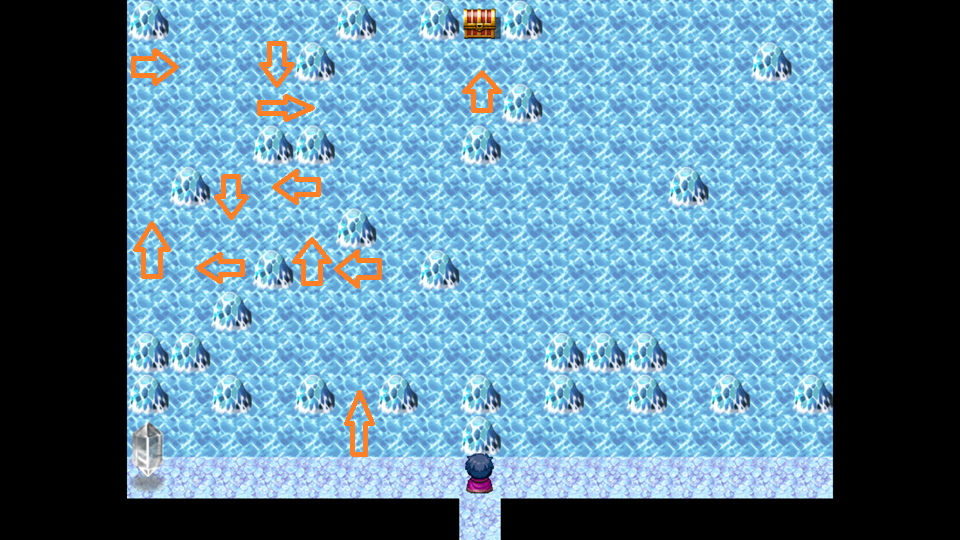
Location: Kandarian, Puzzle House
Condition: Beginner, solved 9 puzzles.
Reward: Membership Card (G Rank), Ring of Mountains (Puzzle Master)
Solution: First walk like the arrows show on the screenshot, then start pulling lever 1 to 3 and back to 1 until the puzzle is solved (you will only walk 2 steps in between).
 Next Rank is in Remburton.
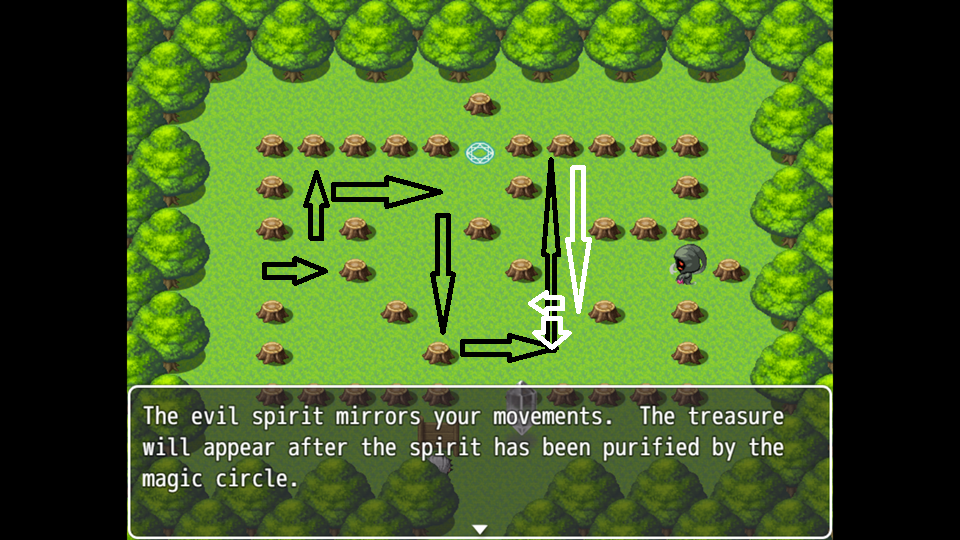
Location: Jungle of Bareel, Ancient Laboratorium
Reward: Ring of Brawn
Solution: Follow the ghost

Location: Tarusk Dungeon, Rheyn’s cell
Reward: Ring of Nimbleness
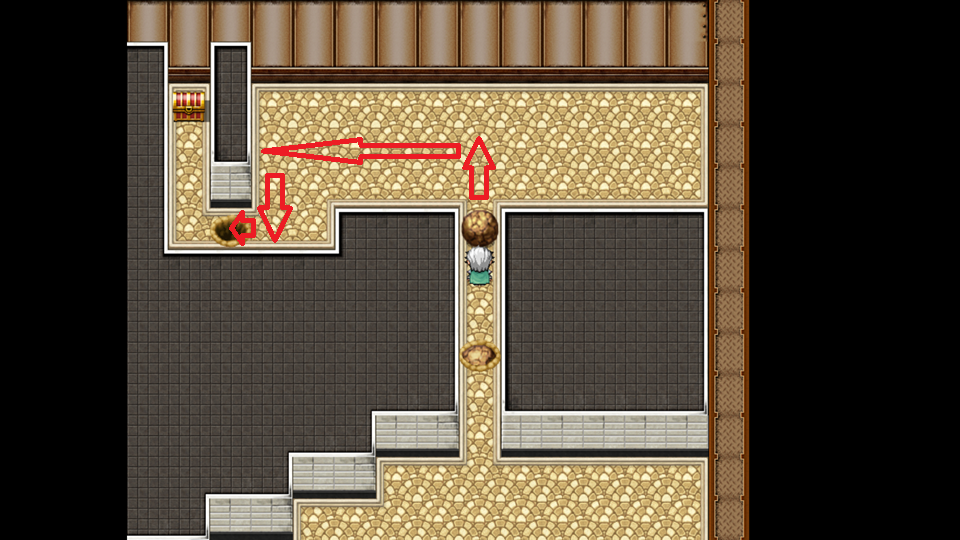
Solution:
- Pull the blue lever and move the boulder (blue arrows)
- Pull first the green and then the yellow lever (don’t trap yourself).
- Push the other boulder (yellow arrows)
- Pull the red lever
Location: Tarusk Forest, east of Dungeon
Reward: Lucky Pendant
Solution: Follow the arrows

Location: Tarusk Manor, Ancient Laboratium (basement)
Reward: Ring of Wisdom
Solution: Start with the eastern platform, pull the lever and return to the starting point.
Then use the western platform.
Location: Remburton Puzzle House
Condition: Rank G, 14 puzzles solved
Reward: Membership Card (Rank F), Proud Brace (Puzzle Master)
Solution:
 Next Rank up in Dansvar.
Puzzles #16 – #30
Location: behind the Treeshop NW from Tarusk Manor
Reward: Translucent Pendant
Solution: Follow the arrows!
Location: Lake Shrine, behind dragon statue
Reward: Overdrive Brace
Solution:

Location: Western Clayn Mountains, Cave 2
Reward: Rage Band
Solution: pull the levers in the corners once each and then the one in the middle

Location: Western Clayn Mountains, Cave 4
Reward: Health Band
Solution: Push in order Green, Orange and Blue!

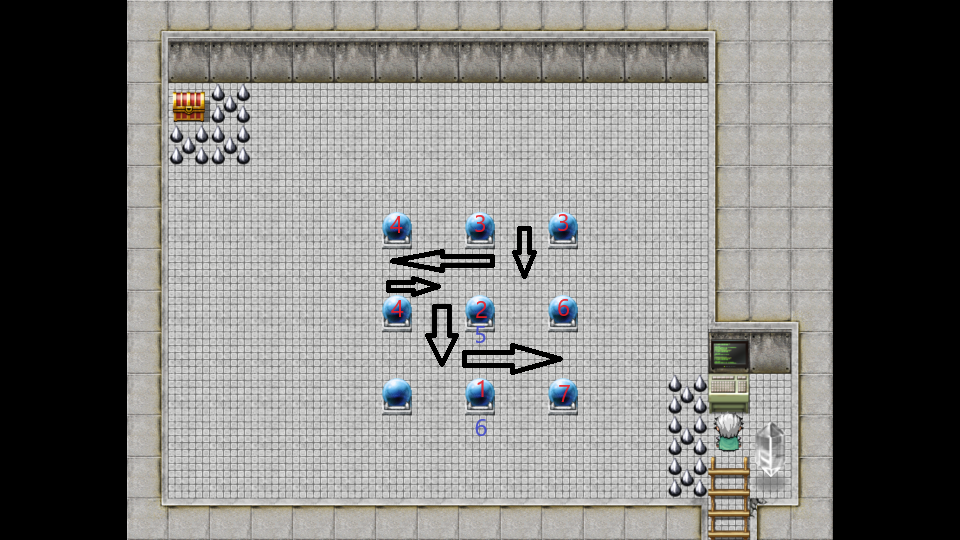
Location: Dansvar Puzzle House
Condition: Rank F and 19 solved puzzles.
Reward: Membership Card Rank E, Tranquil Guard (Puzzle Master)
Solution: The numbers show the order the orbs will lite up, the arrows show the best path to go.

 Next Rank up in Combra
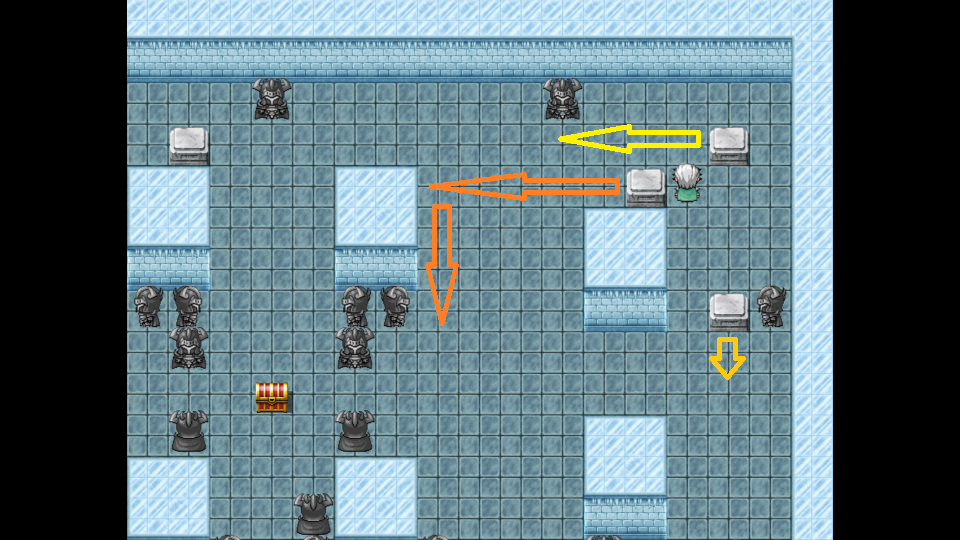
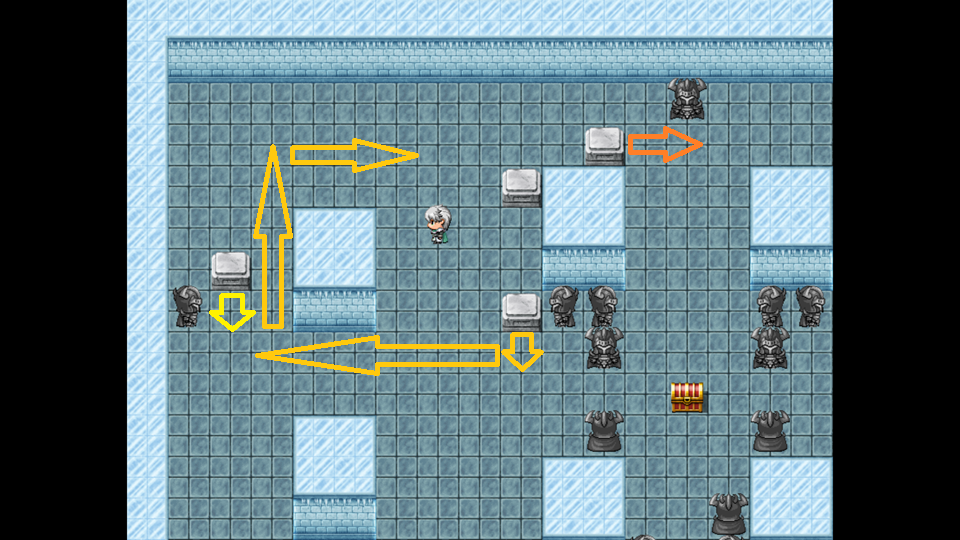
Location: Dansvar Sewers, NE corner
Reward: Ring of Sages
Solution:
- Pull the red lever and cross the bridge
- Pull the yellow lever
- Pull the green lever to the north
- Pull the red lever further west
- Head north and pull the blue lever
- Pull the red lever directly south again.
- circle around and pull the yellow lever.
- Pull the red lever west again.
- Cross the bridges to the NE and pull the blue lever.
- Pull the yellow lever further south and finish.
Location: Bareel Jungle, behind the laser door in the Ancient Laboratory, east side of the map
Reward: Tranquil Guard
Solution: Follow the arrows as shown on the screenshots
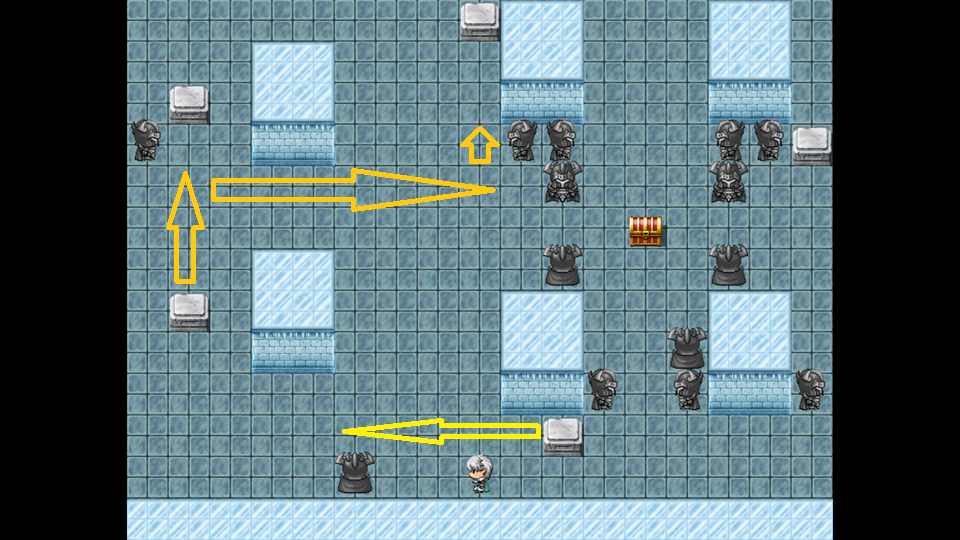
Location: Bareel Jungle, 2nd Ancient Laboratory
Reward: Ring of Nimbleness
Solution: East, East, North, NW (upper platform), West, North, Treasure, East
Location: Southern Clay Mountains, lower path at the start
Reward: Ring of Barbarians
Solution: It is a maze, head north first, east, fully west, north and you can see the remaining path.
Location: Combra Puzzle House
Condition: Rank E and 24 solved puzzles.
Reward: Membership Card (Rank D), Mana Band (Puzzle Master)
Solution: just run around the invisible walls until you reach the chest (no failure)
Next Rank at Tyenar.
Location: Ocean Shrine, teleport down and go upstairs and south
Reward: Ring of Dragons
Solution: The stone tablet shows you the solution.
Location: Ice Cave, west path, first room west from entrance
Reward: Tranquil Guard
Solution: Ice Slipping Ability from the dragon doesn’t work in puzzles.
Location: Western Tundra Ancient Laboratory
Reward: Draining Amulet
Solution: Blue, Yellow, Red, Blue, Green, Yellow, Red
Location: SE Tundra Ancient Laboratory
Reward: Absorbing Amulet
Solution: see screenshot

Location: Yuzer Puzzle House
Condition: Rank D and 29 solved puzzles
Reward: Membership Card (Rand C), Stone Wall Ring (Puzzle Master)
Solution: it is a hurdle walk, best save after each jump.
Next Rank up on Syltz.
Puzzles #31 – #40
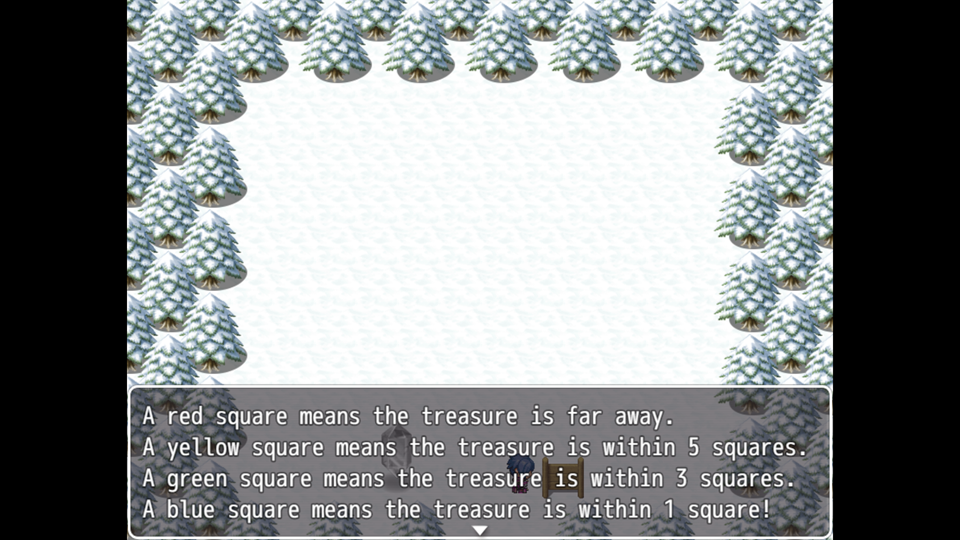
Location: Southern Snow Tree
Reward: 5000 Gold
Solution: Puzzle resets when you haven’t found it in 7 tries (mine was 2 tiles over and one west from the crystal).
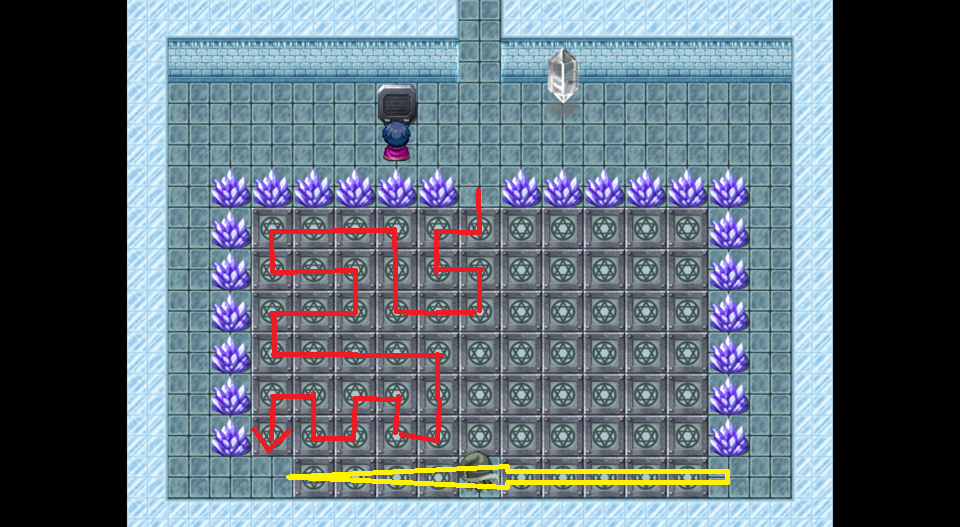
Location: Ice Cave, Yuzer Entrance, east
Reward: Ring of Titans
Solution: one wrong slip will block your path.

Location: Ocean Shrine, entrance
Reward: Countering Amulet
Solution: Follow those sequences (arrow = arrow key)
- ←←←↓↓
→→→↓→
↑↑→↓↓
←↑↑←←
↑→→↑
←←←↓
→→↑←←
↓→ - ↑→↓↓↓
→↑↑↑
←↓↓↓
→↑↑↑
←↓←↓
→↑←
↓↓←←
↑↑↑←
↓↓←↓
→→↑↑↑
←↓↓←
↓→→↑
←←↓→→
↑←←↓→ - →↑↑
←↑→
↓↓↓←
↑↑→↓↓
←↑ - ↑→↓←
↑↑→
↓↓←
↑↑→
Location: Lake Shrine, teleporter area
Reward: Alchemist’s Talisman
Solution: first follow the red arrow and last the yellow one (or the ghost will mess everything up)
Location: Syltz Puzzle House
Condition: Rank C, 34 solved puzzles
Reward: Membership Card (Rank B), Prismatic Ring
Solution: This time you can dig 15x until the puzzle will reset (random), they can be near each other
Next Rank up in Tyenar City.
Location: Shadow Cave
Reward: Tranquil Guard
Solution: the platforms changes in intervalls, so sometime you have to step forward in the dark to proceed. When you fall down, you will start again at the last stabil tile you have reached.
The screenshots are in order of the changes and help you to plan.

Location: Tyenar Castle, via East Tower 2F, Storage
Reward: Second Chance Pendant
Solution:
Location: Tyenar Castle, West Wing Storage (blue key)
Reward: Agility Up x10
Solution:
Location: Tyenar Castle, Ancient Laboratory
Reward: Luck Up x10
Solution: random memory game, but you can save!
Location: Tyenar Puzzle House
Condition: Rank B and 39 solved puzzles.
Reward: Membership Card (Rank A), Battery Ring
Solution:
- Green is the start, east blue, SW yellow, south red (ignore the sole red one).
- Climb up the latter and teleport out.
Last Rank up is in Zoune
Puzzles #41 – #50
Location: Northern Clayn Mountains, entrance
Reward: Defense Up x10
Solution: it is again a maze over two floors.
- Reach the inner SE pillar, climb it up and reach the hole to the SE.
- Reach the next pillar and the next hole.
- Get the treasure, climb up and jump into the big hole to return.
Location: Northern Clayn Mountains after button bridge
Reward: M.Defense x10
Solution:
- Spike 1 (Red, Green, Blue), climb up the vine and pull the levers (watch your step) in order and only step on the tiles with arrows!
- Spike 2 (Green): Climb up the SE vine! As you cannot reach green, pull red and blue (in order)!

- Spike 3 (Red, Green, Blue, Yellow): first climb the NE vine and pull red, the SW vine. Pull blue and yellow.

- Climb up the NW vine.
Location: Sky Shrine, western passage
Reward: Attack Up x10
Solution: don’t get caught, best save at “save” locations.
Location: Sky Shrine, eastern passage
Reward: M.Attack Up x10
Solution: follow the arrows from light to dark. At the last screenshot, you have to walk around the whole map to push the last block.


Location: Zoune Puzzle House
Condition: Rank A and solve 44 puzzles.
Reward: Membership Card Rank S, Aegis (Puzzle Master)
Solution:


 Last Rank Up in Tenton and the Puzzle Master from Zoune moves to Tenton.
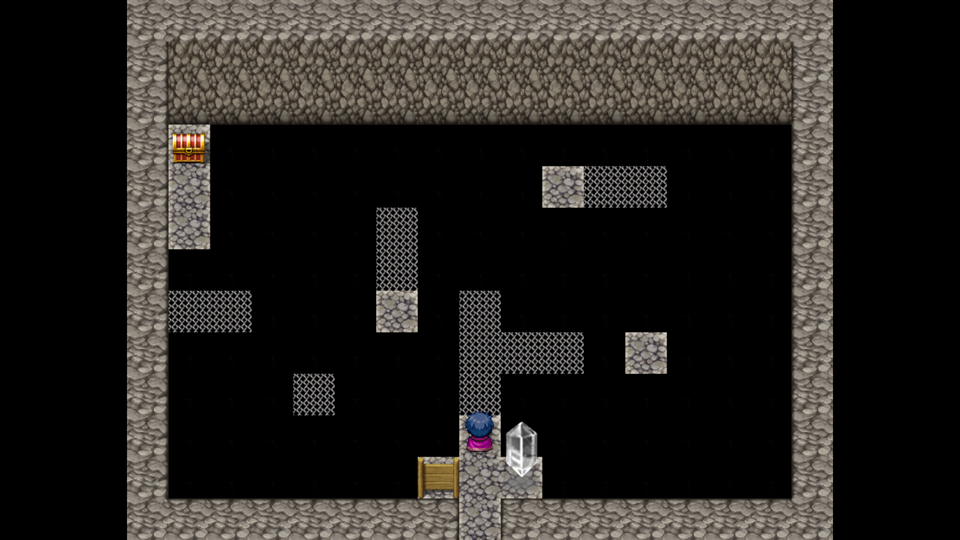
Location: Sol’s Prison, NW
Reward: Executioner Helm
Solution: Don’t jump behind one of the boulders to the basement (only the SE one is save).
 Jump behind and push it to this position:
 Go upstairs and proceed.


 Go downstairs.
 First push the upper west boulder up, the upper north boulder to the right and last the south boulder up.
 Go upstairs and jump into the west hole.

Location: Sol’s Prison, NE
Reward: Lucky Helm
Solution: best save at fire free places.
Location: Sol’s Prison, SW
Reward: Holy Plate
Solution:
- Enable lever red (circles)

- Enable lever orange, yellow and green (in order)
- Disable lever yellow and orange (in order)
- Enable lever dark blue, blue, brown and rosé (in order)
- Go upstairs and pull the lever on the wall
- Open the chest and pull the last lever.
Location: Sol’s Prison, SE stairs, NE corner
Reward: Frozen Plate
Solution: Random as it is a reaction game.
Location: Tenton (rebuilt) Puzzle House
Condition: Rank S and 49 puzzles solved
Reward: Membership Card “Puzzle Master”, Ring of Heros, Achievement “Puzzle Master”
Solution: The start is easy and a trap. Best save before you start on 2 save slots.
- Zoune
- Syltz
- Yezur
- Tyenar
The next locations are random, look at the books (use the 2nd slot to check those locations that are left).
The last question is neither, there is a selection tile over Lister!
Secret Puzzle Mode
- Lister Puzzle House: “If your name”
- Kandarian Puzzle House: “is Puzzle”
- Remburton: “and without ever leaving your house”
- Dansvar: “or touch anything”
- Combra: “you do a full clockwise”
- Yuzer: “loop of the inside”
- Syltz: “while hugging the walls”
- Tyenar City: “before finally touching”
- Zoune: “your bed,”
- Tenton Puzzle House (only until you have found the Ancient Laboratory in Lister Forest or when you have finished the side quest): “you will enter Puzzle Mode”
Start a new game and enter Puzzle as Rheyn’s name.
Then follow the remaining clues in order to unlock the Puzzle Mode and the Achievement “Puzzle Mode“.
You can solve all puzzles but won’t get any treasures as rewards.
Therefore you will enter a teleporter to the next puzzle.
You can skip all puzzles except the final one
At the end of the Puzzle Mode is the Developer Room.
You unlock the Achievement “Developer’s Room“.
Parwan Arena & Casino
You have to win all round to complete a challenge and rise in rank.
For the first clearing you will receive a bonus.
As you cannot use items, have one healer in the party.
The Arena is a great grinding spot, but you can’t challenge lower rounds than your own rank.
Tactics:
Challenge 1: Blind protection
Challenge 2: Poison, Blind and Confuse protection.
Challenge 3-5: 4 party members
Challenge 5: Frost and Confuse protection
Challenge 6: VIP and Tranquil Guard for each party member.
Challenge 7: all elements (7 different scales and Striager with Light), as the Willowisp will have random elements, 4 HP and you cannot use bombs here. Another option are skills that cannot miss, doing 1 HP damage per hit. Against the Snow Angels Ignite and Inferno are a great combo, absorb their Blizzards. Wind Spirits will drop 5.000 EXP each, best hit it with a state+spell combo.
Challenge 8: The Stealthy Predator will summon the shadows from the party (same skills, but not same equipment). Defeat them ASAP
The Statue is immune to physical attacks and has a special attack after hit by Shock/Lightning.
The Mythical Beast will change its stance during the turn – the faster you are, the better you can plan your actions.
Challenge 9: Alluring Lady: copies will cast the strong magic when dying, but have lower HP than the original. After some AoEs you will see the copies.
Guardian Deity: tactic like the Lamia, a battle of attrition. Best have 2 characters with water scale, one of them with the Wind Scale and the other with the Magic Battery.
The Muscleheaded Exhibitionist is a stronger version of the Emperor.
Challenge 10: The Demon is immune to dark and weak to light, draws cards with different effects.
Death has instant death, 2x water scale as well as 2nd chance pendant and Battery help. Immune to dark and weak to light. Countdown of 5 turns will kill.
The Wielder of Light is immune to light and weak to dark. (You have most likely Striager with Light element in the party…). He will attack with Light Arrows most turns, so counter it with Fountain of Life with the Battery. Light Embrace will start Phase 2. His Regen heals him for 15.000 HP and 100 MP per turn – you have to deal more damage or at least survive until the phase is over after 3 turns.
Save, bet on the Imp and win!
Reload when you lose.
You can fast forward pressing the action key.
With the maximum bet or 200 Parwan Coin you can win 2000 Parwan Coins back, earning a total of 1800 Parwan Coins!
And you will unlock the Achievement “Feeling Impish“!
Blackjack (21): Hit will draw a new card, the nearer you are to the 21 at the end, the better, but you will lose when the sum of the cards is over 21. For the first hit of 21 you will obtain a bonus of 500 Parwan Coins.
Duel: you will lose when you draw a letter card.
Snap: test your reaction speed. Mega Prize when no pairs appear.
Spinning wheel: There is a chance to obtain a random major prize.
Major Prizes:
- 1000 Parwan Coins
- Big Healing Potion
- Revival Potion
- Big Energy Potion
- Big Rage Potion
Major Prizes (VIP):
- 2000 Parwan Coins
- Healing Elixir
- Revival Elixir
- Energy Elixir
- Rage Elixir
Once you have hatched your dragon, you can buy a VIP Card for 5000G.
Effects:
- Free ferry and inn
- Hero Booster & more potions
- Crystal Tier equipment and new accessories like Tranquil Guard
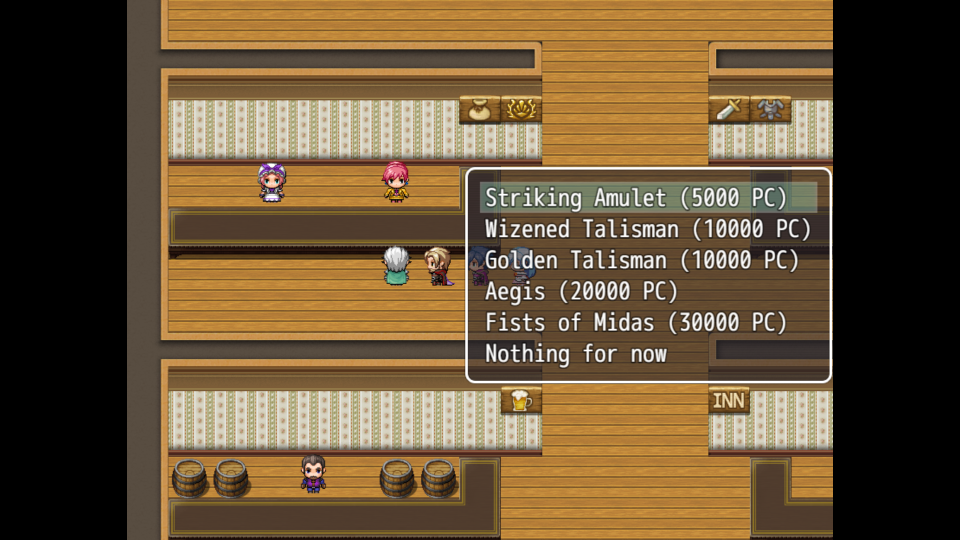
- Maximal 500 betting value
Side Quest: Rebuilding Tenton
- Granny, Lister and Kandaria
In Lister find 2 villagers at the pond.
In Kandaria 1 villager in the inn. - Builder in Dansvar on the city wall, Barkeeper fled to Clayn Mountains (see Pet).
- Essential: Soldier as weapon shopkeeper in Kandaria Castle (barracks), Owner of the Treeshop, No clue for armory (Slave in Tarusk Dungeon).
Optional: Femal debtor at the Parwan Resort (Casino), Treasure Hunter in Bareel (you need top 149 treasures found, earliest during/after Vaster’s Rematch), Puzzle Master from Tyenar. - Essential: no clue to mayor (later retired Councilor Jon)
Optional: secluded village on island surrounded by mountains, Doctor in Tyenar
The tier of shops will increase to higher the available shops (exclusive the VIP of Parwan Resort) after the Tarusk Manor (Crystal)
Mystery Boxes are expensive but really effective in combination with the Golden Talisman.
They will contain one of each possible consumable item in the game.
After the town is fully rebuild, even the permament status ups will appear.
After your ship is upgraded.
Talk multiple times with Jon in the Dansvar Sewer Cell.
Ask Will in the council hall for help.
Tell Jon Will’s answer.
Find his assistant that got missing after Ellaria’s flood in Combra.
Perhaps he was saved by the Tyenar Ship then.
Later you will find him in the Igloo.
Items (Tenton rebuilt): Energy Elixir (Mayor’s house), Rage Elixir (builder’s house), Healing Elixir (Granny’s house)
- Rank 10 in the Arena
- Haesovys, Queen of the Sky, should visit a place over the clouds.
- Ghost at Tenton Fountain
- Flood in Combra, sobbing at the old dock.
- Ental, girl at the well needs help.
- Shaela has returned to her island and is haunted.
- Comfort Lune in the Shadow Realm
- Village above the mountain range of Rocky Island.
- Hole Sleppek’s sky island has left south of Tyenar.
- Reach Puzzle Master Rank S
- Zoune might teach about Diamond Tier equipment.
- Doctor from Tyenar
Once you have found 292 treasures, talk to the treasure hunter in Granny’s house to unlock the Achievement “Treasure Hunter“.
Side Quest: Saving Elrion
Help the girl fetch water at the well to find Elrion.
Have Haley in the party to help tend Elrion.
She sends you to Lune in the shadow realm.
Lune needs his Memories.
Find his memory at the docks.
You play the memory as Elrion.
Say goodbye to your family and councilor and then let the souther soldiers escort you.
You obtain Memory-Fragment: “Departure”.
Find his memory infront of the castle.
You obtain the Memory-Fragment: “Arrival”
Swim to the Lake Shrine and teleport to the first scale location.
You play as Elrion and find the Earth-Scale.
Obtain the Memory-Fragment: “Encounter”.
Find Elrion’s Memory at the east part at the water to obtain the Memory-Fragment: “Reunion”.
Find Elrion’s memory at the bridge to Tyenar to obtain the Memory-Fragment: “Defeat”.
Talk to Lune about Elrion again.
Rheyn’s Dispel (not the 2nd Shadow Scale) is upgraded to Dispel +.
The doctor has returned to Tyenar, so dispel Elrion.
Now you can recruit Elrion into the party and unlock the Achievement “Family Reunion“.
Note: The citizens of Kandaria will react to Elrion and Ellaria and you can sleep in Erlion’s chamber, too.
You can now recruit the Doctor to Tenton with Elrion in party.
Return to the bridge (from Tyenar) with Elrion in party to obtain the Memory of Ice.
Side Quest: Granny’s Rumors unscripted
Side Quest: Kenzan’s Past
Find Striager’s memory in the first Ancient Laboratory.
The weapon Striager’s Fang is now stronger.
Unlocks the Achievement: “How I met your Striager“.
Side Quest: Ghost at Tenton Fountain
Talk to the Ghost and obtain Memory of Fire.
Side Quest: Shaela’s experiments
Sheala is found in the dungeon.
Travel to Shaela’s House and talk to the ghost at the “burning” scraps.
You obtain Memory of Lightning.
Side Quest: Sobbing after Flood in Combra
Talk to the ghost at the destroyed docks to obtain the Memory of Water.
Side Quest: Village abovethe mountain range of Rocky Island.
Items: Healing Elixir, Super Bomb, Energy Elixir, Dragon’s Tear, Revival Elixir
The shops sell Diamond Tier equipment, a rest in the inn is free.
The optional recruit for Tenton is the one in the Elder’s Cave.
Talk to the Elder for more information (see side quest “Kenzan’s Past).
Behind her is the optional Dragon Trial.
Trial of the Dragon
If there are still elements missing, see under the pets for information.
Swim over the pond and break the gate.
Hide and pass the laser door.
Charge the next door and burn the log.
Pass the slippery ice and your Dragon obtains the Sun Element and unlock the Achievement “How to Train your Dragon“.
Both pets will get a boost in magic.

Side Quest: Comfort Lune in the Shadow Realm
Boss Fire Dragon Fayera: weak to ice. You cannot remove the fire attacks. Your Pet will most likely flee after one hit. Fayera’s Blaze will deal massive damage and enter a recovery periode for 3 turns, healing 10.000 HP and 200 MP per turn. The same effect will happen to the Fire Scale wielders.
Reward: Draeg’s Fire Scale unlocks its potential but requires massive Fire Energy.
Boss Water Dragon Suidanys: Weak to thunder ans you cannot remove the 2nd chance, so you have to defeat it twice. Suidanys’ Cascade is her strong AoE with Regen for 3 turns. The same effect will happen to Water Scale wielders.
Reward: Ellaria’s Water Scale unlocks its potential but requires massive Water Energy.
Earth Dragon Veratigon: weak to wind and you cannot remove his Spike Shield. Veratigon’s Tremor is his strong AoE with Regen for 3 turns. The same effect will happen to Earth Scale wielders.
Reward: Vaster’s Earth Scale unlocks its potential but requires massive Earth Energy.
Lightning Dragon Raitogon: weak to water and you cannot remove the Charged Weapon. Raitogon’s Spark is his strong AoE with Regen for 3 turns. The same effect will happen to Lightning Scale wielders.
Reward: Kenzan’s Lightning Scale unlocks its potential but requires with massive Lightning Energy.
After defeating 4 Dragons you obtain the Memory of Shadow.
Boss Ice Dragon Glanier: weak to fire but you cannot remove his buffs. The Ignite/Inferno Combo is really effective. Glanier’s Fall is his strong Aoe with Regen for 3 turns. The same effect will happen to Ice Scale wielders.
Reward: Elrion’s Ice Scale unlocks its potential but requires massive Ice Energy.
Boss Wind Dragon Haesovys: weak to earth but you cannot remove her HP-Regen (2500 HP per turn). Haesovys’ Gale is her strong AoE with Regen for 3 turns. The same effect will happen to Wind Scale wielders.
Reward: Haley’s Wind Scale unlocks its potential but requires massive Wind Energy.
Boss Shadow Dragon Lune: weak to light but has a stronger resistence to magic. Lune’s Eternity is her strong AoE with Regen for 3 turns. The same effect will happen to Shadow Scale wielders.
Reward: Rheyn’s Shadow Scale unlocks its potential but requires massive Shadow Energy.
The party has the potential to defeat Sol.
Once Sol is defeated, you can challenge his memory.
Boss King of Dragons, Sol: You cannot remove his Providence Buff. He now even counters Physical Attacks and can use the Elemental Regen AoEs from the other dragons. To avoid that, have each Scale attached, only Shadow is an exception, and the pet should be dragon with the Sun Element.
His Catastrophe will decrease the party’s HP to 1 (can be absorbed) and seals an action for one turn. 5 turns CD.
Devastion will deplete MP and TP and seal Items for one turn. 5 turns CD
3x Random Attack Skill and Skills will be sealed for one turn.
Repeat.
Recommended party with recommended equipment and tactics from the developer (rec. lv. 40):

(Make sure you have every element represented in Scales)
Turn 1: Absorb with Shadow, Chill with Ice, make sure your pet is Sun for stat buffs.
Turn 2: Anyone who’s slower than him can use TP/MP elixir.
Turn 3: Shadow wants to Dispel, Goddess’ Hunt use Designate Prey.
Turn 4: Slaughter and Jungle Fury. If you’re lucky, you can do 40+ hits here and he dies to Hunting Time at end of turn. Otherwise, get TP and repeat Slaughter. Jungle Fury should kill him at end of 3 turns.
Reward: 250.000 EXP, Achievement “King of Dragons”
Side Quest: Hole Sleppek’s sky island has left south of Tyenar.
You need to find a way to remove the effect of the seal.
The Seals removes all armor and accessories ans seals skills and magic.
The moving boulders (here the Shadow Orb) are the seals and you have to be careful in which seal you unseal in which order.
I recommend Skills, Accessories, Armour, Magic and last Items.
Mobs: Pixies,
Mobs (SE): Enraged Water Spirit, Nymph, Elder Vampire
Mobs (NE): Hellhound, Enraged Fire Spirit, Tortured Soul
Mobs (NW): Enraged Earth Spirit, Alpha Minotaur, Prison Guard
Mobs (SW): Security Robot, Maintenance Drone, Sentinel Robot
Boss Tengu (entrance): has sword skills.
Boss Seiryu (SE): weak to fire and lightning? Tranquil Guard or Hero Rings!
Boss Suzaku (NE): weak to ice and water? Tranquil Guard or Hero Rings!
Boss Genbu (NW): weak to wind. Beware the Spike Shield.
Boss Byakko (SW): weak to earth and shadow. It can get invisible and hard to hit with single attacks.
SE: swim and reach Puzzle #49 at the NE corner.
A bit further SW is a Energy Elixir and the Water Orb is in the centre.
In the SE corner is a Super Explosive, from there west is a Rage Elixir and in the SW corner a Serene Helm.
NE: avoid the flames (100 HP damage per hit) and collect Revival Elixir, Healing Elixir and Ferocious Plate and find Puzzle #47.
The Fire Orb is your goal.
NW: Push boulders into the holes from above. Collect the Stalwart Plate and solve Puzzle #46.
SW:
- Pull the red lever from the west
- Pull the yellow lever
- Solve Puzzle #48
- Pull the green lever.
- Pull the blue lever and collect the Swift Helm
- Defeat the Lightning Orb
- Pull the levers in reverses order or use the teleporter.
Boss Sol: If he has a weakness then shadow. Sol is the ultimative element. He will absorb the elements and destroy the party with it, so avoid that in the first two turns or only use Magic for healing and buffing.
His Catastrophe will decrease the party’s HP to 1 and seals Attack for one turn.
You unlock the Achievement “Sunset“.
- Rank 10 in the Arena
- Reach Puzzle Master Rank S
Light Scale Skills
Thanks to Firefly130984 for his excellent guide; all credit belongs to his effort. If this guide helps you, please support and rate it via Steam Community. Enjoy the game.