Welcome to my in-depth achievement guide for Sable! In this guide, I have given you detailed walkthroughs on how to earn all the achievement in this game. Please read the “Important” section just below this for some more information. Spoiler Alert!!!
Important
- Please experience the game by your own first! Sable is a wonderful game that should be played by you without any guidance when playing for the first time. This guide contains spoilers since I have given walkthroughs for the quests that are associated with achievements.
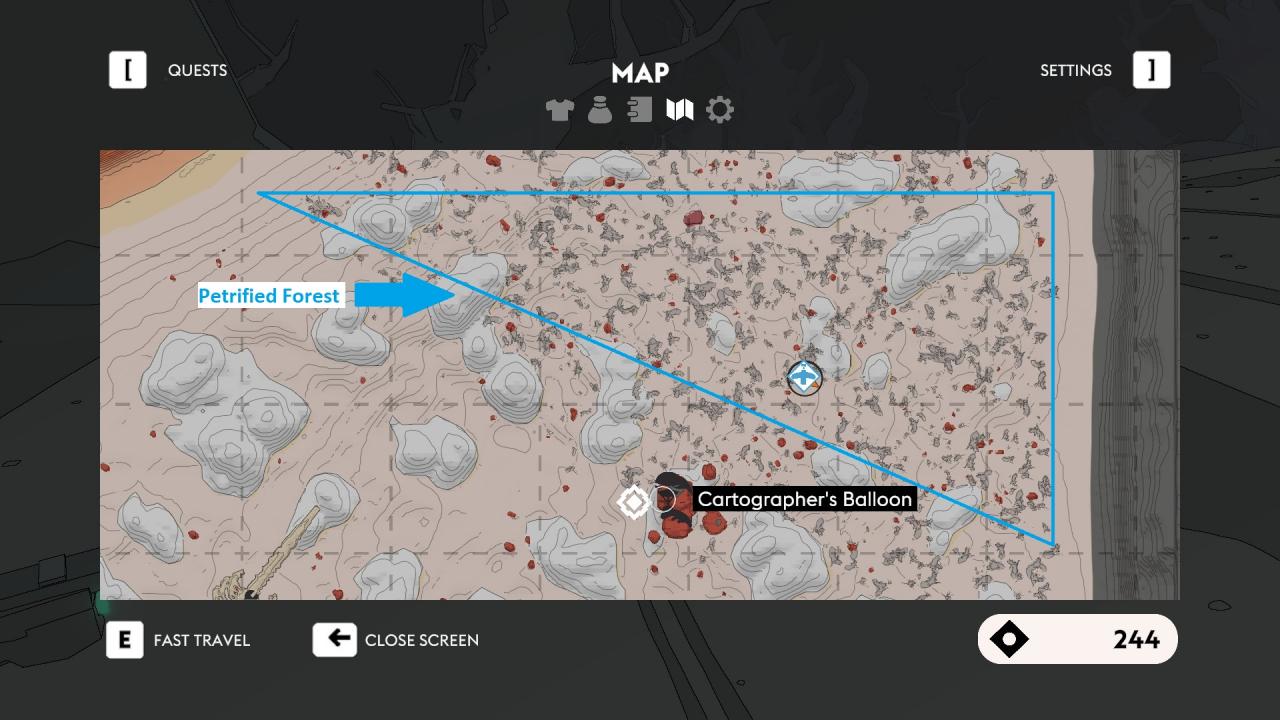
- When entering a region that you haven’t found the map for, keep an eye on the sky for the cartographer’s balloon so that you can buy the map of that region. Having the map of a region can be very helpful in discovering new locations.
- Even though I have listed badges in order (1st, 2nd, 3rd, etc.) under their specific masks, badges can be found in any order unless otherwise stated.
Quest Related Achievements
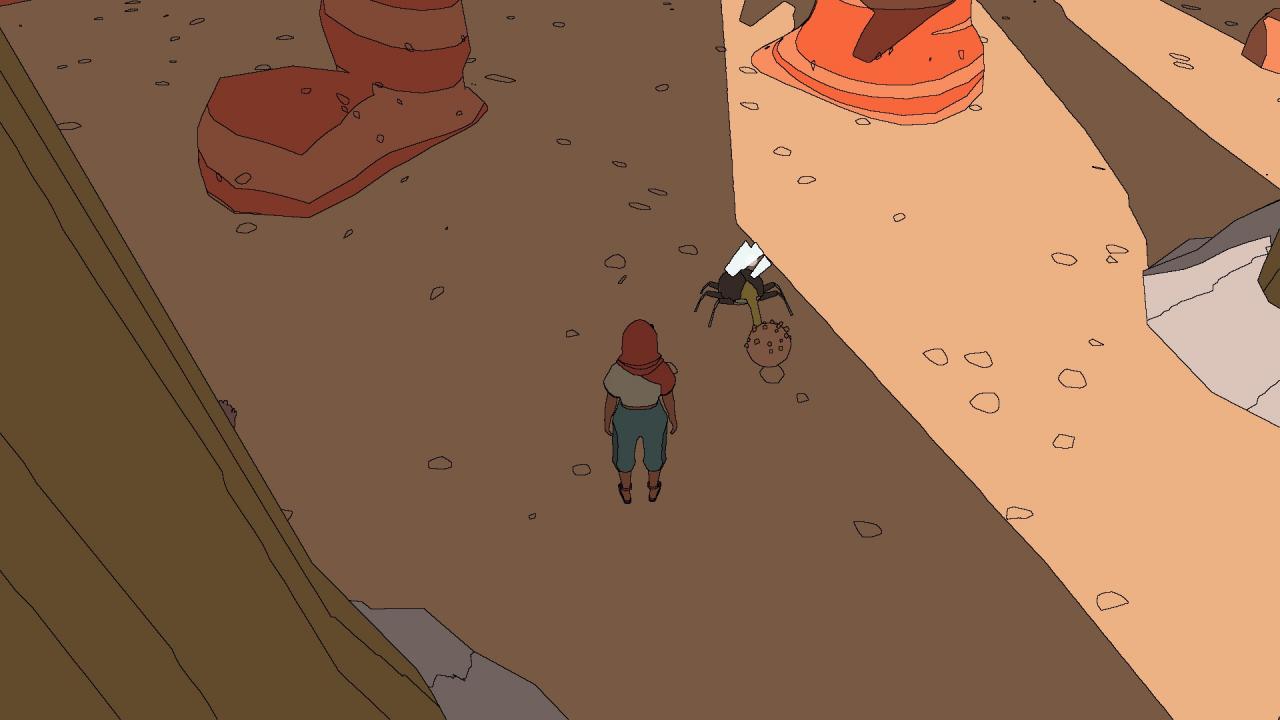
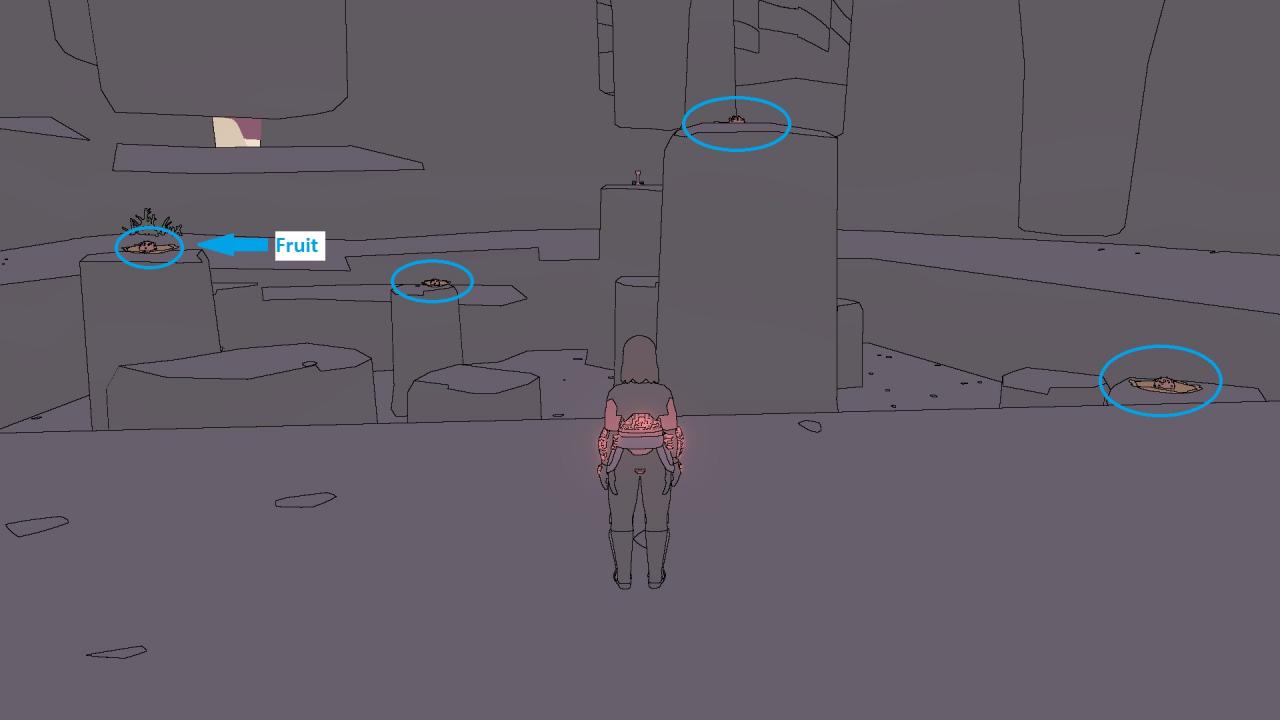
Collect an elephant beetle
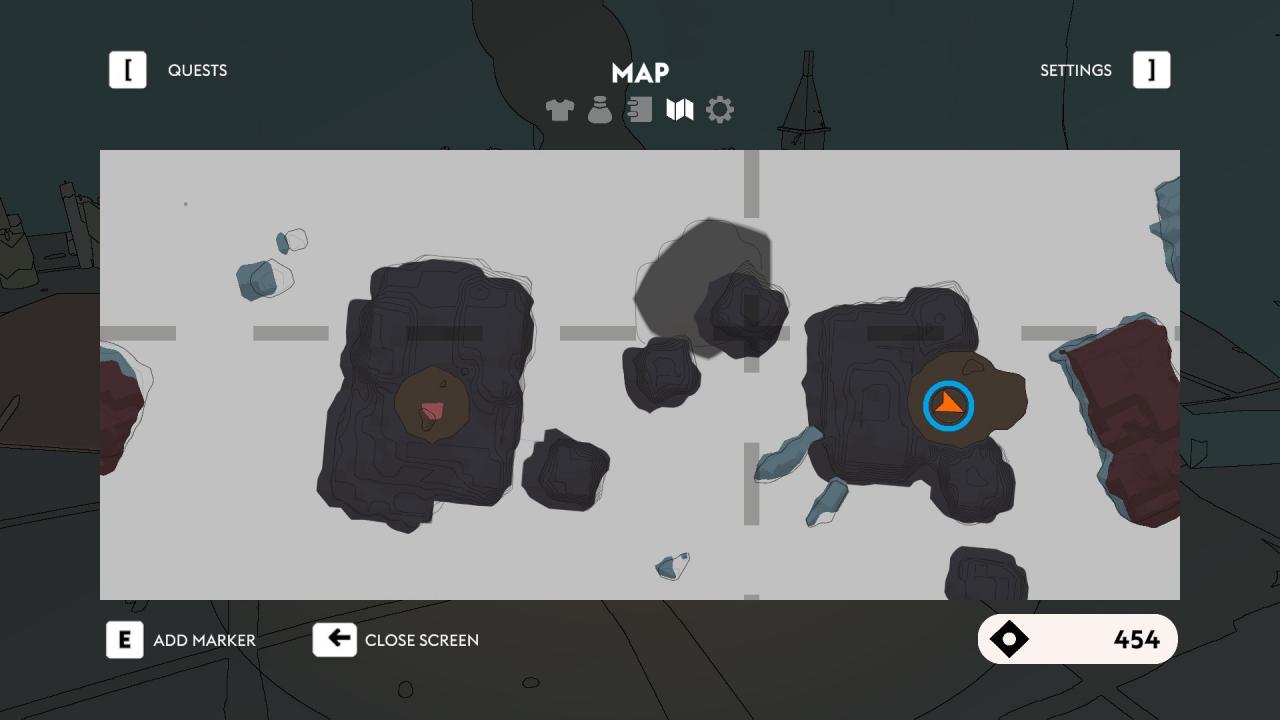
You get the optional objective to find elephant beetles during the “Beetle Detour” quest while finding the calibrator when assembling your hoverbike, but keep in mind that you can get this anytime during your playthrough. Go to the location shown below (near the dam where the control panel for hoverbike is) and go through the pipe to the open area with elephant beetles. Then you need to climb the Tassel trees and go near a fruit and it will make the fruit drop down. Grab a fruit and throw it near a beetle. Afterwards, you can grab the beetle while it’s eating the fruit.
Build your hoverbike
Main story related and cannot be missed. Simply build your hoverbike.
Leave the Ewer
Main story related and cannot be missed. Leave Ewer after building your hoverbike.
Unblock the wind tower
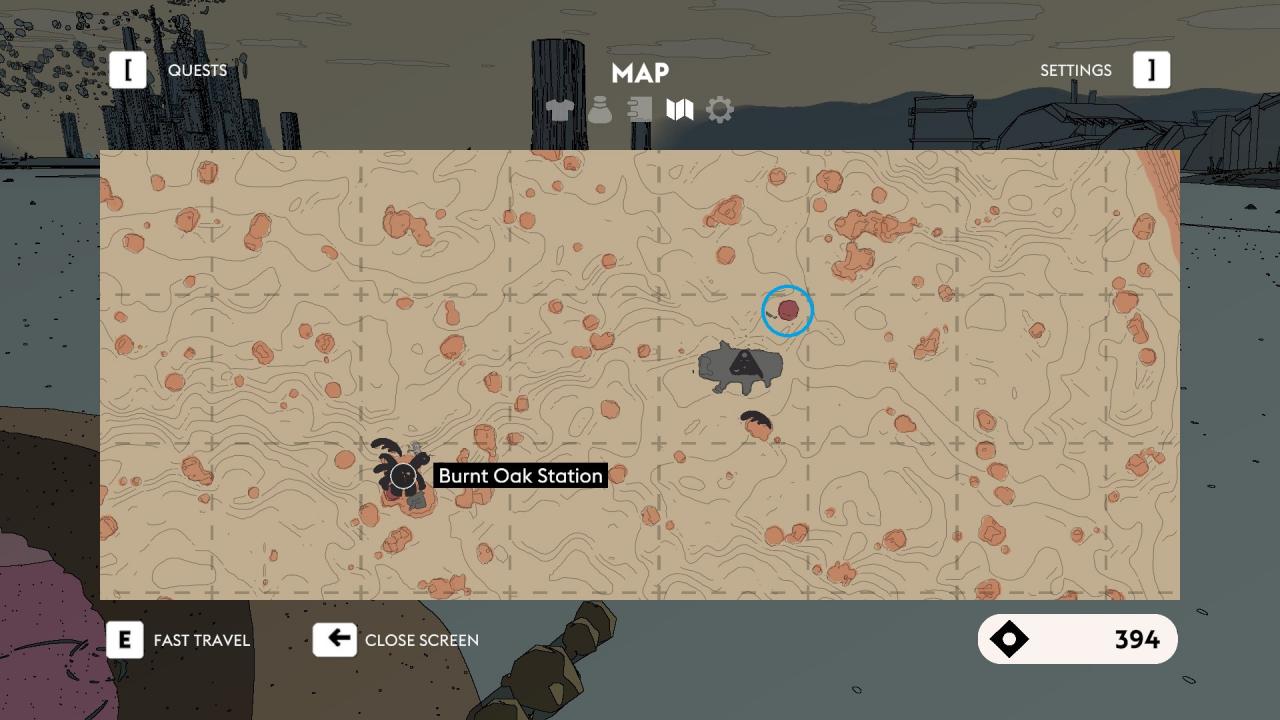
Unlocked while doing “A Stubborn Snag” quest given by the Machinist Utarii in Burnt Oak Station.
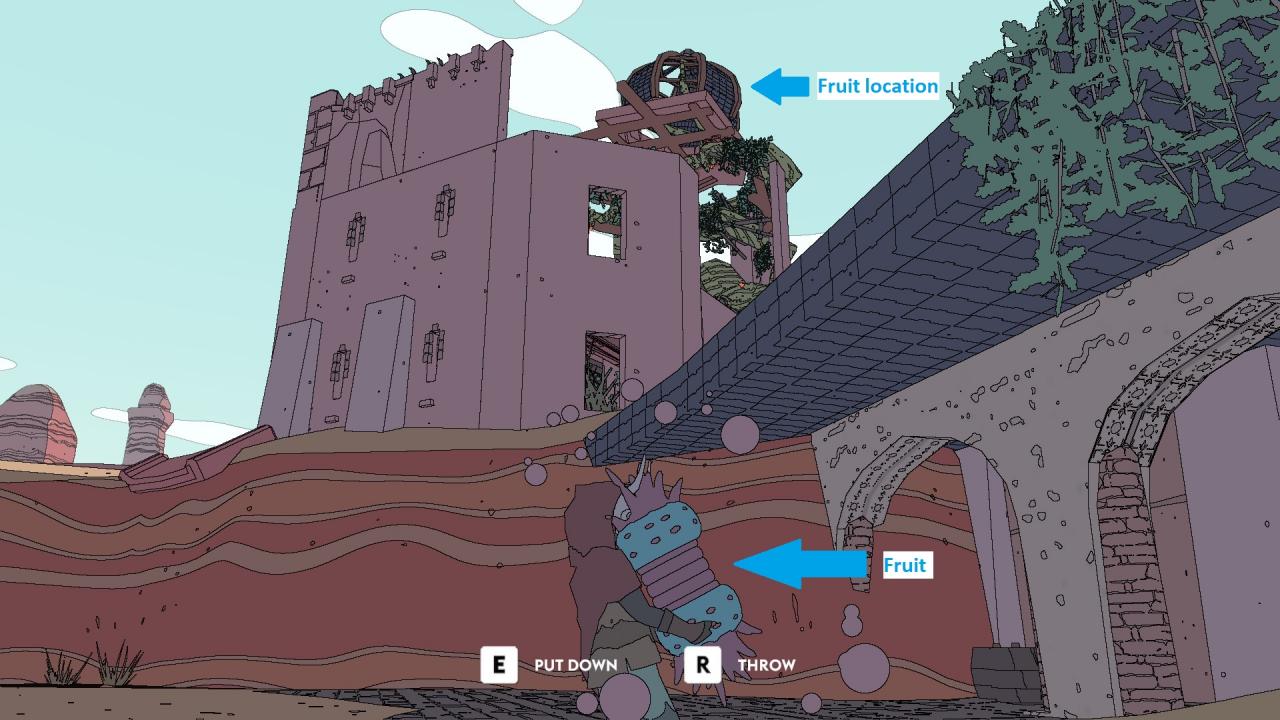
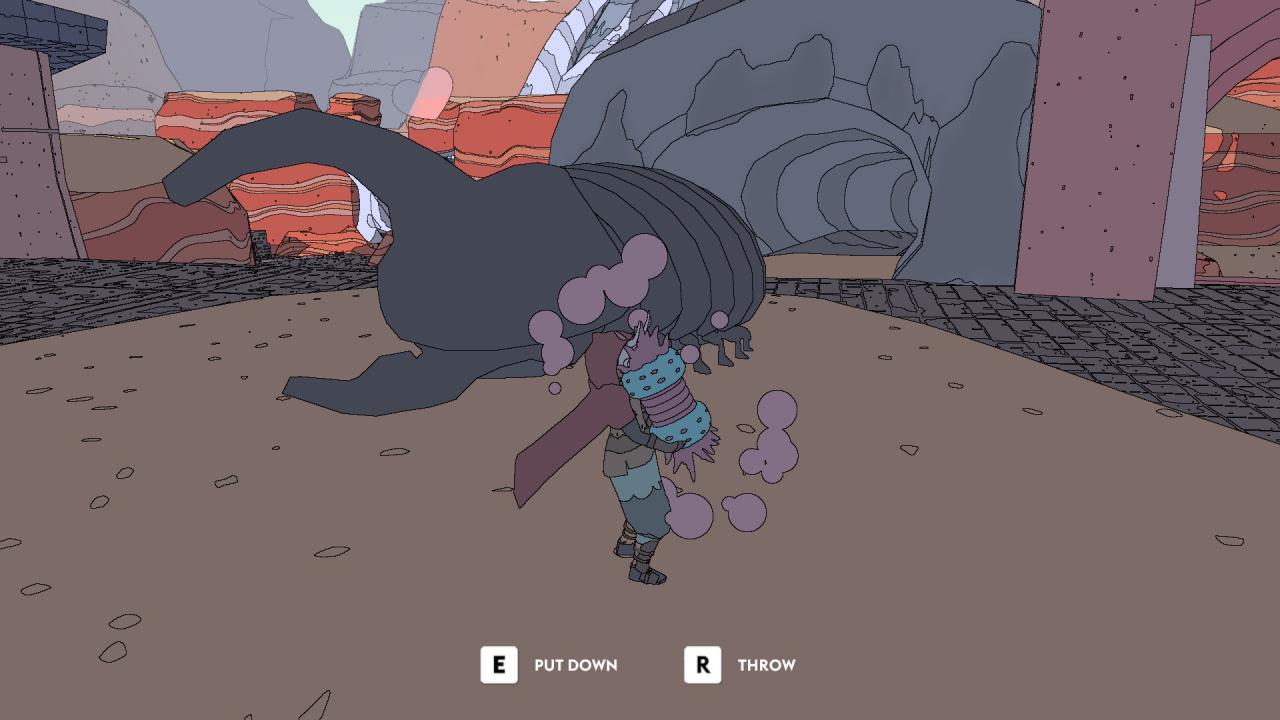
Get into the Hercules Beetle Nest
While in Burnt Oak Station, talk to Innkeeper Ifaa and get the “Remnants of Change” quest. Simply follow along the quest and get to the Hercules Beetle nest. There is a partially broken building in this area. Climb to the top of that building and get one of the fruits on the vines at the top and go near the Hercules Beetle blocking the path to the nest. The beetle will come out if you’re holding the fruit. Lure the beetle out and enter the nest to get this achievement.
Note: I personally got this achievement when going near the Hercules Beetle while it’s blocking the path to the nest even without the fruit. This might be a bug and your experience may vary.
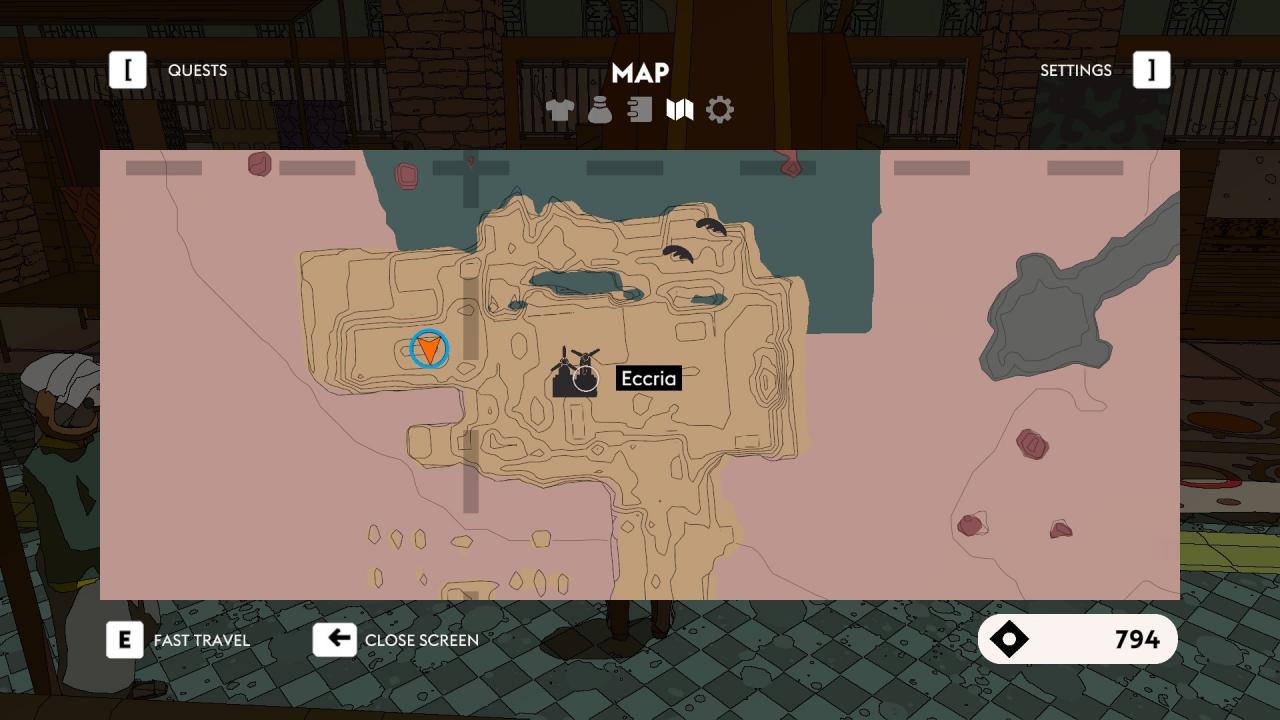
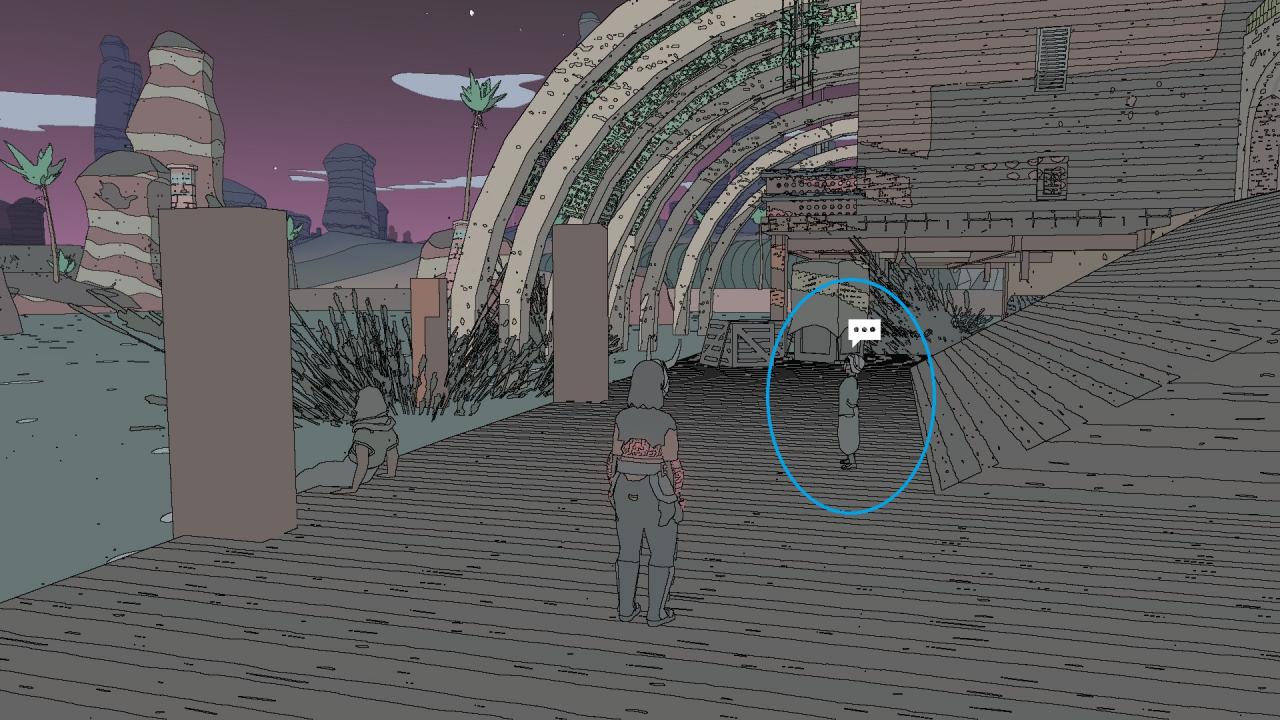
Return power to Eccria
Progress through the “Heartbreak in the City” quest given to you automatically when you visit Eccria.
Point the finger at a suspect
You need to find the person who tampered with the Atomic Heart and created the power cut in Eccria. You must find evidence and decide who the culprit is. There is a clear cut answer that is confirmed by the developers, but the game doesn’t tell you who actually did it even if you accused the correct person. So if you want, you could choose any of the given person as a suspect and get this achievement.
If you want to know more about suspects and deduce it yourself or the suspect confirmed by the developers, below are the hints/evidence/clue. Beware of spoilers.
You must find evidence near the Atomic Heart power core (broken glass, feathers, note of debt to the merchants, power core socket). There are 3 suspects. Talk with all of them.
- Climber Garay: Located under the bridge to the entrance of Eccria.
- Machinist Hamza: Located near the canal in Eccria. You will naturally meet him when repairing the power core. You will find his apartment to be trashed which raises some suspicion.
- Merchant Iria: Located in the market in Eccria. Bribe the guard with Fallow Pomegranate (found in trees near Eccria or bought from vendor under the bridge to the entrance to Eccria) and unlock the door to her.
After talking with 3 suspects, talk to Café Owner Rita near the canals. Ask her about the power cut and then about Garay and she will vouch for his alibi. So you need to decide between Iria and Hamza. Iria has an alibi, given by her guards. Hamza’s apartment was trashed and the the receipt proves that whoever stole the core owed debt to the merchants. Garay says that a machinist tried to sell a power core in the market (presumably to pay off the debt). So we can assume that Hamza tried to steal the power core to create a blackout to pay off the debt.
The developers also confirmed in their Reddit AMA that Hamza is the correct suspect.
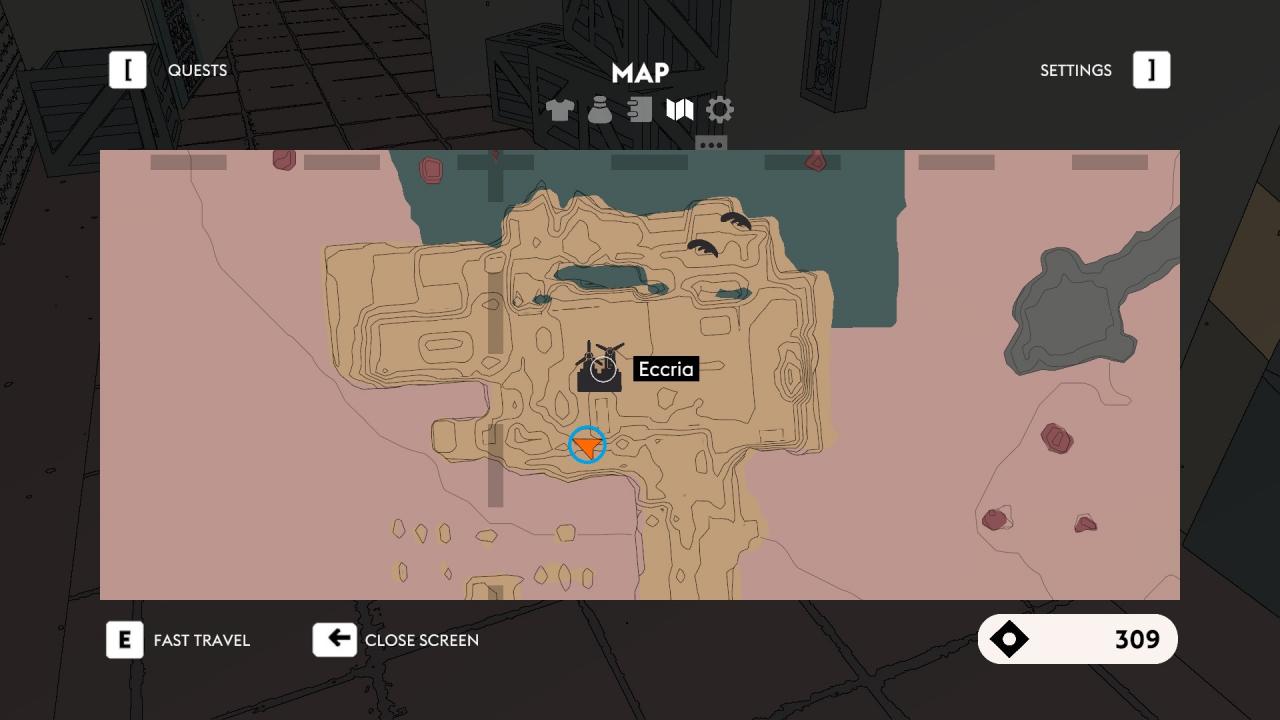
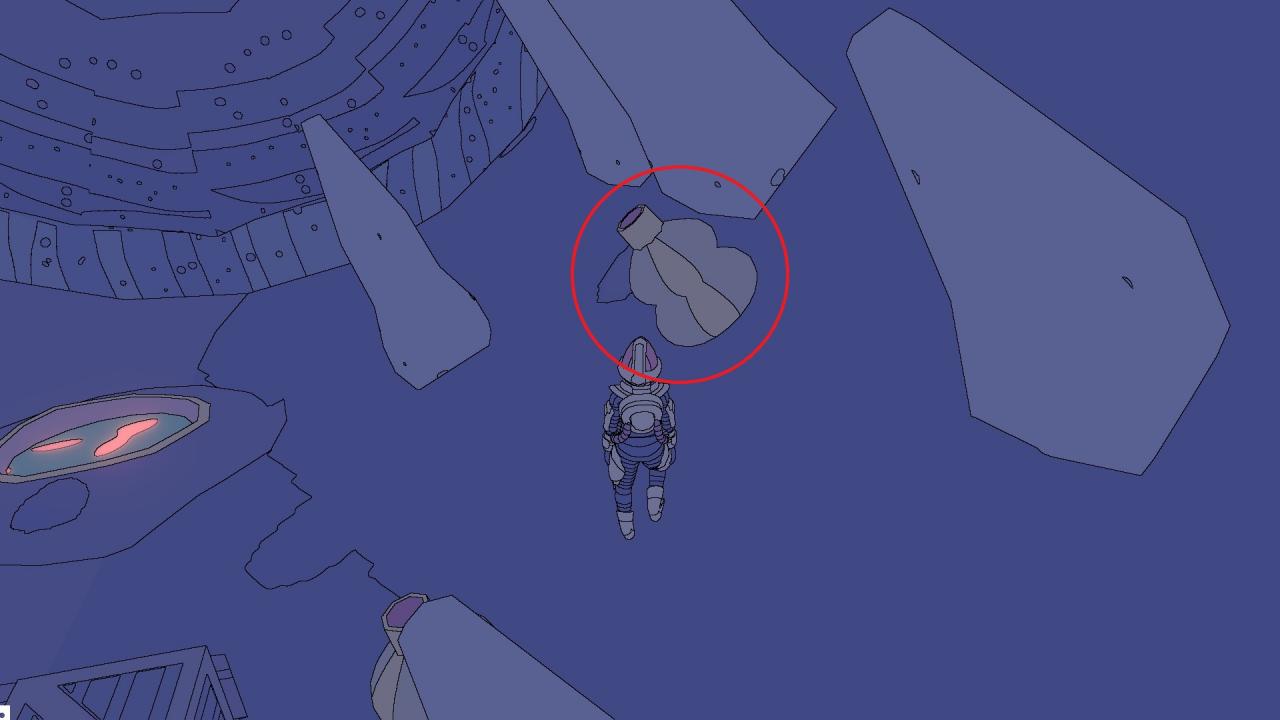
Collect a Hakoan glowworm
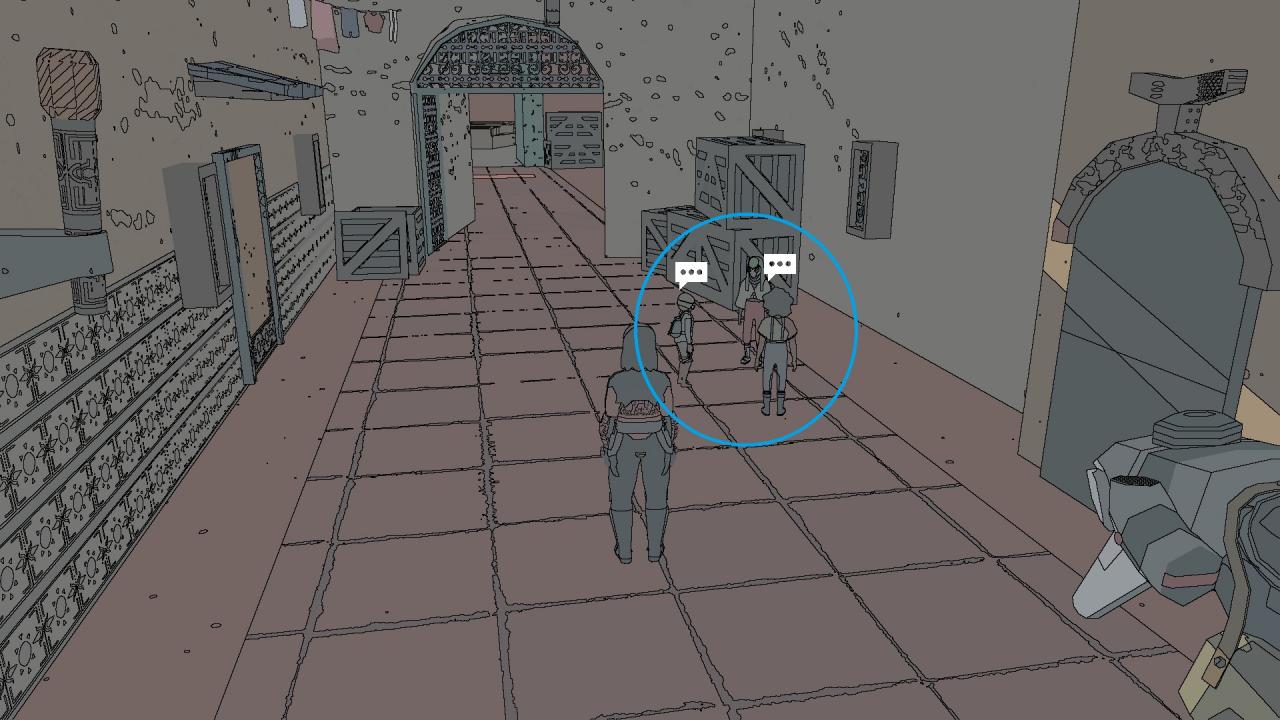
Go to the merchant quarters in Eccria (marked in map below) and interact with the strange snake-like creature. After the cutscene, talk with Merchant Citra and obtain the “Nozi’s Nibbles” quest.
Go through the quest and speak with the Innkeeper Afii in Seven Sisters Station in Hakoa.
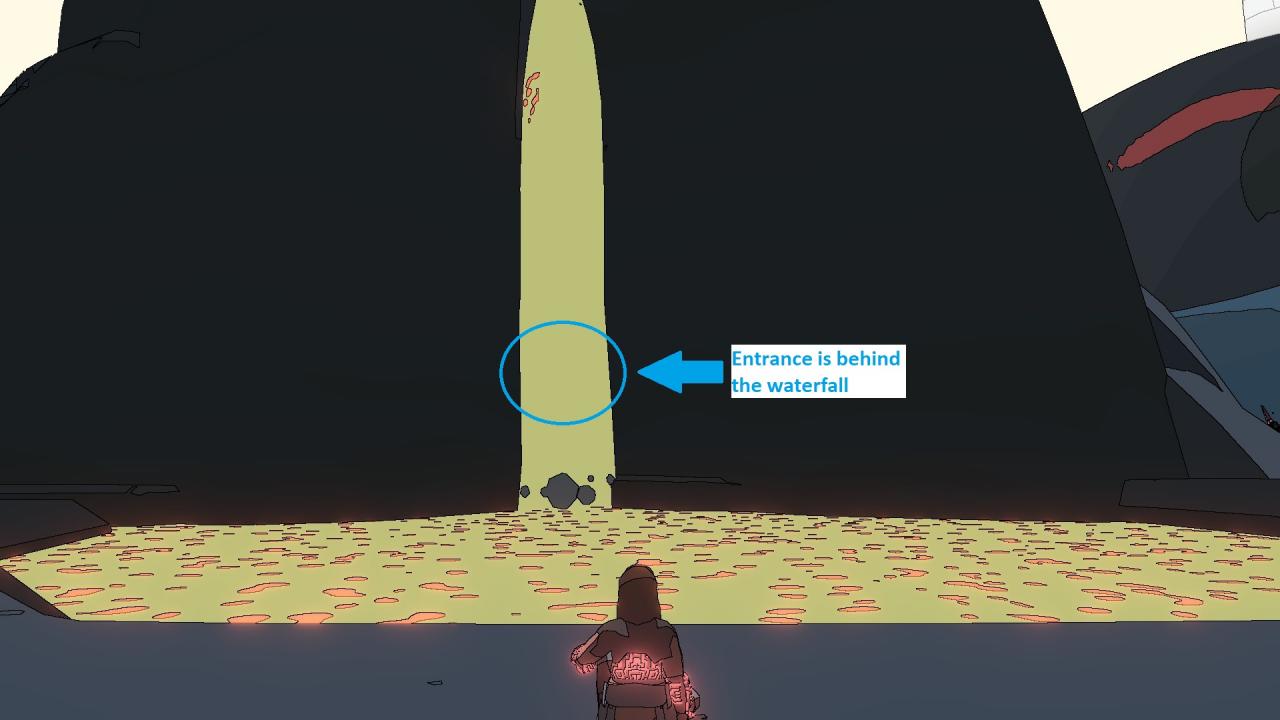
Next up, you have to go to the cave that has the glowworms. Enter the location and go near the waterfall. The entrance to the cave is hidden behind the waterfall.
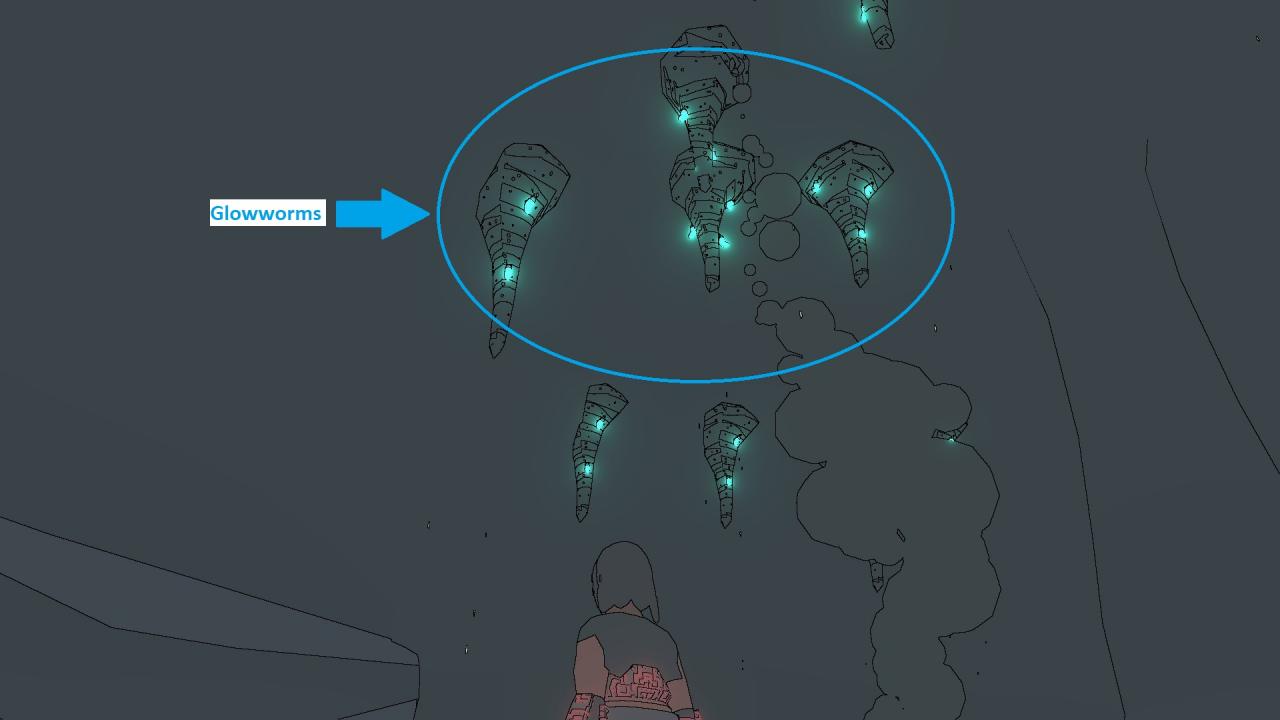
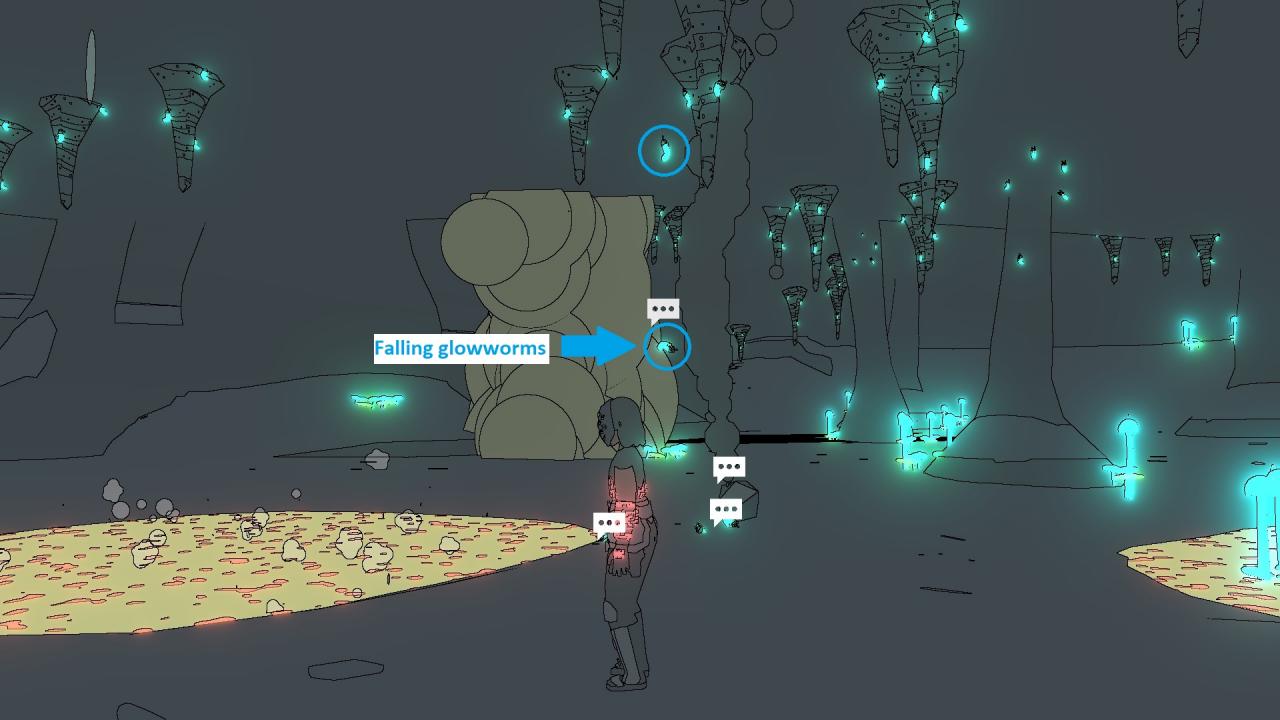
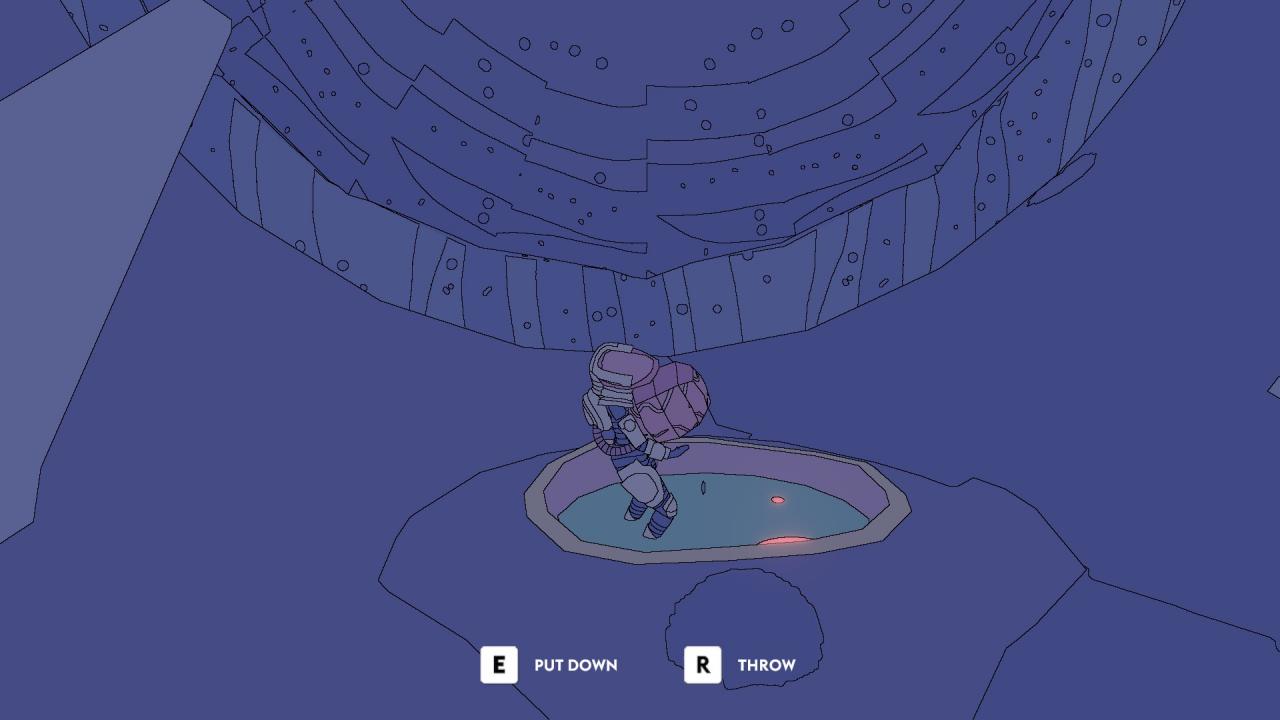
After entering the cave, you will come across an open area with water puddles, rocks, and glowworms on the cave roof. You need to pick up a rock and drop it in a water puddle. Afterwards, the rock will immediately start to smoke. Quickly pick up the rock (while it is smoking) and put it right under a group of glowworms. The smoke from the rock will make them fall down. Afterwards, you can collect them to get this achievement.
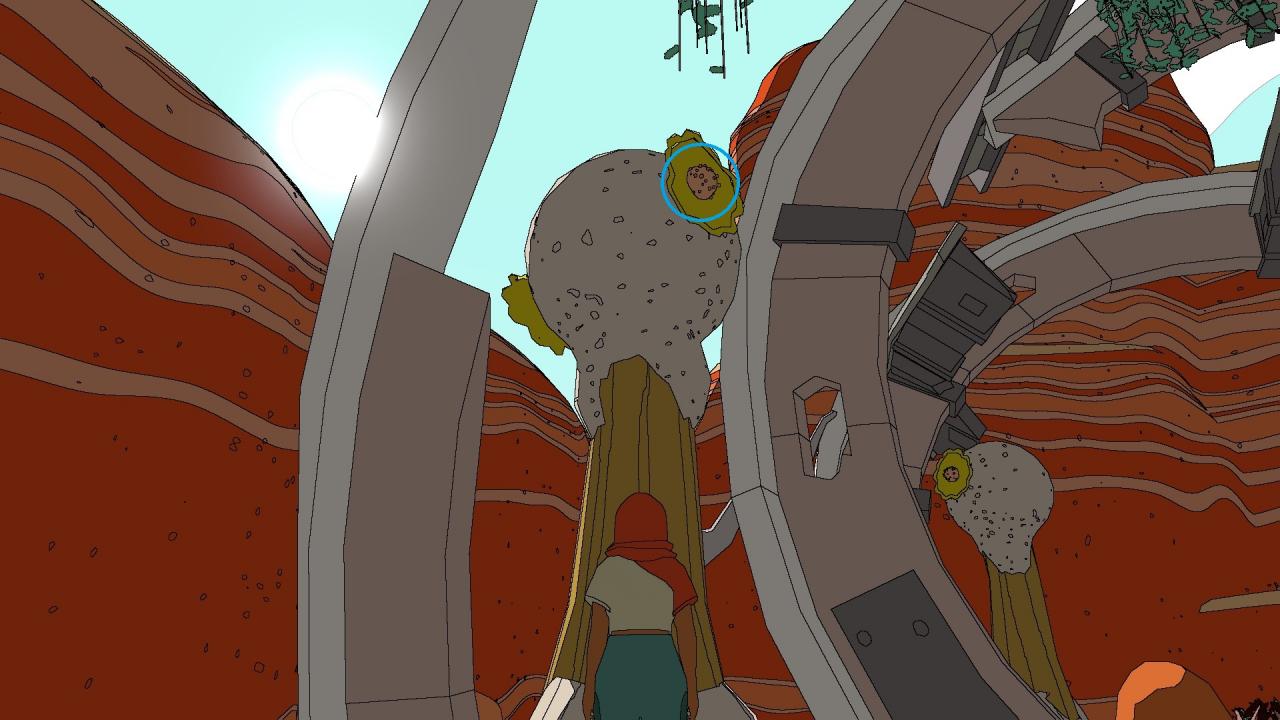
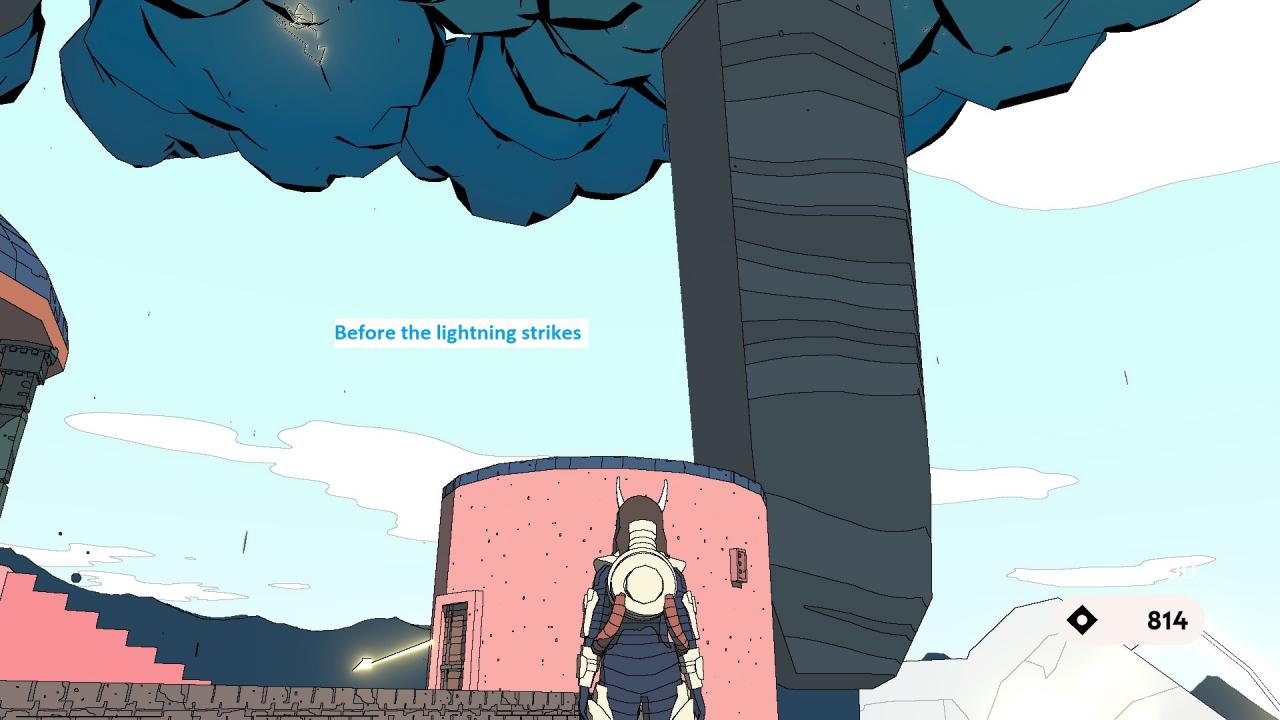
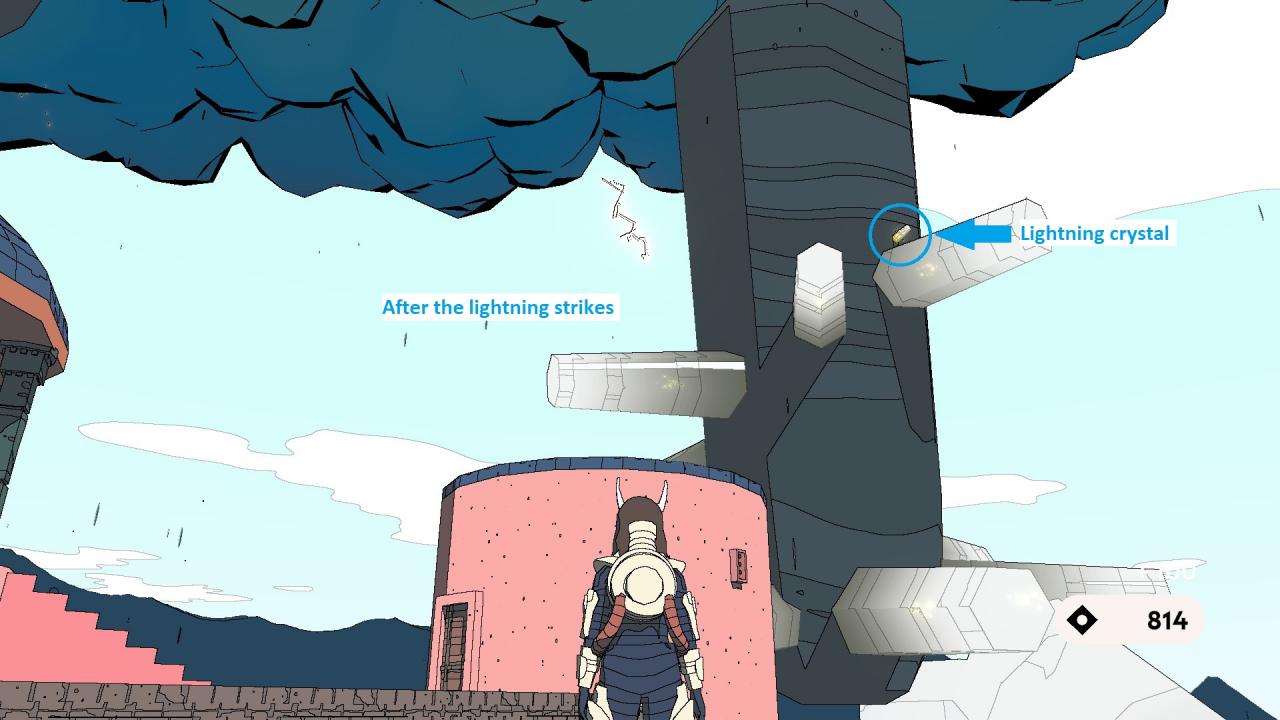
Harvest a lightning crystal
Go to the Seven Sisters Station in Hakoa and speak with Machinist Zahra. Ask for a machinist badge and she will give you the “Lightning in a Bottle” quest.
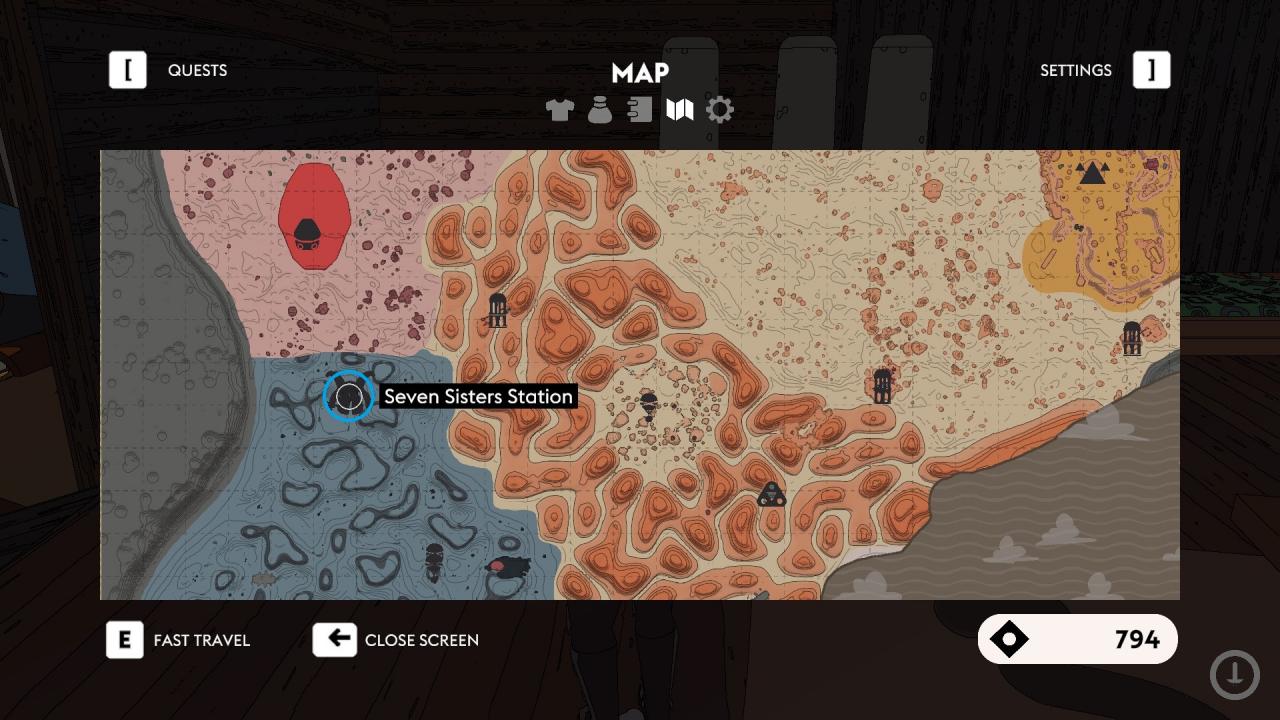
Afterwards, go to the Crystal Plateau and speak with the Hakoans there. There is a Hakoan trader named Caimin who sells lightning crystals for 100 cuts each. You can either farm them or buy them. Either of these methods will give you the achievement.
To farm them, you need to go to the very top of the Crystal Plateau and go near one the pillars shown below. When the lightning strikes a pillar, crystals will expand from it. Some of these crystals contain lightning crystals. Immediately climb the pillar and collect the lightning crystal. If you wait too long, the crystals break off and you will have to wait until lightning strikes again.
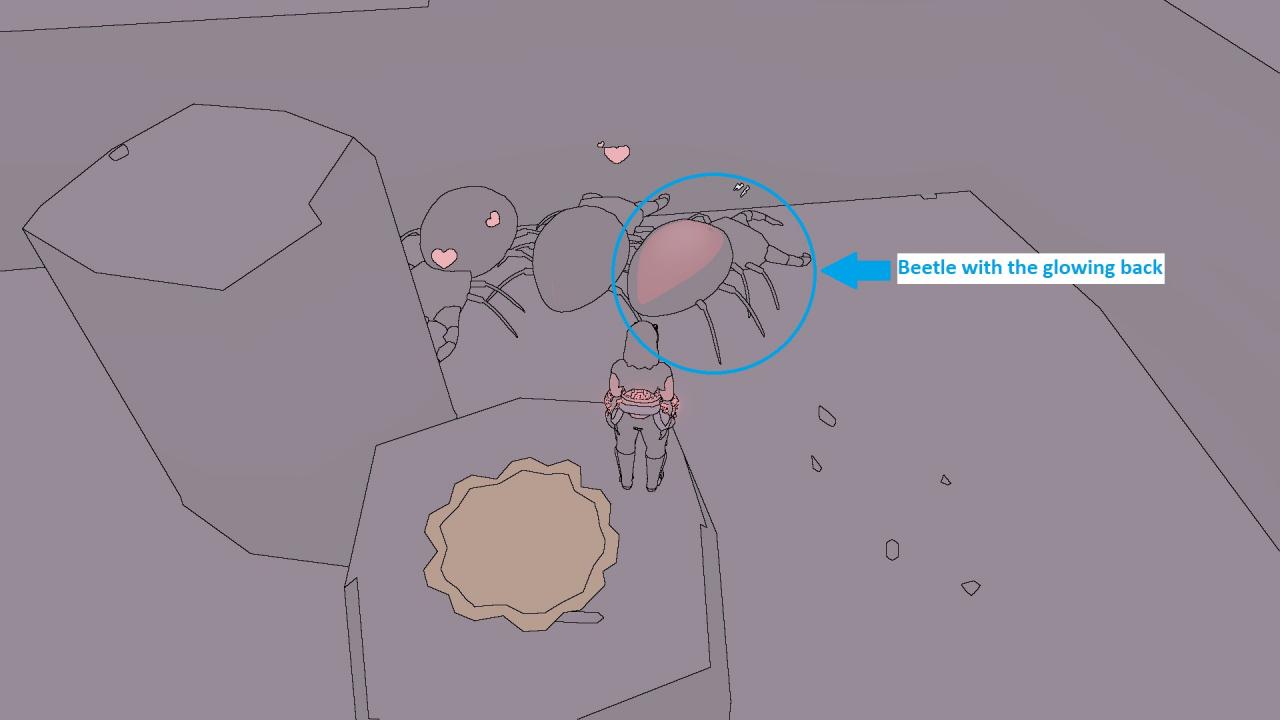
Collect a slicer beetle poo
Go to the Seven Sisters Station in Hakoa and speak with Innkeeper Afii. Ask her if she needs any help and she’ll give you the “The Long Drop” quest. Continue on with the quest and go to the Carab’s Hold. Go inside the location and drop down to the water and swim until you come to the cave with the beetles. To get poop out of them, collect a fruit that are on top of a column and drop it near the beetles. While they’re eating it, one beetle’s back would glow in orange colour. Jump onto that beetle’s glowing back area and it will squeeze out the poop.
Quest Related Achievements (Continued)
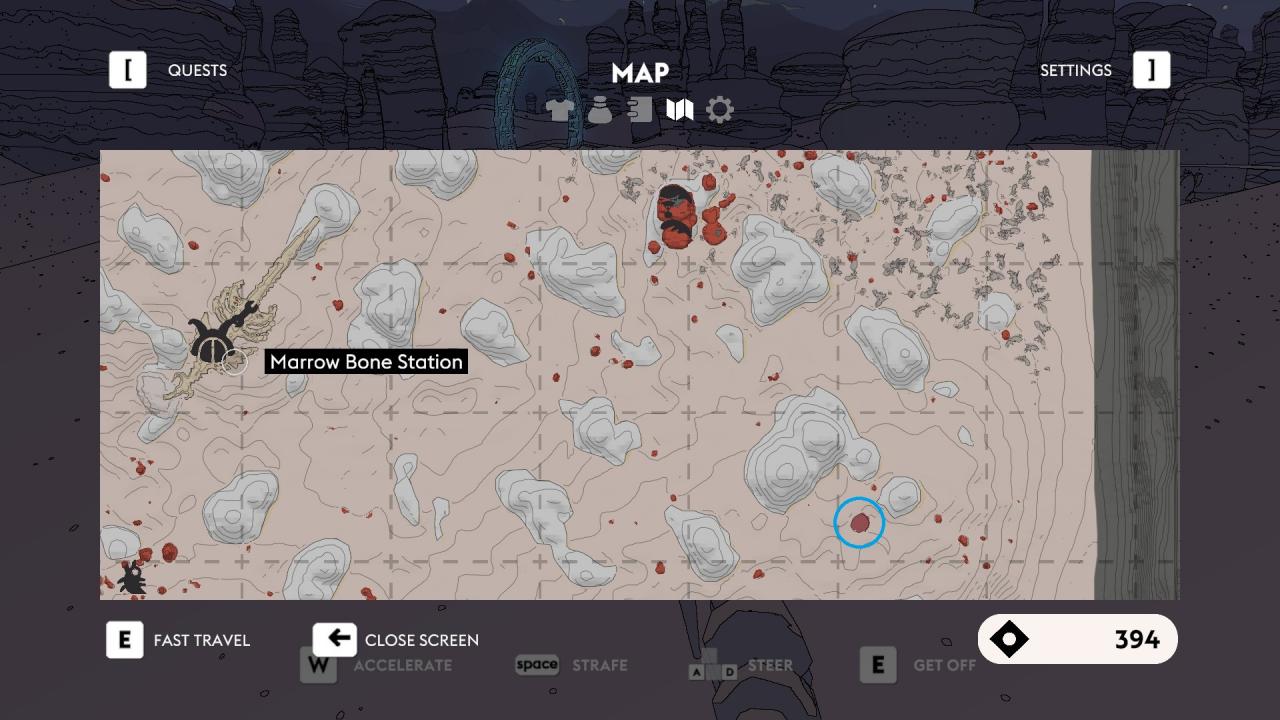
Collect a orange ringed beetle
Go speak with Innkeeper Ofuu in Marrow Bone Station and get the “Orange Ringed Delights” quest.
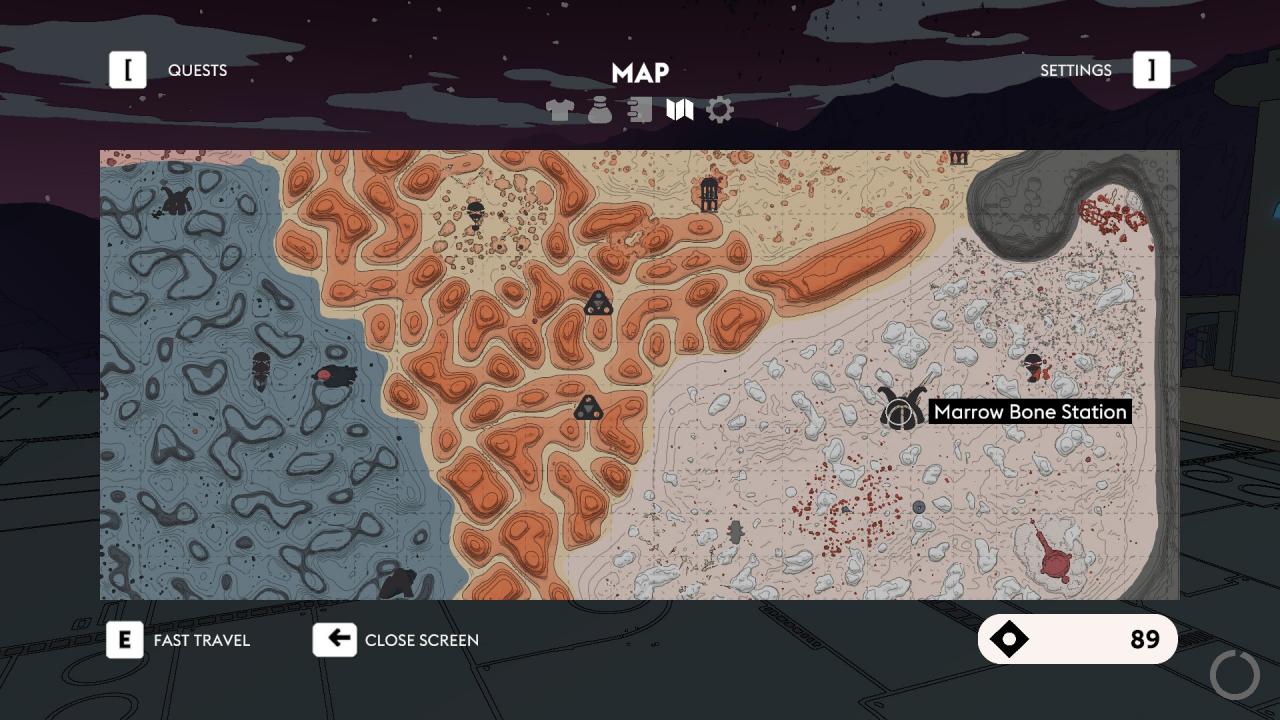
Afterwards, go through the quest to the beetles’ nest shown in the quest marker. These beetles burrow underground when you go near them, so to catch them, you need to wait until the beetles walk on the stone and go near them, they will try to burrow through stone and loose their balance and flip, allowing you to catch them. You can use the nearby Tassel fruits on the Tassel tress to lure them on to a solid surface.


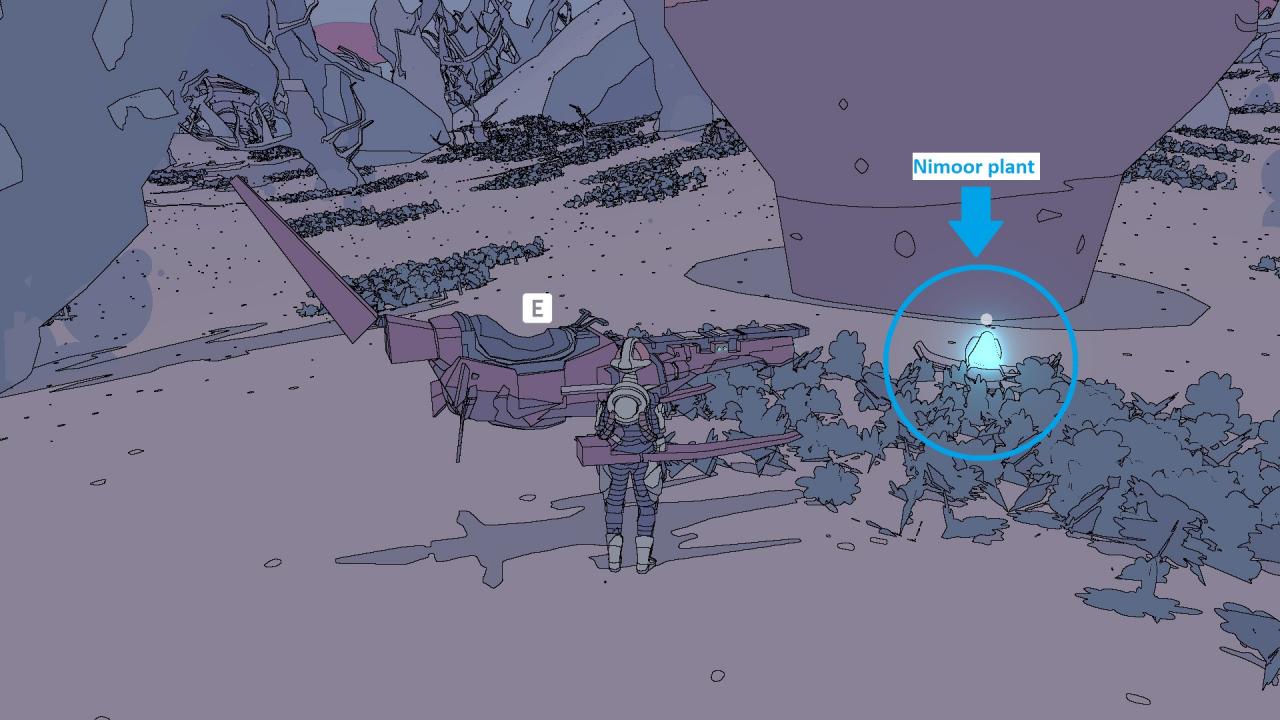
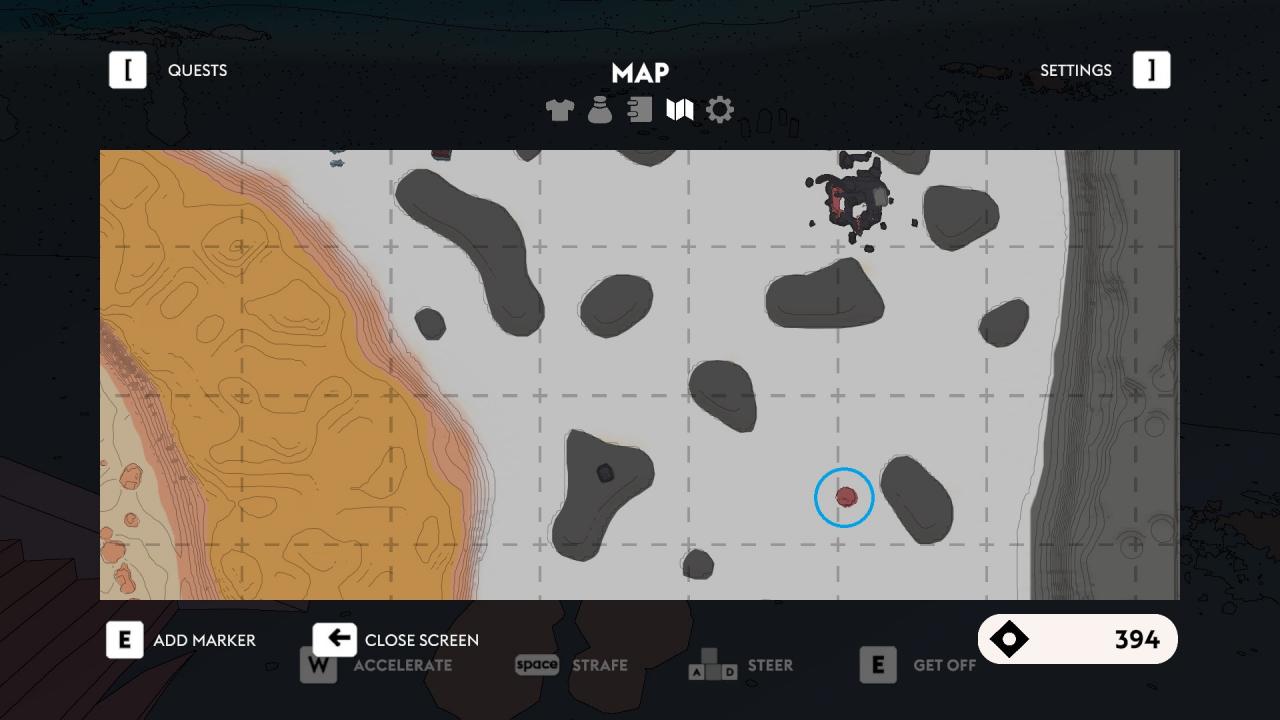
Destroy a Nimoor plant
You get to destroy a Nimoor plant while doing the “Tough Nut to Crack” quest given by Guard Eliisabet. However, to unlock that quest, you first need to speak with her in Burnt Oak Station in Sansee and get the “A View from the Bridge” quest. Complete the quest by meeting her on Bridge of the Betrayed in Badlands.
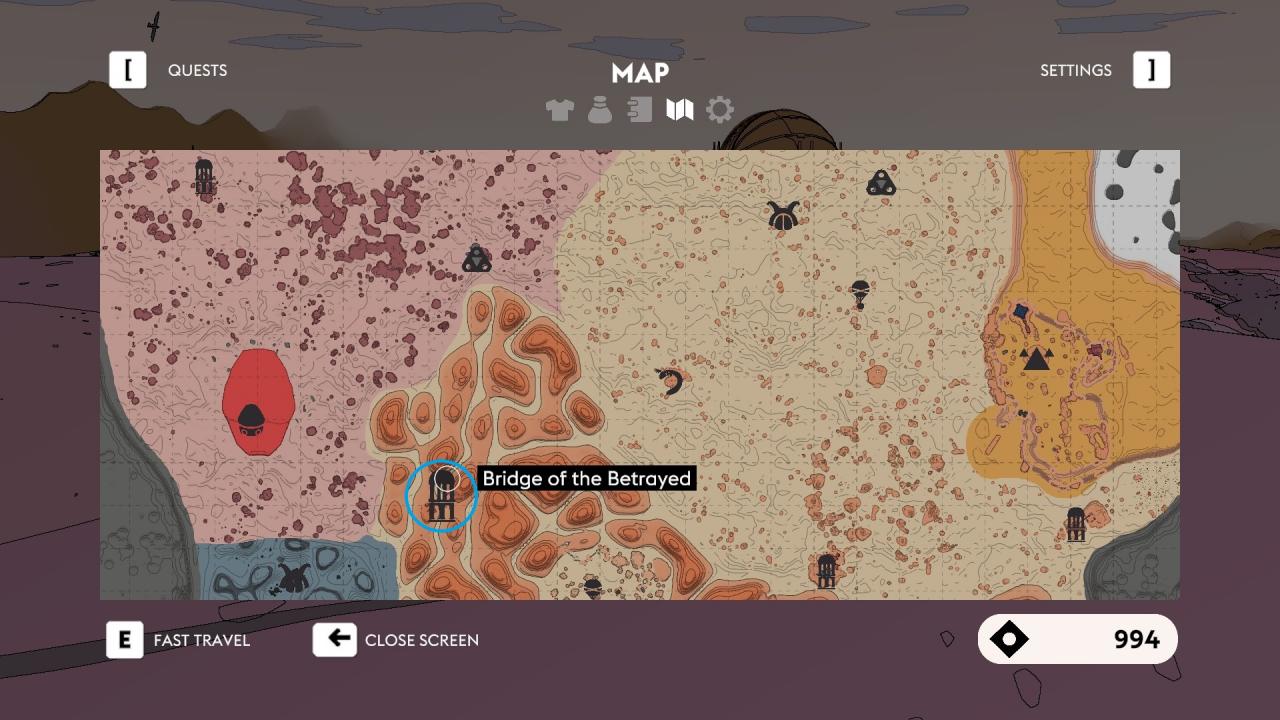
Afterwards, meet her again in Marrow Bone Station in The Wash and get the “Tough Nut to Crack” quest. You will need to destroy Nimoor plants and find what’s inside of them to get this achievement. Go to the Petrified Forest in The Wash at nighttime and find a Nimoor plant. They glow in bright blue colour. Go near one, pick it up and throw it away to break it. Afterwards, collect the item inside to get this achievement.
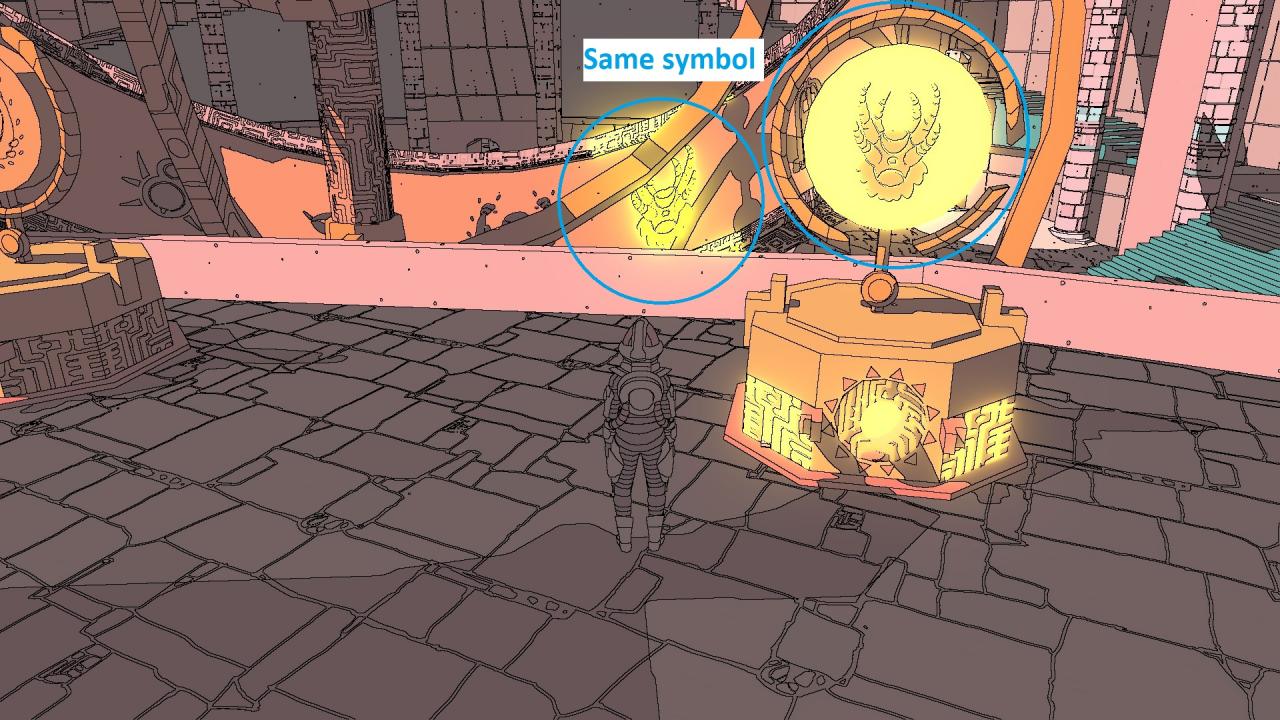
Complete the puzzle in the Watch
Go to the Marrow Bone Station in The Wash and speak with the Machinist Kaalan there. You will get “An Eye To The Sky” quest. Go through the quest and go to The Watch. Keep in mind that you can only do this quest during daytime while the sun is shining. Go inside the structure until you come across a massive room with a large spherical object. To start the puzzle, go to the highest platform with a switch on the floor. Stand on it and it will open the roof.
After the sun shines in, go near a lever that is under a small arch. Move the lever until a section of the arch lights in blue colour. Do this with all the 3 levers under the arches.
Afterwards, go in front of the giant face and pick up a small spherical object from the pedestal there.
Finally, you need to insert the object into the pedestal with the symbol that matches the one on the ring of the large sphere. You will get this achievement after inserting the object into the correct pedestal.
Complete Historical Reconnection
To activate the “Historical Reconnection” quest, you need to interact with 1 of the 7 Sarin instances that you can find throughout Midden. The main way to get this is to find Sarin’s chamber in The Whale in Redsee. However, interacting with any of the other 6 instances will activate this quest as well.
The quest tells you to find more information about Sarin in the beginning. In order to do that you need to find Sarin in all the other 6 locations (other than in The Whale) and listen to all the recordings. The locations of Sarin’s other 6 locations can be found under “The Dunboyne“, “Balfron Connection“, “Rowleys Way“, “Shadow Of Neave“, “Trellick’s Pillar“, and “Centre Of Brunswick” achievements in the Exploration Related Achievements section.
After finding and talking with all the 6 Sarin instances, you will be asked to go to The Whale and meet Sarin. Go there and get to the first platform by the ladder (near the moving platforms) and immediately turn right and go until you come to the unlocked doors, go through the doors to meet Sarin. Complete this quest to get this achievement and some cool items.
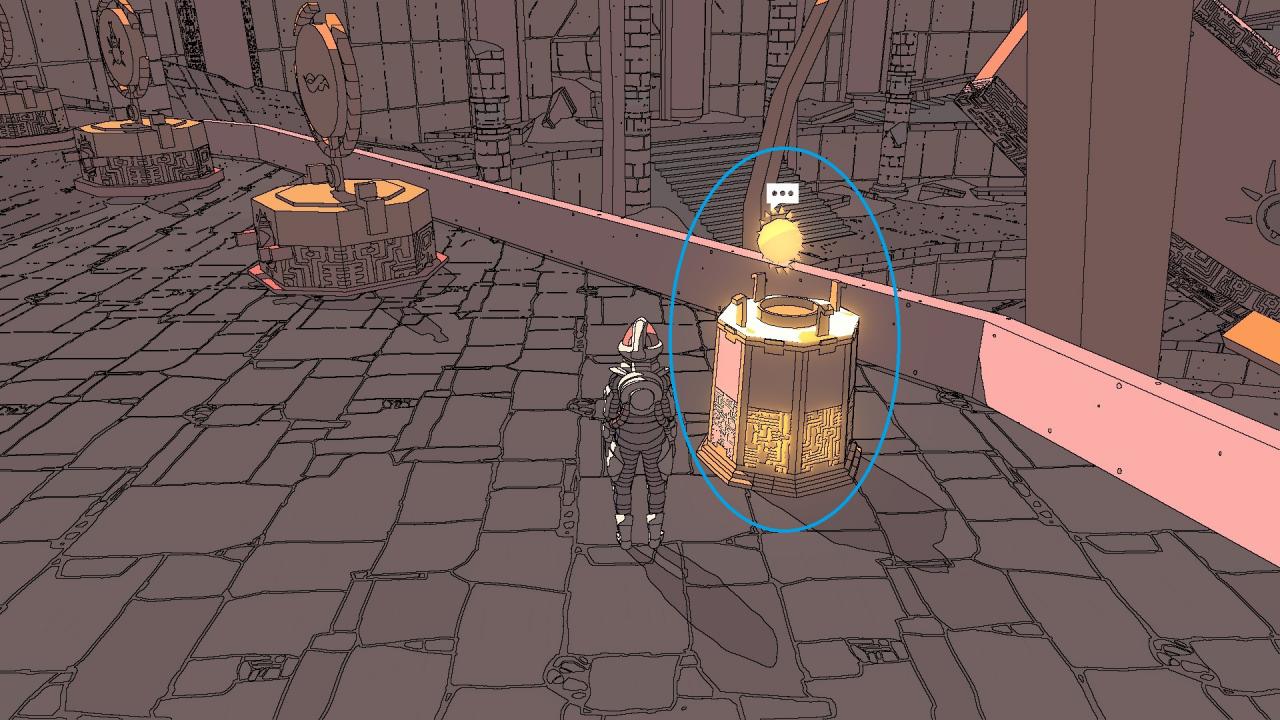
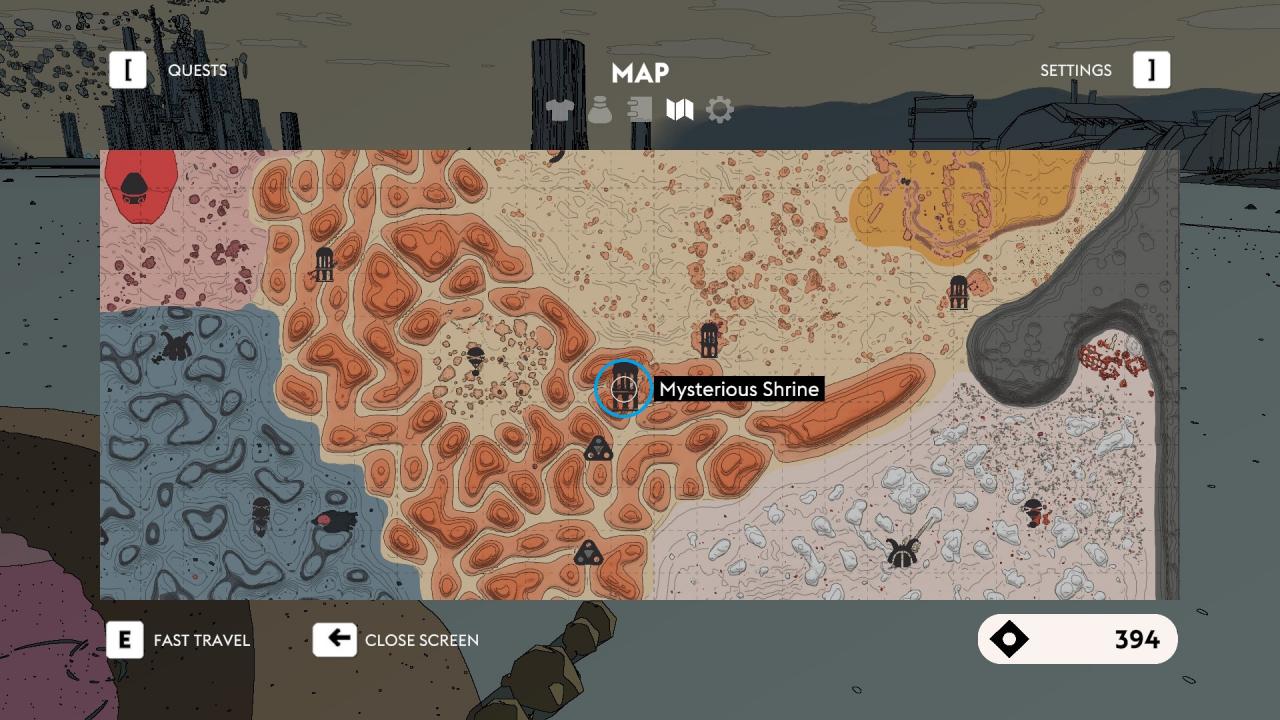
Complete An Ancient Race
To get this achievement, you can go to the Machinist Fir in the Mysterious Shrine in Badlands and speak with her, or simply unlock one of the six mysterious structures scattered throughout Midden (how to unlock one is explained under the “Thread The Needle” achievement in Collectables Related Achievements section). In the latter method, you still need to go to Mysterious Shrine and speak with Fir to learn more about the nature of the quest.
Simply put, there are 6 mysterious structures throughout Midden. To unlock one, you need to drive your hoverbike through 4 giant, green rings that are near that structure.
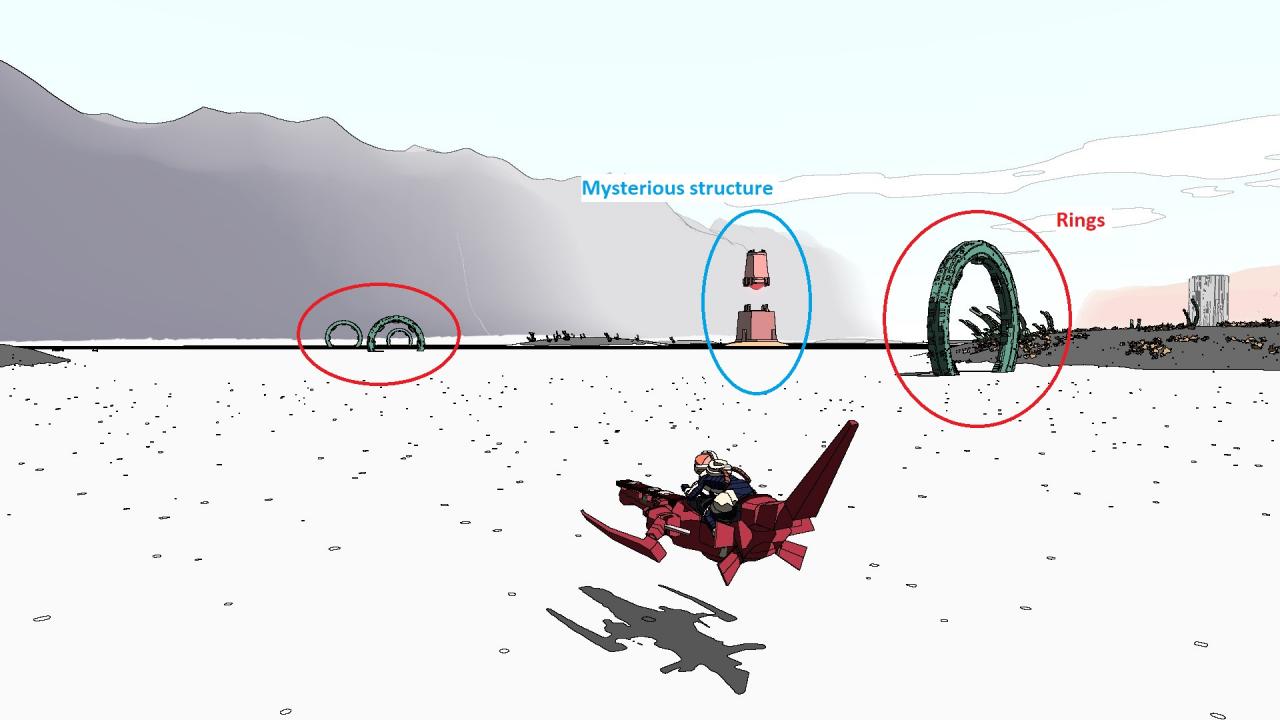
Afterwards, the structure will open up and you can collect an item inside. Locations of the 6 structures are shown below.
Sansee

Redsee

Badlands
Hakoa
The Wash
Sodic Waste
After collecting all the items inside all 6 structures, insert them on the pedestals inside the Mysterious Shrine and speak with Fir who tells you to wait a few days. Speak with Fir after waiting a few days to complete the quest and get some cool items and the achievement.
Choose your mask
Story related and unmissable. You have to complete the “The Gilding” quest and finish the game.
After you finish creating at least 1 mask, interact with the message droid (white pill-shaped thing) in any station/camp to get this quest.
Collectable Related Achievements
Collect 5 badges
Refer the “Badge Collector” achievement below.
Collect 10 badges
Badges can be collected by helping NPCs with their quests or buying from merchants. 3 badges of the same kind can be given to a mask caster for its respective mask.
Open 20 chests
Pretty self explanatory. Refer the “Treasure Tracker” achievement below for more information.
Open 40 chests
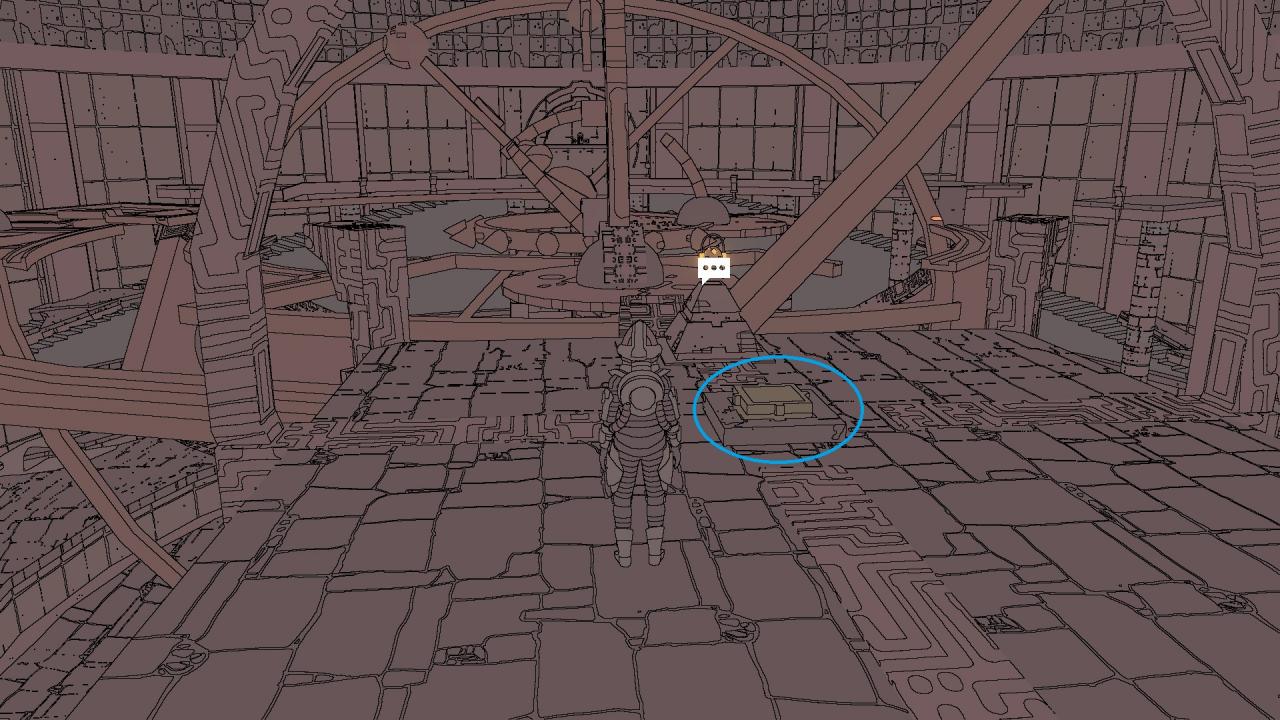
Chests are scattered throughout the world in various locations. You need to find and open 40 of them. Keep in mind that even though the description says chests, vases and any other kind of container that holds cuts (in-game currency) or other items count for this achievement.
Collect 5 masks
You need to collect 5 different masks. You can craft masks by collecting 3 badges of the same type and then going to a Mast Caster to craft its respective mask. Mask Casters can be found in any of the major stations throughout Midden (Burnt Oak, Seven Sisters, Marrow Bone) inside colourful, small huts. You will also collect fully built masks while exploring or doing different side quests.
Unlock the Machinist Mask
1st badge: Given by Machinist Sizo after building your hoverbike.
2nd badge: Complete “A Stubborn Snag” quest given by Machinist Utarii in Burnt Oak Station in Sansee.
3rd badge: Go to the Seven Sisters Station in Hakoa and speak with Machinist Zahra. Ask for a machinist badge and she will give you the “Lightning in a Bottle” quest. Complete the quest to get the badge.
4th badge: Go speak with Machinist Kaalan in Marrow Bone Station in the Wash and get “An Eye to the Sky” quest. Complete it to get the badge.
Unlock the Guard mask
1st badge: Accuse a suspect for stealing the power core and complete the “Heartbreak in the City” quest.
2nd badge: Complete the “A View from the Bridge” quest given by Guard Eliisabet in Burnt Oak Station in Sansee. You need to meet her on the Bridge of the Betrayed in Badlands to finish the quest.
3rd badge: After completing the “A View from the Bridge” quest, you can meet Guard Eliisabet in Marrow Bone Station in The Wash. She will give you the “Tough Nut to Crack” quest. Finish it to get the badge.
4th badge: After completing “Tough Nut to Crack” quest, you can meet Guard Eliisabet in Seven Sisters Station in Hakoa. Speak with her and she will give you the “Luminescent Adolescent” quest. Finish this quest to get the badge. You can complete it by collecting and giving her glowing mushrooms. You can find glowing mushrooms in the same cave where you find the Hakoan glowworms (refer the “Smoked Out” achievement).
Unlock the Scrapper mask
Get the “Treasure Scrappers” quest from Scrapper Altyn in Burnt Oak Station. Scraps can be found in large, white, metal ships and structures that you come across while exploring. Scraps can appear in two ways; in open crates filled with gears that gives 5 metal scrap and simply on the floor (they show up as a gear) that only gives 1 metal scrap.
1st badge: Earn over a total of 500 cuts by selling metal scrap to Altyn.
2nd badge: Earn over a total of 1000 cuts by selling metal scrap to Altyn.
3rd badge: Earn over a total of 1500 cuts by selling metal scrap to Altyn.
Unlock the Merchants mask
1st badge: Bought for 100 cuts from Merchant Iria in Eccria
2nd badge: Bought for 100 cuts from Merchant Iria in Eccria
3rd badge: Bought for 100 cuts from Merchant Iria in Eccria
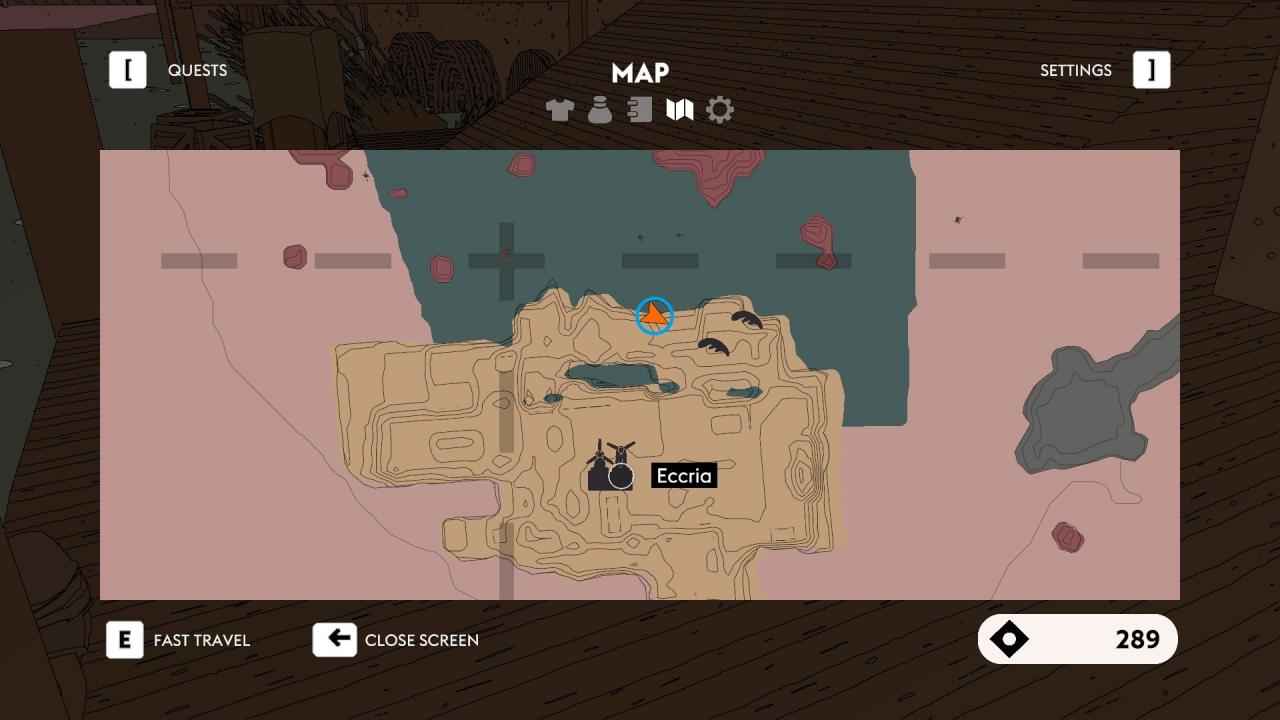
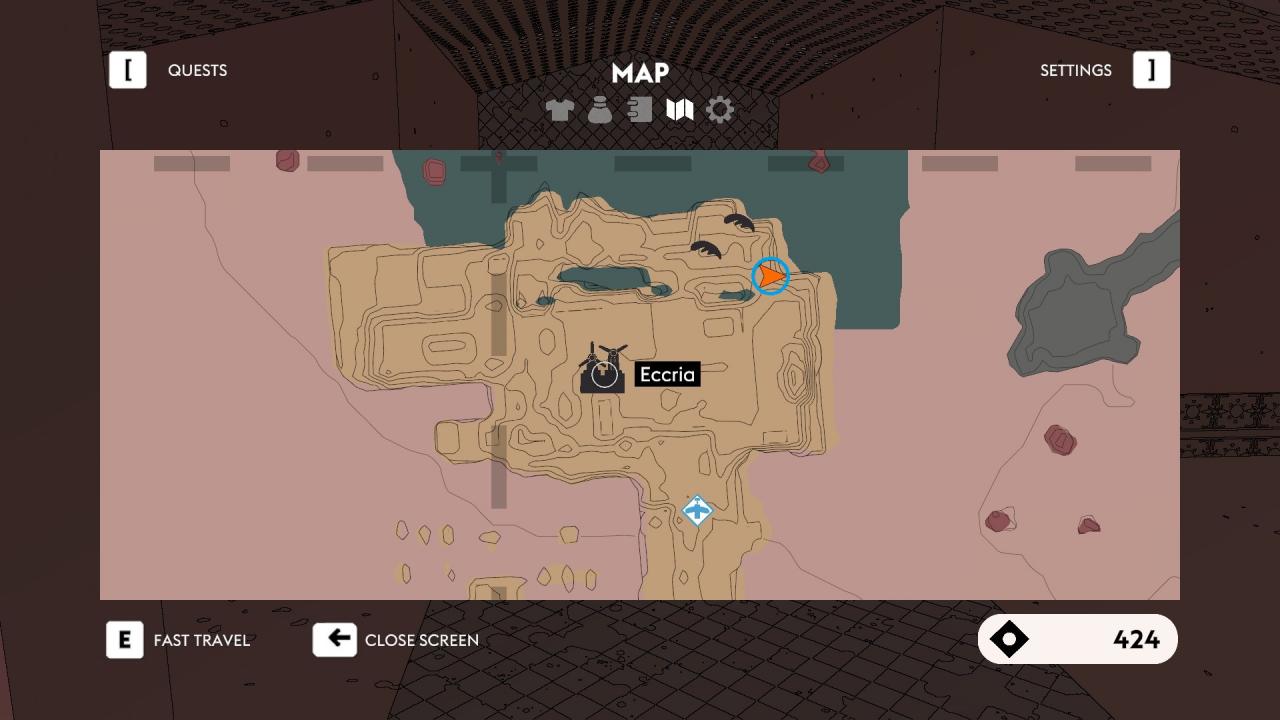
4th badge: Go to the merchant quarters in Eccria (marked in map below) and interact with the strange snake-like creature. After the cutscene, talk with Merchant Citra and obtain the “Nozi’s Nibbles” quest. Complete the quest to get another badge.
Unlock the Beetle Mask
1st badge: Complete “Remnants of Change” quest given by Innkeeper Ifaa in Burnt Oak Station in Sansee.
2nd badge: Complete “The Long Drop” quest given by Innkeeper Afii in Seven Sisters Station in Hakoa.
3rd badge: Complete the “Orange Ringed Delights” quest given by Innkeeper Ofuu in Marrow Bone Station in The Wash.
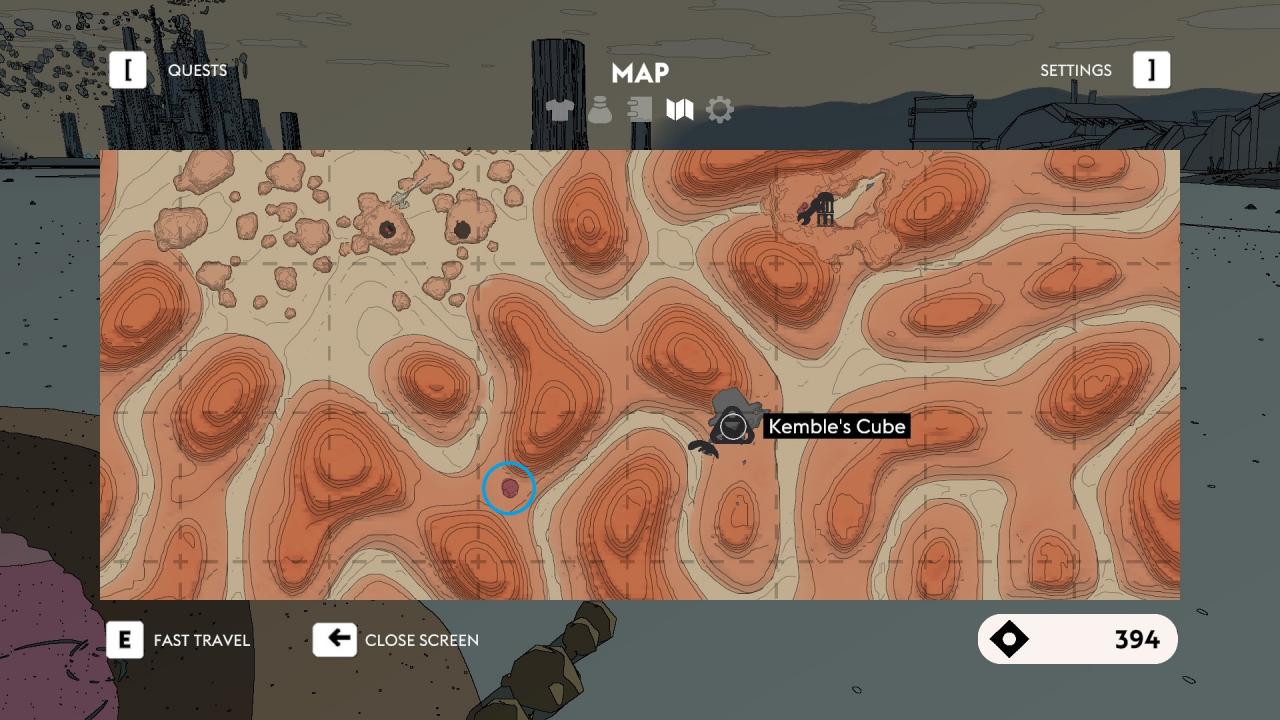
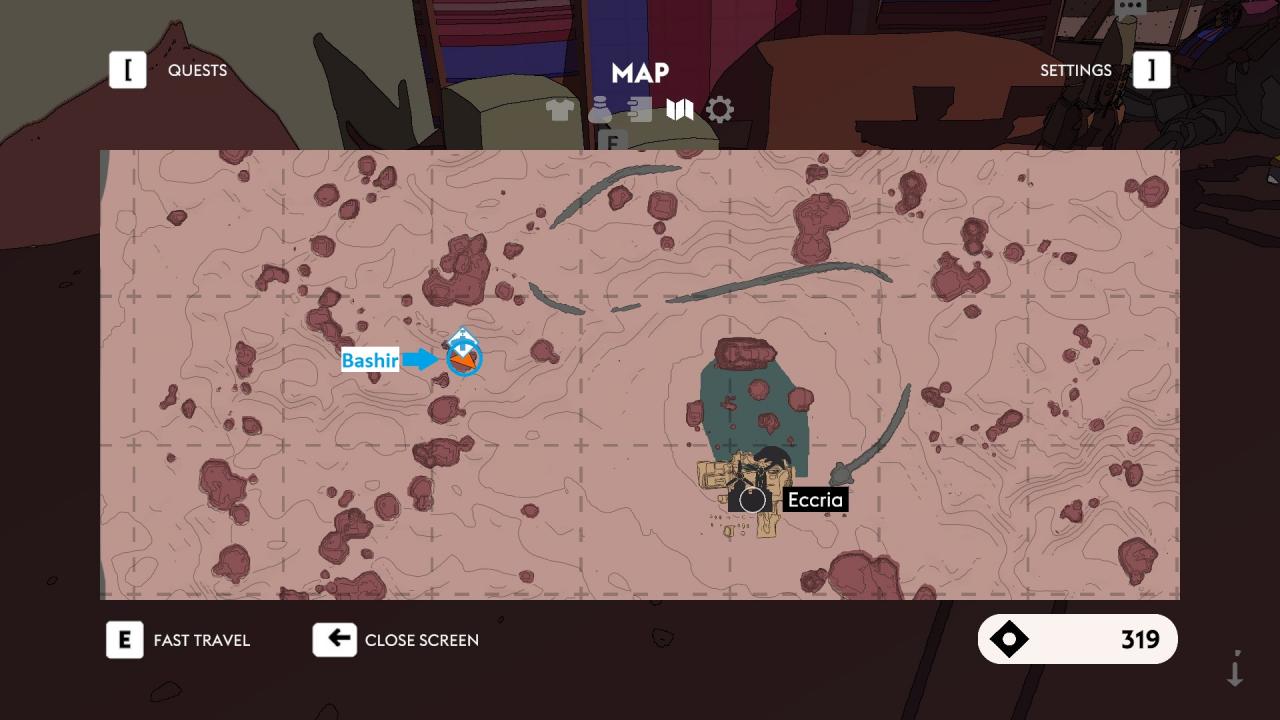
Unlock the Climbers mask
1st badge: Complete the “Sometimes a Well Is Just a Well” quest given by Bashir in Five Bells Camp in Redsee.
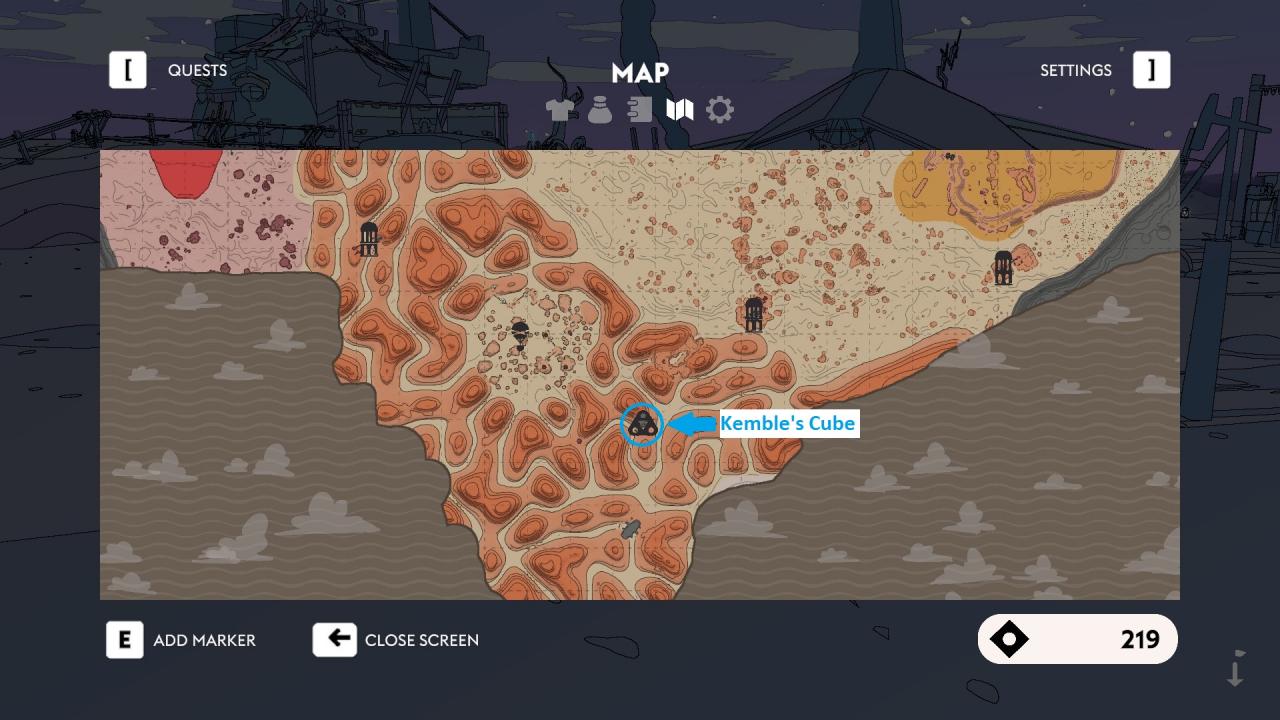
2nd badge: Go to Kemble’s Cube in the Badlands and get the “Tower of Steel” quest and climb the structure by going through the elevator puzzle and talk to Climber Zayna at the top.
3rd badge: Go to the Geyser Rocks in Sodic Waste and speak with Hunter Zebi near the campfire.
He will give you the “Riding the Wave” quest to find his companion, Climber Dilhan. You must find the correct path and climb to the top and speak with Dilhan. Having increased stamina (from delivering Chum eggs) really helps with the climbing. He will tell you that you need to find a Pink Neck egg in order for him to come down. To get to the eggs you must stand on a geyser and launch yourself to the sky and glide your way to the nest which is on the highest pillar.
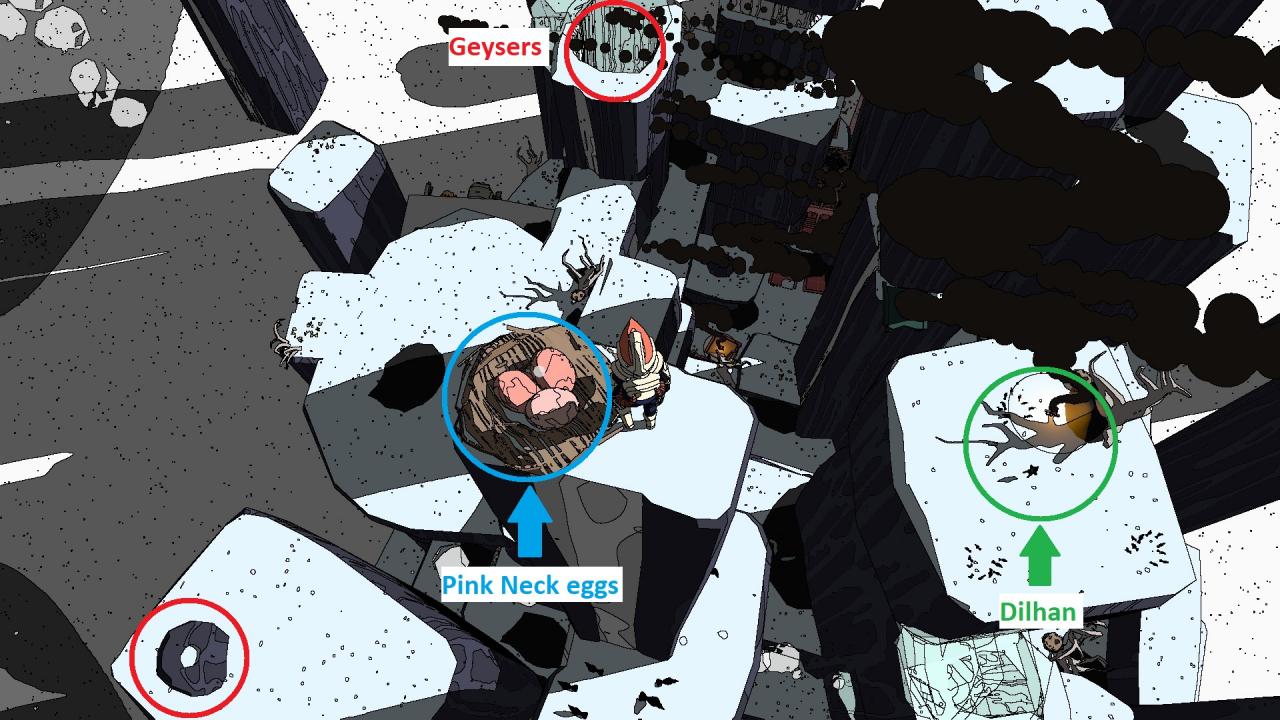
Collect the eggs and speak with Dilhan again and give him an egg to get the badge.
Collectable Related Achievements (Continued)
Unlock the Entertainer mask
1st badge: Complete the “Oasis Flower” quest given by Tej in the docks near the oasis in Eccria.
2nd badge: Complete the “Glide and Seek” quest given by the 3 kids in Eccria.
3rd badge: Speak with Shar Varana in Eccria and get the “Searching for Llhor” quest.
Afterwards, you will need to speak with Innkeepers in 3 different stations to find the location of Llhor. Speak with all 3 of them and get the location. The locations points towards the path of the Archer in Sodic Waste. Go to the location shown below in Sodic Waste near the archer’s statue. You need to follow the path shown by where the archer is pointing at. This will point to another archer statue.
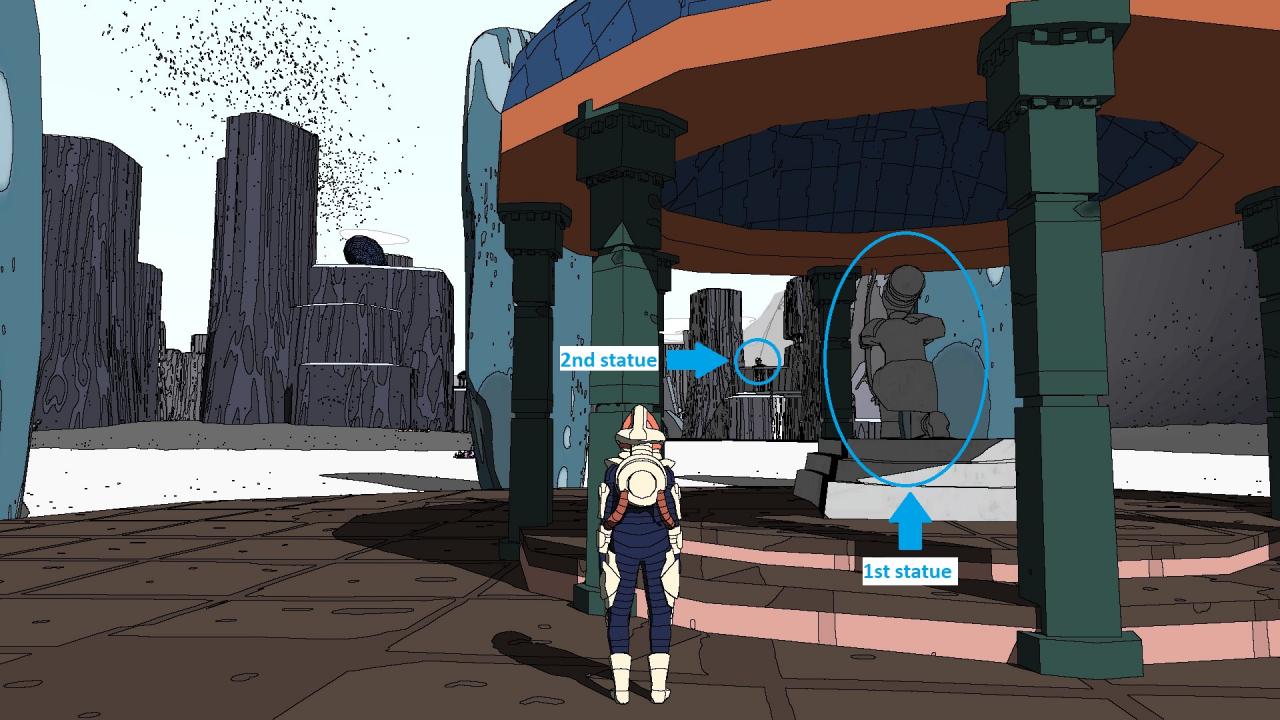
Keep going through these statues until come to a cave entrance with 2 archer statues.
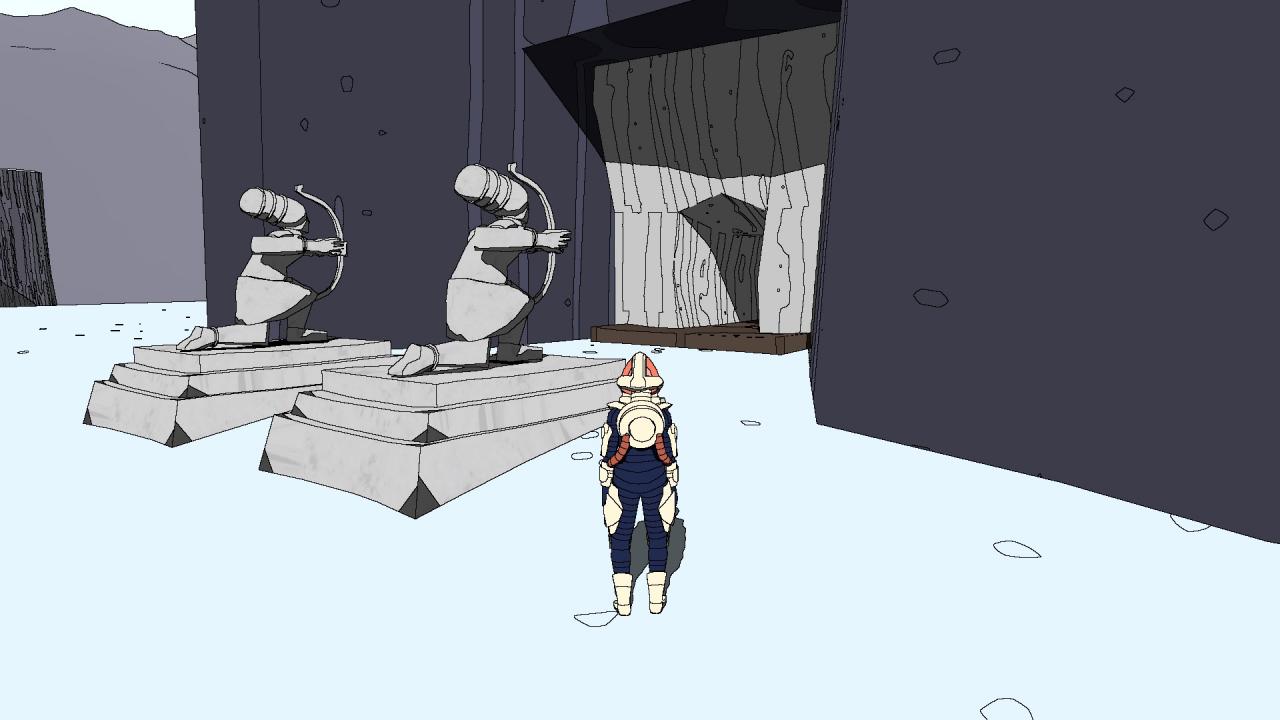
This however, can be a tedious process since some statues are not clear in the distance and some have fallen down so you need to search the next one by looking through the surrounding by yourself. So I have marked the exact location of this cave below. You can enter it easily by climbing the surrounding pillars.
After finding her and speaking with her, she will give you an Entertainer’s badge.
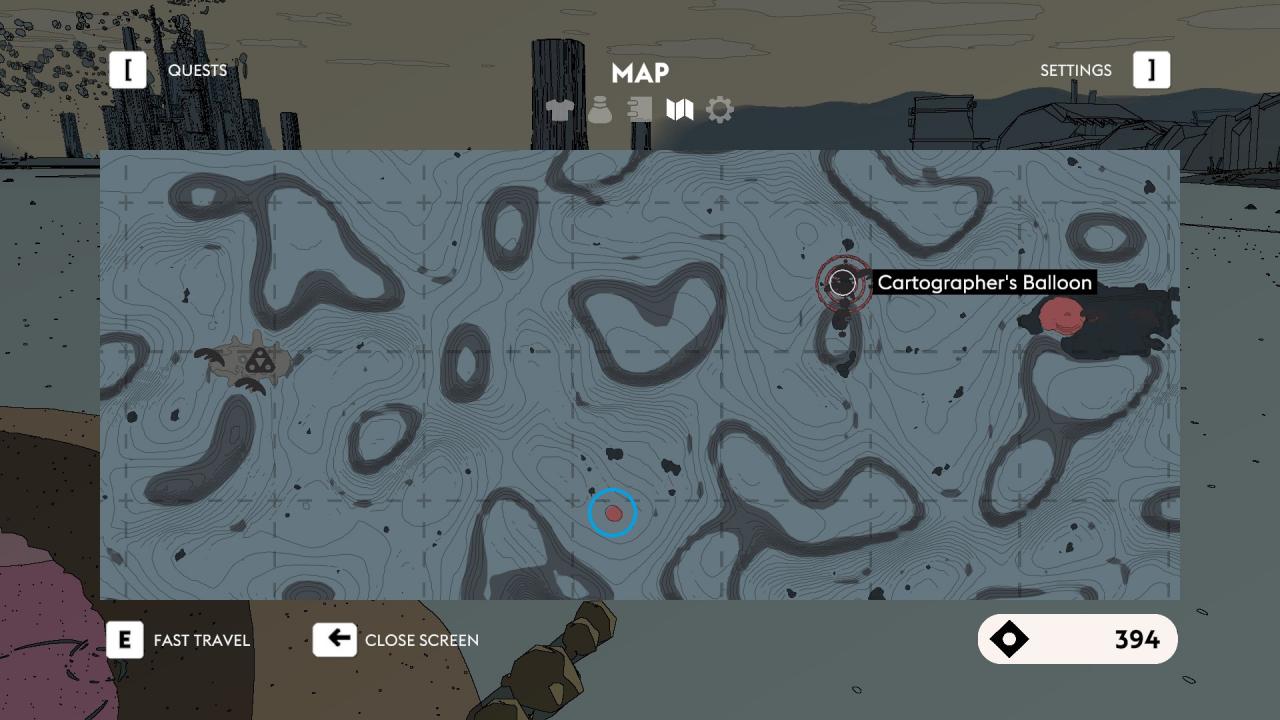
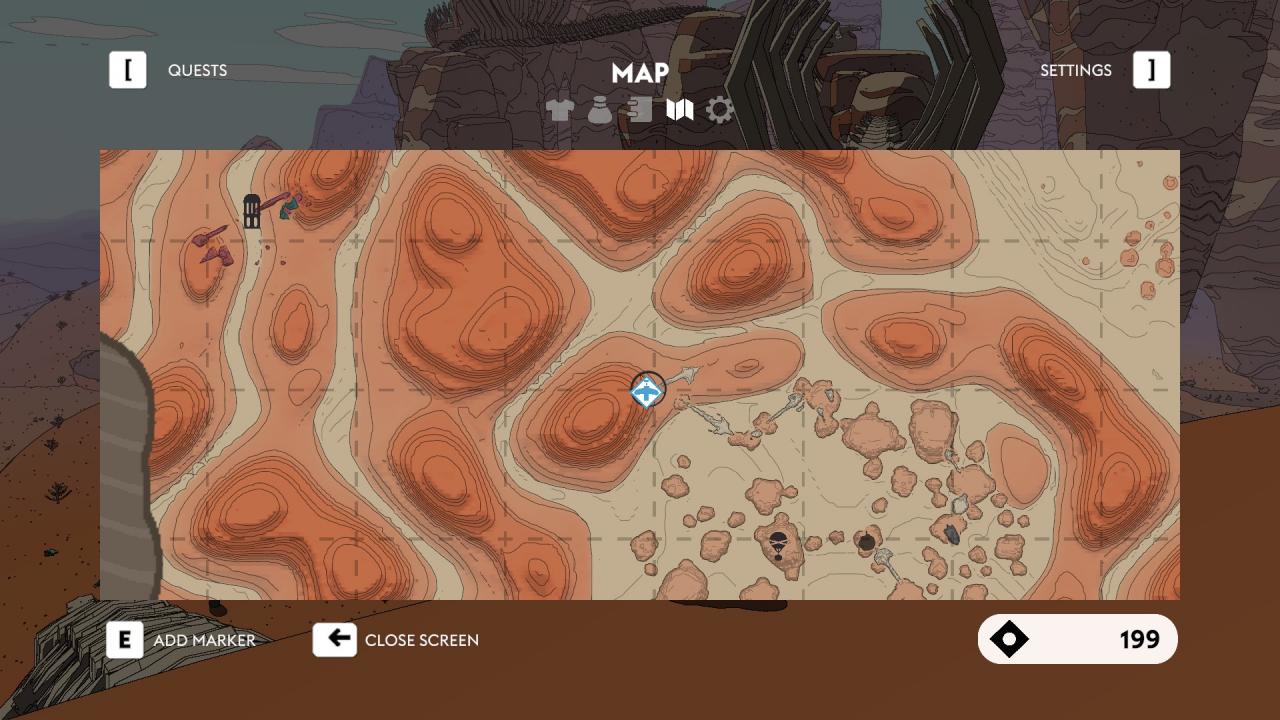
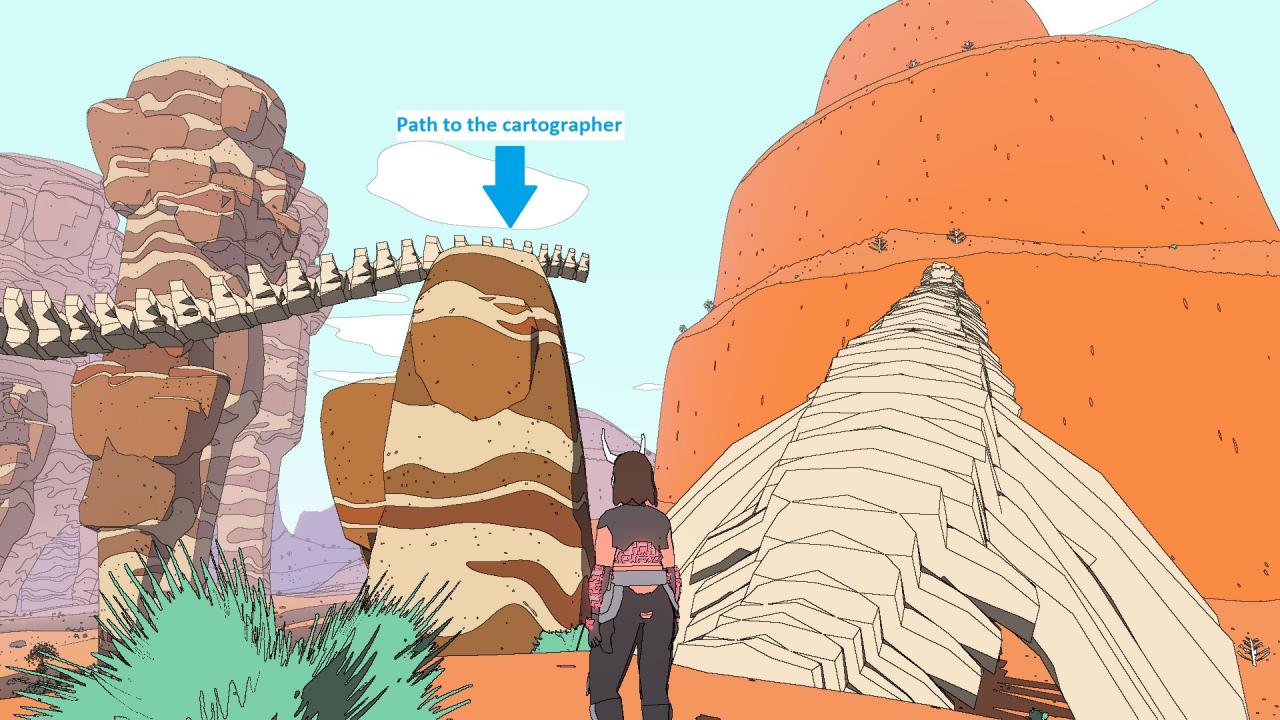
Unlock the Cartographers mask
1st badge: Bought for 50 cuts from the cartographer in Sansee (near the giant floating balloon).
2nd badge: Bought for 100 cuts from the cartographer in Redsee (near the giant balloon near Eccria.
3rd badge: Bought for 50 cuts from the cartographer in Badlands (climb the giant animal bone bridges to the floating balloon)
4th badge: Bought for 50 cuts from the cartographer in Hakoa. Cartographer is on the giant rotating, floating structure near a small hill. To get to the structure, accelerate you bike towards the small hill on the ground and jump as soon as it starts to slow down and immediately start climbing. It might be helpful to increase your stamina so you can climb more. Afterwards jump to the floating structure and climb you way to the top).
5th badge: Bought for 50 cuts from the cartographer in The Wash (climb the giant mushrooms to get to the floating balloon).
6th badge: Bought for 50 cuts from the cartographer in Sodic Waste (you will need to explore nearby buildings near the balloon the find the metal grate to start the climb. you will need to jump between many different buildings to get to the cartographer).
Spend 1000 cuts
Simply spend 1000 amount of cuts (in-game currency) on items (clothes, bike parts, etc.) that you can buy from merchants.
Collect 6 items of clothing
Refer the “Playing Dress Up” achievement below.
Collect 12 items of clothing
Clothes can be bought from merchants, or found in chests scattered throughout the world. You will easily get this achievement if you explore the world and solve puzzles and buy everything, but I have listed a few clothing items and their locations to help you find them more easily.
- Machinist Top: In the chest in the room that unlocks after activating the wind turbine during “A Stubborn Snag” quest given by the Machinist Utarii in Burnt Oak Station.
- Atomic Priesthood Trousers: Inside the ruined ship in the Palm Forest in Redsee.
- Monumental Stone Top: In the room with the chest that unlocks after finding the 3 small statues and placing them in front of the giant face in the courtyard near the Cartographer in Redsee.
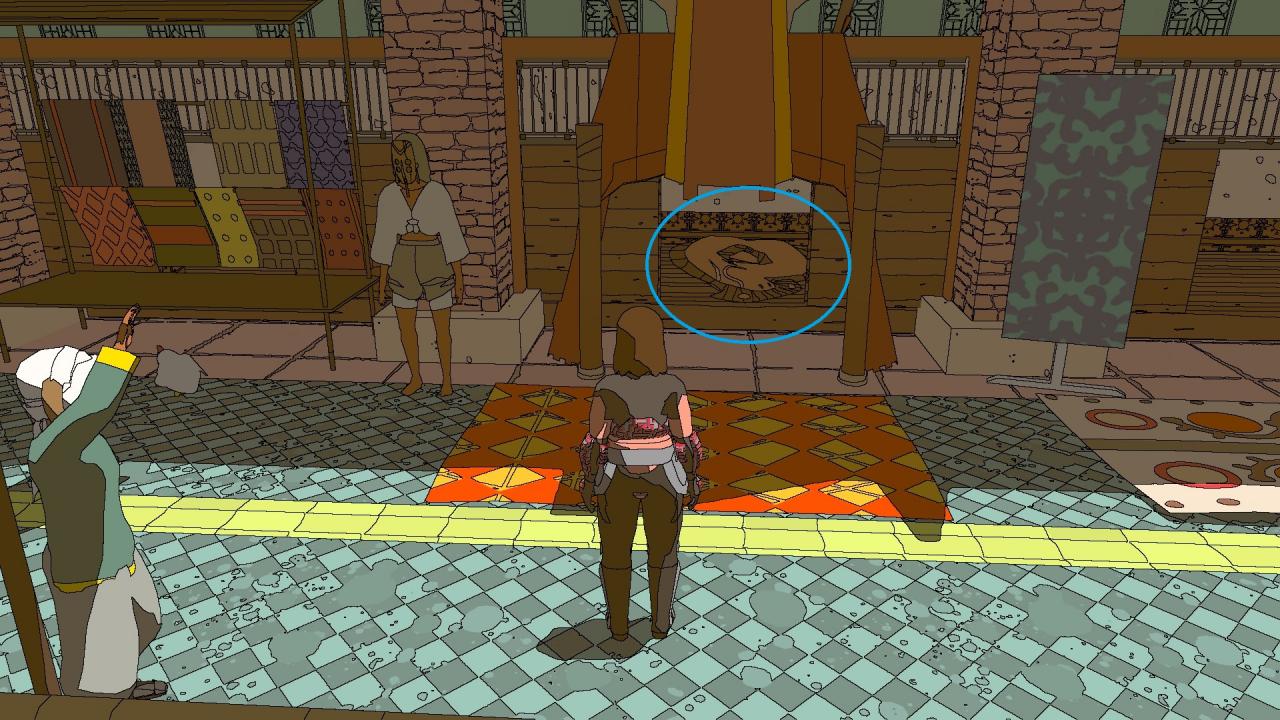
- Eccrine Top, & Trousers: Bought from Fabric Seller Kalia in Eccria.
- Beetle Station Top, & Trousers: Bought from Fabric Seller Kalia in Eccria.
- Biker Top, & Trousers: Bought from Nomadic Merchant Ahvid near the hoverbike docking station in Eccria.
- Sand Surfer Top, & Shorts: Bought from Merchant Habat in Five Bells Camp near Eccria.
- Eccrine Guard Top: In the hidden room accessed by swimming through the vines in the bottom of the Thieving Magpie Well in Redsee.
- Eccrine Guard Trousers: Inside a large canal pipe in the canal in Eccria.
- Hakoan Top, & Trousers: Sold by Hakoan Merchant Caimin in the Crystal Plateau in Hakoa.
- Monumental Stone Bottoms: In the chest behind the giant face statue (next to the right foot of the giant soldier statue on the top) on the Bridge of the Betrayed. To open the door to the chest, stand on the altar in front of the giant face while looking at it when the sunlight hits the cross sign on top of the face.
- Bouldering Trousers: In the chest near the giant face statue (next to the right foot of the giant soldier statue on the top) on the Bridge of the Betrayed.
- Wash Top, & Trousers: Bought from Merchant Thiago in Marrow Bone Station in The Wash.
- Whale Ship Mask, Top, & Trousers: Complete the “Historical Reconnection” quest.
Collect 10 bike parts
Refer the “Bike Aficionado” achievement below.
Collect 20 bike parts
Bike parts can be found or bought from various traders scattered throughout Midden. Simply collect 20 of these parts to get this achievement. Usually traders who sell these bike parts can be found near hoverbike docking stations.
Here are a few of the ways you can find enough bike parts to get this achievement.
- Nomadic Merchant Bobi in Burnt Oak Station: Beetle Bike set (3 parts)
- Bike Merchant Ahvid in Eccria (bike docking station near the entrance under the bridge): Giraffe Bike set (3), Speedster Bike set (3), Delivery Bike set (3)
- Merchant Thiago in Marrow Bone Station: Nomadic Bike set (3)
- Machinist Zhara in Seven Sisters Station after completing “Lightning in a Bottle” quest: Lightning Crystal Bike set (3)
- Complete the “Historical Reconnection” quest: Whale Ship Bike set (3)
- Complete “An Ancient Race” quest: Hicaric Ring Bike set (3)
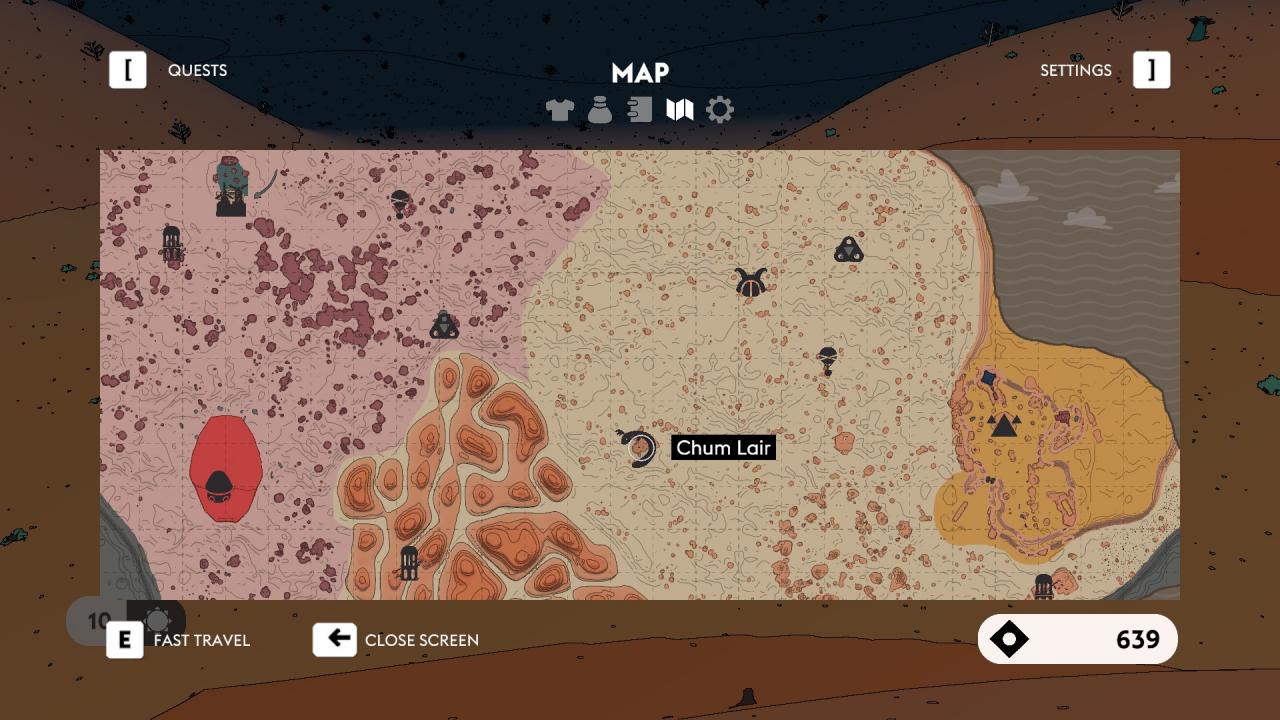
Deliver your first Chum egg
Chums are adorable, white, long reptilian creatures that you can find throughout Midden.
They will offer an egg when you interact with them. You need to deliver 1 egg to the Chum queen in Chum Lair in Sansee to get this achievement.
Deliver 50 Chum eggs
You need to collect 50 Chum eggs from 50 Chums and deliver them to the Chum Queen in Chum Lair to get this achievement.
Complete Building a Queendom
You need to complete “Building a Queendom” quest given by the Chum Queen when you first speak with her. There are a total of 165 Chums spread throughout Midden that you have to find and get eggs from. This is without the doubt the most time consuming achievement in the game. Luckily, users “Nafeij” and “ricbigo” have made a very helpful guide with the map showing all the Chums’ locations.
Exploration Related Achievements
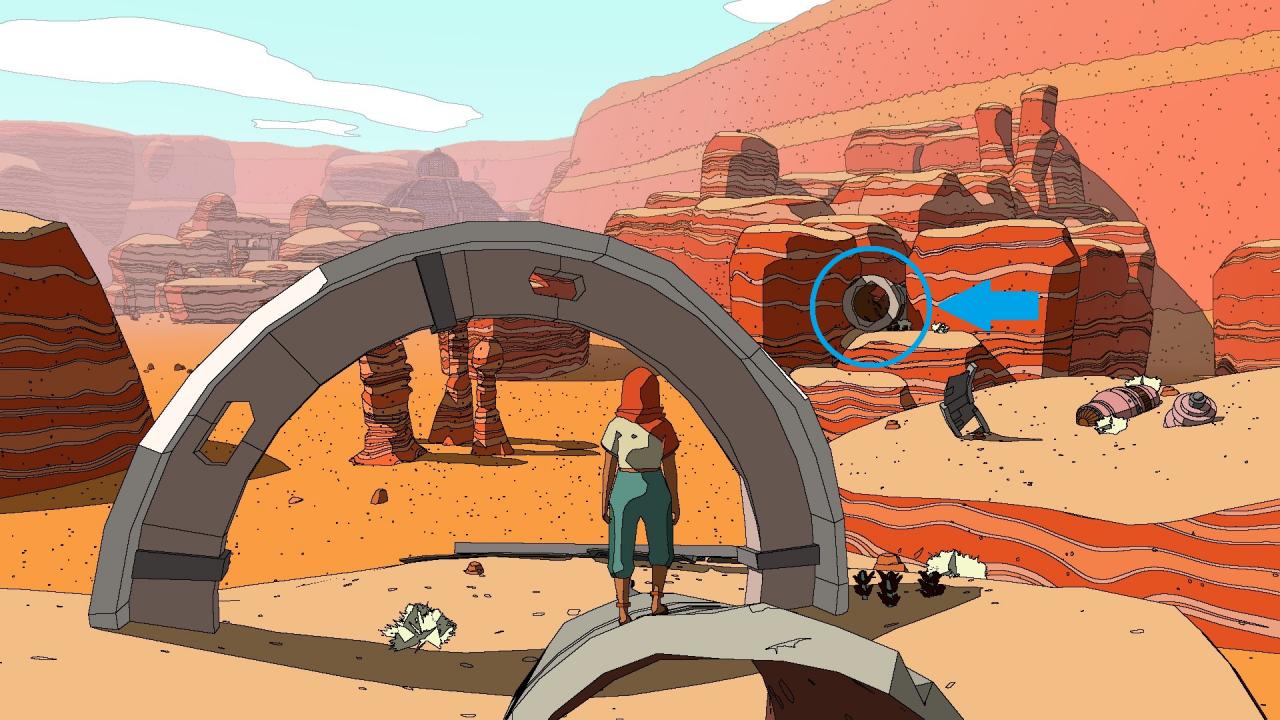
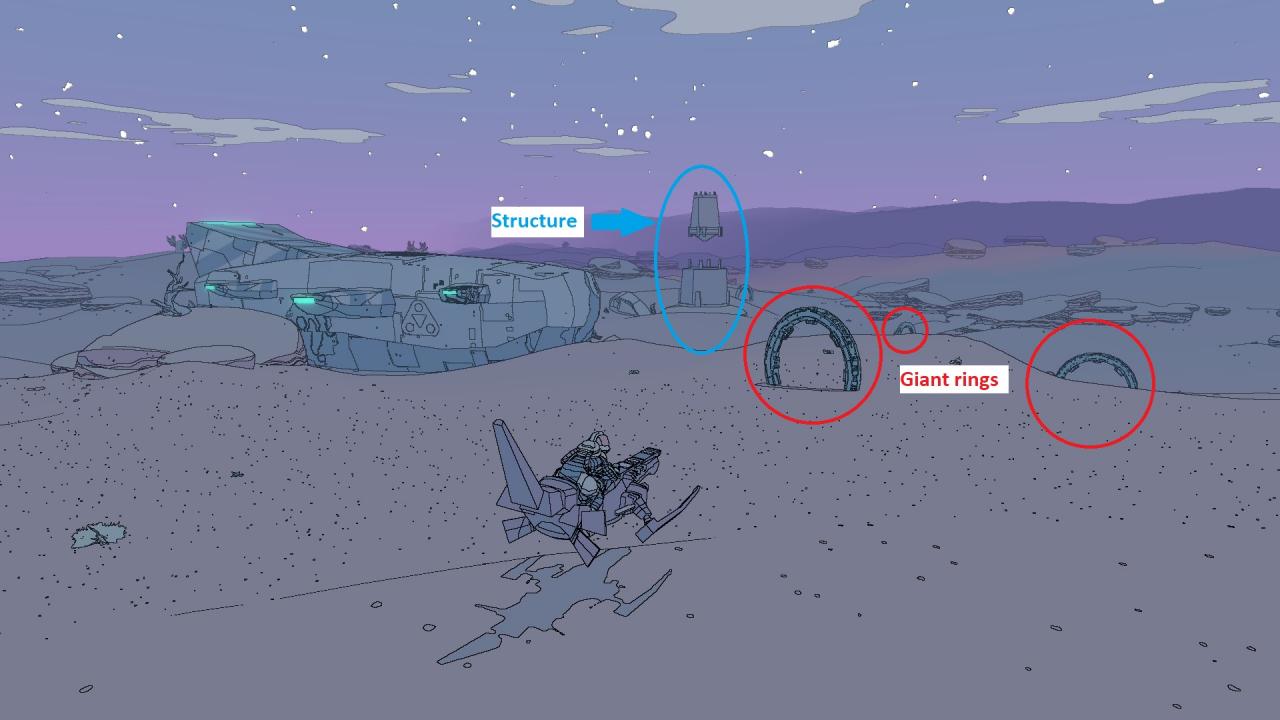
Reveal a Hicaric arch monument
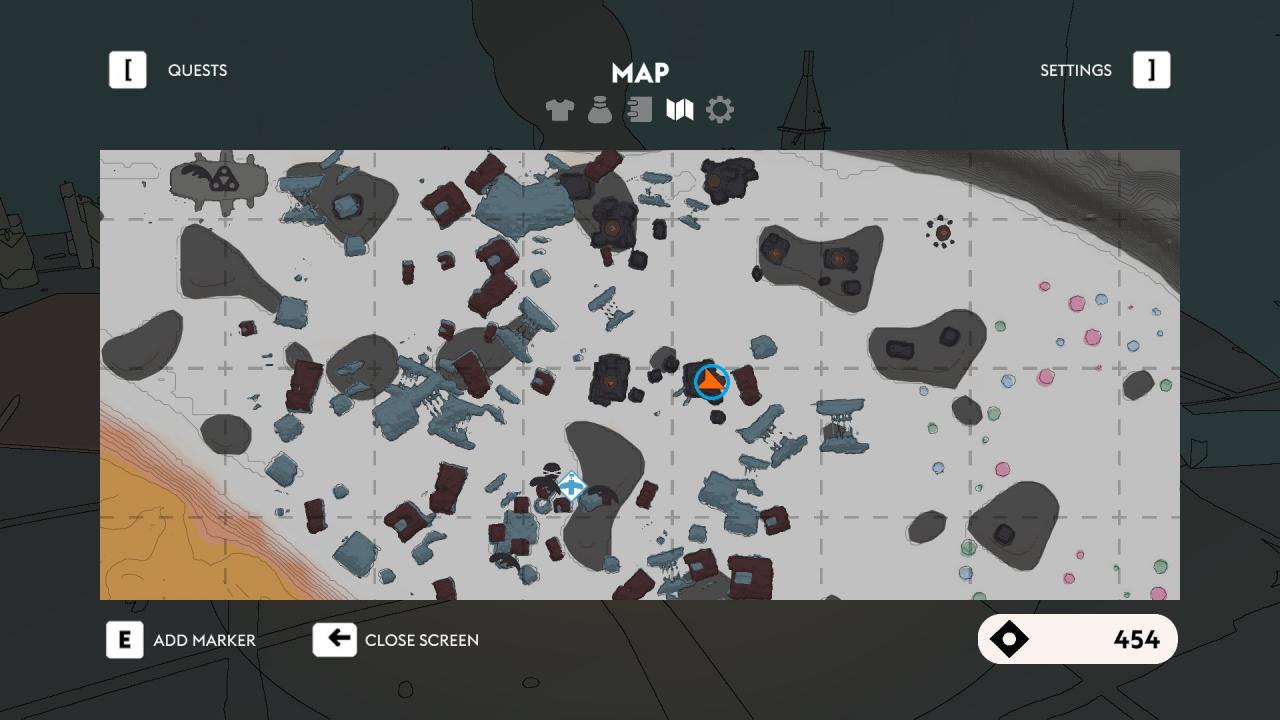
Throughout Midden, you find structures like the ones shown below. To unlock one, you have to ride your bike through the 4 giant, green rings (similar to the one that you went through when you first got the broken hoverbike in the beginning) that are nearby. Go through the 4 giant rings and this achievement will unlock.
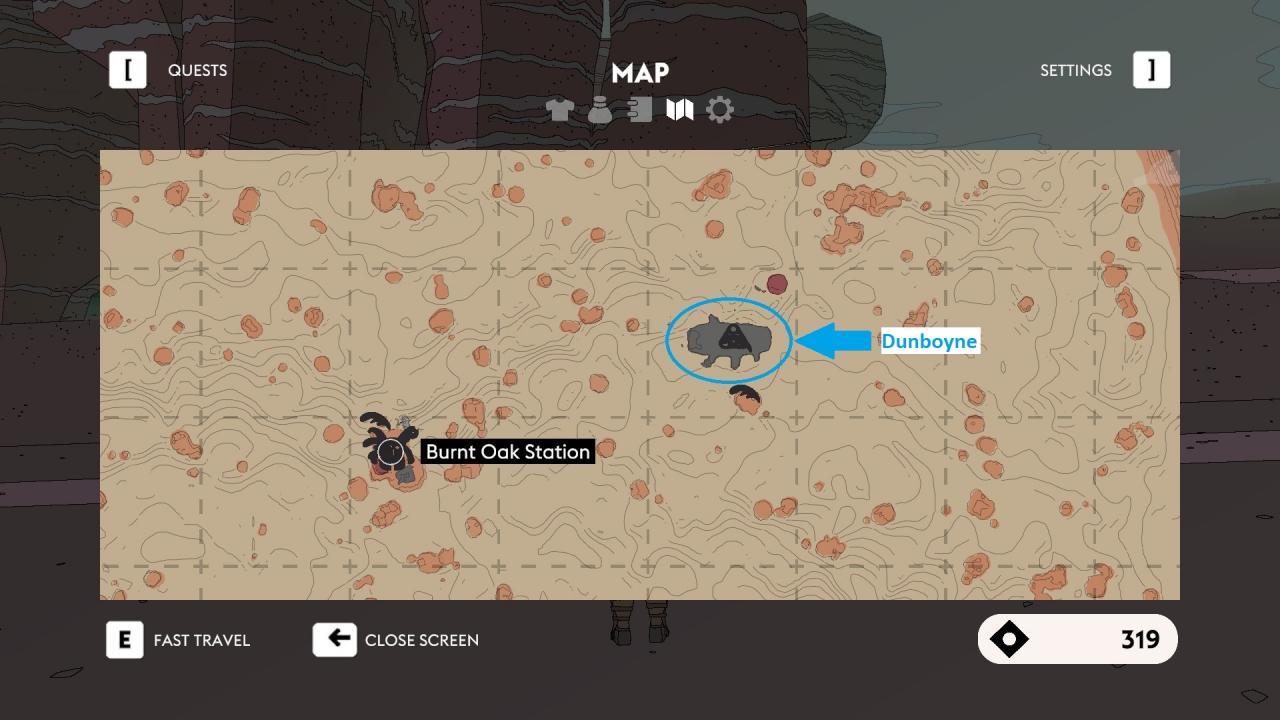
The above shown structure is right next to The Dunboyne near Burnt Oak Station.
Talk to 15 NPCs
Self explanatory. Speak with 15 different NPCs.
Talk to 30 NPCs
Self explanatory. Speak with 30 different NPCs.
Customise your hoverbike with a Machinist
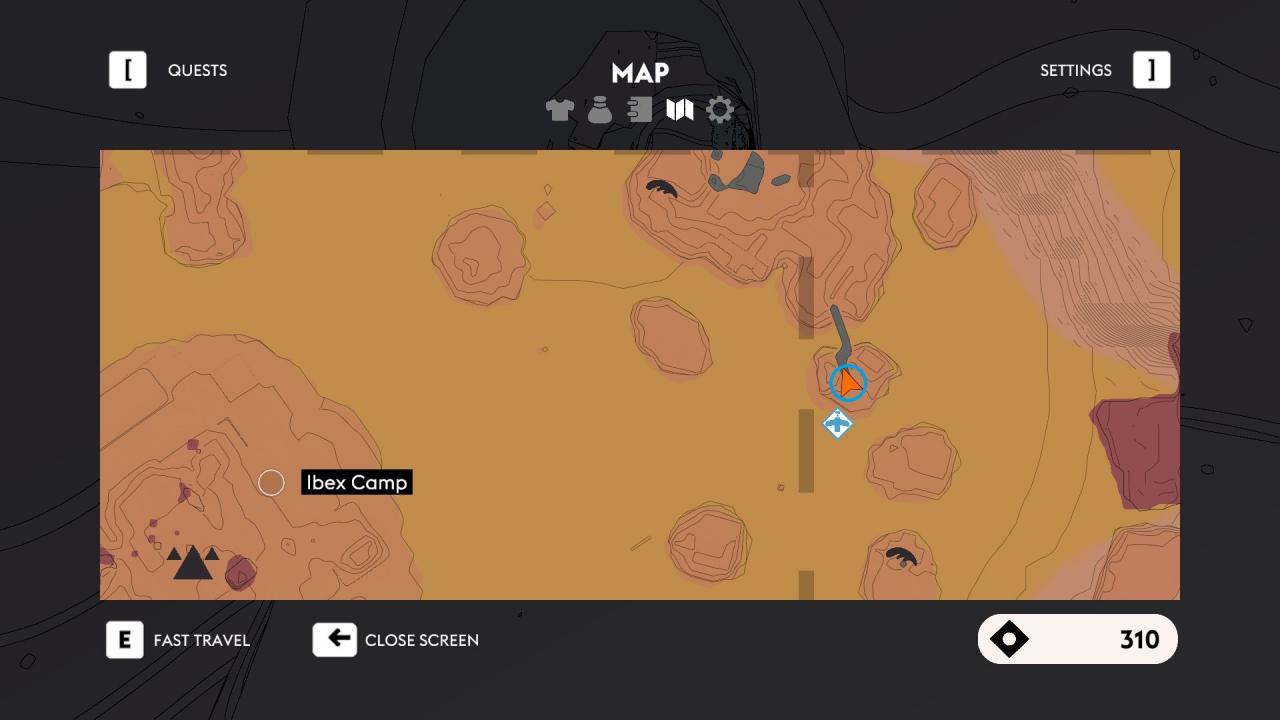
Simply customise any part of your hoverbike using a machinist. You can use the dyes you buy or find while exploring to customise the hoverbike. Two early game examples would be the Ibexii Red dye behind the statue in the cave under the Ibex camp or Salt Plains Pool dye that you can get by talking to the Shephard Lia in Burnt Oak Station.
Hover for 1500m using the Perpetual
You need to travel a total range of 1500 metres while gliding. Use the gliding mechanism whenever you can and you will eventually get this achievement.
Climb 500m in total
Self explanatory. You need to climb a total of 500 metres in length. Distance climbed on ladders count for this achievement as well.
Travel 50km on the bike
Self explanatory. Travel a total of 50 kilometres on your hoverbike. Keep using the hoverbike to travel and you will eventually get this achievement.
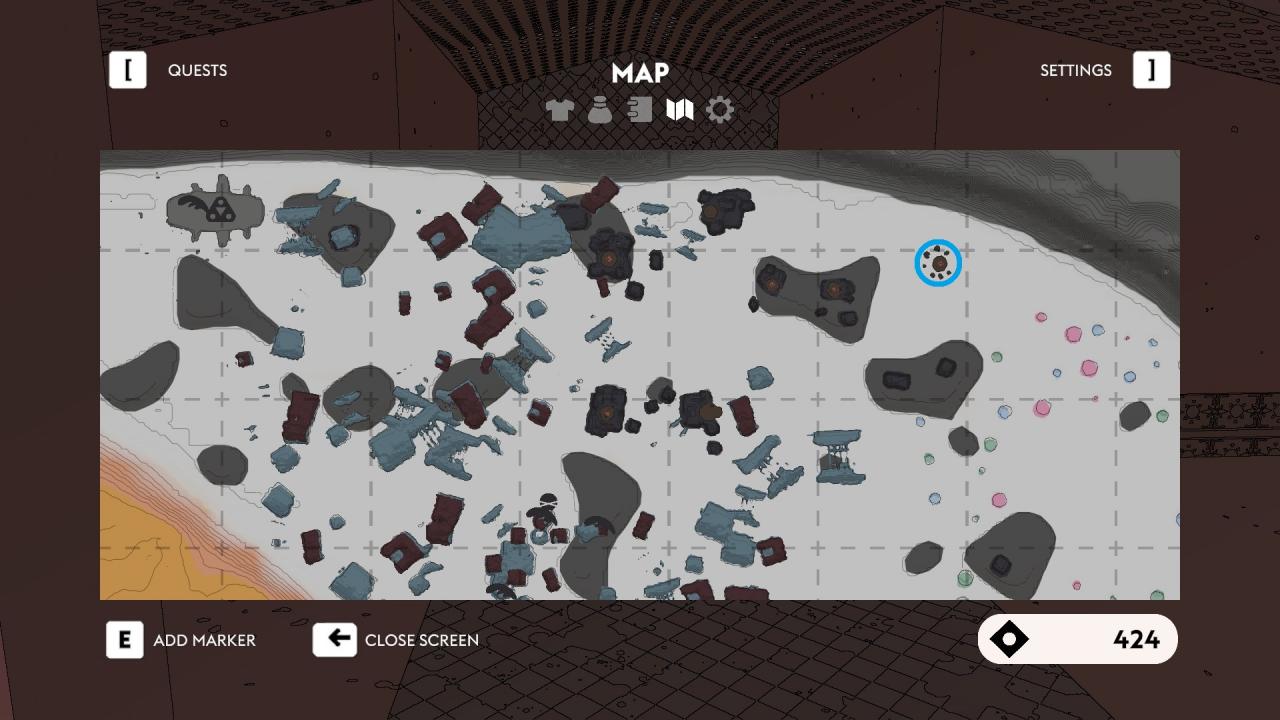
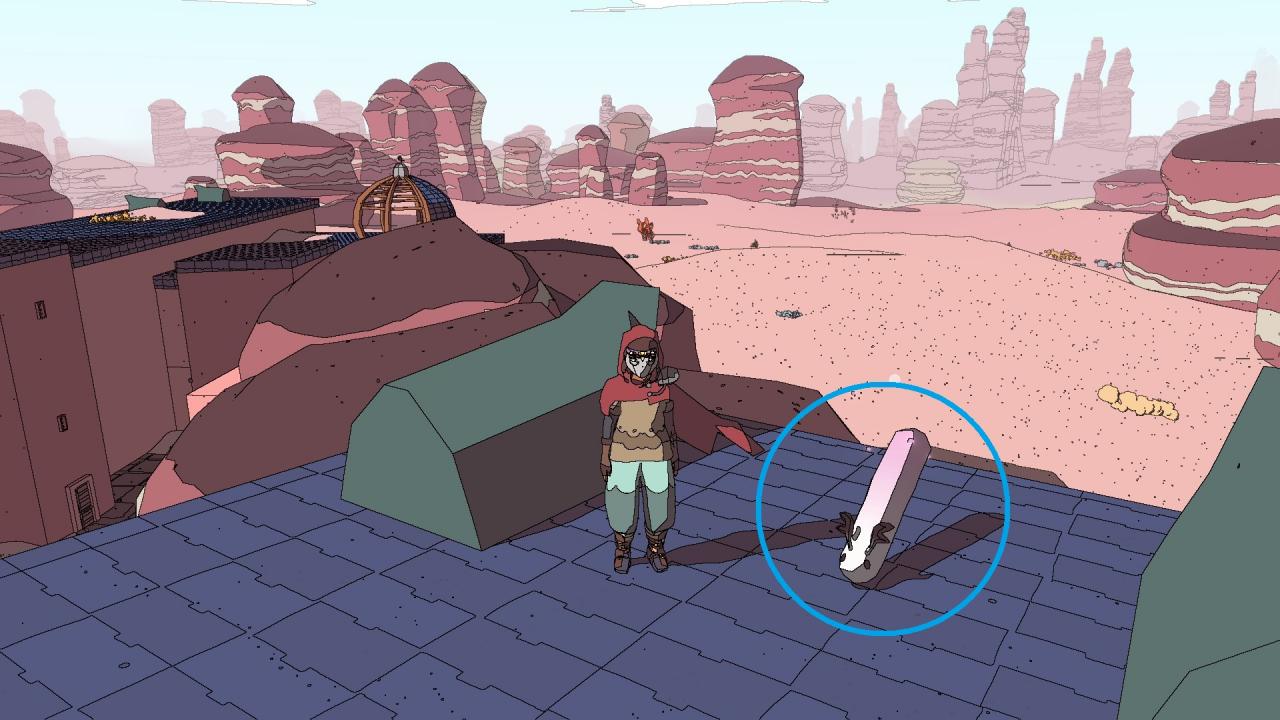
Get 5 seconds of air time on the hoverbike
Much like the achievement description says, you need to jump from a large height from a location and fall for 5 seconds. You can get this on any hoverbike accessible location with a large enough height, but the location that I have consistently managed to gotten this is near the Seven Sisters Station in Hakoa.
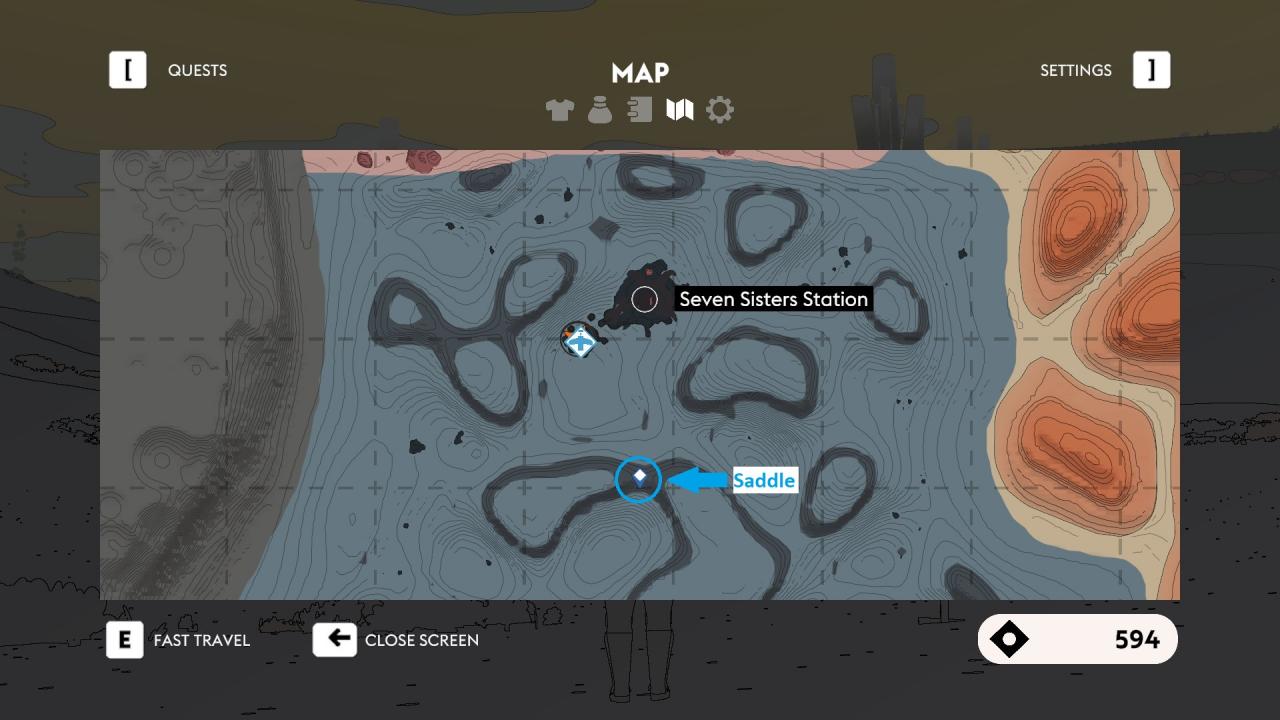
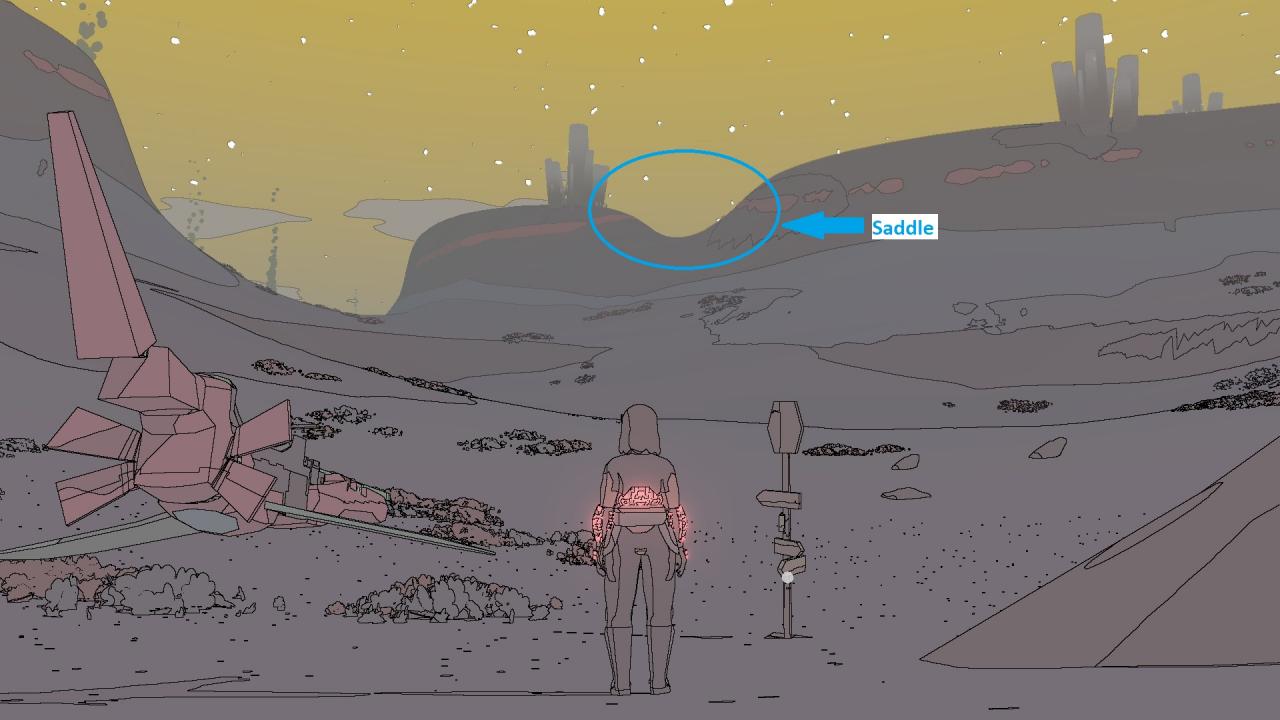
Go to the location I have shown above and mount your hoverbike and accelerate towards the saddle between the two hills that I have marked. There will be a big fall in the next side of the saddle and while falling, aim the bike to the right, towards the bottom for more fall time. This is a very easy, and consistent way to get this achievement.
Note: There are a lot of hills with saddles in the Hakoa region that has big falls which can be used to get this achievement.
Fall from a great height
You need to fall from a massive height. You will be able to get this from any location with a large enough height where you can fall uninterruptedly until Sable spreads her body and free-fall.
The location I got this is from the cartographer’s balloon in Badlands. To get to the cartographer, you need to climb the giant animal skeletons and get to the top where the balloon is. Once you’re on the top, aim for a location on the ground with a clear path and jump. Make sure you don’t activate the glide to break the fall. Simply jump and let yourself hit the ground, and sable will automatically activate the glide to break the fall when hitting the ground.
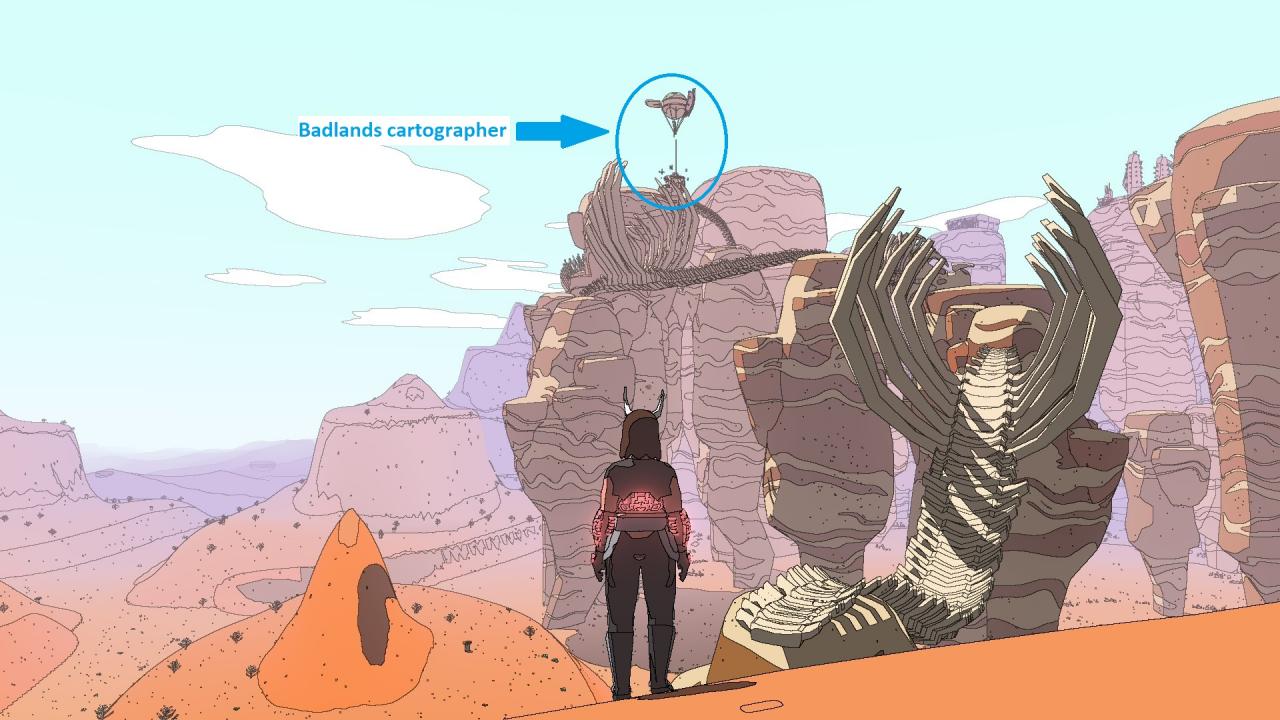
Note: This can also be done very easily by falling from other Cartographers’ balloons (except for the one in Ibex Camp).
Exploration Related Achievements (Continued)
Open the door in the Dunboyne
Go to Dunboyne, which is a giant fallen ship near the Burnt Oak Station (shown below) and enter the ship by climbing the metal grates. Inside the ship, you need to solve the power connector puzzle to unlock the door to the main chamber. Unlock the door and this achievement will pop up.
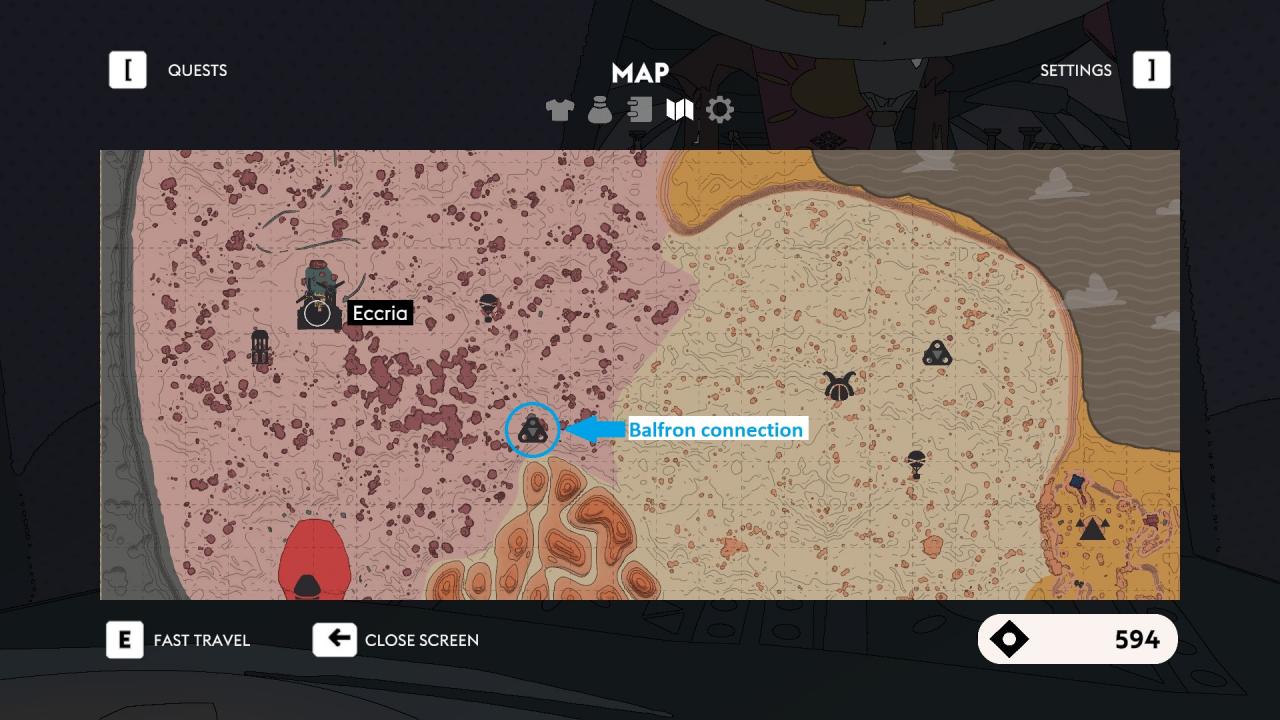
Open the door in Balfron Connection
Like the above achievement, go to the Balfron Connection in Redsee and enter the fallen ship by climbing the metal grates. Solve the power connector puzzle inside and unlock the door to the chamber to unlock this achievement.
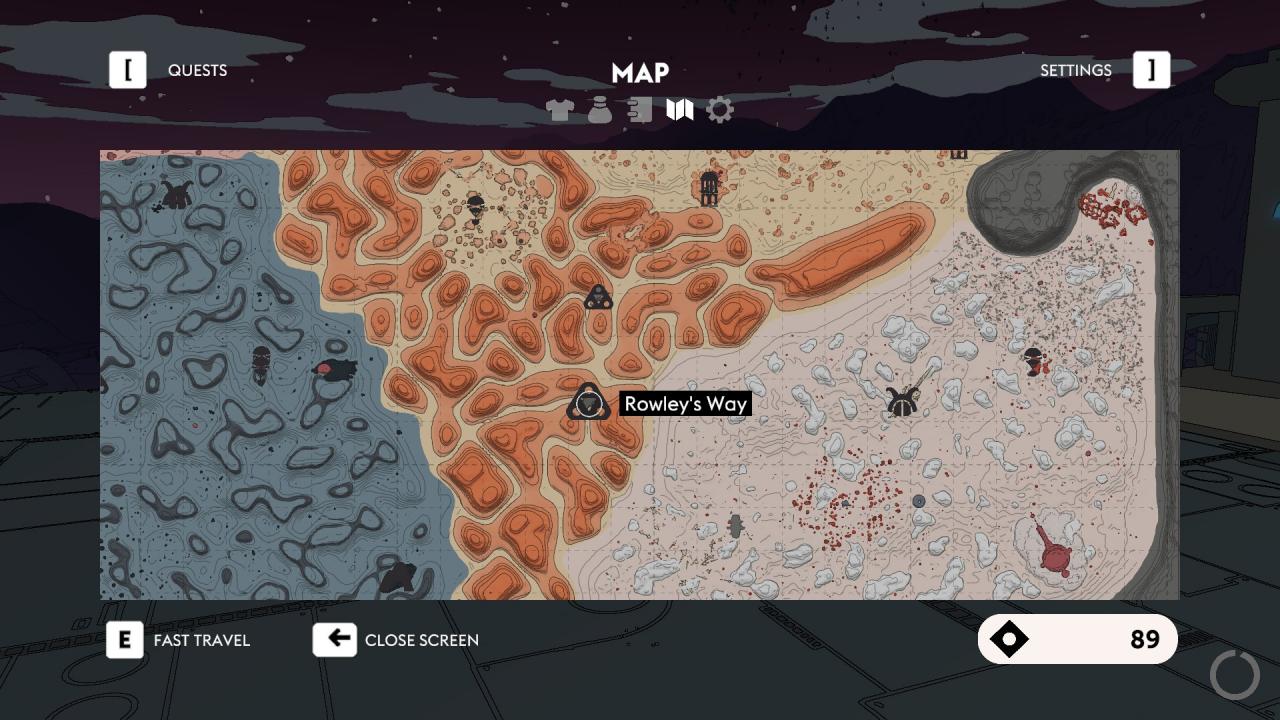
Open the door in Rowleys Way
Like the above achievements, go to the Rowley’s Way in Badlands and enter the fallen ship by climbing the metal grates. Solve the power connector puzzle inside and unlock the door to the chamber to unlock this achievement.
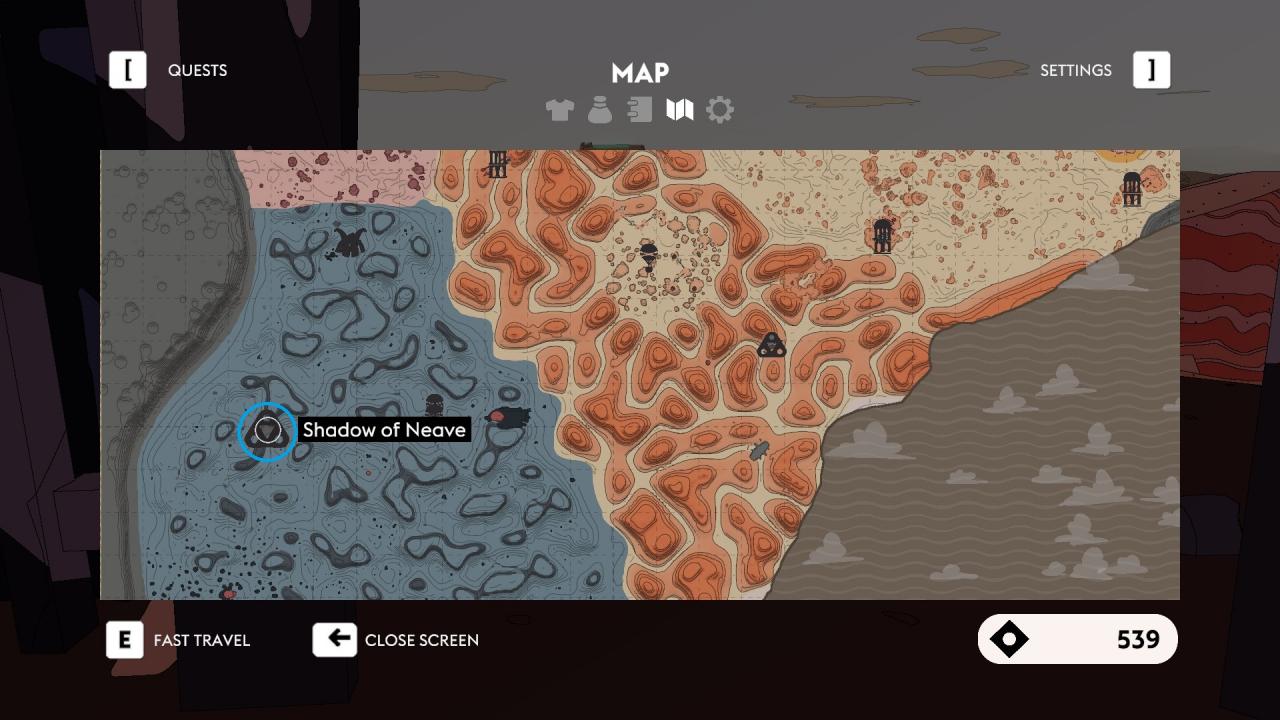
Open the door in Shadow Of Neave
Like the above achievements, go to the Shadow Of Neave in Hakoa and enter the fallen ship by climbing the metal grates. Solve the power connector puzzle inside and unlock the door to the chamber to unlock this achievement.
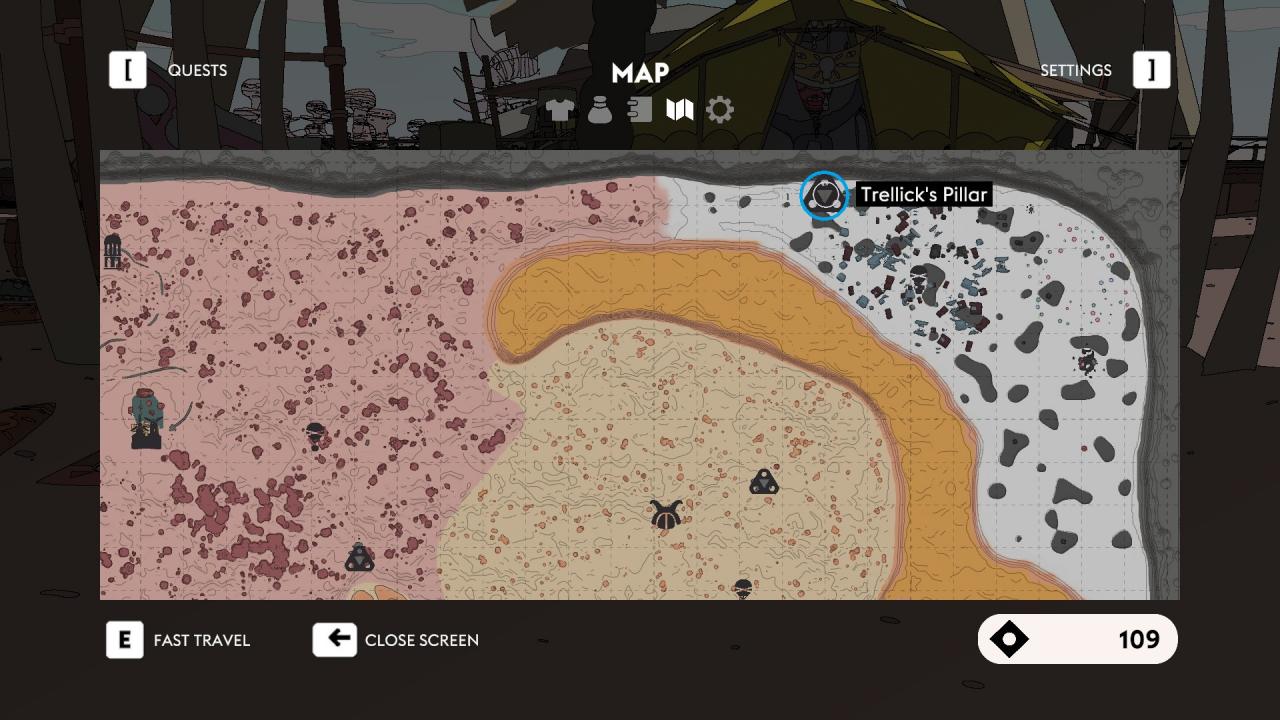
Open the door in Trellick’s Pillar
Like the above achievements, go to the Trellick’s Pillar in Sodic Waste and enter the fallen ship by climbing the ramps. Solve the power connector puzzle inside and unlock the door to the chamber to unlock this achievement.
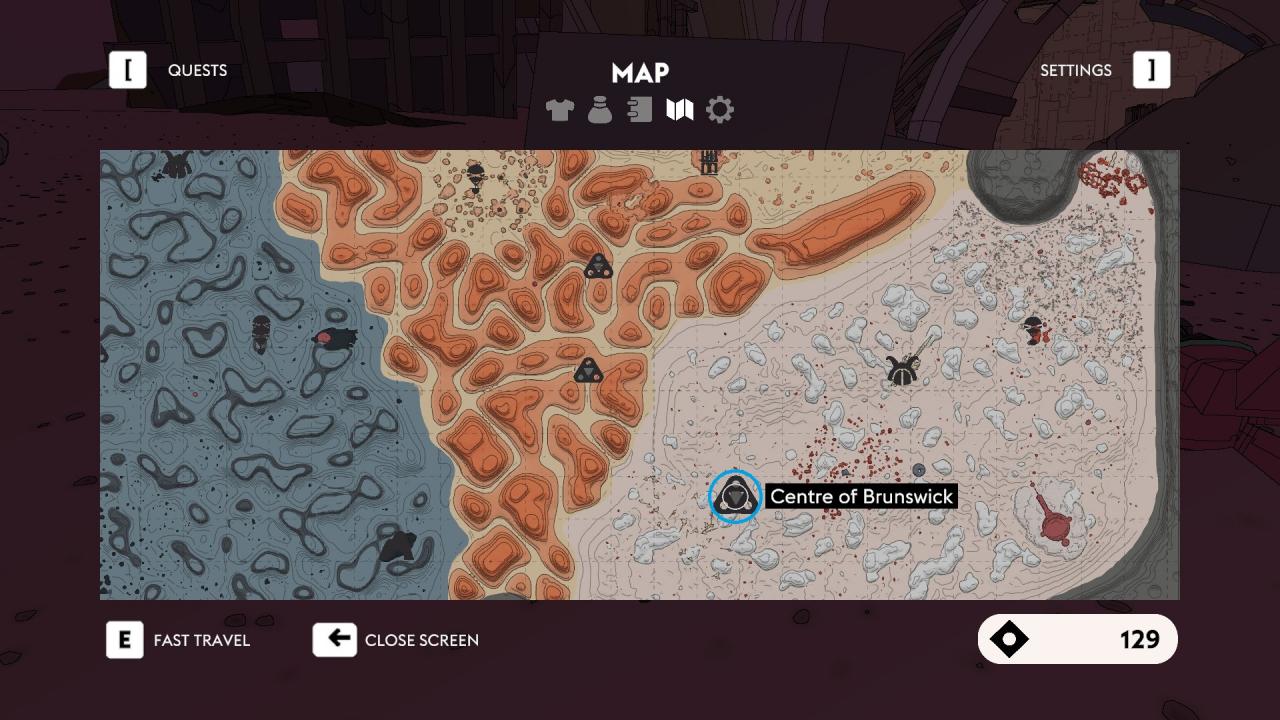
Open the door in Centre of Brunswick
Like the above achievements, go to the Centre Of Brunswick in The Wash and enter the fallen ship by climbing the ramps. Solve the platform puzzle inside and enter through the door to the chamber to unlock this achievement.
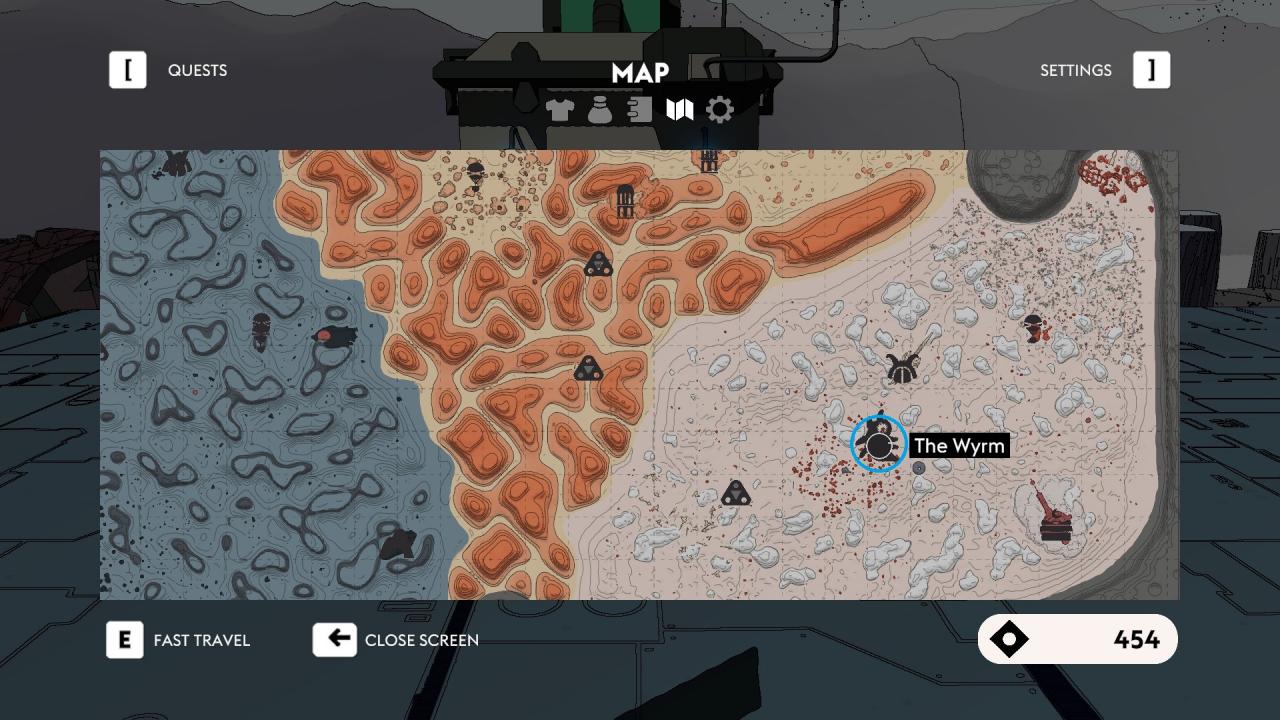
Traverse a hidden cavern
Go to The Wyrm in The Wash and climb it and enter its mouth.
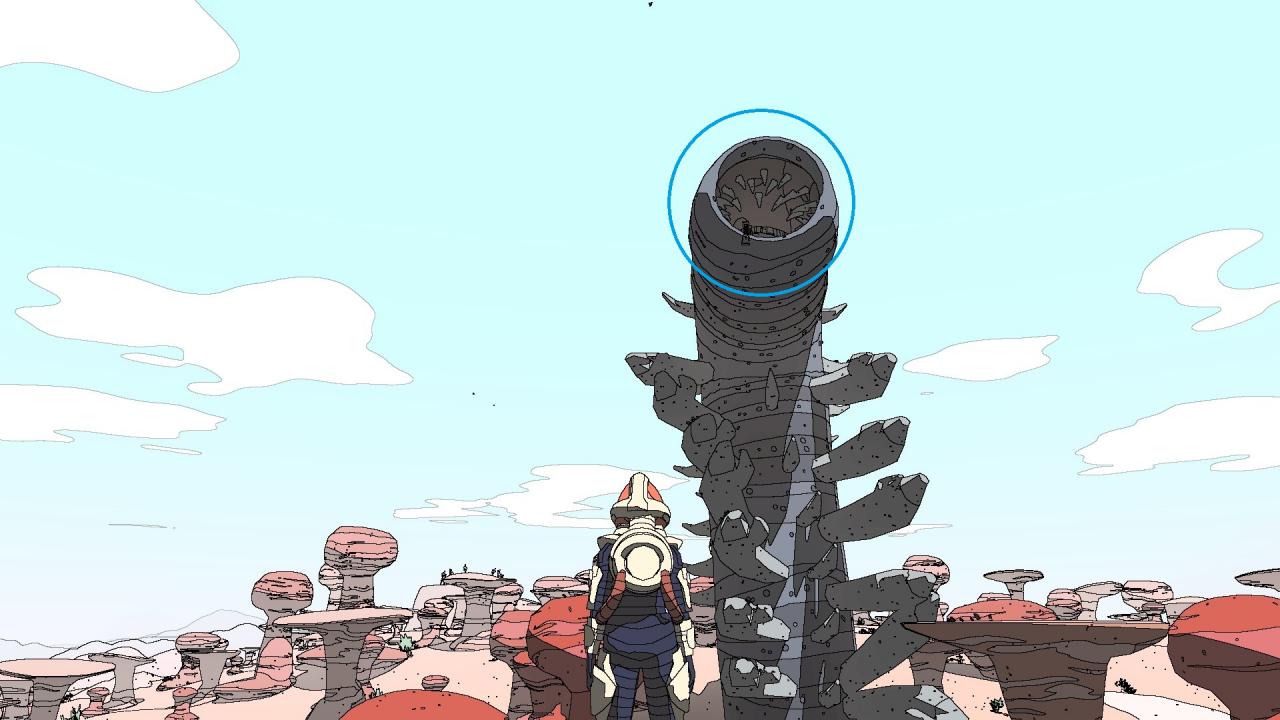
Afterwards, go in front of a green object and whistle (summon hoverbike button). A “fruit” will pop up on top of the object. Pick it up and put in in the green puddle nearby. This will open up the fleshy door.
Go inside and open the door on the floor using the same method. Drop down from the door into the liquid underneath to unlock this achievement.
Thanks to FelixDracul for his great guide, all credit to his effort. you can also read the original guide from Steam Community. enjoy the game.
Related Posts:
- Sable: New Content Guide (November 29th Update)
- Sable: All Chum Eggs (How to Find)
- Sable: How To Get To The Badlands Wreckage