Full guide covering the (nearly) complete game with achievements.
Starting your game
Now you can set 2 settings already and the whole settings including keyboard a bit later on.
If you are a heavy RPG Maker Games player, I recommend changing those settings to fit better.
Those changes will be shown each time you have to press a key to not disturb you.Select your difficulty (4 modes) after starting a new game.Note: If you never change the Expert difficulty you will unlock an achievement!
Chapter 1: From the Jaws of Defeat
Tutorial Battle: Taunt the Castle Guard Captain with Rowan and put the Castle Mage to sleep. Refresh the sleep once the CD is down and defeat the Castle Guard first. You have 2 Lesser Healing Potions. They should be enough to survive even on expert mode. Bleeding (Rowan’s Slash) can kill the enemy. You will earn 3 Ducats and 16 EXP.
Princess Arielle’s room should be on the 2nd floor. You are on the 3rd floor.
Now you can save and look at the quests etc. Crafting and Talents are still locked.
Note Treasure Chests: chest containing items of the Treasure category (Gems, Sundries etc.), have random content and the chance to obtain something with worth will increase the farther you play and might have other entries in this guide.
Items (3rd floor): Gems, 3 Lesser Heals, Revive
Explore the floor.
You can pet various animals (mostly cats and dogs, but even some goats) in this game and most bookshelves have some titles to read.
There are a total of 4 stairs to both sides.
In the east room is an Castle Guard Elite. During this battle Corrine will unlock 2 more skills to break the defenses. First use the sleeping powder and taunt and then break the armor. Remember to apply bleed. Beware when the Elite prepares the Heroic Strike. Counter it with Sleeping Powder to interrupt it (you can interrupt all skills that need prepare time)! You will gain 1 Ducat and 14 EXP.
3 more guards will show up from the most eastern stairs after you have defeated the Elite.
Defeat the Castle Mage, Guard and Knight. You will obtain 3 Ducats, 15 EXP, 2 Lesser Heals and a Bronze Key.
The Talent menu is unlocked with the first level up.
The room with the sleeping guards gets really full now.
With the Bronze Key you can unlock 2 of the 4 doors.
Items (barracks): 2 Lesser Heals x2, Whetstone (after quest), 2 Lesser Heals (after quest)
The barracks are on the 2nd floor via the doors with the bronze locks.
You will trigger an event when you go near the Giant Toad Cleanup Squad.
Commander Stein will give you a side quest to exterminate the remaining Giant Toads in the prison.
There are stairs that will need a Silver Key to unlock.
Items (prison): 3 Lesser Heals
Defeat all Giant Toads. Get rid of the Healer Frogs ASAP or use sleeping powder. The Deadly Frogs are focusing on attack and the Sturdy Frogs on defense.
Beware the Elite Deadly Frog!
You can only enter the cells with the chest.
You will unlock an Achievement when you kill the Healer Frog or Frog with Deadly Blow.
Report the Commander Stein and receive “Book: Novice”, Silver Key and unlock Crafing and another Achievement for finishing your first side quest.
You can now fight the 2 Guards on the 3rd floor.
Use the Silver Key to proceed.
Enter the Throne Room.
First head east to the king’s chamber and plunder the Volatile Trinket.
Accessories will obtain EXP and get better rewards later.
To the south is the main hall.
The Main Hall is on the 1st floor.
You might not have a change on the lower floors, so stay for now (until you have defeated the weaker guards).
To the sides are the sleeping quarters of the personell.
To the south and the east/west wings are exits you cannot use yet.
Upstairs to to the north (big stairs) are the kitchens with the only awake personell.
Go upstairs the southern stairs and further up to unlock the remaining doors to the 3rd floor.
Try to open the doors here!
Explore the hallway to the side and find the balcony (note to surprise the guards on expert mode or you will miss precious EXP).
Now you have to go downstairs from the main hall.
The Arkadya Guards have 340 HP each and are better encountered with level 3 and a surprise attack! Start with a Deadly Blow of Corrine and Taunt all of Rowan. He should then trink his booze to stay healty (effects stacks trice). Corrine will follow a second Deadly Blow on the same target when possible and put the other one to sleep! With a bit of luck you can beat them.
You will gain 6 Ducats, 52 EXP, Revive and Opportunist’s Band.
2 of the door cannot be unlocked yet but you can find 2 Lesser Heals in the middle one (get a glimpse in the room next door).
Enter the basement from the east to trigger the sneak attack!
Enter the south room first and defeat the guards to get a Whetstone.
Unlock the Tempel of the Stars and witness the event (you cannot return for now!).
Take the 3 Lesser Heals, 2 Revives and Battle Prowess and climb the tower. Save!!!
Boss Bell Ringer: Read the tutorial about team combos. Start the battle with said combo and the party will not only deal huge damage but gets healed a bit and got drunk. The Boss will summon Frog Guards as shields. Defeat it ASAP (but don’t use the sleeping powder) before the boss buffs himself too much. Depending on your mode you might need revives but the boss will only target the weakest and sleep doesn’t effect him. Taunt him ASAP or his Assassin Mode will kill you.
You will gain 21 Ducats, 81 EXP and Warrior Stone I (and should reach level 4).
You take control of Arielle.
Crafting, Character and Talents are locked.
Get changed at the wardrobe and explore the formerly locked rooms.
Witness the event in the room you have put the guards and find the flask!
Talk to the now awake people (even the one on the courtyard of the 3rd floor).
The Main Hall is crowded.
Talk to all and especially the ones with the stars.
Visit the bell tower and the throne room for an event and to find Lord Phillip.
Items (south): Gems
Talk to Guillermo in the bank and notice the locked door.
Talk to the Weapon Shop owner to unlock Whetstone and Lesser Heal as ware (but you cannot buy anything yet).
Talk to George in the restaurant and notice the other NPC with an Icon.
Talk to the Merchant next to the clothing shop (don’t enter it yet!) and start the “Magical Trinket” side quest (miss able).
Items (east): Gems
Items (west): 2 Lesser Heal
Talk to the Hauler at the north quarter to proceed with the side quest.
You obtain only 3 Ducats.
Enter the bank (south), talk to the clerk and obtain 5 Ducats.
Return to the castle’s throne room and ask the king.
He will give you 2 Ducats.
Return to the city and Phillip will “gift” you the remaining 90 Ducats.
Report to the merchant and obtain the Friendship Ring.
Now enter the cloth shop to proceed the main story.
I recommend selling the gems and buy 1 Whetstone first!
Talk to your nanny to proceed.
Balance over the plankets. First west, then north and east before the target to reach the Ring of Forgiveness.
Reach the target and proceed.
Talents
Choose wiseley as you share the available points with the party.
First learn the passive of each character.
After Gage joins, spend all Talent points on him, Arielle and Rashim and max out their talents (for more see down).
After some learnt talent the Talent Points needed to unlock a new talent will increase by one.
The 4th-8th needs 2 TP,
the 9th-10th 3 TP
11th-12th 4 TP
13th-14th 5 TP.
If you have a talent that can attack either one or all targets, the estimated damage/healing for one target will be split to all targets.
The more targets the weaker the skill get and a single hit will be more effective.
Aden’s Plaque can stack up to Degen 6 but the enemies DoTs can stack up to 10.
For example: Celestial Flare, level 15 (+ 2 crafted gear) has a single hit damage of 248-303
Damage per target = 248/n – 303/n
n = amount of targets (maximum 8)
Minimum damage per target = 31 – 38
All skills can crit.
Most of the talents are passives stat increases but each character can learn a unique passive that will be extremely helpful for the adventure.
Try to unlock those talents ASAP.
For example: more money drops, double item drop chance and more.
If you unlock 10 Talents for 1 character.
At Level 30 unlock “Determinded”.
Aden can summon a 4th party member aka Lesser Demon once. You can use a defeated enemy as sacrifice for 3 turns.
The Revive item will restore 50% of the max. HP.
Reyna’s Heal will restore app. 15% to a k.o. friend, not depending on AoE or single hit, once you have learned the talent.
So it is better to cast it as an AoE when reviving with Heal.
At level 40 is the cap and you notice that you can’t unlock all talents.
But there are some passive talents you don’t need anymore.
Reset the Talent of Rowan, Corrina, Reyna, Aden and Natasha.
But reset them only one at a time as the maximum TP is 99 and all other will vanish.
Max out Arielle, Gage, Rashim and then withouth their passives Reyna, Aden, Rowan, Natasha –
For Rowan, don’t learn Speed Up, Vendetta and Swashbuckler’s Grace, too.
For Corrina: don’t learn Fatal Strikes and Resilience, too.
For Natasha, don’t learn Dodge up and Weakening Poison, too.
Use the remaining TP as you see fit.
Crafting
Crafted Gear will be permamently equipped (you can only change the Accessory at the beginning) and only be crafted once!
Obtained via the Exterminator side quest or Evenheart, weapon shop.
Rowan: Stein’s Necklace (Strength +3)
Corrina: Razor’s Edge (Strength +3)
Arielle: Keepsake Locket (Strength +3)
Reyna: Celestial Diamond (Spell Power +3)
Aden: Pants of Writhing (Spell Power +3)
Rashim: Rank Commander (Strength +3)
Natasha: Spy’s Training (Strength +3)
Gage: Templar Haft (Strength +3, Spell Power +3)
Unlocked in Oceanvale, weapon shop.
Rowan: Serrated Edge (Strength +5)
Corrina: Featherlight (Strength +5)
Arielle: 8 Pound Caliber (Strength +5)
Reyna: Eye of the Storm (Spell Power +5)
Aden: Earring of Evil (Spell Power +5)
Rashim: Honed Edge (Strength +5)
Natasha: Assassin’s Training (Strength +5)
Gage: Templar Spearhead (Strength +5, Spell Power +5)
Unlocked in Riverton, weapon shop.
Rowan: Reforged Blade (Strength +7)
Corrina: Arkadyan Steel (Strength +7)
Arielle: Winglet Roundshot (Strength +7)
Reyna: G.H.E.V.G.W. Badge (Spell Power +7)
Aden: Staff of Horrors (Spell Power +7)
Rashim: Tariqqi Steel (Strength +7)
Natasha: Fencer’s Training (Strength +7)
Gage: Mage Oil (Strength +7, Spell Power +7)
Unlocked in Evenheart, chapter 3, weapon shop.
Rowan: Wyvern Hide Bracers (Dodge +2%, Speed +5)
Corrina: Moleskin Boots (Dodge +2%, Speed +4, Crit. Rate +4%)
Arielle: Adventurer’s Cloak (Speed +10, Crit. Rate +3%)
Reyna: Aspect of the Stars (Wisdom +3, Dodge +2%)
Aden: Knife of Sorcery (Vitality +3, Wisdom +3)
Rashim: Guards Cape (Vitality +2, Speed +10)
Natasha: Medic’s Training (Vitality +3)
Gage: Arkadyan Plate (Speed +10)
Unlocked in Fort Nasir, item store.
Rowan: Rifled Barrel (Strength +9)
Corrina: Glass Knives’ Badge (Strength +9)
Arielle: Shoulder Rest (Strength +9)
Reyna: Focusing Crystal (Spell Power +9)
Aden: Vest of Darkness (Spell Power +9)
Rashim: Crusader’s Blade (Strength +9)
Natasha: Lightning Blade (Strength +9)
Gage: Templar Runes (Strength +9, Spell Power +9)
Unlocked in Nadim, Gremlin Commander.
Rowan: Breach Loader (Pistol CD -2)
Corrina: Book of Gremlin Tricks (Sleeping Powder CD -1)
Arielle: Gun Sights (Preparation Boost damage +25%)
Reyna: Aspects of the Moon (Mana Regen x2)
Aden: Amulet of Doom (MP costs of Doom halved)
Rashim: Janisarry’s Armor (taking damage creates Team Points)
Natasha: Intricate Crossguard (10% chance of bonus turn each round)
Gage: Storm Battery (increased the rage generated by taunt by 5)
Unlocked in Port Cullis, Selene.
Rowan: Thunderclap (Strength +12)
Corrina: Poisoned (Strength +12)
Arielle: Fine Milled Gunpowder (Strength +12)
Reyna: Aspect of the Sun (Spell Power +12)
Aden: Boots of Torment (Spell Power +12)
Rashim: Runic Armbands (Strength +12)
Natasha: Ancient Steel (Strength +12)
Gage: Insulating Wrap (Strength +12, Spell Power +12)
Unlocked in Trepidanos’ Shop (location).
Rowan: Wyvern Hide Tunic (Dodge +5%, Speed +15)
Corrina: Blessing of the Wind (Dodge +5%, Crit. Rate +8%)
Arielle: Crown of Cirinthia (Vitality +4, Speed +20)
Reyna: Arenthien’s Promise (Vitality +4, Dodge +4%)
Aden: Demon’s Skill (Vitality +4)
Rashim: Guard Hilt (Vitality +4, Speed +20)
Natasha: Blood Moon (Vitality +4, Crit. Rate +8%)
Gage: Runed Plate (Dodge +4%, Speed +20)
Unlocked in Trepidanos’ Shop (location).
Rowan: Tear of Blood (Strength +15)
Corrina: Wind’s Grace (Strength +15)
Arielle: Reinforced Barrel (Strength +15)
Reyna: Starlight Cape (Spell Power +15)
Aden: Socks of Suffering (Spell Power +15)
Rashim: Runes of the Sun (Strength +15)
Natasha: Redemption Hilt (Strength +15)
Gage: Ancestral Power (Strength +15, Spell Power +15)
Found at Port Mandeau.
Rowan: Sea King’s Might (Strength +20, +5 Talent Points)
Win in the Arena all 5 rounds.
Corrina: Tariqqi Resolve (Strength +20, +5 Talent Points)
Finish the Quest: Bless the Rains Down in Ardo Rita
Arielle: Orb of Storms (Strength +20, + 5 Talent Points)
Finish Quest: Liberate Talindra
Reyna: The Empyrean Amulet (Spell Power +20, +5 Talent Points)
Finish Quest: Aden’s Childhood
Aden: Cologne of Evil (Spell Power +20, +5 Talent Points)
Finish Quest: War Hero
Rashim: Desert Emblem (Strength +20, +5 Talent Points)
Finish Quest: The Rozkovs
Natasha: Diamond Tip (Strength +20, +5 Talent Points)
Finish the Thunder Isle.
Gage: Blessing or Arenithen (Strength +20, Spell Power +20, +5 Talent Points)
Unlock “Ready to Rock” and “Master Crafter” after crafting each gear.
Accessories
During your adventure you will find accessories that have a mostly positive effect either via drops, bought in stores or found in chest even on the world map.
The Accessories will earn EXP to attune.
Attune will unlock better and even new effects like bonus EXP.
The Accessory effects will only be affecting the reward screen if the character wearing them was active during the battle.
Accessories of inactive party members will only earn EXP.
A Bestiary is added chapterwise to help you find the best grinding places to obtain new Accessories.
Chapter 2: Suicide Mission
Items (map 1): Mana, 2 Lesser Heals, Sundries (go west)
Arielle will join the party (give her an accessory).
You no longer have keys, so remember to return to the locked doors when you find them.
You need a silver key.
From now on the party will suffer from exhaustion (can only be treated by sleeping in inns or 2nd Wind Potions). Once your Exhaustion is 100 % you will receive an injury (damage dealt -25%, Agi down, Crit Rate down etc).
Beware of the skill Split! The enemy will split in 3 enemies with the same HP as the main body (maximal 8 mobs) but you won’t get more EXP.
Items (map 2 south): 2 Lesser Heals (Bronze Key)
You need a bronze key.
Items (map 3 east of map 2): 2 Lesser Heals, 3 Water Crystals, Heal, Mana
You need to find a switch to open the cell door and a water crystal to fight against the water elemental.
Defeat the Elite Tank Gremlin to obtain a Warrior’s Stone I. Thorns will reflect your physical melee skills.
Enter one of the doors and defeat the other gremlins.
Encounter the water elemental and use a water crystal right of the bat. Remember to interrupt its skills! You will obtain Elemental Water and learn a new Team Ability with Level 5.
Pull the switch and you can enter the cell and find the Bronze Key.
Return to map 2 and unlock the door.
You will encounter another Elite Tank Gremlin.
Pull the blue lever and drain the water. Take the Gems.
Defeat another Elite Poison Frog on the only possible path you can take.
Items (map 4): 50 Ducats
Don’t touch the red flames (-40% HP). The blue ones will only teleport you.
You need the Silver Key so first head west to find the gremlins.
Boss Gremlin Commander: Defeat the other Gremlins with AoEs but the boss will call for reinforcement (interruptable)! Arielle should use her AoE as often as possible and the others focus on the boss or taunt. You will obtain 2 Coppers (the other rewards depend on how many gremlins you have defeated).
Take the Silver Key and pull the switch to disable the red trap.
Unlock the door and proceed.
Items (map 5): none
You might have reached level 6 with the next battle.
If you manage to defeat all mobs in one turn before they can even act, you will unlock an Achievement (best with a combo of Dirty Tricks and Explosive Shot).
At the end of this passage you return to map 1.
Free the ladder and the merchant Trepidanos will appear! He even can respawn the enemies for you (wait best before the next boss). You might unlock some new items (but no Whetstones).
Unlock the door and get the Ring of Speed.
Further south you can reach the next Water Elemental and a Perfume.
Head north to map 6 and to the east to get 2 Elemental Waters and to fight another Elite Poison Frog.
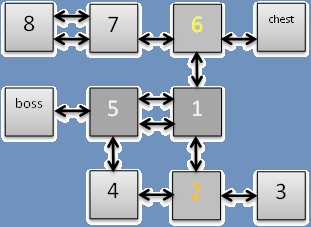
You will need the Gold Key to proceed so turn west.
Items (map 7): Volatile, Gems, Sundries, 3 Second Wind (!)
Cross map 7 and enter map 8.
Cross the map and return to map 7 and defeat another Elite Tank Gremlin.
Don’t forget to get to the map 8 to obtain the Gold Key and pull the switch.
That will move the pillar and creating a short cut on map 7.
If you reach the switch on map 7 you will disable the red traps.
Get the treasures guarded by red and blue traps.
If you enter the room and cross fully to the east, you can find another Second Wind.
Return to map 6 and unlock the door and find the Strategist’s Band.
Leave the Sewers and defeat the Lynx.
Without Respawing and defeating all mobs you should now reach level 7.
Avoid the people on the bridge for now and go south.
Defeat another 2 Lynx.
In the Lynx Lair find Liquor.
To the west are 3 more Lynx, Gems and Refresh.
Going east will circumvent the people on the bridge!
In their Hideout find Delicacy and Sundries.
Talk to the Pirates with the icon, find another Sundries and Reset Talents.
Rest in the tavern (Enemies will respawn), buy another Accessory (Assassin’s Band) and if you need it whetstones.
If you chose 3 foods available for the inn, you will unlock an Achievement.
Currently you cannot enter the Captain’s cabin (there is a sign east of the tavern).
Note: Remember to go back the bridge and witness the event there before you enter the captain’s cabin!
You can sneak attack them! (Best have the Dirty Tricks available!). There is no penalty for the main story.
Boss Pirate Captain: Defeat the other pirates with your AoE like Dirty Tricks. The others should focus on taunting and the boss. Rewards are 56 Ducats, 47 EXP and Thief’s Band.
Note Respawn: Not all mobs will respawn, like the (Water) Elementals (need an item to fight).
If you defeat your 10th Elite, you will unlock an Achievement.
Also there is a slight chance (see bestiary, doubled with a certain talent of Corrina) that you will obtain rare gear like the Frog Charm (Healer Frog).
You cannot obtain the Frog Charm elsewhere and the sewers won’t be available forever.
If you have attuned 5 Accessories, you will unlock an Achievement.
Now you can grind a bit and before you talk to Ratface Jim, rest again.
If you say “no way” to the Ratface Jim to often you cannot talk to the captain.
His first offer is 10 Ducats, the next (and final) 15 Ducats. So take the first offer!
Meet Captain Selene and then head to her cabin and talk to the guard.
In the cabin plunder Gems, Sundries, Wine nand go downstairs to find Selene’s diary.
Leave and witness the rest of the event.
Before you head to the ferry, get the Class Cannon from the Tavern.
If you return to the Pirate Hideout, nothing will happen yet.
Go outside and press enter twice when you want to get attention.
Run west on the beach to find another entrance to some kind of mine.
Items (mine): Sundries x2, Wine (northern exit), Delicacy & Sundries (Rest Area near Town Exit)
In that mine you will encounter cave beetles that have a hard headbutt.
The Elite will appear at random and drop Warrior Stone I (but please don’t be surprised by them).
Look at the signs for orientation.
There is a shortcut to the ferry east of the south eastern beetle with Delicacy and a Bronze Key, that will start the side quest “Bachelor in a Bind”.
Pull the lever to create the shortcut aka bridge.
The “Town Exit” is locked from the mine side, so unlock it.
Outside you will meet your first clue about the side quest.
Return into the mine and climb down the ladder near the Beach Exit.
Items (mines 2): Sundries
Unlock the door with the Bronze Key.
Boss Wolpertinger: Be prepared to fight a 2650 HP strong weretiger. It cannot be stunned (sleep) or silenced. From the danger level comparable to the Lynx. You will obtain 50 Ducats, 105 EXP and 2 Warrier Stone I.
Return to town via the Town Exit and talk to the Bachelorette to obtain the Warrior’s Band.
Chapter 2: Suicide Mission part 2
Items: Sundries (item store), Delicacy, Sundries (weapon shop), Sundries (church), Delicacy (inn), Sundries (house with baby)
In the item store you can unlock the Ring of Speed and Thief’s Band.
Unlock Opportunitues Band, Book: Apprentice and Copper in the weapon shop.
Talk to the father of the baby to start the side quest “the Haunted Cave” (you cannot leave town yet).
In one of the houses you can find the ledger of the famous singer’s fan club.
Talk with Bartolo to start the side quest “Memorial of the Fallen”.
Talk to the Mayor but he has no ideas and it would cost you 3000 Ducats.
Rowan can learn a talent that will increase your earned money in battles and you can find a accessory to increase that amount further soon.
When you have gathered the needed money either in the mines/sewers or later in the haunted cave, return to the mayor.
Reward for paying the 3000 Ducats from Bartolo: Storm Catcher (Relic).
Time to enter the last house in the NE of town (last chance to start those side quests until you have another party member).
Your Exhaustion will be resetted.
Rowan is missing and Corrina can only enter the inn.
Defeat the Pirates.
When you leave the house it is still night.
Even if you leave via the harbor, walk some steps until a message pops up.
You cannot enter Evenheart, the forest south of it and Fort Defiance.
Follow the coast to find it.
If you have trouble, first get the next party member!
Map 1: You find yourself with Ghosts (don’t let them possess you) and 3 locked doors (one Bronze), broken switches…
Elite Ghosts will drop Sorcerer’s Stones I.
Go north and pull the lever.
Cross the rails and get Delicacy, head south to get the Sundries.
Follow the rails to the next map.
Map 2: Find your way through the blue trap.
There are two paths available.
Enter the middle cave and you can at least open up the barred door at the entrance (shortcut around the blue trap).
Go further north.
Map 3: Take the Sundries x2 and proceed.
Map 4: Save!
Jump in (and the 2 other options): You break through the rails and fall to an unknown map.
Map 5: You need the Bronze Key to unlock the switch.
Take the only possible path and you will end up in the middle path of map 2.
Pull the switch, let down the ladder and you can either return to map 1 and go through the now open gate or return to map 4 (no changes yet).
Map 6: Behind the gate of map 1.
Pull the switch and some rails will connect on map 4.
Map 4: Save and take another ride.
Map 7: Take the Sundries.
Now you can explore map 4.
Head north where the rails are patched.
Take the Delicacy, Mana and Liquor.
Return to map 7 and go south of the chest.
Map 8: You need the Bronze Key so proceed and find that Bronze Key!
Boss Tormented Spirit: it has 3810 HP and is immune to stunned and silenced. It can freeze/Degen and slow a character down. Its AoE will deal high ice damage and the battle is much harder than the Wolpertinger. It will drop 2 Elemental Spirits.
Unlock the bronze door.
Map 5: Take the Sundries and unfold the ladder.
Unlock an pull the switch. Ride the cart and you return to the entrance.
Map 1: Unlock the last Bronze door and find the Will of Rin (Relic).
The side quest is finished.
Items (night): Delicacy
You can only enter the inn and of course the church.
Before Arielle changes for bed, talk to the others downstairs.
You can even leave the church.
Talk to the NPC with the icon (Aden) and then the inn is closed.
Return to the church, where you can find Knowledge (best used when fighting bosses).
Get changed at the wardrobe and go to sleep.
Change and go downstairs and Reyna will join the party.
Her passive talent will slow down exhaustion.
Items (during day): Sundries, Reset Talents
Prepare for the next destination.
With your first encounter you will learn about swapping (not infinite like FF X) and some battles later you will learn the Team Ability Tranquility (Reyna & Rowan).
Follow the path until you reach the intersection at map 2.
On this map you can find a Treasure near the eastern exit.
To the south you will find the Lucky Trinket (more gold drops).
To the east you will find a cave with Greater Heal and Knowledge.
Note: Characters not in the active party will recover from exhaustion for a certain percentage per battle.
Chapter 2: Suicide Mission part 3
Items: Sundries (difficult to see beneath a tree)
Remember to go south to start the “Missing Acolytes?” side quest.
Enter the cave and find Mana.
Note: To enter the path and farm later again, stand on the farm and press enter or available when leaving Fort Defiance to the south.
The Elite Hive can (as well as the normal one) summon more Poison Flies.
Enter the cave before you challenge the swarm further south and gather some Poison Sac (also heaving Dirty Tricks available will help).
Find the Gems, Second Wind and 2 Revive in the cave.
Boss Swarm of Marchbugs: A combo of Dirty Tricks and Explosive Shot can obliterate them. When you get poisoned, heal with a Poison Sac.
Enter the 2nd cave and find the Battle Prowess.
Items: 3 Greater Heals, Sundries
You have to solve the conflict to proceed.
Boss: Arkadyan Guard Captain, 2 Acolytes, 2 Guards: AoE are the Key. The Acolites can heal their comrades, so defeat them ASAP.
Check on the people in the remaining houses (icon) to finish the quest and find a Delicacy.
Reward: Ancient Might (Relic).
Proceed heading south to the World Map.
Small tent east of the city. Press enter ontop.
Items: Sundries x3
You won’t proceed there yet.
Yeah you can enter but the city wall is closed.
Boss Sparrow, Gage and Viktoriya: Sparrow is the most dangerous fellow with 11.430 HP (the others have 4480 and 6860 HP) and you have to fight with Reyna instead of Arielle. All three are immune to stunned and silence. You cannot win the fight as Viktoriy will cast Ruination, that will even wipe out a level 14 party.
Chapter 3: Ticking Clock
Items (3rd floor): Volatile Trinket
You will be fully healed and move Reyna.
Arielle should be on the balcony.
One your way there talk the furthest west/east hallways to find the quarrelling Initiates to start the “Internal Disputes or Rats” side quest.
If you take the stairs downstairs in this hall, you will find them. It is possible to defeat the rats with only Reyna (see talents for tips). Return to the Initiates and then to Miss Carrie in the reception hall and obtain the Desecrated Charm (Relic).
Also notice the boxes down there!
Further north is the graveyard.
The balcony is on the 3rd floor, middle north hallway.
Return to the reception hall to meet up and then into the Hall of Empyrea to talk to the High Priest.
Leave the temple and follow the female back into the temple.
Items: Delicacy & Sundries & Gems (garrison), Delicacy (house) x2, Heal (item store)
Witness the event in the inn to start the “G.H.E.V.G.W” side quest.
Talk to the members.
In the bakery you unlock the Heal and Battle Prowess items.
In the weapon shop unlock Razorblades (weapon for Corrina), Book: Journeyman and Bronze.
Talk to Gio twice for the quest then check the books.
You obtain Gio’s Broken Sword.
Show it to the weapon shop merchant and then to her husband.
You have to pay 30 Ducats to repair it.
Return it to Gio and report to the club to obtain the Starry Sigil (Relic).
To the west is the museum.
Enter to start the side quest “Marceline’s Task”.
Hints:
- The Evenheart by Marquis Dubois: rumored to be in a bustling Cirinthian city (Northport).
- Blades of the Three Kingdoms: rumored to be lost somewhere in eastern Tariq. (T’Kara, house east of the inn)
- A Storm is Coming by Rashad Omir: rumord to be in a shop somewhere in Arkadya (Trepidanos’ Shop).
- Queen Avenni’s Shield: rumored to be in a fortified Tariqqi position (Fort Nasir).
- Bust of Arenithen: rumored to be lost somewhere in rural Cirinthia (Whirlwind Village, item store).
- Armor of Sunlight: rumored to be in an attic of an Arkadyan village.
To the north is the Home of Rowan’s former commander of the navy, Admiral Alrin.
Visit him.
Find the Rogue’s Band east of Riverton.
Press enter on this location east of Whirlwind Village.
Items: Reset Talents (cave)
Talk to “Arica Parenetti” who needs help (side quest).
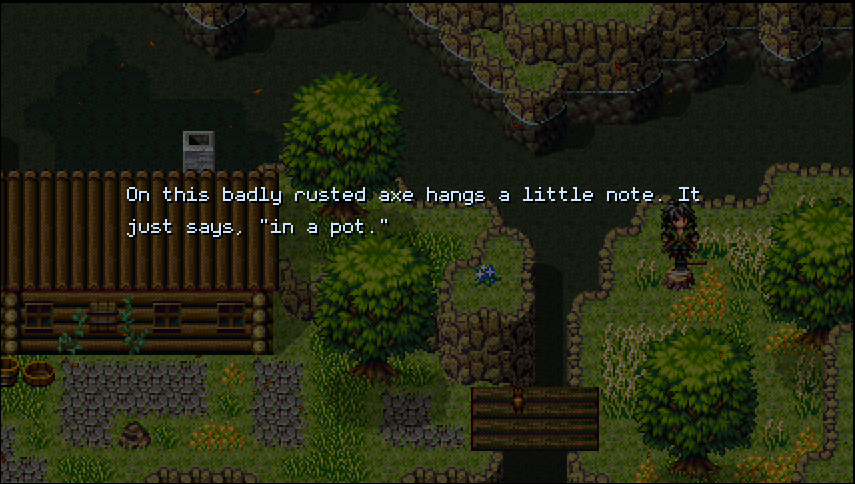
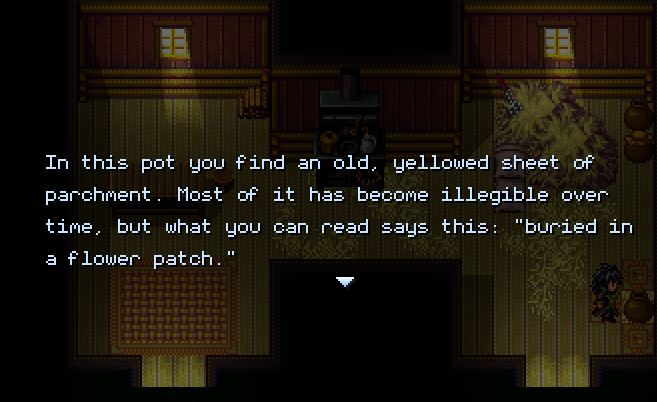
Pull the axe from the stump and offer to help.
The forest is SE of here.
You will be attacked by only 4 wolves. AoE are the best choice of skills.
Report to Arica to obtain the Sun God’s Evlogy (Relic).
Items: Battle Prowess (house), Delicacy, Bronze (Town Hall),
Unlock the Refresh in the item store and find the Bust of Arenithen (Quest).
Enter the Town Hall and talk to the mayor (golden “?”).
Now you can cross the barrier.
Follow the river, collect the Wine and enter the Guard House to obtain the Treasure.
You need a Bronze Key, so go east to the abandoned village.
Items (village): 3 Second Wind, Bronze Key
Read the diary in the house to the south.
Find the clues (you can find the keys even without the clues).
 Behind the tree head north!
Unlock and cross the cave.
Find the 5 Heals and the back entrance to the temple (3rd floor).
In there surprise the Arkadyan Soldiers.
Notice the orb.
Depending on your difficulty fight there until you manage to upgrade all availagle gear.
Go downstairs (2nd floor) and defeat the Soldiers.
Notice the orbs in all 4 directions.
Go downstairs (1st floor) and find another orb.
You need a Silver Key.
Go either west or east into the sewers.
To the south is the main entrance.
The path to the northern part of the sewers is blocked with a blue barrier and to the southern part with yellow barriers.
Avoid the red trap, investigate the blinking tile to obtain the Sorcerer’s Conduit (Quest).
Pull the switches to disable the traps.
Go upstairs and collect 3 of the 6 Minor Charges (Orbs, Quest).
3 Minor Charges can disable one blue barrier.
NW barrier: Avoid the trap, investigate the Major Charge, pull the lever and take the Perfume (in this order).
NE barrier: Take the Major Charge and pull the lever.
You need both Major Charges (one after another) to disable the yellow barrier.
Save before you pull the switch!
Boss Lesser Demons x5: AoE and Healing is recommended. If possible cancel Doom (AoE) and Curse.
Enter the now open gate and meet an acquaintance.
Aden will join the party.
Take the Silver Key and use it on the 1st floor.
In the basement find the tunnel.
The further you go in the darker it will get until you reach the secret harbor.
If you had trouble with this place or want all accessory drops, now is the best time to return to the village, buy enough Bronze for crafting and rest in the inn.
Also after some battles the Team Ability Blackhole (Aden + Reyna) is unlocked.
You fall into an unknown tunnel with the stronger variants of the Arkadyan Soldiers (see Bestiary).
There is an empty chest (random treasure), a barred door and Trepidanos (the Warrior’s, Archer’s and Sorcerer’s Stone I will be unlocked).
Restock on healing items and Second Wind (he only has 2).
The summoners will summon lesser water and fire elementals.
For those you won’t need crystals.
Enter the fortress and you have to find the Golden Key.
In the western room find the Vanguard’s Sigil.
Head upstairs and find the 8-Pounder Short Gun for Arielle.
On the blackboard you can read the names of the soldiers belonging to one bed.
Prepare before you enter the last room.
Take the Gold Note (Quests), read the letter.
Boris bed is in the most right column and the 2nd from below.
Find the Gold Key.
Best time to let Trepidanos Respawn the enemies (you have to change the map once to see the effect).
Unlock the Golden Door.
Boss Viktoriya, Elite Summoner and Arkadyan Summoner (the mobs can vary): Get rid of the Summoners ASAP or you will be spammed with Lesser Elementals. The boss has similar skills as Aden and can cause massive damage with detonate. You can start with Rowan, Corrina and Arielle to get rid of the summoners but then swap the girls for Reyna and Aden.
Keep that formation for round 2:
Boss 3 Demons: Summon a Demon with Aden, taunt with Rowan and support with Reyna (not possible to shield the demon). Aden should then use Plaque and Detonate. You cannot interrupt their chanting. The demons can summon Living Bombs. Destroy it ASAP and then heal!
Once the last Demon is near death, it will summon 5 Living Bombs. That will end the battle.
You are washed on near the cave of the east exit.
Leave the forest.
Before you enter Evenheart, you can do something else.
Talk to the Major to obtain a random Treasure (Perfume or Treasure).
Chapter 3: Ticking Clock Part 2
Arielle and Reyna will proceed to the castle, Corrina and Aden go into the tavern and Rowan will explore the city.
Unlock the “Book: Outfitter” and Iron in the weapon shop.
Near the cloth shop you will meet the woman you have run into at the Telindra Temple.
She will wait for you in the inn (miss able).
During that date you get to know Brooke.
Collect Aden and Corrina in the tavern.
Enter the Castle and take control of Arielle.
Enter the Main Hall and then the Throne Room.
Talk to the Maid with the golden icon to proceed.
Use this chance to talk to all people in the palace.
Last talk to Aden and then the others in the rooms of the basement.
Rest in Arielle’s chamber to proceed (don’t forget to change).
Even the pets are sleeping (you can check).
Near the dining hall, watch the event.
Follow him.
Flee to the guest rooms downstairs.
Hurry to the chambers of the princesses.
Check on the older one (lower room) first.
Leave Evenheart.
Cross.
Enter via the main entrance.
You obtain 300 Ducats and the Right Half of a Torn Note.
Chapter 4: A Storm is Coming Part 1
Either enter the cave or defeat the guards.
Both areas have only more foes.
SW: Find the Elemental Earth.
SE: Defeat the Guards of the Ruins (Bronze Key needed) and then head west!
Head west until you trigger an event.
Defeat those Rebells and obtain the Bronze Key.
Return and unlock the ruins.
Clear the ruins until you need the Silver Key.
South of that door are two stairs.
For the east one you need the Silver Key, too.
Take the western stairs.
Say hello to Trepidanos before you proceed upstairs.
You unlock the Blood Trinker (weapon for Rowan).
Note: if you reach an amount ot 5000 Ducats you will unlock an Achievement.
Proceed on the roof until you can enter the ruins again.
Boss Free Leader and some troops: Get rid of his minions first, especially the Priest.
The Leader will call for reinforcements use them to create Demon Tokens to summon Aden’s Demon. Swap in Reyna to be able to cast Healing/Shield and Tranquility. Keep the enemies taunted.
You might obtain a Ruby.
Find the Silver Key, unlock the door to return to the stairs.
Unlock the other Silver Door and beware the red traps (ignore that strange tile at the wall).
Outside find the Reset Talents and head west right below the wall.
Avoid the blue trap to reach the Aquamarine and Elemental Fire.
Return to the east and head south.
Follow the path and you will reach the desert.
In the tents (one can be entered from behind), you can unlock the Demonic Hymn (weapon for Aden) at the merchant. He has even some Second Wind in stock.
Further south reach the cave at the broken bridge.
The cave has two exits.
First head up to obtain 2x Second Wind and 3x Heal.
Next head south into the dry river bed.
Possible exits are to the NW and the SE.
Find the Delicacy.
First head to the NW to gather the Nymph Charm.
Note: The Nymph Band can’t be optained via shops, so get that drop! One of the possible stats (unattuned) is an EXP Boost of 25%. Collecting 8 might take a while, but it is worth it.
Then head SE to the crossroads.
Your goal is to the SE, but first explore the cave to find the Knowledge as well as the Delicacy x2.
You cannot go to Nadim in the west.
Items: Delicacy, Sundries, Blades of the Three Kingdoms (Quest),
Explore the town and talk to the citizens.
One room in the inn is blocked for now.
In the weapon shop unlock the Ring of Evasion, Shielding Ring and Tremor Band.
Ignore the blind man for now.
Notice the Man (Bounty Hunter) in the inn to start the “Desert Secrets” side quest.
Talk to the Bartender to get some clues and buy the Bounty Hunter a drink for 2 Ducats.
You will meet him in the mountains south to T’Kara later.
Your goal is the building near the stairs to the east.
Find the Left Half of Torn Note and read the full note.
Give the blind man a coin and choose the new 3rd option.
Talk to the innkeeper and then you can enter the blocked room upstairs.
Take the Battle Prowess and Amethyst.
Talk to Tika (icon) when you want to proceed.
With Reyna, look for the others.
Corrina is right above Reyna.
Arielle should be in the back room of the hideout (as well as Aden).
Head to the shops and follow Rowan to the outlook.
Talk to your friends and then leave the hideout/inn.
Before you head to Nadim, grind a bit more and deliver the quest item to the museum (especially on expert mode).
Right south is the mountain mentioned by the Bounty Hunter, press the Actionkey to enter.
To the West is Nadim.
Talk to the Bounty Hunter to proceed the side quest.
Take out all Glass Knives before you climb the mountain.
Down in the Valley find Sundries, Sparkling Wine and Liquor.
Find a Wine after the 2 rounds of battle when climbing.
Boss Sabir: She can dispel taunt and other negative states, so refresh it!
Boss Taku: He will summon 5 Decoys (will reset DoTs), so AoE and taunt is the best answer. You can see at the DoT damage which one is the real one (he never changes his location). The poison of the decoys will stack up to 10 times (?) and the poison 2 of Taku stacks too. Blackhole is not helpful as the decoys still count as bosses. But detonate him once the decoys vanish!
A possible tactic with Rowan, Reyna and Aden:
- round (boss summons decoys): booze, shield on Rowan and when possible summon Demon (or Drain).
- round: Taunt all, Celestrial Flare (later heal Rowan each turn) on real boss, Plaque all, Curse on real boss with Demon
- round: Pistol/Fury on the real boss, heal Rowan, Plaque all, Slash on real boss with Demon
- round: the decoys vanish, Fury, heal Rowan, Detonate.
- Repeat until the boss is defeated.
You obtain the Winter’s Song (Relic).
Chapter 4: A Storm is Coming Part 2
Items: Queen Avenni’s Shield (Quest)
Unlock the Hero Band, Book: Artisan and Steel in the item store.
You can take this city as a short cut to Telindra.
After you have broken out and defeated the guards, go upstairs.
You need a Bronze Key here so enter the only available room.
Defeat those lovers and proceed and clear until the next street.
Enter the first tower (you will need the Silver Key here) and go to the top.
Cross Roofs and obtain the Bronze Key.
In the basement of the 2nd tower you need the Silver Key.
In the southern house you need the Silver Key.
Return to the Prison building, unlock the meeting room and defeat all soldiers.
Note: talk to your “prisoners”.
Go into the next house and find 2 Greater Heal on the 2nd floor.
Leave and clear the street.
The restaurant is the building you need the Silver Key for.
Enter the sewers (right next to the restaurant).
There is a message written on the pillar infront of you.
Pull the lever and proceed to the first room.
Pull the lever to the south and the switch so that a ladder will appear in the room you just crossed.
Climb the ladder and avoid the blue trap.
Climb down the first ladder, take the Heal and pull the last lever (the bridge is ready now).
Evade the remaining blue traps via the ladders and reach the Ring of Purity.
Note: If you have trouble with the blue traps, you will find an Accessory later that will let you walk through them unharmed (Fireball Ring).
Now cross the new bridge, find the Elemental Earth and the door.
Boss Gremlin Commander: Get rid of the Gremlins with AoE and DoTs. The boss will call for reinforcements regulary. Single Hit attacks should be on the boss. When the boss prepares a move, interrupt it with Kick (You know that the Sleeping Powder doesn’t work on bosses).
Drops the Book: Tinker.
Find the Silver Key.
Unlock the door in the Sewers and gather Delicacy and Treasure.
Return to the town and unlock the restaurant kitchen doors as a shortcut to the two towers.
First unlock the basement of Tower 2 and find 2x Steel.
Then unlock the 1st tower and talk to Trepidanos to unlock the Warrior’s, Archer’s and Sorcerer’s Stone II.
Enter the house next to Trepidanos and unfold the ladder at the end for a shortcut.
Before you cross via the top floor of the toy shop, enter the house to the NE and find Elemental Fire.
Now you can either go north or west.
First head north and witness the event.
Plunder the treasury and obtain 2x Aquamarine and Ring of Flight.
Go further north and defeat the Tariqqi Elite.
Their bleeding is very effective, so perhaps get Reyna (Dispel, Heal) in for Arielle (you need the interruption skills).
Find the 3 Rubies and enter the Narab’s Manor (best through the west door).
You might possibly unable to pass the blue trap.
Defeat more Elite and pull the switch to disable the 1st blue trap.
Get past the red trap and pull the switch to disable the 2nd blue trap.
Go upstairs and find the Gambler’s Ring.
Pull the switch and disable the 3rd blue trap.
Enter the top floor, find Second Wind and pull the lever to disable the last blue trap.
Now you can get the Gold Key.
Return to the crossroads and turn west.
Enter the administration building and head upstairs.
Boss Rashim: Get rid of the Soldiers with AoE and Dots as the boss will lure your attacks. But beware when he cast reactive barrier or regen! Cast Shield as an AoE, keep healing (hope you can revive with heal already). Once the soldiers are defeated, it gets easier.
Chapter 5: Promises Part 1
Rashim joins the party.
Exit the inn and explore the town again.
In the treasury you can unlock the Ring of Endurance and find a Perfume and Treasure.
In the toy shop you can unlock Volatile.
Go near the 3 Star Colors between the towers to start the “Nadim Justice Force” side quest.
Meet them again at the prison and talk to the Grumpy Officer.
Thugs can be found in the house next to the toy shop.
Defeat them and obtain Sunlight (Relic).
Items: Delicacy
All other chests are empty.
Items: Spices, Perfume, Liquor
Talk to the Arena Master (star icon) to start fighting.
If you don’t proceed fighting, you have to start with round 1 again.
In the bestiary are some other possible mobs, but I never had those.
You will obtain a Greater Heal if you loose.
Note Slime Elemental: Can summon 4 Slimes which can split to 3. It gets easier when you focus your single attacks on it.
Items: Wine, Delicacy, Knowledge, Mana
The Fort is currently empty.
Find the 4 torches.
Items: Ring of Endurance, Elemental Fire
Stone Memorial x2: Just remember where they are.
Items: Delicacy
Items: Delicacy
You need the Bronze and Silver Keys, so go south.
Don’t underestimate the mobs and elite here.
The last hut is sealed with a barrier.
Currently you can only get some crafting materials here.
Items: Heal (inn), Elemental Earth (above inn), Elemental Water (harbor house), 2x Mana (harbor house), Treasure (North District house)
Rashim lives on the east side of town and will temporaly leave the party.
Unlock Greater Heal, Strong Wine and Supple Hide in the items store.
Talk to the Seamstress in the East District (house east of Rashim) to start the side quest “Unity”.
Enter Rashim’s house and he will rejoin the party.
Talk to his family.
Enter the castle.
Talk to the Administrator and then again to the Seamstress.
As Angelico is not reachable yet, proceed with the story.
Talk with the front desk manager in the castle.
If you are prepared talk to the manager again and choose to wait.
Take control of Arielle and talk to the guard with the icon to proceed.
Leave the castle.
Talk to the NPC guarding one of the houses and enter.
Natasha will join the party.
Talk to the ferry NPC (icon).
Chapter 5: Promises Part 2
Head south and witness the event.
Go nearer and get a clue.
Defeat the Pirates.
Proceed to the sealed door and enter.
After some battles, you will learn the team abilities Wither and Soporific Aura.
Avoid the red traps.
Enter the room and pull the lever.
Carefull, those traps have an irregular path.
Guarded by those traps is Silver and 2 Spices (disable the traps first).
The door is locked.
Check the corridors to the west and pull the lever to the SW.
To the west is a barred door, so head north into the water.
You need the Bronze Key.
Head south in the waterway and find a locked gate, Delicacy and a lever that will open that gate.
Reach the switch in the top NE corner to disable the red traps.
Behind the gate find the Bronze Key.
Unlock the Bronze Door and then the barred door.
Go downstairs.
You will leave at the west entrance of the pyramid.
For the next entrance you need the Silver Key.
Cross the bridge.
To the south you need the silver key.
Unlock the eastern pyramid and create a shortcut to the entrance of the dungeon.
Enter the south tomb with the Bronze Key and find the Silver Key.
Now you can unlock the gate to the center.
Enter the western pyramid with the Silver Key.
Boss the Silencer: its bleeding effects stack and it can stun the party. DoT like Degen is very effective. Drops Gold Key and Paladin’s Fire.
Unlock the golden gate to the north and reach the port.
Note: You won’t be able to return to Port Folio and the Evenheart Sewers once you proceed!
Try to surprise the pirates.
Cross the east tent to obtain the Treasure.
In the west tent find Silver.
South on the pier you will find Silver and Trepidanos.
You will unlock the Warrior’s, Archer’s and Sorcerer’s Stones II.
When your level is high enough (25) you will unlock the Empyrean Edge.
In the small tent find another Silver.
Enter the ships.
In ship 1 find Sparkling Wine, 2x Second Wind and the gunpowder storage.
Enter ship 2: Find the gunpowder room and this will be the ship you will escape with.
Enter ship 3: Find Reset Talents, Delicacy and the gunpower room.
On deck find 2x Heal.
You can reach the fort via the back exit of the 2nd ship.
Find Silver and 3x Volatile.
Reach the next map.
Prepare and go up the stairs in the tent.
Boss Selene, Lilly, Heavy Slim and Ratface Jim: Battle Focus will nullify taunt. In that case Rashim is the better choice. Disrupt her Cannon! Drops Book: Expert and 2 Silver.
Escape to the 2nd ship and defeat all pirates getting in your way.
Rowan, Corrina and Natasha are washed ashore.
Head north and find Arielle, Aden and Rashim.
Now you can either return to the beginning and then turn east or enter the cave.
East of your saviors find Sparkling Wine.
In the cave find 2x Second Wind, Elemental Water (first exit) and leave via the 2nd exit.
Find 3x Ruby, Treasure and the native NPC.
There is an path to the south (to Angelico) and the natives block the path to the NE.
To the NW are pyramids.
In the west pyramid open the chest and defeat the Pyramid Spirits to obtain Sorcerer’s Stone IV.
Also another chest containing 2x Elemental Fire will appear.
Repeat that in the east pyramid to obtain another Sorcerer’s Stone IV and 2x Spices.
Now head south to Angelico.
Items: Delicacy x4, Liquor x4, Mana, 2x Greater Heal, Perfume, Treasure (inn, roof), Wine
In the item store unlock Healer’s Ring, Warrior’s Band, Warlock’s Band and Silver.
Enter the Trading Company at the harbor to proceed the “Unity” side quest.
Buy and ship the fabric for 1000 Ducats.
Enter the Infirmary and talk to the receptionist.
Go upstairs and find Reyna.
There is a little change in the Harbor (orchestre).
Prepare and head into the inn.
Pay the 100 Ducats rent.
Talk to the girls.
Talk to Brooke.
Go on the roof and talk to the others.
Enter Brooke’s room.
Leave the room and unite with your party.
Defeat the 2 waves of pirates and go downstairs.
Send the innkeeper to the backroom and leave the inn.
Defeat all pirates (3 groups at the market place, 1 at the harbor)!
Confront Selene and her crew.
Climb down the ladder to board the ship.
You need a silver key so go below deck and meet Sparrow.
Take the Silver Key and return on deck.
Unlock the door and follow Selene.
Boss Selene, Heavy Slim, Ratface Jim and Lilly: same tactic as before. You obtain Elemental Spirit and 2 Silvers.
Follow Reyna and try to tell her about Sparrow.
Talk with the others and last with Natasha.
Set sail.
Chapter 5: Promises – Free World Exploration
Now that you have the ship “The Starwatcher”, you can travel to unexplored lands before you proceed with the main story at Fort Adara.
You can land ashore at docks.
You cannot cross bridges.
Items: Knowledge, Treasure, Delicacy
Find the Statue of Trepidanos.
Find the 4 torches.
Behind the door you will find a stone memorial.
You cannot enter the house with the boss or unlock the shed yet.
The blockade of the natives is gone and you can explore the NE part.
To the north is Rowan’s former home.
Enter the house and start the side quest “Squatters”.
Enter the boss’ hut.
Talk to Captain Fire-Eyes, take you weapons from the chest and leave.
Items: Knowledge, Delicacy, Treasure
Find the 4 torches.
Talk to the Seamstress and wait for the finished Unity Flag.
Deliver it to the Administrator in the castle and return to the Seamstress and pay the 500 Ducats fee for her.
You will be rewarded with Frostwall (Relic).
Items: Delicacy (hidden at the field), Liquor
Talk to the Woman claiming about the rain to start the side quest “Bless the Rains Down in Ardo Rita”.
Leave to the west and go south after the bridge.
Talk to the NPC there.
Investigate the fishes to find the Pirate Key (Quest).
Enter the house and search for the book.
Further west is another Stone Memorial.
Report to Captain Fire-Eyes and obtain the Captain’s Seal (Quest).
Get your weapons and leave.
With the Seal you can enter the locked shed.
Inside get the Poisoner’s Band, Gold x2 and Treated Silver.
Return to Rowan’s House and go upstairs.
Enter his parents’ bedroom and find Mother’s Locket.
Unlock the Ring of Death and an Achievement “Master Trader” (normally when you have unlocked all items).
Start the side quest “Aden’s Childhood”.
Proceed until you reach 3 paths.
Right: Find Gambler’s Ring.
Left: proceed (the middle is a dead end).
Investigate the door.
Visit all Stone Memorials (7 in total, see below) and return with the Keystones.
Boss Aden’s Father: He is a combination of the sins you have defeated. Drops Grandmaster: Warlock.
Pull the lever to leave.
Items: Knowledge, Delicacy, Liquor
Find the 4 torches.
Witness the event to start the side quest “War Hero”.
Talk to the female Looter to get some clues.
Travel further south.
Enter the cabin and read the diary.
Enter the cave.
First head further south.
Items: A Storm is Coming (Quest)
Talk to Trepidanos to proceed with the “Bless the Rains Down in Ardo Rita” and obtain the Lore Stone (Quest).
Talk to him again to unlock Fireball Ring, Warrior’s/Archer’s/Sorcerer’s Stone III, Book: Magicksmith, Treated Silver, Book: Master and Gold.
Talk to the Mysterious Man.
Boss Fallen Hero: He will summon his fallen allies at the beginning and near the end. Remember not to attack directly when he has cast Thorned Guard. His Mortal Strike can deal over 600 Damage. But he is totally beatable even with level 28 on expert. Drops: Grandmaster: Veteran.
Note: There will be a time you can visit him again in the Isolated Cabin.
Items: Liquor, Treasure x2, Perfume x2, Ring of Protect(ion) (weapon shop), Wine (a bit hidden), The Evenheart (Quest, storage)
Talk to the Pirate at East Northport to start the side quest “Port Manteau”.
Leave Northport to the south to find the Ring of Focus on the World Map.
Take the Fireball Ring and unlock the door.
Enter the hideout and witness the event.
The formerly empty chest now contains 3x Ruby.
You can enter via the front door
Further east on the World Map find the Lucky Trinket.
Further north is a stone memorial.
Island NW of Northport. You need to start the quest first to be able to enter it.
First climb to the top floor of the building to obtain the Bronze Key.
Cave to the east: Find Perfume.
Caves below the building (from the docks): Unlock the bronze door.
Proceed.
Boss Captain Iron-Tits and 3 Pirates: You cannot interrupt her as long as the other pirates stand in front of her.
Take the Cat’s Eye Ring, 3 Ruby, Sparkling Wine, Liquor, Delicacy and Grandmaster: Pirate.
You cannot enter yet.
Chapter 5: Stone Memorials and Promises Part 3
Defeat Pestilence and Despair. That is the worst combination of sins.
Defeat the Bosses Wrath and Despair: Don’t underestimate them and try to interrupt them!
You obtain the Keygem.
Defeat the boss Wrath and obtain the Keygem.
Defeat Pestilence and obtain the Keygem.
Defeat Despair and obtain the Keygem.
Defeat 2x Wrath and obtain the Keygem.
Defeat Pestilence and Wrath and obtain the Keygem.
You cannot enter yet.
NEXT STOP:
Items: Liquor
You start the side quest “Fort Ardana”.
Head south right after the bridge to find 2x Spices.
Proceed to the NW.
From the pass you have to ways south.
One to the far west and one before the last bridge.
South before the bridge find Liquor and the exit for the quest (Yanari and Forinya).
West of the bridge you will reach the exit to Peren Desh, Udingrad, Karinsway and Fort Wrath.
Report to Renata and obtain a Ring of Focus.
Items: Greater Heal, Wine, Battle Prowess, Perfume
You can bribe one of the Arkadian Soldier at the dock with 100 Ducats and then search for Admiral Terrin in the harbor master’s office (“The Port of Yanira” side quest).
Head to the slums in the west part of town to proceed the quest.
Report to Admiral Terrin and obtain Estoc (Natasha).
Items: Wine, Liquor, Armor of Sunlight (Quest)
Talk to the merchant to unlock the Ring of Sapping.
Note: Deliver the final piece to the museum of Riverton and obtain the Light of Empyrea (Relic) and unlock the “Mysteries of Rin” Achievement.
Items: Knowledge, 2x Greater Heal, Reset Talents
At the intersection you can go NW, Cave, SW and South.
Cave: Sparkling Wine
South: Delicacy, Templar’s Ring (World Map)
SW & NW: Head north to reach a hut with Fencer’s Band and Ring of Sapping.
Further west reach Orenad.
Items: Liqour, 3x Ruby, Delicacy, Knowledge, Wine
In the item store unlock Platinum.
There’s a Back Alley the 2nd street south from the east and east.
Start the side quest “The Rezkovs”.
Talk to the guard and then check the bronze door.
Check the cliff to the north to find a Orange Flower (quest).
A bit further south and west over a small bridge find the Yellow Flower (quest) near white stones.
To the south are flower pots and a bit to the west is the Blue Flower (quest) at a tree.
Put the Flowers in the pots and take the Bronze Key.
Unlock the Servant Quarters.
First get the Wine upstairs.
Cross the sewers to the west as well as the basement and kitchen.
To the west is Natasha’s mother.
Boss Diana Rezkov and 3 Rezkov Guards: She can cast Dispel, nevertheless use DoTs.
You obtain the Grandmaster: Spy.
Find a Ring of Focus on the World Map.
Items: Delicacy x2
You cannot enter yet but collect Elemental Spirit.
You cannot enter yet.
Items: Liquor x2, Delicacy x2 (not a snowman)
Notice the switch in the westernmost house.
A bit north of Karinsway.
Check the gate.
Question the NPCs.
Rumors: Girl in the inn…
Talk to the innkeeper and wait for Eva.
Pull the switch and follow the hidden path until the end.
Items: Reset Talents, Gold
Meet the other members from T’Kara.
Once you are prepared, talk to Commander Brenden in the left room.
Enter the meeting room in the middle.
Flee throught the basement and reach the cave.
Fight your way through and collect Liquor, 2x Spices.
Investigate the fire before you proceed.
Chapter 6: Behind Enemy Line
You will leave the area via the big gate you have seen before.
Pay the 100 Ducats bribe to proceed.
You enter without your weapons again.
Items: Wine x2
Unlock Ring of Shell and Ring of Protect in the item store.
Unlock the Achievement “Sparkly” when selling a Ruby.
One room in the Cross Weapon Manufactory is locked.
Enter the Registration Office next to the inn to proceed.
Go upstairs and talk to all your friends.
Follow Cross to the Cross Weapon Manufactory and enter the formerly locked room.
Talk to him to proceed.
Talk to Cross and you get your weapons back.
Items: Snow Hawk Pelt
You need the Bronze Key.
Enter the east house and via the basement you will reach a barred door.
Get out again and start surprising the patrols.
Notice that Rowan’s Booze has changed to Valor!
Beware the Elite here, they have very effective DoTs.
Enter the upper gate (you need the bronze key here) and pull the switch to open the lower gate.
You need the silver key, so proceed.
In the bad prison you will need the silver and gold key.
Leave the bad prison to the north and head west to check the other houses.
Help the family and leave through the back door in the basement.
You need a gold key to follow Viktoriya.
Check the west area and find 2x Aquamarine.
Clear the rest of the map and climb down the latter with the action key.
Obtain the Bronze Key and unlock the door.
Go outside and take care of the new patrol.
Unlock the house, unlock the barred door and enter the roof.
Gather 2x Aquamarine and enter the house next door.
Get the Tesla Coil in the garden and leave via the back door.
Reach Trepidanos and unlock Snow Hawk Pelt, Ice Bear Hide, Warrior’s/Archer’s/Sorcerer’s Stone IV.
Fight for the Vampiric Ring.
To the north you will meet the remaining crew of Selene.
Find the Treasure and head east.
Cross the house and enter the Imperial Castle.
Witness the event near the throne and ignore the front door.
Find the Aetheric Ring and Silver Key.
Leave via the front door and unlock the switch to open the gate.
Return and enter where the light comes out.
Unlock the door and go to the bad prison
Unlock the door to the good prison and free Gage.
You obtain the Gold Key and Gage joins the party.
Free all prisoners in the bad prison.
Return to the lighthouse Viktoriya went into and unlock the switch.
Enter the lighthouse, take 2x Second Wind 2x Heal.
Reach the top.
Boss Viktoriya: She will summon Demons. Your best choice of Team is still Rowan, Reyna and Aden.
Aden can summon his Demon, which will kill her Demon and then curse her.
Reyna should cast Dispel before the Degen stacks too much and she casts Detonation.
Rowan is out cold. Time for Gage to shine.
Take the shortest path to the boats.
Defeat 2 waves of Soldiers.
Go further and defeat another wave of Soldiers.
Talk to Lilly.
The Areas with 4 Torches are now activated when you have found all relics.
Frozen Forest, Island NW of Jena’an, Island south of Angelico and Fort Kahleen.
You cannot enter the other towns.
After some fights you will unlock the Team Abilites Spear of Arenthien and Thrill of Battle.
You will unlock the Achievement “Teamwork”.
Defeat the Soldiers and enter the Starwatcher.
Follow Corrina and join the wedding.
Talk to your friends and last to Natasha to set sail.
If you have saved the villagers or Yanira, you will find them below deck.
Once you set sail and each character wears a accessory, you will unlock the Achievement “Bling”.
You will trigger a conversation with Tom the Warlock/Spy when you carry the Lore Stone.
Note: please check the chapter “Eldritch Horrors” for the end game challenges.
You can land again in Yanari and cross the Forinya Forest.
Talk to the innkeeper to proceed the “Bless the Rain Down in Ardo Rita” side quest.
Head upstairs and talk to Tom.
Close the door while standing in front of it and pressing the action key.
Talk to Tom.
With the activated Lore Stone in Gage’s hands you can pass the whirlpool.
Tom has a clue: look for the differences.
- Rubble next to the coffins.
- Missing rune to the left side of the room.
- Torch to the right.
Go upstairs and climb up the ladder to the the balcony (nothing to do yet).
Head north into the next building.
Search again for diffences.
- Wooden signs.
- Stones in the rooms.
- Pillars upstairs
- Stone tablet upstairs
- Spider webs
Go upstairs and reach the statue.
Boss Arenithen and 3x Chosen One: The boss will stun/Bless/Degen or attack both friend and foe. Dispel when possible. When the 3 Chosen Ones are defeated, he will summeon 4 more (repeatly). Your party of choice should still be Rowan, Reyna and Aden! Aden has to cast plaque all each round! Reyna heals/revives and Rowan Taunts or uses the Party Ability with Reyna.
You obtain the Grandmaster: Warrior.
Finish the side quest and obtain the Grandmaster: Cannoneer.
???
Enter the mine below the mayor’s house and talk to Lilly to proceed.
Lilly, Heavy Slim and Ratface Jim will accompany you.
Return to the sewers and climb back into Evenheart.
Chapter 6: Behind Enemy Line Part 2
You are welcomed by Philippian Loyalists.
Boss Captain Stein and Philippian Loyalists: Change back to Rahim (!), Reyna and Aden! Rashim because his Lure is not affected by Battle Order: Focus. Take care of the Loyalists with Blackhole and Plaque.
Talk to all and then head to the castle.
Enter the throne room.
Boss Philipp and his Loyalists: Keep the party of Rashim, Reyna and Aden! Clear some mobs with Blackhole. Philipp’s poison will stack. Once be mob is defeated swap Rahim for Rowan (Kick) and taunt him.
Talk to all, especially those with icons so Gage and Rebecca will join Arielle.
Talk to Stein to proceed.
Enter the king’s chamber for an event.
Talk to the king’s bed and the barricades.
You can now enter the chambers of Arielle’s sisters for extra events when talking to the bed of her elder sister.
Change in Arielle’s chamber.
Enter the balcony.
Chapter 7: Written in the Stars
You obtain the Signet Ring.
Talk to the people in the throne room and main hall.
Philipp is really in the prison.
Leave the castle and start the side quest “Liberate Telindra”.
Talk to the citizen of Evenheart.
Clear the mobs from the Graveyard to the Main Hall.
Don’t forget the side entrances.
Head upstairs to the 3nd floor.
Defeat the last resistance.
You will unlock the Achievement “Patience” for clearing all side quests.
You obtain Grandmaster: Priestess.
Unlock the Warrior’s/Archer’s/Sorcerer’s Stone V.
In this dungen you will earn the most EXP, so you can unlock all remaining talents.
Demand entry.
Inside is Trepidanos and need a silver key.
Gather Elemental Earth, Elemental Spirit and go upstairs.
To the west find Elemental Water and Elemental Fire to the east.
Go upstairs.
Find 2x Aquamarine and Templar’s Ring and go outside.
Boss Kudrin and Templars: You can start with Rashim, Reyna and Aden until the Templars are defeated. Then either swap Rashim for Rowan or better Gage. Drops the Oath of the Templar.
You unlock the Achievement “Gear” for having all weapons.
You obtain the Silver Key.
Go downstairs and unlock the gate.
After the 2nd gate you unlock the Achievement “Beginning of the End”.
Proceed to the first cave.
Clear the cave but you need a silver key.
Proceed and clear the map.
In the middle is a building with a sealed chest and to the sides are 2 towers.
West Tower: Touch the orb and then defeat the Ancient Spirit.
Boss Ancient Spirit: it will summon different Tests like Magic Defense and Many (see bestiary). You have to defeat the Tests before you can hit the original boss again. Defeating the Test will damage the Ancient Spirit by half of its max. HP. You will also pass when Gage is still alive during Judement but then the Ancient Spirit won’t get damaged.
When you fail a test, you have do another one and hope you have survived.
Best fight those with Reyna, Aden and Gage.
East Tower: Repeat what you have done in the west tower.
Test of Magic Defense and Many are most likely the only tests you can win with that party on expert.
Test of Pacification: Shield only your taunter! This is the strongest Test of all.
Test of Power: Interrupt Doom (only possible with Rowan’s Kick)! Shield will block it!
Test of Control: Interrupting with Gage is possible. Taunt them and shield Gage! Revive him asap!
Test of Healing: Dispel is your main weapon here!
Enter the building in the middle and you see that you only need to pass one more test.
North Tower: Repeat what you have done in the other two towers.
Return to the sealed chest and talk to the Templar Spirit.
Take the Silver Key.
Go back to the cave and unlock the door.
Cross the next cave and reach Trepidanos.
Trepidanos will serve as a teleporter to the castle and back here.
If you still need to grind (or defeat the Eldritch Horrors, teleport.
Trepidanos Respawn Enemies is hidden under shops.
Go through the cave.
Talk to the Sages and Trepidanos is in the first left hut.
You can rest in the first right hut.
Try to enter the temple to proceed.
Your group will split to 3 Teams.
Team 1 is Rowan & Corrina. Rowan should wear the Tesla Coil and Corrina a Rouge’s Band.
Boss Sparrow and 23 Arkadyan Soldiers: You have to defeat all Arkadyan Soldiers before Sparrow will reveal herself.
As a first turn use Volatile and/or Elemental Fire!
Roland uses Taunt, Slash, Fury and when necessary the Team Ability.
Corrina should either attack the bleeding victims or use Death Blow.
Sparrows debuffs will stop you from using items and lowers your Max HP up to 9 times.
Each hit will be deadly then.
If you fall, you will stand up again 3x.
Thanks to the Relics and Tesla Coil you will deal damage to all enemies each round.
When you (most likely) fail to defeat all, Rowan will sacrifice himself to Sparrow.
If you manage to survive to the last 4 enemies, Sparrow will Assassinate you.
Team 2 is can be chosen of the remaining 6.
Boss Noraskov and Viktoriya: They will summon more Soldiers for battle. As long as Noraskov is protected by a Demonic Shield, you cannot harm him. And you can’t interrupt his or Viktoriya’s specials. Degen will harm Noraskov, so keep it up and remember to cast dispel before your own Degen stacks too much. Defeat Viktoriya first.
Boss Demonic Viktoriya: Your party is healed (Well, Corrina has a nasty debuff). The Demons Viktoriya summons are not counted as bosses, so Doom of Aden’s Demon will work. Viktoriya’s Doom should be dispelled ASAP. You can only interrupt the Demons.
If need is use Elemental Spirit to heal the party or Elemental Water to hit the boss hard.
Cast a Shield over the party when Viktoriya prepares her Unleash Fury!
If you have fought all battles at Expert difficulty you will unlock the Achievement “Master Tactican”.
Eldritch Horrors
Unlocked in Chapter 6 after your escape from Udingard once you have collected all Relics.
Stand between the now lit 4 torches.
Note: Please do that challenge near the end of game.
Boss Asketill: It has 3 turns per round and can petrify. Devour will kill a character doing 9.999 HP damage. Tremor Band is helpful.
Best party is Rowan, Reyna and Aden. A battle of Endurance and many Revives.
It will drop many EXP, but for Expert difficulty I recommend being level 40 already.
You obtain the Sword of Fire (Relic).
Boss Gudrun: Can attack between 3 and 6 times (bonus turns). Relatively easy as she only attacks the taunter or causes bleeding.
Best party is Gage, Reyna and Aden.
Drops the Heroine of Thunder (Relic).
Boss Ylva: Likes to bind your partymembers and buffing itself. She poisons and drains the HP of the party. Maul will hit pretty hard when buffed. Keep your Taunt and Degen active, as she can dispel herself.
Best party is Gage, Reyna and Aden.
Drops the Arrows of Ice.
Boss Nerthus: Summons Orb of Power, which is invulnerable so focus your skills on the boss. You have to deal more damage than it can restore the boss. Get rid of Demonic Blessing ASAP (latest at the 2nd stack).
Best party is Rowan, Reyna and Aden. Rowan because of the team ability and his Valor (3 stacks). Keep Degen auf maximum stacks and let Aden either cast blind or use an item in between.
Drops the Soul of a Dark God.
You unlock the “Empyrean Champion” for defeating all Eldritch Horrors.
Epilogue
Enjoy the credits.
Once you have unlocked Reyna, you can swap party members before each battle or 3 times per battle.
Why is Rowan anytime in the party?
Because he can taunt!
At least swap her in during boss battles for AoE Healing.
Against Humans: Rowan, Corrina and Arielle
Against animals and monsters: Rowan, Reyna and Aden
Boss Battles: Rowan, Reyna and Aden (at least on expert), summon the Demon for help.
Rashim can substitute Rowan.
She can substitute Corrina.
A fully new constellation will be a party of Rashim, Aden and Natascha, most effective at Angelico Island.
His time to shine comes after Rowan is disabled.
He cannot only substitute Rowan and Rashim, but partly even Aden.
Bestiary Chapter 1
Also are the loacation names in optional locations not accurate like the Forest of Evenheart lies in the Area of Tarindor if you only look at the mobs.
I won’t add the EXP/Ducats or HP to the Bestiary to keep it short and not to reach the character limit of the chapter.
Also the EXP/Ducats are affected by Passives and Accessories.
Bestiary Chapter 2
Bestiary Chapter 3
Bestiary Chapter 4
Bestiary Chapter 4 Part 2
Bestiary Chapter 5
Bestiary Chapter 5 Part 2
Bestiary Chapter 5 Part 3
Bestiary Chapter 6
Bestiary Chapter 6 & 7
Bestiary Chapter 7
Thanks to Firefly130984 for his great guide, all credit to his effort. you can also read the original guide from Steam Community. enjoy the game.