Have you attempted to move your existing world to a dedicated server, but could not quite figure out how? This guide will show you how to transfer the world files AND fix potential issues with moving character data. It also shows how players can keep their map information (what they’ve explored and any markers), which is stored on their computer.
Note: This guide was created by copygirl and tested for version 41.65.
Server: Transferring Config and World Files
First of all, locate your Zomboid folder.
- Windows: C:\Users\<username>\Zomboid\
- Linux: ~/Zomboid/
In the “Server” subfolder, you will find configuration files for each server or hosted game that you’ve set up. They will be named “<servername>.ini”, “<servername>_SandboxVars.lua” and so on. Copy or upload these files into the same location on the server.
Next, in “Saves/Multiplayer/<servername>” you will find all the world save information, which includes items, zombies, players, vehicles etc. Also copy or upload this folder to the server’s “Multiplayer” folder.
I do not recommend to change the server name in these files and folders – I have not tested what happens when you do. Certain database files refer to the server name so changing it could have adverse effects.
There is also a “<servername>.db” file in the “db” folder. This file contains login information for Steam accounts (when using the host option in-game) or user / password based accounts when hosting a dedicated server. Due to how Steam accounts are not compatible with user / password accounts, I recommend NOT including this file. More on this in the next section.
If you’ve previously used mods when hosting the game, you will have to tell the server to install the right mods from the workshop, or else you will get error messages regarding missing mods when starting up your dedicated server.
For this, open the “<servername>.ini” file in a text editor. In there you will find the following the following two lines, for example:
Mods=ModManager;modoptions;MoreDescriptionForTraits
...
WorkshopItems=
You will need to go to the Workshop to find the workshop ID (10 digit number or so) for each mod ID (such as “ModManager”) and place them in the “WorkshopItems” line. For the specified three example mods from above, this would look as such:
WorkshopItems=2694448564;2169435993;2685168362
When starting up the server without any special arguments, it uses the server name “servertest” by default, which might not be the same as you’ve used for your hosted game. To start the server with the correct server name, run it with the argument “-servername <servername>”. For example, on Linux, this would look as such:
cd ~/Steam/steamapps/common/Project\ Zomboid\ Dedicated\ Server/
./start-server.sh -servername ProjectBunny
Server: Fix Account Names in players.db
So why am I saying “might”? Actually, when you join a hosted game, the game will create an account for you locked to your Steam ID, and uses your current Steam profile name for the account name. When you log into a dedicated server, you have to specify a name and password yourself.
When you create a character, it will be bound to a specific username. Your Steam profile name on a hosted server or the account name on a dedicated server. When switching to a dedicated server, you have two options:
- Create accounts with the same account names as your Steam profile names. Due to the character being bound to the same name, everything matches up. This won’t work if you had special symbols in your Steam name, which you can’t type in-game.
- Fix up the names the characters are bound to, so the person logging into an account with a certain name will get a certain character assigned. This works even when creating new accounts after renaming the character’s username.
If every player from the old hosted server can create accounts with the Steam name they used, you’re lucky! You can skip the following step. Otherwise, you’ll have to get good and fix the problem. Here’s how:
If you still have your “<servername>.db” file in the folder “db”, I recommend to just rename or move it somewhere else. Doing this will clear out any existing account data, and require you to re-create a new admin account on the next server start.
Next, you will need to edit “Saves/Multiplayer/<servername>/players.db”. This file is in a non-text format called SQLite, so you will need a program capable of editing it. Here I’m using DB Browser for SQLite[sqlitebrowser.org] which is available for both Windows and Linux. I recommend making a backup copy of any file you edit just in case you screw something up. Screwing up could mean deleting your, or everyone’s game characters for that world.
Open the DB Browser program, click “Open Database”, and select your “players.db” file.
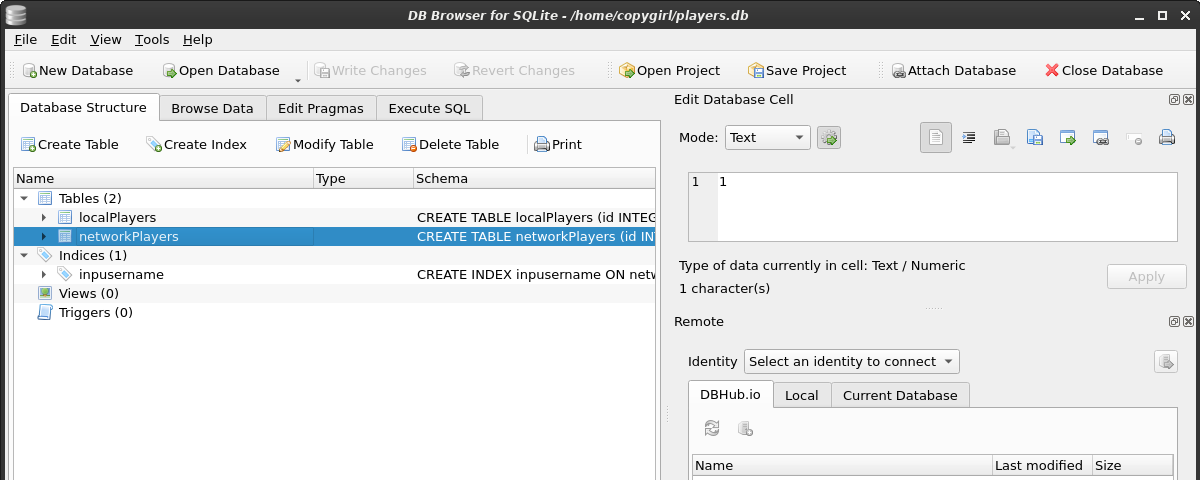
Right click the “networkPlayers” table and select “Browse Table”.

Here, you will find all the player characters in the world, the username (account name) they’re associated with, the name of the character itself, and much more. All you’ll want to change is the “username” column for each character (unless it’s already correct).
Select the username you want to change, and type in which account name you want it to be bound to. The next person logging in with the same account name will be logged into that character.
Finally, click the “Write Changes” button to save your changes to the file. (And upload to your dedicated server if necessary.)
Players: Transfer Map Information
This is because this information is actually stored on your computer, and not the server. And there’s currently no way for the game to realize that, after a server has been moved, the old and new server are actually the same.
To fix this, we need to transfer the map data from the hosted server over to the dedicated server. (Make sure you’ve logged into the new server at least once.)
First of all, locate your Zomboid folder.
- Windows: C:\Users\<username>\Zomboid\
- Linux: ~/Zomboid/
Go to the “Saves” subfolder, then “Multiplayer”. In here you’ll have one folder for each server you’ve joined. Hosted games will have the format “<steamid>_<servername>_player”. (This uses the Steam ID of the person who hosted the game.) Dedicated servers have the format “<address>_<port>_…”.
Once you’ve found the right folders, delete the files inside the dedicated server folder to which you want to copy the map information. Then copy the files from the hosted game folder into the dedicated server folder.
Thanks to copygirl for his great guide, all credit to his effort. you can also read the original guide from Steam Community. enjoy the game.
Related Posts:
- Project Zomboid: How to Create a Server on Linux
- Project Zomboid: The Bare Essentials to Start
- Project Zomboid: Guide to Maintenance of Weapons
Thank you. Helped me a lot.