Description of the functioning of all the current traps, guards and upgrades.
Introduction
I decided to visually show how they work.
I got most upgrades unlocked and tested, however most guard unlocks are still missing for me.
They do seem to overlap quite alot though!
Legend
They are as follows:
These squares will trigger the trap.

These squares are safe before and after triggering the trap

These squares will kill you if you are not moving (Or moving enough)

These squares could kill you depending on where you stand

These squares indicate where a guard can hear you jumping and running

Trap: Boltshot
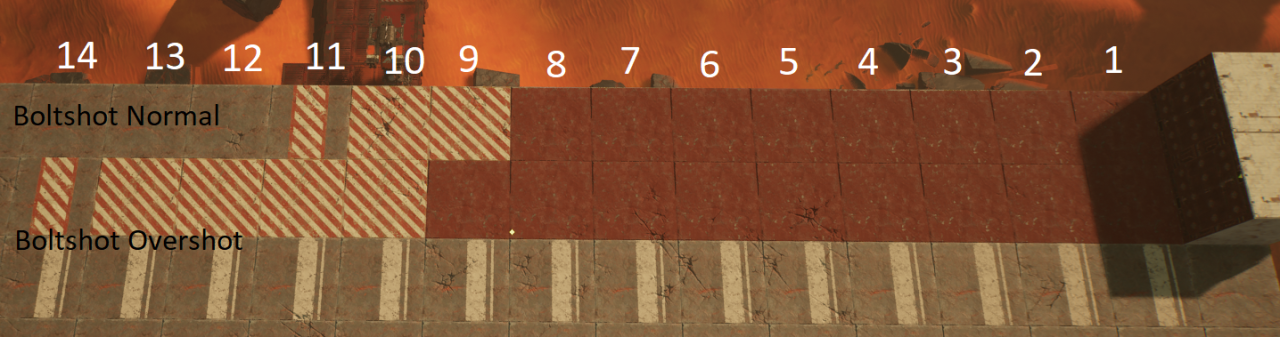
Activation Range: 8 Blocks in front (9 with Overshot)
Projectile Range: 10 Blocks in front (14 with Overshot)
Triggers: 1 Trigger (2 with Double Down)
Cost: 50 Resources
Mods:
-Overshot 15 Resources (Extend range by 1 and Projectile range by 3)
-Double Down 15 Resources (+1 Extra Trigger)
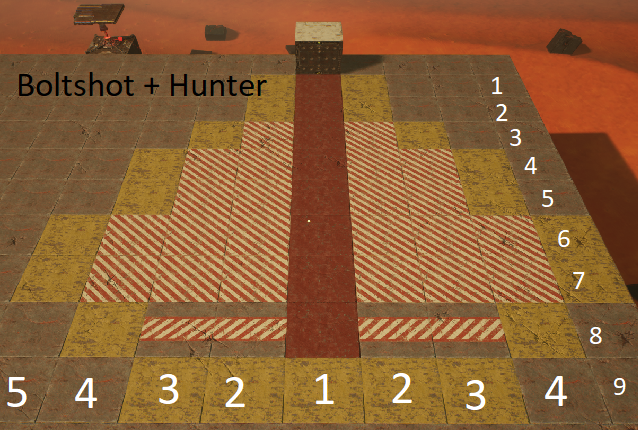
-Hunter 15 Resources (Will follow the player after being triggered)
-Second Wave 5 Resources (Will appear after the Genmat has been stolen)
Normal activation range versus activation range with Overshot.
Activation range with only the Hunter mod installed.
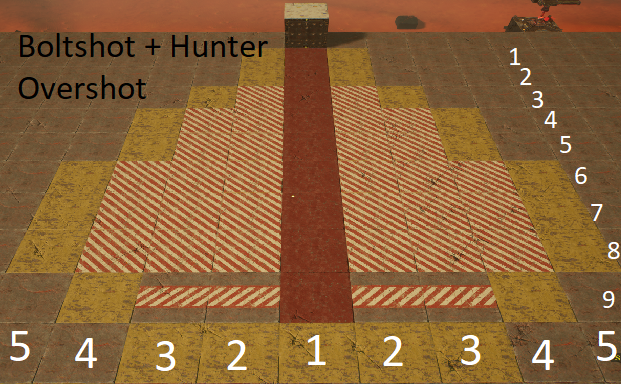
Activation range with the Hunter and Overshot mods.
Trap: Impaler
Activation Range: 1 Block in front
Projectile Range: 1 Block in front
Triggers: 1 Trigger (Infinite with Unrelenting)
Cost: 50 Resources
Mods:
-Self Destruct 10 Resources (Will explode after being destroyed)
-Blockade 10 Resources (Trap stays activated for 5 seconds from activation)
-Unrelenting 15 Resources (Trap will trigger until destroyed)
-Second Wave 5 Resources (Will appear after the Genmat has been stolen)
Activation range for Impaler
Trap: Iron Claw
Activation Range: 4 Blocks in front
Projectile Range: 5 Blocks in front in a cone shape
Projectile Speed: 3 seconds for 4 blocks (2,5 second for 4 blocks with a speed upgrade)
Triggers: Infinite until destroyed or the claw has been destroyed
Cost: 30 Resources
Mods:
-Double Down … Resources (Will explode after being destroyed)
-Greased Chains … Resources (Increase speed for pulling in by 0,5 second for 4 blocks)
-Quick Launch … Resources (Increase speed for grabbing by 0,5 second for 4 blocks)
-Second Wave … Resources (Will appear after the Genmat has been stolen)
Activation and Projectile range for the Iron Claw:
Trap: Death Piston
Activation Range: Periodicly activated
Projectile Range: 1 Block in front
Projectile activation time: 2 seconds idle and 1 seconds activation (3 second activation with Blockade)
Triggers: Infinite until destroyed
Cost: 70 Resources
Mods:
-Burning Piston 15 Resources (The sides of the Piston become lethal aswell)
-Blockade 15 Resources (Trap stays activated for 3 seconds instead of 1 second)
-Unstable 15 Resources (Trap will trigger for 1 second at random intervals)
-Second Wave 5 Resources (Will appear after the Genmat has been stolen)
Sidenote: Touching the front of the piston is always lethal.
Activation range for the Death Piston:

Trap: Incinerator
Activation Range: 4 Blocks in front (5 with Dragon Breath)
Projectile Range: 4 Block in front (5 with Dragon Breath)
Projectile activation time: Trap will fire for 5 seconds after activation
Triggers: Infinite until destroyed
Cost: 50 Resources
Mods:
-Dragon Breath 20 Resources (Increase activatrion and projectile range with 1 (5 total))
-xx
-xx
-Second Wave 5 Resources (Will appear after the Genmat has been stolen)
Normal activation range versus activation range with Dragin Breath.
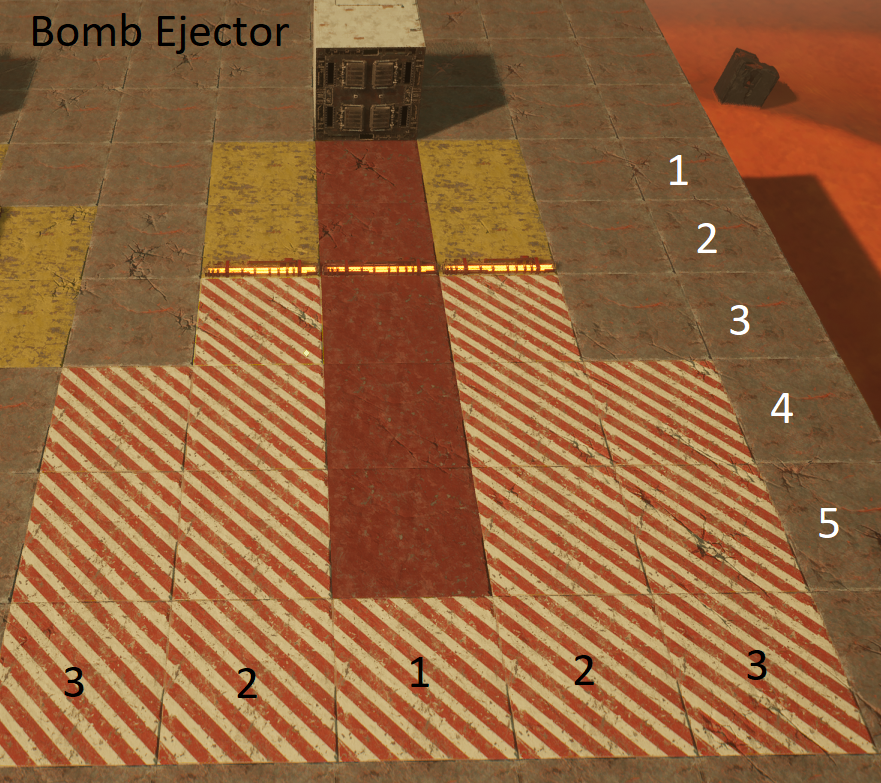
Trap: Bomb Ejector
Activation Range: 5 Blocks in front (7 with Eagle Eye)
Projectile Range: See overview down below
Projectile Speed: Heavily dependent on surrounding environment and orientation
Triggers: 1 Trigger will drop 8 bombs
Cost: 70 Resources
Mods:
-Eagle Eye 20 Resources (Increases activation range by 2 (7 total))
-Chaos Bombs 20 Resources (Bombs will bounce further than normal depending on surrounding environment and orientation
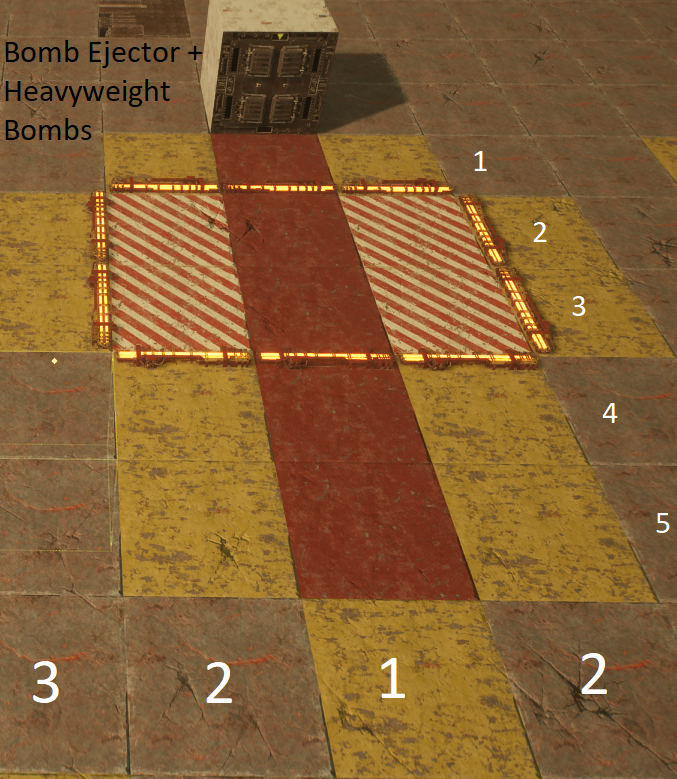
-Heavyweight Bombs 20 Resources (Bombs will bounce less than normal depending on surrounding environment and orientation)
-Second Wave 5 Resources (Will appear after the Genmat has been stolen)
Sidenote:
-Bombs do not collide with the player.
-Bombs can be deflected or shot.
-Due to the bombs being unpredictable, below overviews are an aproximate indication.
Normal activation range versus activation range with Eagle Eye.
Activation and Projectile range for the Bomb Ejector:
Zone where bombs drop indicated by Lights
Activation and Projectile range for the Bomb Ejector + Heavyweight Bombs:
Zone where bombs drop indicated by Lights
Activation and Projectile range for the Bomb Ejector + Chaos Bombs:
Zone where bombs drop indicated by Lights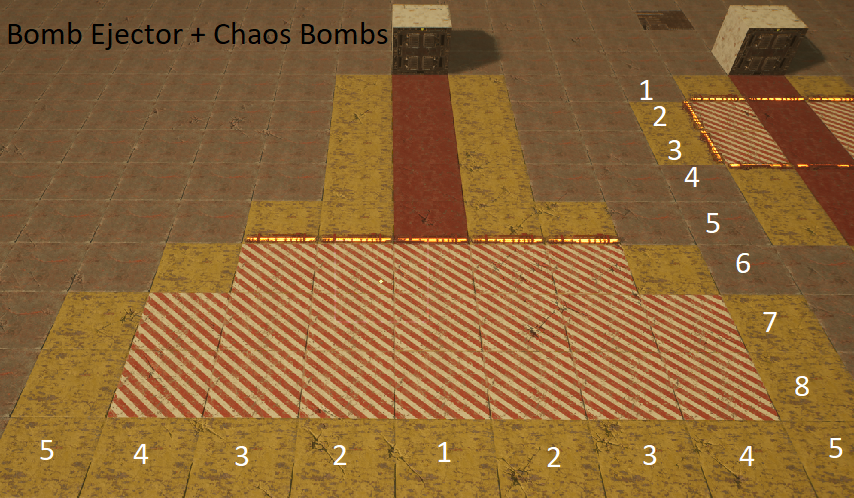
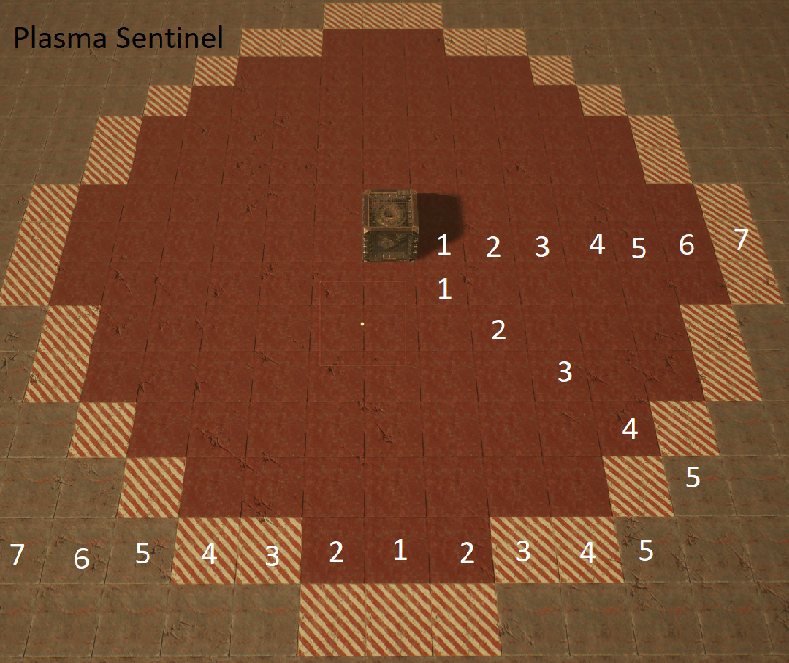
Trap: Plasma Sentinel
Activation Range: 6 Blocks from any side, 4 diagonal. (8 From side and 5 Diagonal with Eagle Eye)
Projectile Range: Infrinite after being fire in a straight line
Projectile Speed: 4.5 blocks per second
Triggers: infinitely until destroyed
Cost: 50 Resources
Mods:
-Eagle Eye 15 Resources (Increases activation range by 2 (7 total))
-Plasma Cloud 15 Resources (A ball of plasma 1 block big will linger on impact for .. seconds)
-Self Destruct … Resources
-Second Wave 5 Resources (Will appear after the Genmat has been stolen)
Plasma Sentinel Activation Range:
Plasma Sentinel + Eagle Eye Activation Range:

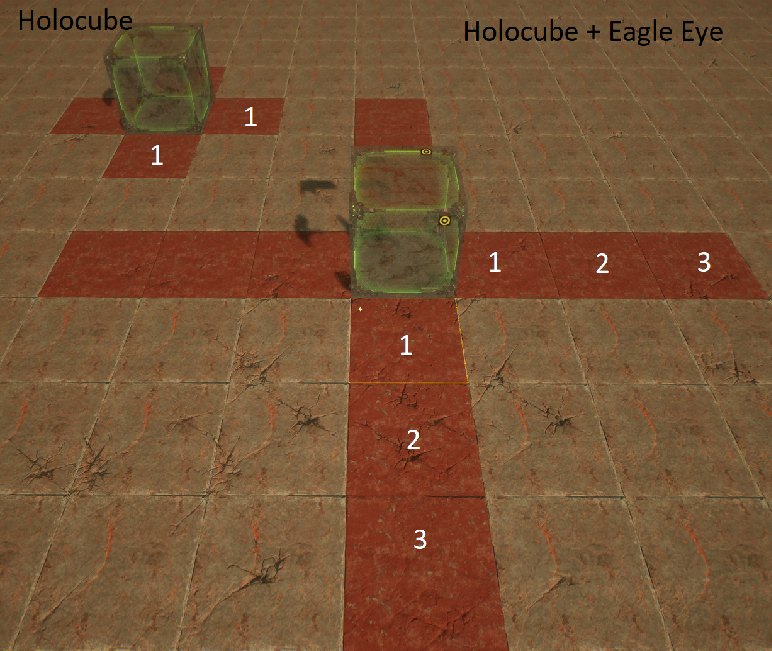
Trap: Holocube
Activation Range: 1 Block from any side. (3 From any side with Eagle Eye)
Triggers: 1 Trigger
Cost: 10 Resources
Mods:
-Eagle Eye 5 Resources (Increases activation range by 2 (3 total))
-Masquerade .. Resources
-… Resources
-Second Wave 5 Resources (Will appear after the Genmat has been stolen)
Sidenote:
-Explosions and weapons will also trigger the holocube.
-Guards can pass through the holocube without triggering it.
Holocube Activation Range:
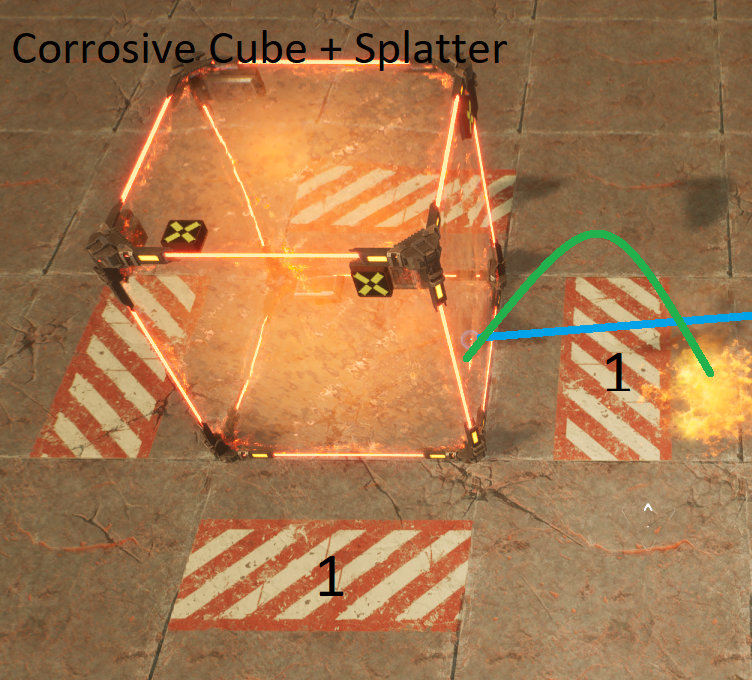
Trap: Corrosive Cube
Activation Range: None
Triggers: Triggers constantly when inside the cube
Cost: 15 Resources
Mods:
-Splatter 5 Resources (Creates a puddle of acid on the floor, 1 block away from the side it was struck)
-Hardened Skin 5 Resources (Object cannot be pierced or entered)
-Opaque 5 Resources (Object cannot be seen trough)
-Second Wave 5 Resources (Will appear after the Genmat has been stolen)
Sidenote:
-Guards cannot aim or trigger through the cube.
-A single cube can be grappled through safely.
-When using the second wave mod, traps can activate through this cube.
Corrosive cube Splatter activation range:
Guard: Enforcer
Activation Range: 7 Blocks forward (10 with Optical Implant)
Hearing Range: 6 Blocks backward
Projectile Range: ……
Fire Rate:
Cost: 50 Resources
Augments:
-Adrenal Converter …. Resources (Increase movement speed by …..)
-Reflex Manipulation …. Resources (Increase fire rate by ….)
-Bloodlust … Resources (Will rush to battle when other guards in range are engaged)
-Optical Implant … Resources (Increase field of vision by 3 blocks)
-Short Leash 15 Resources (Guard will stay within 1.5 blocks from patrol path)
-Dead Man’s Switch 15 Resources (Guard will explode on death)
-Plating 15 Resources (Will add armor that deflects Plasmabow and Fury’s Edge, otherwise will take extra hit when hit on armor)
Normal activation range versus activation range with Optical Implant.
Difference indicated by Lights

Bloodlust hearing range:
……
Guard: Warmonger
Activation Range: 7 Blocks forward (… with Optical Implant)
Hearing Range: 5 Blocks backward
Attack Speed:
Cost: 50 Resources
Augments:
-Adrenal Converter …. Resources (Increase movement speed by …..)
-Reflex Manipulation …. Resources (Increase fire rate by ….)
-Bloodlust … Resources (Will rush to battle when other guards in range are engaged)
-Optical Implant … Resources (Increase field of vision by 3 blocks)
-Short Leash 15 Resources (Guard will stay within 1.5 blocks from patrol path)
-Dead Man’s Switch 15 Resources (Guard will explode on death)
-Plating 15 Resources (Will add armor that deflects Plasmabow and Fury’s Edge, otherwise will take extra hit when hit on armor)
Normal activation range versus activation range with Optical Implant.
Also hearing Range indicated.
Bloodlust hearing range:
……
Guard: Cannonback
Activation Range: 7 Blocks forward (… with Optical Implant)
Hearing Range: 5 Blocks backward
Attack Speed:
Cost: 70 Resources
Augments:
-Adrenal Converter …. Resources (Increase movement speed by …..)
-Reflex Manipulation 20 Resources (Increase fire rate by ….)
-Bloodlust … Resources (Will rush to battle when other guards in range are engaged)
-Optical Implant 20 Resources (Increase field of vision by 3 blocks)
-Short Leash 20 Resources (Guard will stay within 1.5 blocks from patrol path)
-Dead Man’s Switch … Resources (Guard will explode on death)
-Plating 20 Resources (Will add armor that deflects Plasmabow and Fury’s Edge, otherwise will take extra hit when hit on armor)
Normal activation range versus activation range with Optical Implant.
Also hearing Range indicated.
Bloodlust hearing range:
……
Guard: Hornet
Activation Range: 7 Blocks forward (… with Optical Implant)
Hearing Range: 5 Blocks backward
Attack Speed:
Cost: 70 Resources
Augments:
-Adrenal Converter …. Resources (Increase movement speed by …..)
-Reflex Manipulation …. Resources (Increase fire rate by ….)
-Bloodlust … Resources (Will rush to battle when other guards in range are engaged)
-Optical Implant … Resources (Increase field of vision by 3 blocks)
-Short Leash 20 Resources (Guard will stay within 1.5 blocks from patrol path)
-Dead Man’s Switch … Resources (Guard will explode on death)
-Plating ….. Resources (Will add armor that deflects Plasmabow and Fury’s Edge, otherwise will take extra hit when hit on armor)
Normal activation range versus activation range with Optical Implant.
Also hearing Range indicated.
Bloodlust hearing range:
……
Thanks to Reddie Systeem for his excellent guide, all credits belong to his effort. if this guide helps you, please support and rate it via Steam Community. enjoy the game.
Related Posts:
- Meet Your Maker: Outposting Guide for Beginners
- Meet Your Maker: Beginner’s Guide (All You Should Know)
- Meet Your Maker: How to Beat “Killboxes”