This guide is mainly for assistance with the games basics and mechanics. I’m not going to go into builds or optimisation in this, as I suck at those, and will let other people who are actually good at number crunching post those instead. This is mainly for help with early game, and is more for general information purposes.
S P A C E M A N S G U I D E T O D E I C I D E
Now this is very important. Most things in this game give you some basic info if you hover your mouse over them, so I recommend checking them out like that if you’re a bit confused on some things.
SECTION ONE: THE FIRST SCREEN AND BASICS
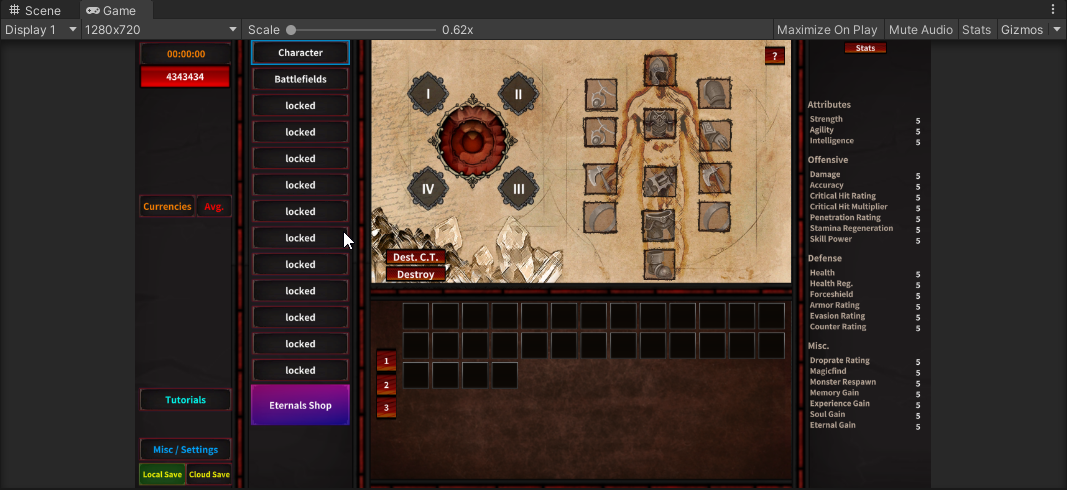
On the first column on the left, in descending order, you have:
– The time since your last rebirth (will cover those later)
– Your health and forceshield total.
– Under that is the currencies box. That tells you the average of each main currency you get per second, and is EXTREMELY IMPORTANT FOR OFFLINE GAINS. If it is red, it means you don’t have an average yet because you haven’t been running for at least a minute. If it is red, you don’t get offline gains. If it’s green, you’re all good to go.
– Tutorials/Misc & Settings/Save are all pretty self explanatory.
This is where the fun stuff can be found. The first section, your CHARACTER menu, is where you can customize your skills, equipment, and later on, do some crafting and such to get even stronger.
In the top left corner there’ll be a big ol red thing with some diamonds around it. The large red thing in the middle is your HEARTCORE. This isn’t too important for now, but as you progress through the game, it will passively fill, getting you bonuses to various stats.
The diamonds around it are your SKILLS. You only start with one unlocked, and you gain more as you progress through the game. If you click on the skill, it will open a skill tree. As you use the skill it levels up and you get SKILL POINTS. (I recommend spending your first 10 points on the first node, as it makes your attack hit a second target. Absolutely invaluable)

To the right of that is your EQUIPMENT LOADOUT. You put equipment here to get TOUGH and also DEADLY. It is one of the main ways of getting stronger, and you’ll get plenty of delicious loot to fill those slots up.
Underneath that is your INVENTORY. This is where dropped items go.
To the right is your STATISTICS BAR. This is where you find the final total of each of the main stats. You can hover over these stats for an explanation as to what they do.
You have now mastered the currently unlocked content of the Character menu, and are one step closer to murdering some pesky gods.
You’ve got all this knowledge now, and the burning desire to use it to slaughter helpless critters. Luckily for you, the second tab, BATTLEFIELD, allows you to do just that.
SPAWN AREA
When you first start the game, you’ll be resting in the Bound Throne. No enemies spawn here, this is the safe zone to heal up if you get KO’d. Read the Big White Writing, and follow those instructions to get to the next area and start FIGHTING! While you passively beat the crap out of slimes, I will explain the part beneath.
HUD
This is your HUD:
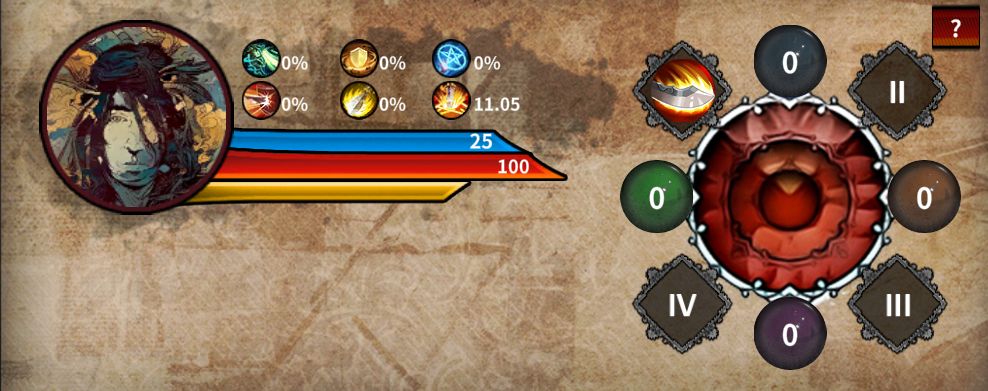
Click on the big face. Do it. I dare ya. Click it again. Hey look it’s Jones. This is just aesthetic and doesn’t do anything, but you can change your face and unlock more later.
Right beside the face, there are three bars. The BLUE bar is your Forceshield, which acts as a secondary health bar that takes damage first. The RED bar is your health. If it hits 0, you die. The YELLOW bar is your Stamina. When that hits max, everything else dies 😄
Above those, you’ll find some symbols and %s. These are your main secondary stats, and will be explained in depth a bit later. Don’t worry too much about them now, except the final one. The final one is your DAMAGE, you want that number be b i g.
To the right is your heartcore again? Cool. That’s a surprise tool that’ll help us later. The skills around it expand a bit when used, which is helpful later on when you have more. The orbs store your generated CHARGE POINTS. You also don’t really have to worry about them now, and will be elaborated on in my COMBAT GUIDE later on.
(P.S. Check your inventory. I bet you have some sweet sweet loot by now.)
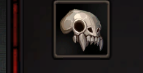
The bar on the right has a picture of a skull. Creepy. Hover over it. Read the info. As you go through areas, these will drop. When you destroy them in your inventory, you get some points that fill up the Current Level bar at the bottom of the hover. When that reaches level 100, you get the benefits that are in red. Every 100 levels above that, up to a maximum of 600, you get +2% awakening bonus, which will also be explained later.
By now, you probably have some better gear. You should equip it, if you haven’t already. If you’re unsure what stats to look for, I’d recommend focusing on Damage, Health, and Health Regen at the start. You can diversify more once you have more options and build potential later on, but for now, those three are key.
To the sides of the area name, Ancient Depths, you’ll see some arrows. Click the one on the right. You’re now in Ancient Depths 2, and the enemies are stronger. However, they drop better loot too. Keep progressing through the areas you can, equipping better gear, until you can get to Ancient Depths 10. Once you can beat this area, you unlock the next area, AND some cool new features!
![]()
SECTION TWO: COOL NEW FEATURES
The first tab we unlock is the AWAKENING menu. This is the main Prestige Mechanic, and is how you will increase a lot of your many, many numbers. We’ll look at the initial tab, also called AWAKENING, first.
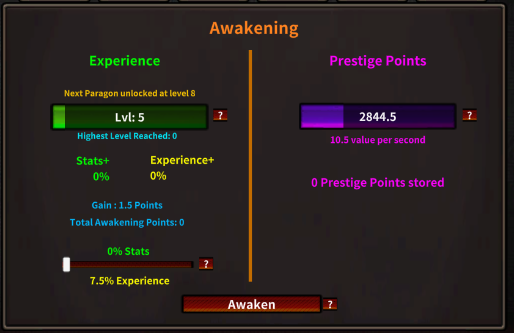
The main part of the screen is taken up by the EXPERIENCE and PRESTIGE POINTS sections. In the EXPERIENCE section, you’ll see a green bar that fills up from kills. This is your experience meter, when it’s full, you get a LEVEL. Levels influence a few things, mainly the amount of AWAKENING POINTS (AP) gained from Awakening, and your highest level reached gains you PARAGONS to spend in the PARAGON tab.
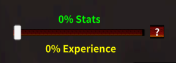
Underneath the experience meter, you’ll see a slider with STATS, EXPERIENCE, and some awakening points stats. You gain AP each time you awaken, and you can use them to either gain a 1% stat multiplier per point, or a 5% exp multiplier per point. By moving the slider from left (exp) to right (stats) you can change the balance of how the AP is used. This does not spend AP, instead it chooses where the AP is being used.
(I normally leave it at halfway to balance them equally because I’m lazy and can’t be bothered changing it each awakening, though I have no idea if that is optimal.)
To the right, you will see the PRESTIGE POINTS section. You gain PP based on your current area and stage each second, and when the meter is full you gain additional PP upon awakening. This PP can be spent in the UPGRADES tab. The total unspent PP you have can be seen in the top right corner. Just below this is the timer for how long you’ve been in a run, and beside that is a toggle to reset your PARAGONS when you awaken.
Now, onto the act of Awakening itself. When you Awaken, you will reset your highest area reached, your current level, and some other things from features unlocked later. However, you will also gain AP, PP, and the stored stats in your Heartcore will be added to your actual stats.
Each % towards stats on the slider influences your Damage/Health/Health Regen/Forceshield. They each get the full bonus no matter what. Above that, you will see a list of 6 stats, with checkboxes beside them. These stats can also be affected by the AP bonus to stats, however the total bonus is divided between them all. So if you select 3 of them they will each get 1/3rd of the total AP bonus. This does not affect D/H/HR/FS gain, which ALWAYS get the full bonus. I recommend only ticking droprate initially, as that is the most important one at this stage, and should likely always be ticked, as it is always important to have.
Alright, now we’ve gone through the main awakening tab, time to check out the UPGRADES. This is where you spend your PP. It’s pretty self explanatory, you spend PP there to upgrade your stats, unlock helpful features, etc. Get the Early Damage and Early Health first.
Head towards the PARAGON menu. This is my favorite part of the game. This is your massive skill tree, full of nodes that can change your build from complete trash to sub-optimal. I’m not going to go into what builds are optimal, because all of the ones I use are stupid niche ones designed to gives Jones headaches. However, as stated earlier, Damage, Health, Health Regen are all good early game. (ignore my build, it’s whack)
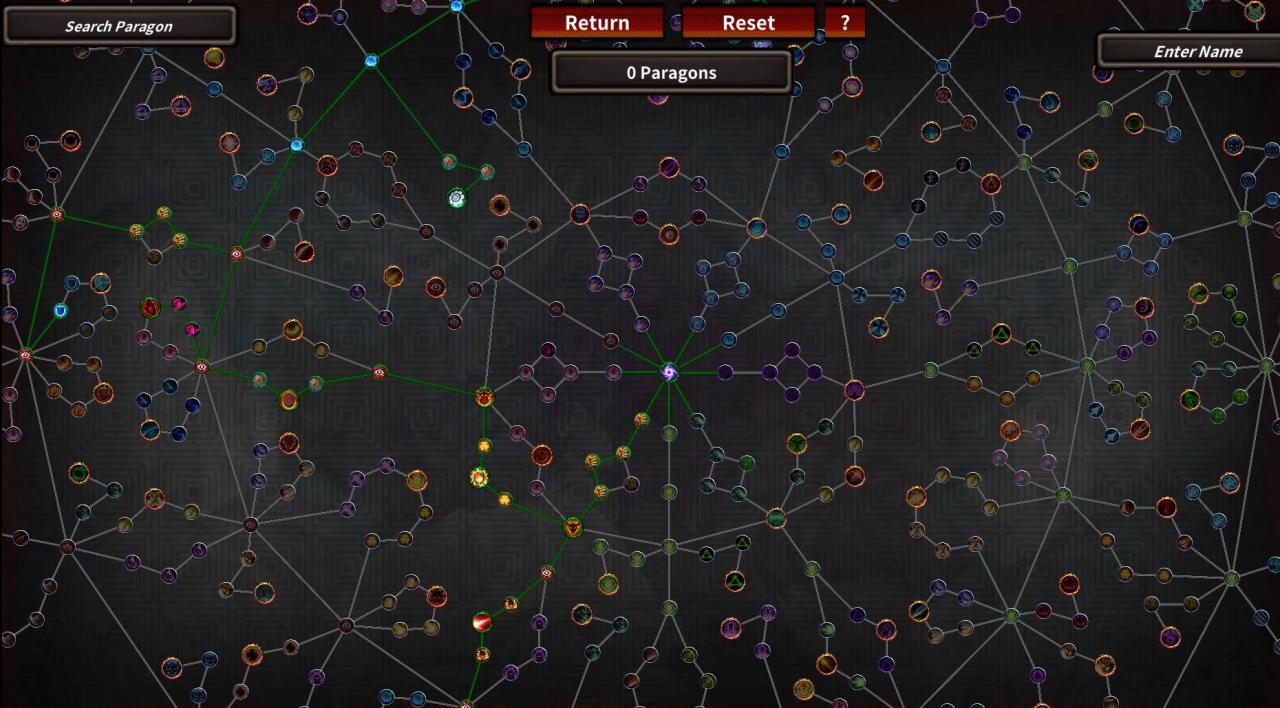
You gain PARAGONS through various means, though at the early game it will mainly be from reaching milestone highest levels in the AWAKENING menu. You can also buy some from the ORIGIN store, explained next. These Paragons are used to unlock nodes in the Paragon Tree. You need to purchase a node to unlock any connected to it. Pretty simple in execution, the complexity comes from the builds that this allows you to make. Again, I’m not gonna talk about builds, because I suck at optimizing. Check the discord for some theorycrafting on that.
Paragons are locked in once they are purchased until you awaken, and can only be reset by selecting the Reset Paragon toggle in the Awakening tab initially.
The final tab we’ll explore is the ORIGIN menu.
Here you will see some tabs up the top, ORIGIN, PERMANENTS and PERMANENTS 2. More tabs will unlock as you progress, but these are the important ones for now. Primarily the important one is Origin. Permanents and Permanents 2 are (mostly) way too expensive for you right now, with a couple of exceptions.
Right, so to the ORIGINS tab. You gain memories from killing enemies, and for reaching 100 in each of the different areas ARTIFACTS. As with gear, Health, Health Regen, and Attack are the best ones to invest in, though buying some Paragon Points can be helpful if you’re a point or two away from a big node. Ignore Soul stats for now, that gets unlocked later, and is a waste of memories to buy now.
So pretty simple, you get memories from killing, and you spend them in here. Bouncing over to the PERMANENTS tab quickly to end this segment, Basic Item Filter is very helpful. It lets you select rarities to automatically destroy on pickup, which stops your inventory filling with low rarity trash.
Do some awakenings, increase your stats through the various ways unlocked, and go fight in Balazans when you’re strong enough. Once you’ve cleared Balazans Stand (you’ll need to beat the final stage 5 times in a row without dying, this is the norm for all areas after the first), come back if you’re unsure of what to do, and move onto the next part of the guide
SECTION THREE: THE POWER OF THE SOUL

Congratulations, you’ve now unlocked Eternal Foundry! By beating Balazans Stand, you unlock a couple of new features. SOULCORE and FATES are now unlocked, and you’ll notice a purple bar filling up underneath your health/forceshield bar, in the top left corner.
First, I’ll explain the new resource. Unlike Health and Forceshield, Soul isn’t related to battle directly. It regenerates over time, up to your current Soul Cap, and you gain 1 Soul every time the purple bar fills up. You gain a higher Soul Cap from killing enemies, and purchasing it in the new tab in the Origins section. Soul is used for many different things, but initially you will only use it for Soulcore.
Second, onto the SOULFORCE tab in the Origins menu. Here you will see purchasable Soul stats. Soul Cap increases your base Soul Cap, Soul Refill increases how fast your Soul refills upon Awakening, and Soul Power increases the effect of Soul in its various uses. Underneath that you have Soul Speed. This increases the speed that the purple bar fills up, and at 40, you gain your soul refill every tick. I recommend purchasing this pretty quickly, at least getting it up to 20, before you get any of the other Soulforce Upgrades.
Finally, when you Awaken, you will lose all your accumulated Souls, but once you beat Balazans Stand you will be able to access them again. After you have unlocked Souls for the first time however, they will continue to accrue in the background, ready to be used once Soulcore is unlocked again.
Now that you have Soul, you need to use it on something. And luckily, you have unlocked a nice new feature called SOULCORE. Initially, only the BATTLECORES will be unlocked. These are where you utilize your Souls initially.
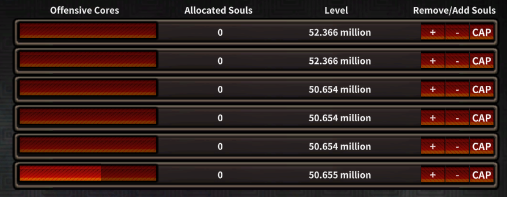
There are two types of Battlecores, OFFENSIVE and DEFENSIVE. Each of these has 6 different cores you can invest Soul into, with each one increasing the Soul required to cap it by a magnitude of 10. By investing Soul into any of these cores, you will increase the level of it by 1 every time the bar fills up.
Each core has a maximum amount of soul that is needed to cap it out, making it fill 20 times every second. When fully capped, the battlecore just appears as a solid bar. This cap can be lowered by increasing your soul power, and incrementally lowers each time the bar is filled. You can use the cap button to the right of each soulcore bar to add the maximum effective amount of soul to increase the fill per second.
![]()
You’ll also notice a new section under the purple soul bar with INPUT VALUE: 1. This is used to change the input of any numerical value. For instance, if you put 1000 into it, and click + on one of the battlecores, you’ll be able to add 1000 Soul to a battlecore at a time, instead of just 1.
Do you like Gatcha? I like Gatcha. And Jones was kind enough to put some Gatcha in the game, to give me that sweet sweet dopamine rush that pulling a good reward entails. In Godsbane, the Gatcha system is called FATES. This is pretty simple, every 23 hours you can draw a new fate, and get a bonus from it! Pretty neat.
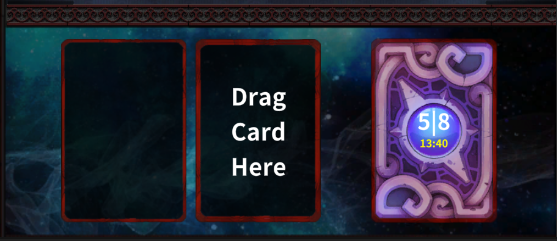
As you draw more fates, you will open up higher tiers of unlockables, and the lower tiers will increase in value as well, so make sure to draw whenever you can. You can initially only have one Fate stored at a time, but there are upgrades in the Eternals store that let you hold multiple fates, if you are going to be away for days at a time.
When the timer is up, the Fates menu will be highlighted in blue. That means it’s time to draw a card! Drag a card onto the middle area, and it will reveal itself, disappointing you when you draw the worst result every single time. Have fun!
This is more of a fun little bonus and doesn’t particularly make you stronger, instead giving you some free Eternals, and eventually, some boosters that you can use.
And with that, the Balazans Stands unlocks have been explained. Power onwards, get stronger, and beat Eternal Foundry to get to the next part of the guide!
SECTION FOUR: ASCENSCION
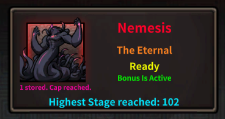
The first thing we will check out is the SERAPHIM menu. You’ll notice that there is only one thing unlocked, a creepy looking tentacle monster called NEMESIS. You can fight this whenever you want, but you can only gain rewards from killing it every two hours. Every twelve hours, you get bonus rewards as well when you kill it. This is the first major boss of the game, and fighting it is integral to progression.
When you enter the Nemesis fight, you keep fighting stronger and stronger versions of him until you either die, or run out of time. You gain more time with each kill, so it’s unlikely you’ll be timed out unless you have a massively focused defensive build. Once you’ve ended the Nemesis fight, you’ll gain a few types of rewards.
First, you’ll gain BOOST CRAFTING RESOURCES, and various types of SHARDS. These are used in CRAFTING, and will be covered later on in this segment. You’ll also extract some DIVINITY, which is used in APOTHEOSIS, which I will cover now.
The only thing that can kill a God is another God. So it’s time to ascend, using the APOTHEOSIS menu to turn your DIVINITY into tangible power.
When you open the Apotheosis screen, you will see 3 main sections. At the top are a bunch of stats with 0/500 and +/- buttons beside them. You will gain GOD POINTS over time, and can invest them into these stats as you see fit. You can freely add or remove them, so feel free to play around with them until you find a balance you like. Each point invested gives diminishing returns, though you build them up fairly quickly once you gain some more Divinity.
How do you gain God Points, you ask? In the middle of this screen, is a large face, with two red bars on each side. Once these bars fill up, you gain another God Point, though each God Point takes longer than the last to gain. The left bar tells you the total amount of energy needed to fill, and how much you currently have, while the right bar tells you how much energy you are gaining per second, and how long it will take to gain another GP.
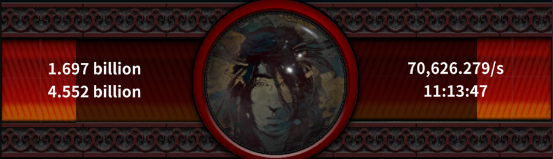
The amount of energy gained each second is equal to the amount of Divinity you have, so make sure to kill Nemesis as often as you are able to.
At the bottom, you’ll see a bunch of Soul Stuff, and the Divinity you gained from killing your Nemesis. By investing your Divinity into the SOUL stats, you can increase their power, granting you more Soul Cap, Power, and Refill respectively.
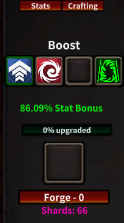
Your gear probably sucks, and you probably hate it. If you don’t well thats fine, future you will hate it because future you has upgraded it to make it better. Using CRAFTING!
If you go back to the CHARACTER menu, and look to the right where the stats tab is, you’ll see another option there, CRAFTING. There are four sections, but only three of them are important right now. The first is where you use the BOOST CRAFTING RESOURCES gained by killing Nemesis. By dragging a piece of equipment into the box, you can FORGE it for a cost of shards, increasing all stats on it by 5% per forge, up to 100%, pretty simple. By forging an item up to 100%, you gain a small bonus to all stats.
The next section is where you use the various TYPE SHARDS that you gain from killing Nemesis. By dragging a piece of equipment into the empty box, you can imbue it with a specific additional stat once you have gained some shards of its type. E.G, by dragging a weapon in, and selecting One Handed Damage, you can imbue the weapon with extra One Handed Damage. These stats show up as Orange, and only one type can be on any piece of gear at a time. Each time you forge the new stat onto the piece of equipment, you gain 10% of the total possible value, up to 100%.
Last is the EXTRACTION and EXCHANGE. With extraction, you can remove the boost from any previously upgraded equipment, destroying the item and getting an EXTRACTION ORB. This can be used to upgrade a different item if you find a better one, though with a few caveats. First is that Orbs extracted from Weapons can only be infused into other Weapons. Second is that you can only infuse the orb into items of the same level or lower.
Exchange is fairly simple, you can exchange some of the specific type shards for a different type at a 10:1 ratio. Not the best exchange rate, but if you have a bunch of shards that are completely useless to you, you can gain some better ones instead.
Thanks to tycanor for his great guide, all credit to his effort. you can also read the original guide from Steam Community. enjoy the game.