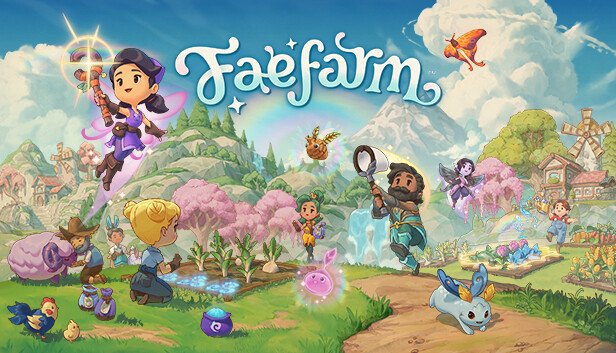
This guide is a full achievement guide for Fae Farm, with all 35 achievements.
Introduction
Missable
 … And Spit Back Out
Get pulled underwater…
At the beginning of the game, there are whirlpools in the sea in the south part of the map. Simply swim to the whirlpools and you will get pulled underwater and thrown back onto the island.
Story

Azoria Beckons
Complete the First Chapter of the Story.

A Thorny Situation
Complete the Second Chapter of the Story.

Calm Sailing
Complete the Third Chapter of the Story.

Open the Gate!
Complete the Fourth Chapter of the Story.

Clear the Air
Complete the Fifth Chapter of the Story.

Search for the Hairy Grell
Complete the Sixth Chapter of the Story.

Flaming Hot Completos
Complete the Seventh Chapter of the Story.

Fae Farmer
Complete the Final Chapter of the Story.
Skills
 Break Net Speed
Catch 2 or more critters with one swipe.
Some critters are easier than others, snails are slow but may not spawn together. I tended to find a lot of Fireflies spawn in twos and threes in the Fae Realm when you unlock it by progressing the story.
 Miner 49er
Pick and Collect 400 Minerals
Minerals include all the metals and gems you mine in the dungeons, of which there are three.
 Lumberjack
Chop and Collect 400 Logs
Chopping trees with your axe will provide logs. Areas have different hardness of wood which require an improved axe from Cinder. You can also buy Beech and Oak saplings from Willow in the main market square.
 Got to Catch Them All
Catch 500 Critters
Just catch 500 critters with your net. You can purchase improved nets from Mel which are required to catch some later game critters.
 Rumble in the Jumble
Smash 500 jumbles.
Jumbles are the enemies inside the dungeons. Use your staff to defeat the jumbles.
 Fanatical Farmer
Harvest 500 Vegetables.
Plant vegetable seeds into soil beds. You can buy seeds from Holly in the market square and you can also craft seeds from harvested vegetables using the Garden Bench which you can place on your homestead.
 Angling Authority
Catch 200 Fish
Just catch 200 fish with your fishing rod in any body of water. You can purchase improved fishing rods from Eddy which are required to catch some later game fish.
 Oui, Chef!
Cook 200 Meals.
You can cook a variety of meals from vegetables, berries, nuts, etc. You can cook simple meals on the basic cooking fire and more advanced meals using the Cooking Hearth.
 Skilled
Bring one Skill to Level 20.
Different skills are easier to level up depending on how you play the game. Bear in mind though, that you will need to get all skills to Level 20 for 100% achievements, not just one. Here’s a list of the ways to get XP for each skill:
- Mining – mining ores, gems and stone in dungeons. You will get more XP from the endgame ores and gems than the ones at the beginning of the game.
- Logging – chopping trees. You will get more XP from the endgame trees than the ones at the beginning of the game.
- Farming – planting seeds, watering and harvesting.
- Fishing – catching fish. Rare fish that have a small glow effect give more XP.
- Foraging – harvesting berries, mushrooms, grass
- Critter Catching – catching critters. Rare critters that have a small glow effect give more XP.
- Animal Care – petting, brushing and collecting the resources from each animal. There are 6 different animals you can get, of which you can have 3 of each.
- Cooking – cooking meals on the cooking fire and cooking hearth, preparing ingredients at the food prep table
- Potion Brewing – brewing potions at the Potion Brewing Cauldron. You won’t unlock this until you enter the Fae Realm during the main story.
- Magic – defeating jumbles in dungeons with your staff
 Very Skilled
Bring all Skills to Level 20.
See tips above for this achievement.
Collectables
 Humble Collector
Find 50 Scattered Scrolls.
Scattered Scrolls are small items that are placed on the floor across the game map that reward you with decorations, furniture, fencing etc when picked up. They are pretty easy to find, just make sure you explore a lot around the map. There are some hidden behind boulders which you’ll unlock a way to break near the end of the game. There are some inside the buildings in the town so check every one of them. You can also find some further into sea in the south part of the map on some small islands.
 Scattered Scroll Scrounger
Find 100 Scattered Scrolls.
You’ll be very near the end of the game when you find 100 scrolls. I wouldn’t worry too much thinking you’ve missed some, you unlock a lot of them during the end game as you unlock new areas and staff abilities.
 Beach Comber
Collect 200 Shells and Coral Along the Beach.
The beach is on the south side of the island, You can collect the sand dollars, ammonites, corals, etc. I don’t think the edible shellfish count though. The shells respawn on the beach every few days, so you can just sleep if you want to progress this quickly.
 Cloverfield Island
Gather 100 Wild Four Leaf Clovers.
After you complete the main story, you will find little areas of green clovers around the map, accompanied by a rainbow. Each of these spots will have a small number of Four Leaf Clovers for you to collect, and they’ll respawn after a few days.
The locations are:
- The area directly north up the ramp above your starter house
- The area east from the previous location on the road to the Wisp Mother in the Mysterious Grove
- The Mysterious Grove have a couple small spots on the left and right side
- The area just west of Verdant Valley
- A small area to the west side of the map. Follow the bridge out of town in front of the waterfall and you’ll eventually hit the boulder, unless you’ve already cleared it. Just south of that is the clover spot
House
 House Proud
Have Your First House Fully Upgraded.
You will unlock 4 houses in total throughout the course of the game. You only need to fully upgrade your starter one. You can upgrade your house by talking to Aspen in the market square about “Carpentry Services”. It will cost money and some materials. Your fully upgraded house will have the main center room, a left room, a right room and an attic.
 Captain of Cozy
Have a House With Maximum Coziness.
When inside your house, you can see your coziness rating. You will need to craft and place every piece of furniture that increases the comforting, relaxing and inspiring ratings. There are 10 items in each category. You will gradually unlock new materials as you progress the story that will allow you to build the next set of furniture. You should try and do these as you go as they increase your health, energy and mana, which will make the game a lot easier.
Other
 Bramble Breaker
See That 50 Thorns are Destroyed.
When you first obtain your staff by progressing the story early on in the game, you will be able to clear paths blocked by purple thorns by hitting them with your staff. Just find 50 thorns around the map and destroy them.
 Mist Walker
See That 30 Shade Clouds are Chased Away.
You’ll unlock your first spell, Vortex, for your staff by progressing the story. You will have seen black clouds around the map; there are a lot of them just east of your starter house. Use the Vortex spell with your staff and it’ll make the black clouds disappear. Do this on 30 clouds for this achievement.
 Botanical Breakthrough
Harvest a Hybrid Flower.
You can breed a hybrid flower by planting two different colour flowers adjacent to each other and having an empty flower plot available for the new flower to grow. You can buy flower seeds from Rosalind east of the market square.
The easiest way I found to do this:
- Place four flower soil beds in a 2×2 square
- Plant a red rose seed in the top left plot
- Plant a white lily seed in the bottom left plot
- Water both and wait some days until they breed
 Higher Tax Bracket
Earn 100,000 Florins
The most expensive items to sell are the polished gems you can craft from the rough versions in dungeons. I wouldn’t wast too much time focusing on this achievement until you’ve at least unlocked the third dungeon as those gems are the most valuable. Some food items also sell for a decent amount but not as much and is more hassle than just mining. You can make 10,000-20,000 by selling the endgame polished gems on the market tables in one day. Just make sure you are selling the polished versions which you create at the Gem Polisher.
 Azorian Anniversary
Witness a Second Year in Azoria.
Thankfully, there are only 28 days in each season, so 112 days instead of 365. Once you finish the first 112 days and enter Year 2 in the calendar, you will get this achievement.
 Chatty Neighbor
Make Friends with 10 Azorians at a time.
You can see your relationship level with all the Azorians in the game by going to Relationships in the quick menu. The Azorians in the Romance column do not count for this achievement. You can increase your relationship level with each person just by talking to them every day. There are multiple stages of friendship: “Stranger” → “Aquaintances” → “Friends” → “Good Friends” → “Great Friends,” but you only need to have 10 Azorians “Friends” at the least. Just make sure to talk to people as you run past them.
 I Now Pronounce You…
Get Married.
There are a certain list of people you can romance and marry, listed under the “Romance” column in the Relationships screen. Similar to the Chatty Neighbor achievement, talking to them increases their relationship level. You can also give them gifts to increase it faster. You will go on several “quests” together and eventually get married.. just be prepared to hand over a decent chunk of money to get this achievement 🙂
Here are the Azorians you can marry:
- Argyle
- Jack
- Nhamashal
- Pyria
- Galan
- Pepper
 Right Tool For the Job
Fully Upgrade your Tools
You can upgrade your tools by talking to Cinder, providing some money and the ingots of the required metal. You will unlock each new level of the tools by mining the ores in the dungeons, made available by progressing the main story.
 Giving the People What They Want
Complete 10 shipping contracts.
At some point in the main story, you will be pointed to the Shipping Contracts board in front of Jade’s shipping warehouse. These contracts can be fullfilled by providing a certain amount of items. You can do 2 contracts every season so as long as you do them every time, you’ll get this achievement about halfway through the second year.
Workaholic – Part 1
 Workaholic
Complete all the Job Quests.
This is the big one. At some point during the main story you will unlock Job Quests from a select number of Azorians that correspond to your skills. You need to complete all job quests from every Azorian. I’m not sure if this is a bug, or the achievement description is just misleading, but I also needed to complete the extra task listed on the “Achievements” tab. For example, for Fishing you need to catch every fish in the game in addition to all the other tasks listed in the “Jobs” tab.
Fishing
You can catch fish in the sea, ponds and rivers using your fishing rod. You can make it easier to catch some fish by buying an upgraded rod from Eddy and cooking some meals that boost your fishing skills, like Crab Cakes.
Jobs:
- Catch 2 freshwater fish
The freshwater fish are those in ponds and rivers. - Catch 2 saltwater fish
The saltwater fish are those in the sea south of Azoria. - Catch 1 rare fish
Rare fish have a glowing circle around them, just keep walking along the shoreline and rivers until you see it. - Catch 2 Fae Realm fish
Follow the main story until you unlock the Fae Realm. There is a river in the north side. - Catch 1 rare Fae Realm fish
Same thing as before, just look for a fish that’s glowing in the Fae Realm. - Catch 2 mountain fish
Follow the main story until you unlock the mountain area in the north east. There is a river in the north-east side that leads to the waterfall near your starter house. - Catch 1 rare mountain fish
Same thing as before, just look for a fish that’s glowing in the mountain area. - Catch 2 deep sea fish
There is a bridge above the entrance to the Saltwater Mines dungeon, and then a broken bridge to the left of that. Jump over that broken bridge and follow the steps down. You can catch deep sea fish from this spot. - Catch 1 rare deep sea fish
Same thing as before, just look for a fish that’s glowing. - Catch 2 seafood creatures
You’ll need to have unlocked the bash spell for your staff by progressing the main story so you can break boulders that block paths on the map. Go to Eddy at Stay-A-While Bay. Head south-west into the sea and you should find a small island with a pier. The fish here are seafood creatures. - Catch 1 rare seafood creatures
Same thing as before, just look for a fish that’s glowing. You might have trouble catching this depending on your fishing level, so you can cook a meal like Crab Cakes to increase your fishing proficiency. You can also upgrade your rod by buying them from Eddy.
Achievement: Catch all 42 different fish
Open the Almanac and head to the Critters & Creatures section, then Fish and Shellfish. You need to get all fish here except the last row, the shellfish do not count for this. Each fish that you haven’t caught gives you a clue of where you can find them and during what season if applicable.
Critter Catching
You can catch critters using your net. You can make it easier to catch some critters by buying an upgraded net from Mel.
Jobs:
- Catch 10 bugs, butterflies and bees
Catch any critter using your net by getting near them and swinging when the blue glowing effect is shown. Some critters require to sneak by holding the button otherwise they will escape and disappear. - Catch 10 frogs and critters with shells
Critters with shells include crabs that spawn on the beach and snails that appear on the paths and grass outside of the main town. - Catch 2 critters with one swing!
Doing this will also trigger the Break Net Speed achievement. As mentioned for that achievement, fireflies tend to spawn in groups of 2s and 3s, especially in the Fae Realm. - Catch 3 rare critters
Like fish, rare critters have a glowing effect around them. - Catch 6 fae buddies & bloblins
You will unlock the Fae Realm during the main story. The fae buddies are the little ground critters and the bloblins are the bouncy blobs with horns. - Catch 6 fae wisps & sprites
The wisps are and sprites are the floating critters that disappear briefly when you swing your net at them. - Catch 6 rare fae critters
Just keep walking around until you see glowing critters. - Catch 8 snowflake & stone critters
You will unlock access to the Mountain area in the north-west area of the map during the main story. Any critters in the snowy area will count. - Catch 8 amber and cinder critters
You will unlock access to the Volcano area during the main story. Any critters in the volcano area will count, but I also had some critters in the snowy area near the entrance to the volcano count towards this. - Catch 8 rare mountain critters
This might take a little while and multiple days of wandering around the mountain area. The idea is still the same as before though, just keep walking around until you see glowing critters.
Achievement: Catch all 62 critters (lifetime)
Open the Almanac and head to the Critters & Creatures section, then Critters & Creatures. You need to get all critters here. Each critter that you haven’t caught gives you a clue of where you can find them and during what season if applicable.
Mining
You can mine ores and gems in the 3 dungeons across the map. Some ores and gems will not be able to be mined until you’ve upgraded your pickaxe by providing ingots and money to Cinder.
Jobs:
- Mine 8 pieces of coal
During the main story you will unlock access to Saltwater Mines. There are three dungeons in total, each having 25 levels. Saltwater Mines will have coal throughout the dungeon, it’s the black coloured rock. - Produce 8 polished citrine
You can mine Rough Citrine, a yellow gem, in the Saltwater Mines. You will need 80 Rough Citrine and then process them into 8 Polished Citrine using the Gem Polisher. - Mine 8 pieces of copper ore
Copper is the first metal ore you will come across in the Saltwater Mines. - Produce 8 polished topaz
You can mine Rough Topaz towards the end of Saltwater Mines. Again, you will need 80 and then process them in the Gem Polisher. - Mine 8 pieces of iron ore
You can mine Iron Ore in the second half of Saltwater Mines. - Produce 8 polished amethyst
Rough Amethyst is the first gem found in the Floating Ruins in the Fae Realm, which you unlock during the main story. Again, process them into polished versions. - Mine 8 pieces of feyrite ore
Feyrite ore can be mined in the Floating Ruins. - Produce 8 polished emerald
You can mine Rough Emerald towards the end of the Floating Ruins. - Mine 8 pieces of silver ore
Silver Ore is located in the Floating Ruins as well, being the last metal type in the dungeon. - Produce 8 polished ruby
Polished ruby is the first new gem found in the third and final dungeon, the Scorched Caverns, unlocked during the main story. Again, process them into polished versions. - Mine 8 pieces of orichalcum ore
Orichalcum ore is the first metal ore localed in the Scorched Caverns. - Produce 8 polished diamond
Rough Diamonds is the final gem in the game, located in the Scorched Caverns. - Mine 8 pieces of gold ore
Gold ore is the final metal ore in the Scorched Caverns.
Achievement: Refine all 12 crystals at least once
The following rough gems need to be processed into polished versions using the Gem Polisher, some of them will have already be done during the job quests.
- Citrine
- Peridot
- Aquamarine
- Topaz
- Amethyst
- Rose Quartz
- Sapphire
- Emerald
- Ruby
- Garnet
- Diamond
- Obsidian
Workaholic – Part 2
There are 3 sets of vegetables: the basic vegetables you can buy seeds for from Holly, the seasonal vegetables of which there are 4 seasons, and the fae vegetables. Seasonal and fae vegetables require the use of magic crop swap fertilizer to initially grow until you can craft their own seeds.
Jobs:
- Harvest 30 vegetables in one day
You can buy vegetable seeds from Clover in the market square. Plant the seeds into basic soil beds on your homestead to grow and harvest vegetables. Don’t forget to water them every day! - Make florins selling 40 vegetables in one day
If you plant 40 vegetables instead of the 30 needed for the previous job, you can sell them all for this job. You will need to buy the Produce Stand from Pearl at the Merchant’s Guild. The market stands will take 32 vegetables in total and the Produce Stand will sell another 8. You’ll find it near your house after purchasing it. - Harvest 12 seasonal vegetables
In order to grow seasonal vegetables, you need to plant the normal vegetable seeds and use Magic Crop Swap Fertilizer, which can be bought from Holly at the market to crafted at the Garden Bench. - Use Zippy Fertilizer 12 times
Zippy Fertlizer can be crafted at the Garden Bench or bought from Holly. Use it in the same way as the Magic Crop Swap Fertilizer from the previous job. - Harvest 12 of potatoes
You can buy potato seeds from Holly but you’ll need to achieve Farming Level 10 beforehand. Plant and harvest other vegetables until you’ve levelled up enough. - Craft 12 pickled vegetables
You will need to craft the Artisan Table and Food Prep Table to unlock the recipe for Pickled Veggies. Prepare Chopped Vegetables at the Food Prep Station and then use them to craft Pickled Veggies at the Artisan Table. - Harvest 12 fae crops
When you unlock the Fae Realm in the main story, you will eventually get access to another homestead. In order to grow fae crops, you need to place normal vegetable seeds into basic soil beds and then use Magic Crop Swap Fertilizer to change them into fae versions. Alternatively, you can grow fae crops at your main home outside of the Fae Realm by using fae soil beds. - Craft 12 fae seeds
After harvesting the fae crops from the previous job, you can craft seeds for those crops at the Garden Bench. - Make florins selling 48 fae vegetables in one day
You’ll need to have 2 produce stands to have space to sell 48 fae vegetables at once. Just fill both produce stands and all market tables to total 48. - Harvest 12 seasonal grains
At Farming Level 15, you can buy corn seeds from Holly. You’ll need to harvest seasonal versions of these by planting corn with Magic Crop Swap Fertilizer.
Achievement: Harvest all 38 crops (lifetime)
You’ll need to plant and harvest all basic crops, as well as the seasonal and fae versions.
Cooking
Meals can be cooked at the cooking hearth, but the majority of them require being prepared at the Food Prep Station or Artisan Table in order to have the necessary ingredients.
Jobs:
- Forage 8 wild greens
The wild greens change with each season, but they are the plants that grow near grass and are edible. - Prepare 5 salads
There are a few different salads you can craft. The ingredients need to be processed in the Food Prep Station and then crafted into salads in the Cooking Hearth. - Prepare 5 meals with shellfish
Shellfish can be found along the coastline amongst the shells. Prepare them into Sliced Shellfish at the Food Prep Station and then craft a recipe that uses it, like Shellfish Chowder. - Prepare 5 meals with fish fillets
Fish fillets can be prepared at the Food Prep Station from any fish that you catch from fishing. Then just craft any recipe that uses it, like Steamed Fish. - Prepare 5 meals with mushrooms
There are a decent amount of mushrooms in the Spooky Woods. Process them into Sliced Mushrooms and craft any recipe with them. - Prepare 5 meals with nuts and berries
The Spooky Woods also has nuts. Berry bushes appear in most places around the map. Process Mixed Berries and Chopped Nuts at the Food Prep Station and craft a recipe like Trail Mix. - Forage 8 flavorful fae forageables
Once you’ve unlocked the Fae Realm, forage edible plants like Violet Jellycaps and Cloudtop Boletes. - Prepare 5 meals with fae veggies at the cooking hearth
Grow some fae veggies on your farm by placing basic veggie seeds into soil beds in the Fae Realm, or fae soil beds in the home realm. Harvest and use them to craft recipes in the cooking hearth. - Prepare 5 meals with seafood
You’ll need to have unlocked the bash spell for your staff by progressing the main story so you can break boulders that block paths on the map. Go to Eddy at Stay-A-While Bay. Head south-west into the sea and you should find a small island with a pier. Catch these seafood with your fishing rod and prepare them into Chopped Seafood at the Food Prep Table. Craft any food from the Chopped Seafood like the Crab Cakes. - Prepare 5 pies
You can craft Jumbleberry Pies by preparing mixed berries, sugar and butter at the Food Prep Station and then flour at the Artisan Table. - Forage 8 mountain berries, mushrooms and greens
This is easy, just harvest from a couple berry bushes once you’ve unlocked the snowy mountain area in the north-west part of the map. - Prepare 5 meals that enhance your performance
Some meals enhance your performance such as Crab Cakes that increase your reeling power. Any meals that increase performance list the benefits in green when you view them in the crafting menu.
Achievement: Cook all 5o meals (lifetime)
You’ll need to cook all the meals from the Cooking Hearth.
Logging
You can chop trees using your axe. Some trees will not be able to be chopped until you’ve upgraded your axe by providing ingots and money to Cinder.
Jobs:
- Produce 8 beech lumber
Craft a Lumber Station and use it to craft Beech Lumber from Beech Logs after chopping down their trees. - Craft 1 decor items using beech lumber
Inside your home, craft a decor or cozy furniture item that uses the beech lumber from the previous job. - Produce 8 oak lumber
Craft Oak Lumber from Oak Logs after chopping down their trees. - Craft 1 decor items using oak lumber
Inside your home, craft a decor or cozy furniture item that uses the oak lumber from the previous job. - Produce 8 flutterwood lumber
In the fae realm you’ll find flutterwood trees. Craft flutterwood lumber from flutterwood logs after chopping down their trees. - Craft 1 decor items using flutterwood lumber
Inside your home, craft a decor or cozy furniture item that uses the flutterwood lumber from the previous job. - Produce 8 sporewood lumber
In the Floating Ruins dungeon, you’ll find some sporewood trees. Craft sporewood lumber from sporewood logs after chopping down their trees. - Craft 1 decor items using sporewood lumber
Inside your home, craft a decor or cozy furniture item that uses the sporewood lumber from the previous job. - Produce 8 ancient lumber
In the mountain area to the north-west, the first tree type you will come across will be ancient trees. Craft ancient lumber from ancient logs after chopping down their trees. - Craft 1 decor items using ancient lumber
Inside your home, craft a decor or cozy furniture item that uses the ancient lumber from the previous job. - Produce 8 frostwood lumber
Further into the mountain area to the north you’ll find the final tree type called frostwood. Craft frostwood lumber from frostwood logs after chopping down their trees. - Craft 1 decor items using frostwood lumber
Inside your home, craft a decor or cozy furniture item that uses the frostwood lumber from the previous job.
Achievement: Craft all 50 decor and cozy items that use lumber (lifetime)
There are more than 50 decor and cozy items in total, but you only need to craft ones that use lumber.
Workaholic – Part 3
These jobs are just hunting for a compass located somewhere on the map, which you will be provided a clue to direct you.
Jobs:
- Find my marker at my favourite swimming hole
The bridge leading to the beach on the south-east part of the map will have the first compass on a rock next to the waterfall.

- Find the next marker down in the great water sprite’s lair
At the end of the Saltwater Mines is where the water sprite lives. The compass is on top of one of the pillars. You might need the wings given to you during the main story in order to reach it.

- Find another marker in a spooky corner of the forest
The next compass is located right above the Spooky Woods wayshrine on a rock.

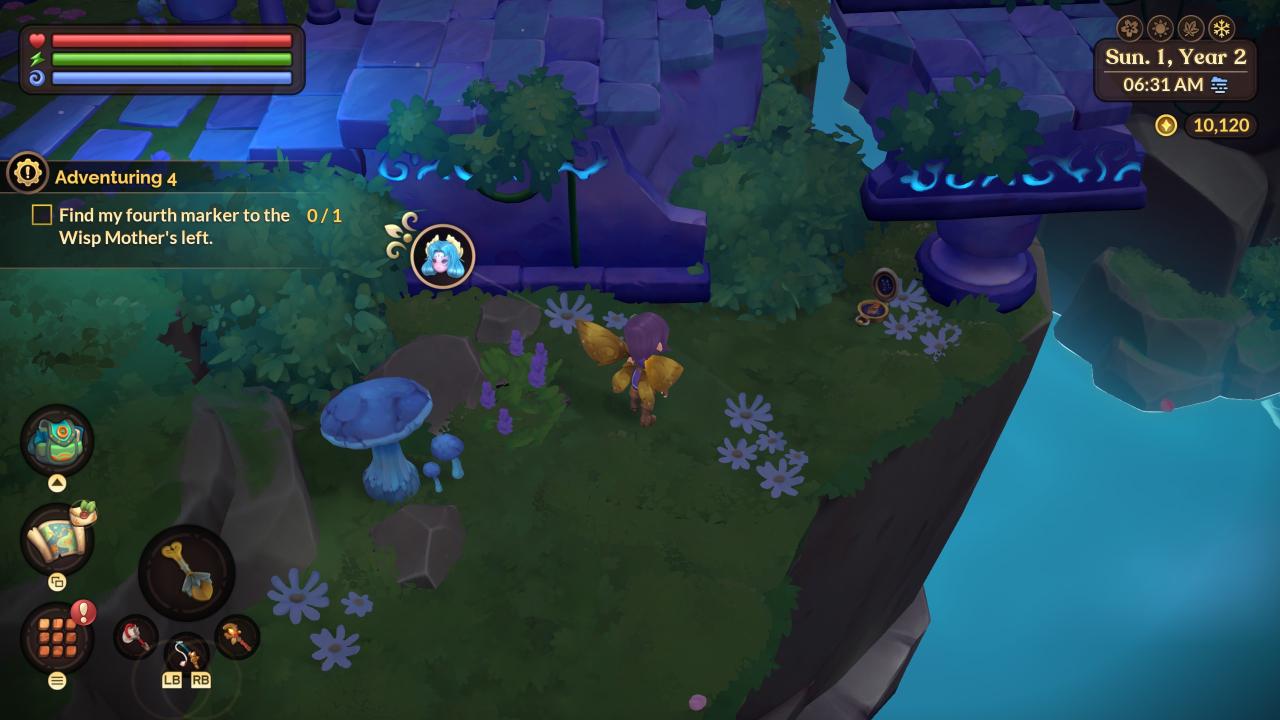
- Find my fourth marker to the Wisp Mother’s left
The Wisp Mother is located in the Mysterious Grove. Go to the right and the compass is under the broken bridge.
- Find a marker near the Floating Ruins
In the fae realm, just by the entrance to the Floating Ruins, is the next compass on the floor to the left.
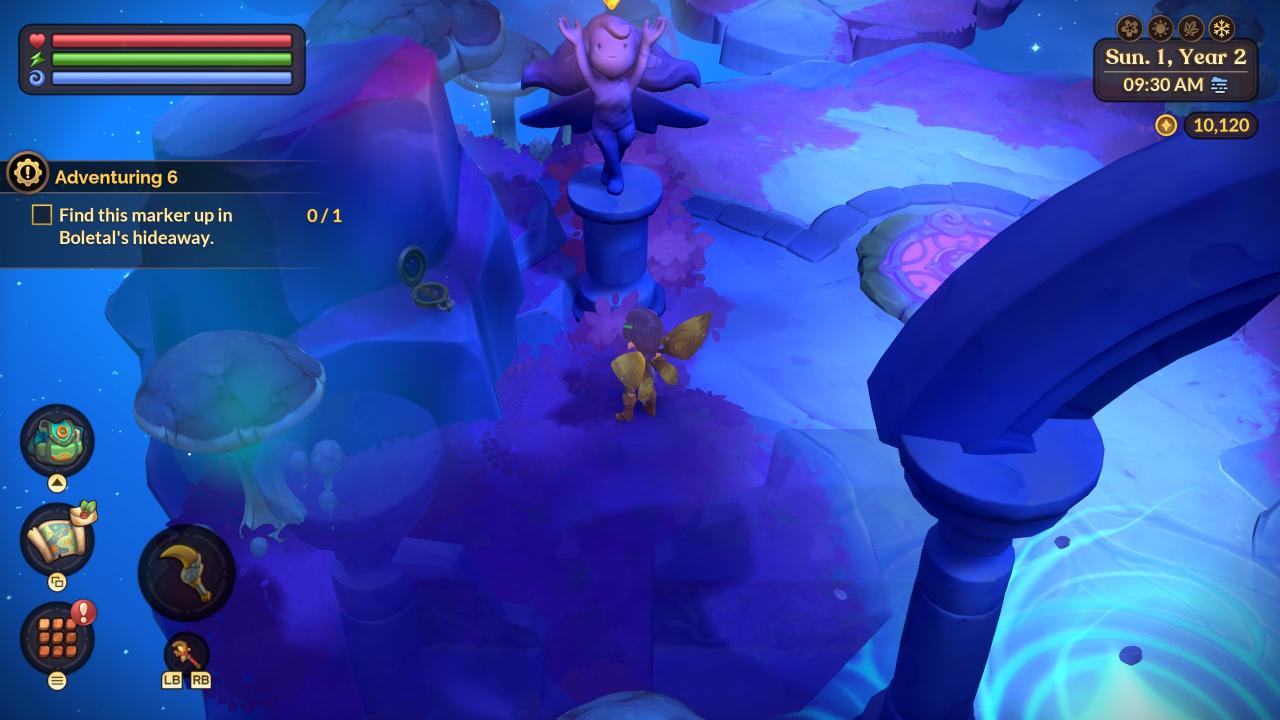
- Find this marker up in Boletal’s hideaway
Boletai lives at the end of the Floating Ruins. To the left of the level is the compass up high.
- Find my next marker at Grell’s lair
Grell is the spirit that lives in the mountain area. Go behind them and up to the right to find the next compass.
- Find another one of my markers on an icy refuge
After you’ve obtained the bash spell for your staff you can access the Frozen Farm homestead to the far west side of the map, after destroying a boulder blocking the path. From the Frozen Farm, go south-west until you find a pond with a small island in the middle with the compass.

- Find one more marker near lava
The lava is located near the volcano (obviously). Near the entrance to the Scorched Caverns dungeon is the compass up on a little broken pillar.

- Find my final marker where the fire sprite dwells
At the end of the Scorched Caverns dungeon is the final compass slightly hidden in the bottom left up on some rocks.

Achievement: Unlock every Pedestal around Azoria and within the three dungeons.
The Pedestals refer to the wayshrines you can activate with seals crafted at the Seal Crafting Station to enable fast travel between them.
Magic
Jumbles are the animated objects that serve as the enemies in the game’s dungeons.
Jobs:
- Dispatch 50 jumbles in the Saltwater Mines
Just go through the levels of the Saltwater Mines dungeon defeating all jumbles you come across. - Use Vortex spell against jumbles 10 times
After you’ve unlocked the Vortex spell during the main story, go back to Saltwater Mines and use the ability on jumbles there. - Dispatch 30 octowheels
Octowheels are the spinning wheels in Saltwater Mines dungeon. - Dispatch 50 jumbles in the Floating Ruins
Just go through the levels of the Floating Ruins dungeon defeating all jumbles you come across. - Use Faerie Fire 10 times
After you’ve unlocked the Faerie Fire spell during the main story, go back to Saltwater Mines and use the ability on jumbles there. You can actually use the spell and walk into rocks outside of the dungeon, this is how I accidentally did it so you don’t necessarily need to use it on jumbles. - Dispatch 30 skellos
Skellos are the cello jumbles in the Floating Ruins. - Dispatch 50 jumbles in the Scorched Caverns
Just go through the levels of the Scorched Caverns dungeon defeating all jumbles you come across. - Use Charm spell against jumbles 10 times
After you’ve unlocked the Charm spell during the main story, go back to Saltwater Mines and use the ability on jumbles there. - Dispatch 30 blamps
Blamps are the bombs that fall from the ceiling in the Scorched Caverns dungeon. - Use Bash spell against jumbles 10 timesAfter you’ve unlocked the Bash spell during the main story, go back to Saltwater Mines and use the ability on jumbles there.
Achievement: Defeat all Jumbles.
Go into the Almanac and make sure you’ve defeated all the jumbles listed in the Dungeoneering page.
Potion Making
Crafting potions rely heavily on ingredients gathered from critters in conservatories as well as some fae vegetables.
Jobs:
- Collect 8 potion ingredients from your first critter conservatory
Craft a Lowlands Critter Conservatory and place critters in it to get potion ingredients from them - Create 8 small Healing Potions
Craft small healing potions at the Potion Brewing Cauldron. - Create 8 medium Zoom Potions
You’ll need to craft popped candy corn at the Potion Ingredients Station from candy corn. You can harvest candy corn in the fae realm by growing corn with magic crop swap fertilizer. - Create 8 large Gone Potions
You’ll need to craft crystal pepper shards at the Potion Ingredients Station from crystal peppers. You can harvest crystal peppers in the fae realm by growing peppers with magic crop swap fertilizer. - Collect 8 potion ingredients from a fae conservatory
Craft a Fae Critter Conservatory and place fae critters in it to get potion ingredients from them - Create 8 small Fairbreath Potions
You can create steel cut clovers from clover feed in the fae realm and blob gobs from Bloblins also in fae realm. - Create 8 medium Warmth Potions
You’ll need to craft flame petals at the Potion Ingredients Station from flame hearts. You can harvest flame hearts in the fae realm by growing cauliflower with magic crop swap fertilizer. - Create 8 large Confusion Potions
Stone grains can be retrieved from critters in the mountain area. - Collect 8 potion ingredients from a mountain conservatory
Craft a Mountain Critter Conservatory and place fae critters in it to get potion ingredients from them - Create 8 small Fireproof Potions
You can create frost fuzz from frost thistle from the mountain area. Snow flakes come from mountain critters. - Create 8 medium Zaps Potions
Fae dust comes from some fae critters in the Fae Realm. - Create 8 large Whirlwind Potions
You’ll need to craft magic bean bites at the Potion Ingredients Station from magic beans. You can harvest magic beans in the fae realm by growing beans with magic crop swap fertilizer.
Achievement: Craft all potions at least once.
Just craft all potions listed in the Potion Brewing Cauldron.
Workaholic – Part 4
There are 6 types of animals that you can buy and look after, kept in barns across 3 homesteads. Each animal provides you with a certain resource.
Jobs:
- Breed 1 chickoo
Buy a chickoo from Earlline and register it back at your barn on your homestead. After it’s registered, you can bring it to Loretta to breed it. - Breed 1 cottontail
Buy a cottontail from Earlline and register it back at your barn on your homestead. After it’s registered, you can bring it to Loretta to breed it. - Collect 3 chickoo eggs in one day. Collect 3 cotton tufts in the same day
If you own 3 chickoos are 3 cottontails you can get this guaranteed. Depending on your animal care level, sometimes they will produce more than 1 egg or cotton tuft per animal. - Breed 1 different colored mamoo
Buy a mamoo from Jeremiah and register it back at your barn on your second homestead when you have unlocked it. After it’s registered, you can bring it to Patel to breed it. Before you do that, you’ll need to buy a breeding charm that gives a chance for offspring to be a different colour. Note though that this is not guaranteed to happen, so you’ll likely need to purchase multiple charms and breed multiple times to get a different colour. - Breed 1 woolyhorn with higher happiness
Buy a woolyhorn from Jeremiah and register it back at your barn on your second homestead. After it’s registered, you can bring it to Patel to breed it. Before you do that, you’ll need to buy the heart pillow charm that gives a chance for increased happiness. Again, it is only a chance this happens so may require multiple attempts. - Collect 4 mamoo milk in one day. Collect 4 woolyhorn wool in the same day.
Like with the eggs and cotton tuft, having 3 of each animal is the easiest way to get this. You’ll need to rely on at least one animal providing more than 1 resource. - Breed 1 different colored spriggan
In the fae realm, once you’ve unlocked the homestead there, buy a spriggan from Reyglor and register it back at your barn on your homestead. After it’s registered, you can bring it to Temael to breed it. Buy the breeding charm to change the colour as before. - Breed 1 lunen with maximum happiness
Buy a lunen from Reyglor and register it back at your barn on your homestead. You’ll need to keep breeding multiple lunens in order to raise the happiness to 6 bars in total, called Blissful. Each time you breed the animal, the offspring will have a higher maximum happiness. After you’ve got a lunen with Blissful as its mood, bring it to Temael to breed it. You might need to buy the heart pillow charm that gives a chance for increased happiness as well. - Collect 4 spriggan fancy leaves in one day. Collect 4 lunen silk threads in the same day.
Like with the eggs and cotton tuft, having 3 of each animal is the easiest way to get this. You’ll need to rely on the animals providing more than 1 resource.
Achievement: Produce 20 different colored animals (lifetime)
You will already have been breeding different colours, just keep doing this with your animals until you’ve completed this.
Thanks to Moon for his great guide, all credit to his effort. you can also read the original guide from Steam Community. enjoy the game.