
A detailed Elementary Evil Guide provided with advanced maps. In here, I’ll give you some tips on how to complete the level more efficiently and maybe even score S rank.
Intro
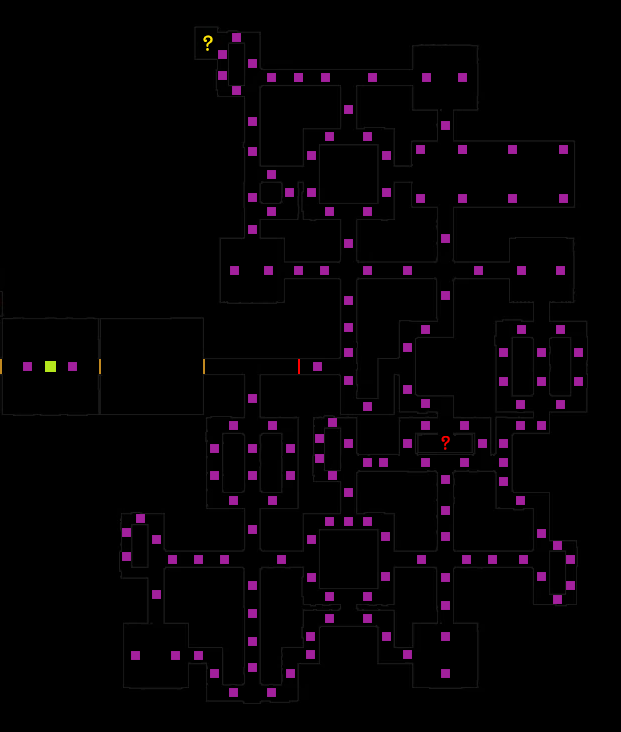
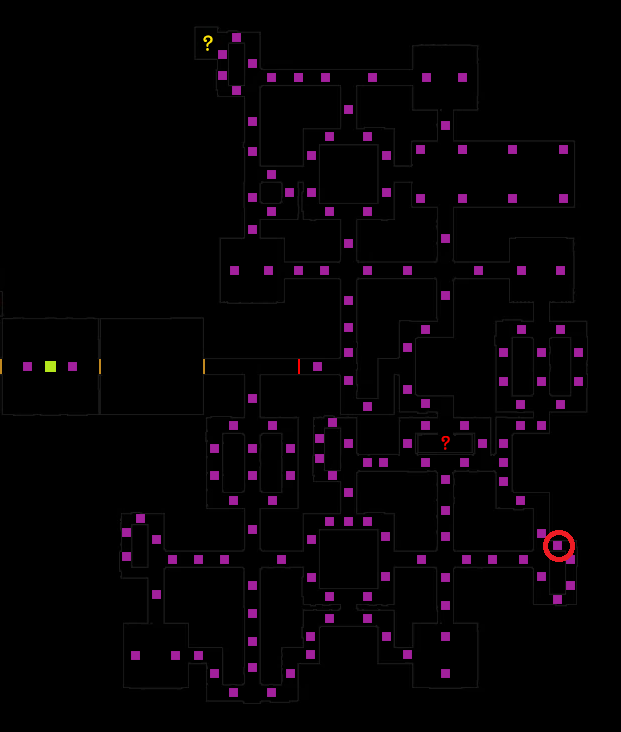
Zone 1. Layout
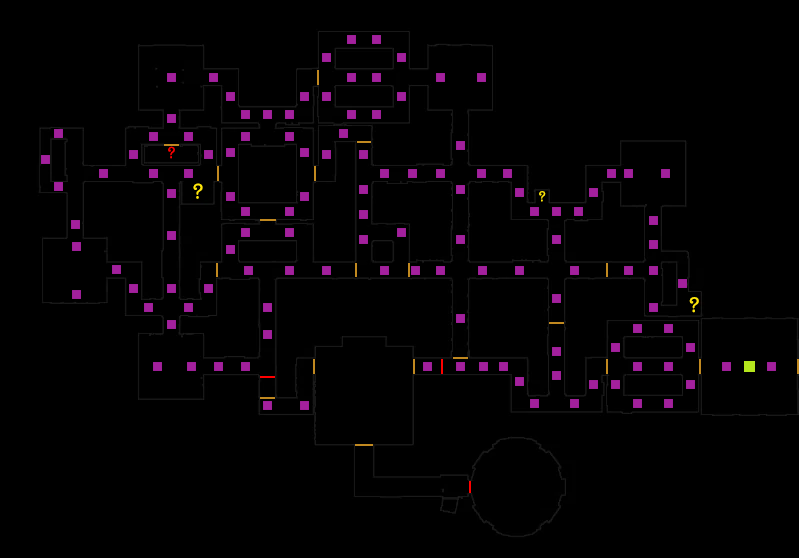
Original file: “School secrets” by Kyrope[dark-deception-game.fandom.com] [CC-BY-SA-3.0]
Yellow lines on the map are doors, and red lines are barriers which can be broken through using Speed Boost. Red question mark indicates the mysterious room, but it doesn’t count as the secret in level results (hence not necessary for S rank) — basically, it’s just a lore element.
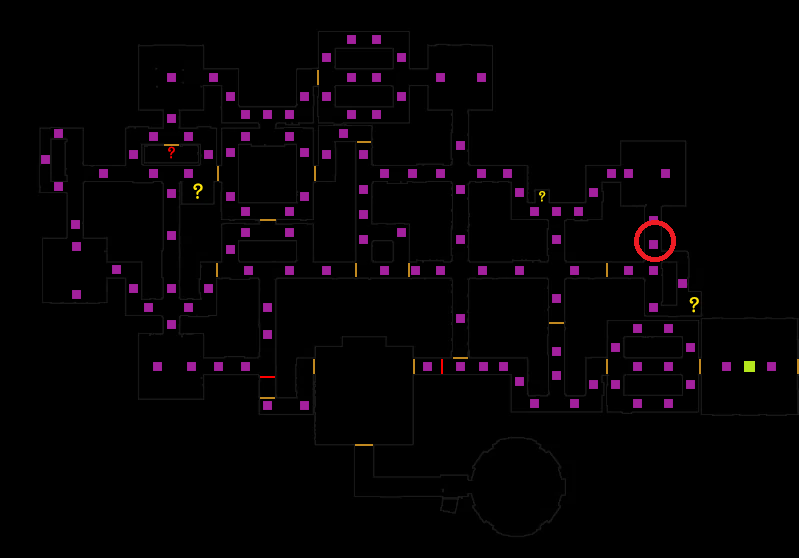
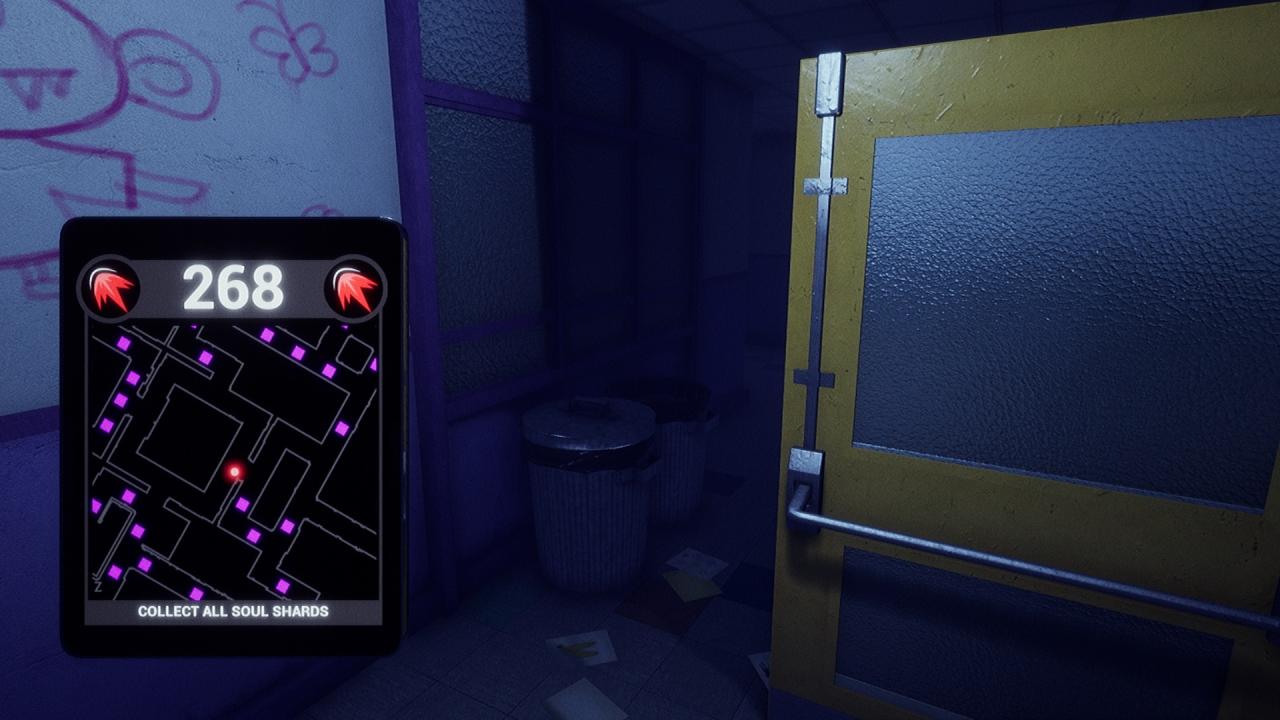
Your only enemy here is Agatha. Once you hear her say “Ready or not, here I come!” after breaking the barrier, she spawns in here:
Let’s talk about her tactics in detail.
Zone 1. Agatha’s tactics
- Unlike the Monkeys, she doesn’t know your exact location, BUT. Imagine yourself playing hide-and-seek as the seeker in a maze like this. You don’t know where the hider is, so you listen to the sounds of footsteps, panting and door clapping to determine the general direction you should be heading. Agatha does exactly the same thing, but with some additional tricks stated below.
- She can spot you through the door. Doesn’t work for multiple doors, though.
- Also ’bout doors: she never opens them. Instead, she teleports through them. It works like this: she gets to the door — WHEESH! *disappears* — CLINKZZZ! *appears at the other side*.
- After spotting you, she’ll try to chase you down, but will stop running fast small time after you turn somewhere and run away far enough. However, she’ll anyway be back on track after you fled.
And now, let’s get to your tactics.
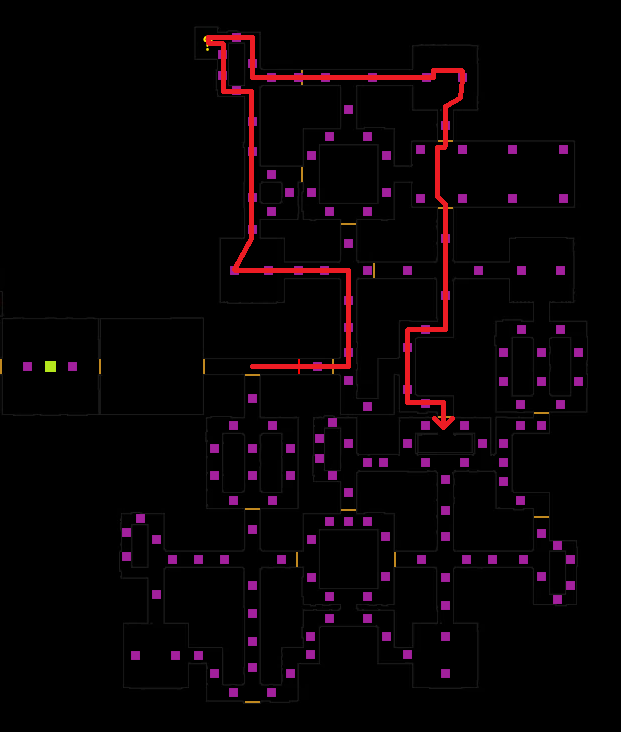
Zone 1. Your tactics
Then, your route. Tough point here is that Zone 1 is has oblong shape and some pretty long hallways where Agatha can very likely spot you. Also, regarding the fact Agatha’s following you, you might end up turning around right into her arms ’cause you’ve got to the far right side of the map. It’s like, first she was coming after you, then so came you after her. To avoid such unpleasant situations, I’ve devised a starting path for this zone.
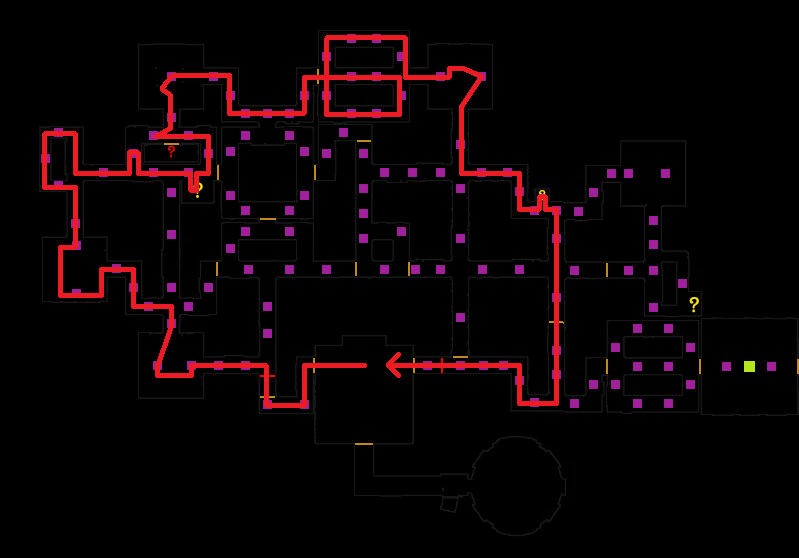
If you’ve watched my Monkey Business Guide, you’ll see that the idea here is similar: you take the outer-most hallways and collect a streak of secrets, not taking Stun Orb and Reveal Shard if they appear on your way. But I’ll also highlight that here you should try not to bump into walls or desks and use Speed Boost whenever possible. Here’s why: at the end of the path you’ll need to take a steep turn right and if you weren’t fast enough, Agatha will spot you, while what you actually need is to mislead her and sneak back to the auditorium.
Note: I haven’t included all the secrets in this path like I did in the previous guide, ’cause if you haven’t beaten Elementary Evil yet, your Speed Boost level won’t be enough to get ahead of Agatha unspotted from the far right side of the map (unless you fool her somehow — there are two directions out of the secret corner letting you mislead her). After all, you may take the remaining secret later.
So, if everything went smoothly, you ended up right where you started, safe and sound — but it’s not over yet. You need to advance further and collect the remaining shards. That’s where the left Stun Orb and Reveal Shard are coming in handy — you’d most definitely want to use them in order to safely collect the rest of the shards.
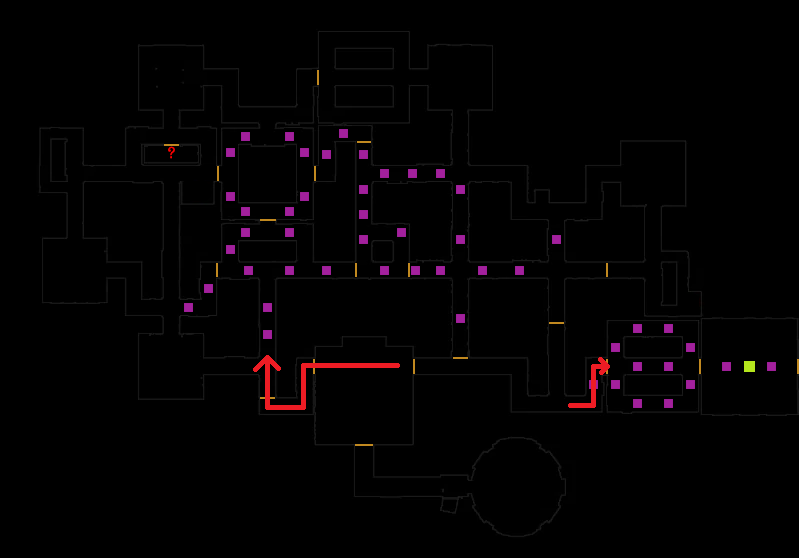
After you’ve collected all the shards in the main area, carefully proceed to the lower right angle where the Ring Altar is placed and collect the shards there (note & remember the trick used — leaving what’s near the exit for the ending). Agatha will disappear after you collect the last shard in this zone.
Also, the tips I haven’t mentioned before:
- Throughout the game, you can hear Agatha mumbling different phrases, e.g. “Not scared of a little girl, are ya?”. There are three special phrases she murmurs once she spots you: “There you are!”, “I found ya” and “Hello, friend!”. If you hear those and the subsequent intense music — flee immediately. However, there is one phrase that may mislead you — “Got ya!”. This is just her mumbling, but can cause you panic if heard, so keep it in mind.
- In Normal Mode, Agatha is slightly faster than you sprinting without a Speed Boost. That’s why you’d better not end up spotted by Agatha with your Speed Boost exhausted.
- It takes several seconds for Agatha to teleport through doors, that’s why you’d want to close them after opening and going through — it may help you in potential pursuit afterwards.
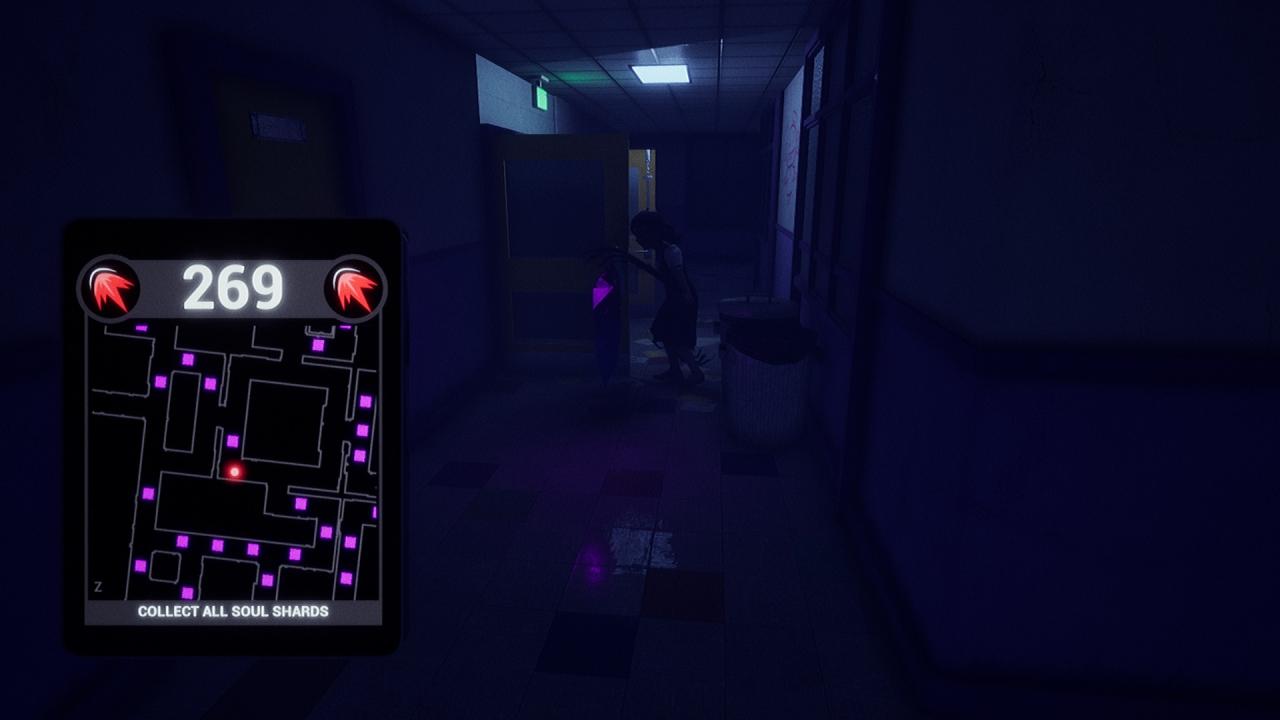
- There is a tough place where you’ll get stuck if the door is open (see screenshots below). Better don’t run there while being pursued. Also, fun fact: Agatha gets stuck there, too.
- You can hide from Agatha in any of the 4 secret rooms if necessary, but keep in mind that if she’d been pursuing you before, she would patrol a small area near the door. There’s also a funny Easter egg phrase Agatha tells you in such cases — “Do you feel safe in there?” That said, if you speed boost out of there wisely (like when Agatha is somewhere aside), you might escape successfully. But I don’t recommend hiding in there anyway unless really needing to.
- While you’re speed boosting with Reveal Shard activated, it might be hard to tell the red triangle on the tablet (Agatha) from shard icons for picture becomes blurred with red Speed Boost shade — be careful with that. Zooming in the tablet (Z) and slowing down a bit now and then may be a solution.
Zone 2. Layout
 Original file: “School secrets”
This map has one common secret and one mysterious room. Again, the latter isn’t required for S rank, but, if opened for the first time, it grants you the Steam achievement.
A few seconds after Bierce’s voice line “It’s her victims! This school has become her dollhouse!” Agatha says “Ready or not, here I come!” and spawns here:
And, like in the previous zone, Agatha is your only enemy here. But what Agatha?
Zone 2. Agatha’s tactics
- Like I said, in pursuit, Agatha will try to cut you off by teleporting ahead, but, if you are facing a wall closely, she’ll teleport in some nearby place, quite far from you.
- Agatha only teleports at random places if you are far enough from her. Otherwise, she keeps on tracking you as usual.
- She won’t disappear after you’ve collected all the shards — keep that in mind.
Zone 2. Your tactics
The secret is not the main reason I’ve devised it like this (in fact, you may even leave it if you’re just aiming to complete this level anyhow, this will give you more time). The point is that, if you take right instead of left at the beginning and head to the center of the map, you’ll be more likely to encounter Agatha, if not even say — bound to. Why? The answer is simple. Sure, Agatha may be teleporting now and then — but remember her primary goal is still tracking you down. And, of course, she’ll have more chances to succeed if you’re heading to the center than if you’re taking far left side of the map, ’cause the distance between you and her is less (recall where she spawns). And that’s virtually the motivation for going left.
However, you should still be careful and, again, use your Speed Bost whenever you can (sorta twice on this way), try not to bump into the walls and pay attention to Agatha’s sounds’ direction. By some accident, she might spot you, so you have to be ready for it. And now let’s talk about your tactics in detail.
- NEVER waste your Speed Boost after the starting route — I mean it. The worst situation possible is ending up with power-ups exhausted and Agatha having spotted you. Only use it if you’re 100% sure you won’t get in trouble (like with Reveal Shard or Stun Orb activated) or in actual trouble — when Agatha spots you.
- And to not get spotted by her, keep listening to her sounds and analyze her whereabouts. Here’s also some new tip on that: how to deal with her random teleportations. If you hear “WHEESH!” somewhere near without the subsequent “CLINKZZZ!” — this means she’s teleported at some random point, and if you hear both, this means she teleported through the nearby doors. If you only hear “CLINKZZZ!” — this means she’s landed somewhere near. In the two latter cases you’ll need to get twice as much careful.
- About the Stun Orb and Reveal Shard — again, don’t waste them right away, ’cause you’re most definitely gonna need ’em later. Better leave them for some tricky shard clusters or tough pursuits.
- Pay much attention. It is dim in here, so it might be hard to spot Agatha who’s also quite dark, especially from long distance (but you’ll hear the chase music anyway). Also, like I’ve been saying before, listen to the sounds. There’s also some background laughter that adds up to the general sound, so listen closely and don’t miss Agatha’s spotting phrases (see them above in Zone 1 part).
- Avoid long corridors. In those, Agatha has the most chances to spot you, obviously, and what’s even worse — chase you down with her troublesome teleportation.
- And, to deal with these, remember: she tries to teleport in the direction you’re facing, but with one exception: if you’re facing the wall closely, she’ll teleport to some place nearby, but far enough for you to flee. So here you can see two ways to abuse her technique. However, doing so requires some smart timing and concentration. And if you are too overcome with feeling of panic — just flee and try to lose her in some small and entangled corridors. And if you’re in a long one, don’t turn around from her — just activate the Speed Boost and run backwards. She might eventually teleport in front of you, giving you some time to find a smaller corridor to flee or a wall to face.
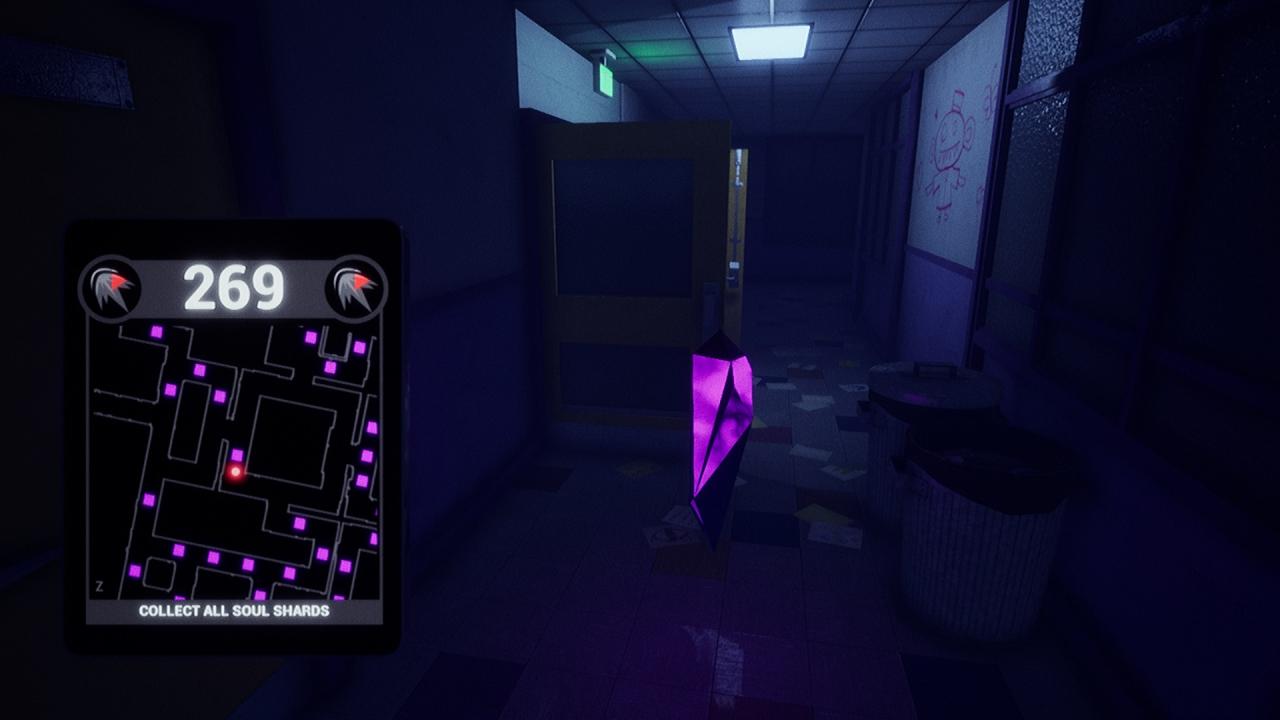
- Leave [at least some of] the “Ф” letter shards near the starting place for the ending. This will make your escape path shorter. But remember that Agatha will try to hinder you to get to the ring piece at any cost, so don’t pop out of the “Ф”‘s door in the first place — or you might get another jumpscare experience.
To summarize this briefly — don’t play recklessly. This zone (and the whole level) isn’t really about running around as fast you can all the time, it’s more about careful sneaking and stealth. Also, it’s highly situation-based, so it might take you some time to cope with this zone. But everything’s possible as soon as you consider it possible.
Escape Sequence
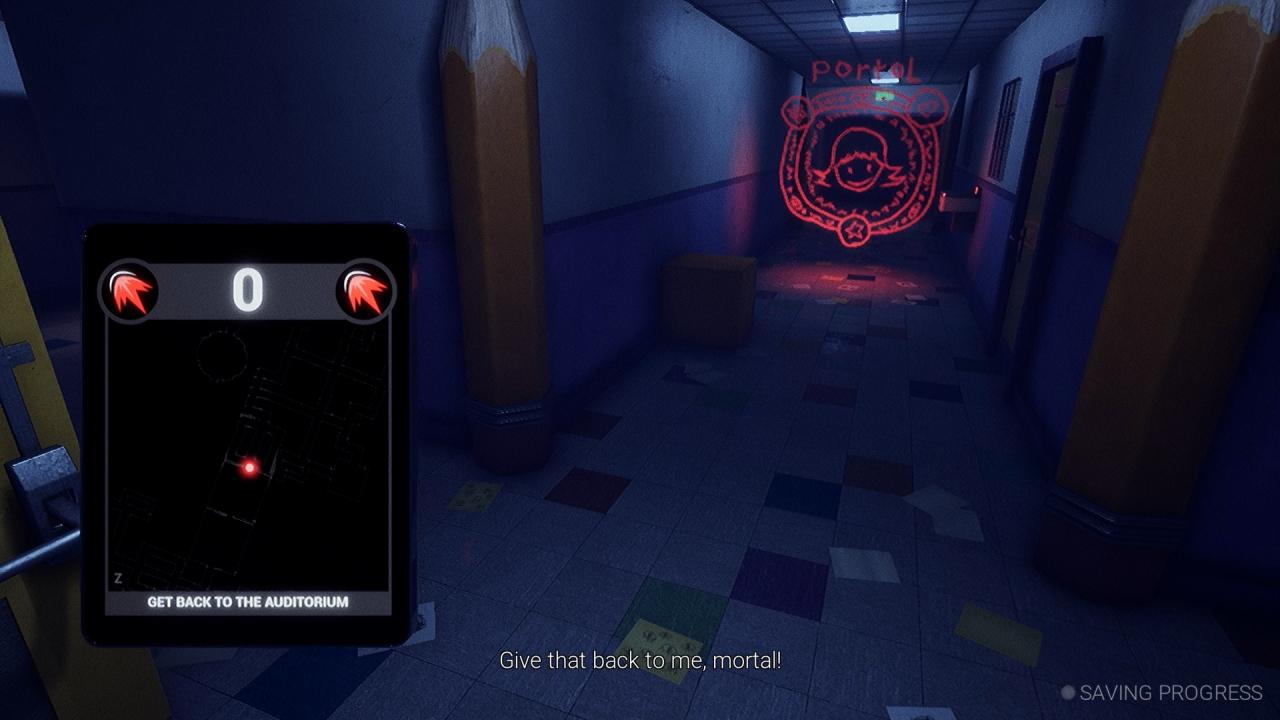
Don’t enter them — unless you haven’t had enough of Agatha chasing you for two zones and want some more. If you hit such portal, Agatha will spawn ahead of you — with Malak behind still chasing you it’s almost a certain death.
Fortunately, these portals have predefined positions and there actually is a safe way around them (and respective Steam achievement if you follow it, btw). Here it is:
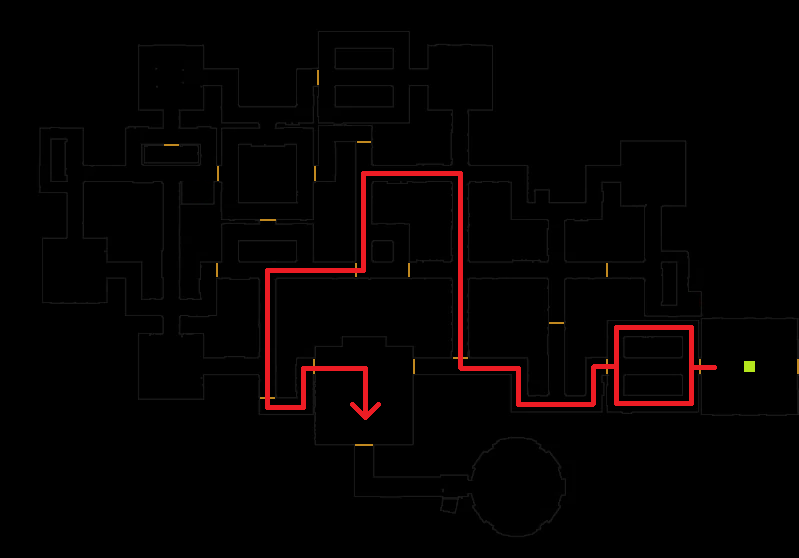
Forked line in its beginning means that you may take either way, both are free of fake portals. This is also the shortest pathway to the auditorium. But wait, how can it be? There’s actually the door before the long turn that leads right to auditorium. Yeah, right, and Agatha knows that, too — so if you try to enter it, it will slam at your very face with a snide Agatha’s “Ah-ah-ah! No shortcuts” — and hello Malak from behind, he’ll be already right there to catch you up. So, just follow the path instead.
When you enter the auditorium, the door closes and pursuit ceases. And when you head to the exit door, there will be a little scary cutscene — Agatha appearing right in front of you, saying “Going somewhere?” — then teleporting back and creeping to you, trying to finally end you. But Bierce opens the door, and, while Agatha is surprised, just quickly speed boost out of there and get to the portal; there will be really enough time so that she won’t catch you up most definitely. Remember, however, that there’s the school bus obstacle which you may run into. And that’s it!
Have fun and good luck!