
Full stats (HP and Weaknesses) for all of the monsters and bosses within the game.
Introduction + Tips/Advice
First off, the real reason you’re clicking on this guide is at the very bottom (in its own section) of this guide. Next, I will divide up each map into a category it fits into (which you’ll see on your right and at the end of this section) along with each monster and its stats present in that map. Lastly, I will single out important bits about certain unique aspects of both the bosses and the silver chests functions into its own section, as well.
Before moving on to the list of the map areas into their categories, I felt I needed to put some Tips & Tricks out on the table so you’re more aware of them:
Tip #1: Poison damage (whether on Flode or your enemy) takes 10% of max hp each turn. For the bosses that can be poisoned (who will be mentioned in their sections) and the bosses that can poison you, this is highly useful to keep aware of.
Tip #2: Most every regular monster can be blinded and put to sleep, with some bosses being susceptible to being blinded, as well as sometimes being put to sleep. I’ve experimented with most of them, but not all of them so I can’t not say one boss can or can’t be put to sleep/blinded; I just might’ve not tried it.
Tip #3: Some status ailments that Flode can have (Aroused, sensitive, drenched [in c*m], orgasm [in combat]) will negatively affect Flode’s stats. Being drenched lowers your agility (your speed and/or dodge); Being sensitive lowers your defense; and being aroused lowers all of your base stats by a significant amount. Orgasming while in combat will result in a turn of Flode’s being missed, while having even lower stats for that turn duration.
Tip #4: Perhaps the biggest tip/trick/advice that I know to give is: If you’re having difficulty with some battles; you’re already on the easiest difficulty setting within the game (unless you’ve changed it yourself, you madman). Do not be afraid to level-up Flode or get some better gear, spells and accessories. Your Priestess Rank is important in the post game battles! The higher it is, the better spells you have at your disposal.
Tip #5: The massage you can get in Myra is beneficial to you in various ways. The first (cheapest) massage you can get gives an all-day small stat boost, but also an exp boost. The second (middle-option) massage you can get gives an all-day better stat boost, along with the exp boost. The third (more expensive) option gives the same benefits as the 2nd massage, but gives you the H-event along with it. Just to emphasize: The massage boost lasts all day until you go to sleep to the next day.
Tip #6: A small bit of advice about the ‘Fear’ status effect some monsters can inflict. Although it does not affect your magical abilities’ damage or resistance, it does affect your attack and defense. If you’re using a lot of physical melee strikes or receiving a lot of them in the battle, get rid of it!
Tip #7: You remember all those Techniques you could choose to start with when starting your New Game? The primary reason I bring this up is that you can get all of them once you start a NG+. Once you re-unlock Myra as a destination, visit the Fortune Teller’s shop. She will have for sale all 6 of the skills you could choose to start with for 50,000 G each. This becomes very useful for tackling post-game bosses.
Categories:
Primary locations:
*) Strange-Smelling Forest
*) Coastal Cave
*) Abandoned Mine
*) Altoce City / Altoce Temple
*) Shrine Maiden’s Pilgrimage
Secondary locations:
*) Fear Plains
*) Leid Mountain
*) Road to South Cerbes
*) Old Fortress Nemeos
Late Game locations:
*) Road to Western Cerbes
*) Underground Alchemy Facility
Post Game locations:
*) Drug Dealer’s Hideout
*) Forgotten Treasure House
*) Skilla Archipelago
*) Paracress’s Divine Land
Silver Chests
Night-time Bosses
True Final Boss
Primary Locations
Strange-Smelling Forest
Difficulty: [1-star]
======
Bush Hunter
HP: 90Greedy Petal
HP: 150
Weakness: Fire-element magique
Hornet
HP: 110
Old Tree Giant
HP: 250
Weakness: Fire-element magique
Outlaw (Forest)
HP: 500
Note: Doesn’t show up until story progresses after First Treasure obtained
Basilisk (Night-time-only Boss)
HP: 4900
Drops: Wasp Emblem (100%); Gold Bar
Notes: Poisons semi-frequently, so having a wearable item to nullify poison is essential
Notes(2): You can gain an upper-hand on the fight by approaching it on the right side to initiate the fight, to get a free turn
Mary’s Garden (Boss)
HP: 1800
Weakness: Fire-element magique
Drops (Battle): Fairy Flower Leaf (100%)
Drops (Chest): Beast Coin ; Forest Staff ; Insecticide
—–
============
Coastal Cave
Difficulty: [2-star]
======
Cave Fish
HP: 200
Weakness: Electric-element magique
Deep Soldier
HP: 300
Weakness: Electric-element magique
Sea Jewel
HP: 270
Weakness: Electric-element magique
Aqua Drake
HP: 600
Weakness: Electric-element magique
Drops: Water snake core (100%)
Notes: Appears next to the golden chest you find the Swimsuit within as a 100% guaranteed spawn.
Deep Knight
HP: 450
Weakness: Electric-element magique
Kraken (Night-time-only Boss)
HP: 8000
Weakness: Electric-element magique
Drops: Sea Monster Emblem (100%); Pure Mana Water
Notes: Can poison you semi-regularly
King of the Sea (Boss)
HP: 2799
Weakness: Electric-element magique
Drops (Battle): Squid Ink
Drops (Chest): Fish Coin ; Purification Ring ; Sorcerer’s Brooch
Notes: Blinds semi-frequently; either wear something to nullify the blind, or use magic (which isn’t affected by blind)
—–
============
Abandoned Mine
Difficulty: [3-star]
======
Kobold Trooper
HP: 420
Kobold Scout
HP: 400
Yellow Jellian
HP: 370
Weakness: Fire
Goblin Soldier
HP: 550
Goblin Shaman
HP: 420
Orc Warrior
HP: 750
Demi-Orc Hero (Night-time-only Boss)
HP: 9999
Drops: Warrior Emblem (100%)
Notes: Can be poisoned, can be put to sleep, can be blinded.
Notes(2): You can gain an upper-hand on the fight by approaching it on the right side to initiate the fight, to get a free turn
Orc Chief (Boss)
HP: 4800
Drops (Battle): Fighting Spirit Ruby (Not 100%)
Drops (Chest): King’s Coin ; Warrior Insignia ; Earth Spirit Ring
Notes: Can poison you. Able to be poisoned; able to be put to sleep
Notes: Has one Orc Warrior and one Goblin Soldier accompanying him
—–
============
Altoce City
Difficulty: [5-star]
======
Remnant Dealer’s Guards
HP: 1300
Notes: Can be put to sleep; can be poisoned
Underground Village Crook
HP: 950
—–
============
Altoce Temple
Difficulty: [5-star]
======
Miasmatic Spirit
HP: 720
Weakness: Holy-element magique
Geist
HP: 750
Weakness: Holy-element magique
Zombie
HP: 900
Weakness: Holy-element magique
Purple Jellian
HP: 699
Weakness: Fire-element magique
Cursed Coin
HP: 700
Fury
HP: 800
Weakness: Holy-element magique
High Priest
HP: 850
Weakness: Holy-element magique
Grim Reaper (Night-time-only Boss)
HP: 13333
Weakness: Holy-element magique
Drops: Harvest Emblem (100%) ; Pure Mana Water
Notes: You can gain an upper-hand on the fight by approaching it on the right side to initiate the fight, to get a free turn
Grand Master (Boss)
HP: 9500
Weakness: Holy-element magique
Drops (Battle): Religious Text (100%) ; Magi’s Soul ; Sanctuary Khakkhara
Drops (Chests): Skeleton Coin ; Miasmatic Spirit Ring
Notes: Can blind you.
—–
============
Shrine Maiden’s Pilgrimage
Difficulty: [6-star]
======
Miasmatic Element
HP: 950
Weakness: Holy-element magique
Evil Eye
HP: 1190
Weakness: Ice-element magique
Succubus
HP: 950
Weakness: Holy-element magique
Living Loom
HP: 1300
Weakness: Fire-element magique
Red Jellian
HP: 1000
Weakness: Fire-element magique
Outer God (Night-time-only Boss)
HP: 20000
Weakness: Qliphoth Sign (Melee-only when equipped)
Drops: Spiritual Emblem (100%)
Notes: You can gain an upper-hand on the fight by approaching it on the right side to initiate the fight, to get a free turn
Noir’s Avatar (Boss)
HP: 14000
Weakness: Holy-element magique
Drops (Battle): Fruit of Passion (100%) ; Gold Bar
Drops (Chest): Phantasmagoric Coin ; Spiritual Fabric ; Divine Ore ; Miasmatic Spirit Ring
Notes: Can inflict ‘aroused’ status.
Secondary Locations
Fear Plains
Difficulty: [4-star]
======
Green Jellian
HP: 600
Weakness: Fire-element magiqueBarghest
HP: 600
Weakness: Ice-element magique
Harpy (Plains):
HP: 580
Weakness: Fire-element magique
Beryl Horn
HP: 3200
Nuxy (Night-time-only Boss)
HP: 50000
Drops: Giant Beast Emblem (100%) ; Nuxy Meat
Notes: Permanently regains 250 HP every turn.
Notes(2): You can gain an upper-hand on the fight by approaching it on the right side to initiate the fight, to get a free turn
—–
============
Leid Mountain
Difficulty: [4-star]
======
Glider Boa
HP: 550
Weakness: Ice-element magique
Minor Wyvern
HP: 700
Weakness: Ice-element magique
Harpy (Mountain):
HP: 580
Weakness: Fire-element magique
—
Magma Fish
HP: 580
Weakness: Ice-element magique
Rock Eater
HP: 600
Weakness: Ice-element magique
Lava Crab
HP: 900
Weakness: Ice-element magique ; Physical-attacks when “Heat Shell” is active
Leidran the Spirit Eater (Night-time-only Boss)
HP: 50000
Drops: Demon Dragon Emblem (100%) ; Dragon Blood
Notes: Highly resistant to all 3 offensive element-magique spells (Holy isn’t affected)
Notes(2): You can gain an upper-hand on the fight by approaching it on the right side to initiate the fight, to get a free turn
—–
============
Road to South Cerbes
Difficulty: [4-star]
======
Green Jellian
HP: 600
Weakness: Fire-element magique
Misty Bandits Member (S. Cerbes Road)
HP: 620
Notes: Will disappear once Misty Bandits Leader is arrested and turned in to the Guards.
—–
============
Old Fortress Nemeos
Difficulty: [5-star]
======
Misty Bandits Adventurer
HP: 600
Misty Bandits Member
HP: 620
Misty Bandits Former Guard
HP: 650
Misty Bandits Fallen Caster
HP: 550
Misty Bandits Corrupt Knight
HP: 650
Drops: (?) Royal Knight Insignia
Misty Bandits Martial Artist
HP: 800
Misty Bandits Leader (one-time-Boss)
HP: 4500
Notes: After defeating this boss, all Bandits will disappear from South Cerbes Road as encounters.
Road to Western Cerbes
Difficulty: [7-star]
======
Green Jellian
HP: 600
Weakness: Fire-element magiqueEriel
HP: 1400
Outlaw (W. Cerbes Road)
HP: 1000
Samluke
HP: 3500
—–
============
Underground Alchemy Facility
Difficulty: [8-star]
======
Alchemic Golem Mk.2
HP: 1920
Weakness: Electric-element magique
Alchemic Golem Mk.1
HP: 1350
Weakness: Electric-element magique
Alchemic Golem Mk.3
HP: 1620
Weakness: Electric-element magique
Metal Jellian
HP: 200
Weakness: Highly-resistant to magic; physical resistance not as high (not classed as a ‘weakness’)
Notes: Can run away if you don’t kill it fast enough.
Prototype Golem
HP: 3400
Chimera (Night-time-only Boss)
HP: 25000
Weakness: Electric-element magique
Drops: Demon Beast Emblem (100%) ; Pure Mana Water
Notes: Attacks twice each turn.
Notes(2): You can gain an upper-hand on the fight by approaching it on the right side to initiate the fight, to get a free turn
Paracress (one-time-story-boss)
HP: 25000
Note: After every cast of its special move “Ground Zero”, it will then cast miasma to lower your stats; you can negate it with the use of the Rank 5 ability <Rainbow Protection> the move after Ground Zero.
Note(2): Once it gets low-HP, it will add-in a 2000-hp heal into its rotation of its possible actions.
Post Game Locations
Drug Dealer’s Hideout {Post-game}
Difficulty: [5-star]Unlocked: NPC Quest, next to Fortune Teller in Myra.
Additional Requirement: Need to have beaten the Misty Bandits’ Leader and handed him over to the Guards before this NPC shows up.
======
Drug Dealer’s Guard (Hideout)
HP: 1300
Remnant Dealer (one-time-boss)
HP: 500
Notes: Has 2 Drug Dealer’s Guards with him during his battle.
Additional Note: In case you missed the event/Bad End before, you can lose to any of the guards in this location to unlock the “lose to the Remnant Dealer’s Guards” Bad End/H-event.
—–
============
Forgotten Treasure House {Post-game}
Difficulty: [9-star] <Self-evaluated>
How to get here:
No other requirement is needed besides reaching the Post Game.
======
Mimic
HP: 3500
Weakness: Fire-element magique
Revenant
HP: 2800
Weakness: Holy-element magique
Notes: Can poison you
Gold Jellian
HP: 8000
Weakness: non-elemental magique (Synthetic Buster/Shark Bringer/Spirit Destruction)
Notes: Can run away!
Notes(2): Highly resistant to all elemental-magique; high agility/dodge-chance
Trap Jar
HP: 3200
Weakness: Electric-element magique
Notes: Can put you to sleep
Living Armor
HP: 4000
Weakness: Electric-element magique
Draco Alrem (Secret boss, located at <FTH – Guardian Space>)
HP: 20000
Weakness: None (Normal damage from electric and non-elemental magique)
Notes: Resists holy, fire, ice magique; has high defense & resistance
Notes(2): Has a heal towards the later-half of his HP (Once he does Overload)
Mimic Sentry (one-time-boss)
HP: 30000
Weakness: Fire-element magique
Drops: Mimic Soul (100%)
Notes: Casts ‘Random Box’ often which has a random effect on Flode; postives, negatives, and ‘nothing happening’ are all within range
—–
============
Skilla Archipelago {Post-game}
Difficulty: [10-star]
======
Storm Shark
HP: 2800
Weakness: Electric-element magique ; Chainsaw Charm (when equipped [melee-attacks only])
Notes: Can be insta-killed with Chainsaw Charm melee-attacks
Ice Shark
HP: 3200
Weakness: Fire-element magique ; Chainsaw Charm (when equipped [melee-attacks only])
Notes: May sometimes become a regular Storm Shark (when hit by their elemental weakness?)
Notes(2): Can be insta-killed with Chainsaw Charm melee-attacks
Fire Shark
HP: 3200
Weakness: Ice-element magique ; Chainsaw Charm (when equipped [melee-attacks only])
Notes: May sometimes become a regular Storm Shark (when hit by their elemental weakness?)
Notes(2): Can be insta-killed with Chainsaw Charm melee-attacks
Topaz Shark
HP: 3900
Weakness: Electric-element magique ; Chainsaw Charm (when equipped [melee-attacks only])
Notes: Can be insta-killed with Chainsaw Charm melee-attacks
Gigalodon (once-a-day shark boss)
HP: 42000
Weakness: Electric-element magique ; Chainsaw Charm (when equipped [melee-attacks only])
Drops: Shark Heart (100%) ; Shark (100%)
Storm Dragon Typhon (one-time-story-boss)
HP: 65000
Weakness: Electric-element magique
Drops: Storm Dragon Scale (100%)
Notes: Will cast ‘Overload’ when it reaches near the last ~10-15k of its’ health
—–
============
Paracress’s Divine Land {Post-game}
Difficulty: [13-star] <Self-evaluated>
======
Root of Paracress (in all areas)
HP: 8000
Weakness: Fire-element magique
Larva
HP: 4200
Weakness: Holy-element magique
Stray Jellian
HP: 4000
Weakness: Fire-element magique
—
Epidemia
HP: 2900
Tiny Legion
HP: 3000
Alraune
HP: 4800
Weakness: Fire-element magique
Diva (Ethereal Forest Boss)
HP: 45000
Weakness: Insecticide (Melee-attacks only when equipped)
Notes: Poisons you extremely regularly; Fears semi-regularly; has 2 Tiny Legions accompanying it, which it can revive 0-2 turns after any die
Notes(2): Can put the tiny legions to sleep
—
Orihalcon Crab
HP: 5300
Weakness: Lightning-element magique
Alchemic Shark
HP: 4000
Weakness: Lightning-element magique
Charybdis (Holy Spring Cave Boss)
HP: 40000
Weakness: Lightning-element magique
Notes: Auto-heals 800 HP each turn
—
Adamas Horn
HP: 6800
Weakness: Ice-element magique
Highlander Orc (Godly Mine Roadway Boss)
HP: 50000
Notes: Can be poisoned!
—
Alchemic Golem F
HP: 5000
Weakness: Electric-element magique
Notes: Attacks twice each turn
Chronos (Vacant Temple Boss)
HP: 52000
Weakness: Holy-element magique ; Qliphoth Sign (Melee-only when equipped)
—
The Faceless (Top Floor, Secret Boss)
HP: 65000
Weakness: Qliphoth Sign (Melee-only when equipped)
—
Paracress Antithesis (one-time-story-boss)
HP: 120000
Weakness: Reverse Nemesis (unlockable spell) ; Qliphoth Sign (Melee-only when equipped)
Notes: Highly recommended to be at Level 90-99, highest level staff, gear and accessories and Rank 9 Priestess rank. Recommended to battle in NG+, unlocking all of the skills from the Fortune Teller
Notes(2): Has 3 phases. Initial phase starting out; Second phase when it bathes itself with holy energy; Third phase when it upgrades its heal from 3k to 5k, and adds Miasmatic Flare as an attack it can use.
—–
Silver Chests
This deserves its own section simply because of its mechanic (that is also shared with the harvesting mechanic).
Silver chest OPENINGS are randomized loot each time; same thing with harvesting at most any one harvest spot.
What this means is that if you need an item (which I have mostly listed in their corresponding boss earlier in the guide) from a specific chest but don’t want to spend in-game days to get it, you can save-scum for the item.
- Step 1: Beat the boss
- Step 2: Save before opening the Silver Chest
- Step 3: Open chest, check rewards
- Step 4: If rewards are not what you wanted from the chest, quit to title and reload save.
- Step 5: Repeat until you get what you wanted.
Please note, this also works for almost any harvesting location. Although some locations generally only have a predetermined “roll” for the type of harvest you get, there are some that have multiple types that you can get.
For instance in the Sweet-Smelling Forest, you might go through all of the harvesting marks and only get 1 rubian fruit. You could reload a save before harvesting the Forest, and go through it once more but this time get 5 rubian fruits instead.
=====
A useful Technique you get at some point Post Game status is called “Collector” and it’s super useful for harvesting. I’m unsure of the exact requirements to obtain it, though my guess is it involves harvesting a certain amount of times, or unlocking and harvesting from all harvest spots in a day.
The main draw of this technique is that you get DOUBLE (and sometimes triple depending on harvesting location) the harvesting loot from each spot every time.
[If someone is able to narrow down the requirements for this and inform me of it, I’ll add it to the guide.]
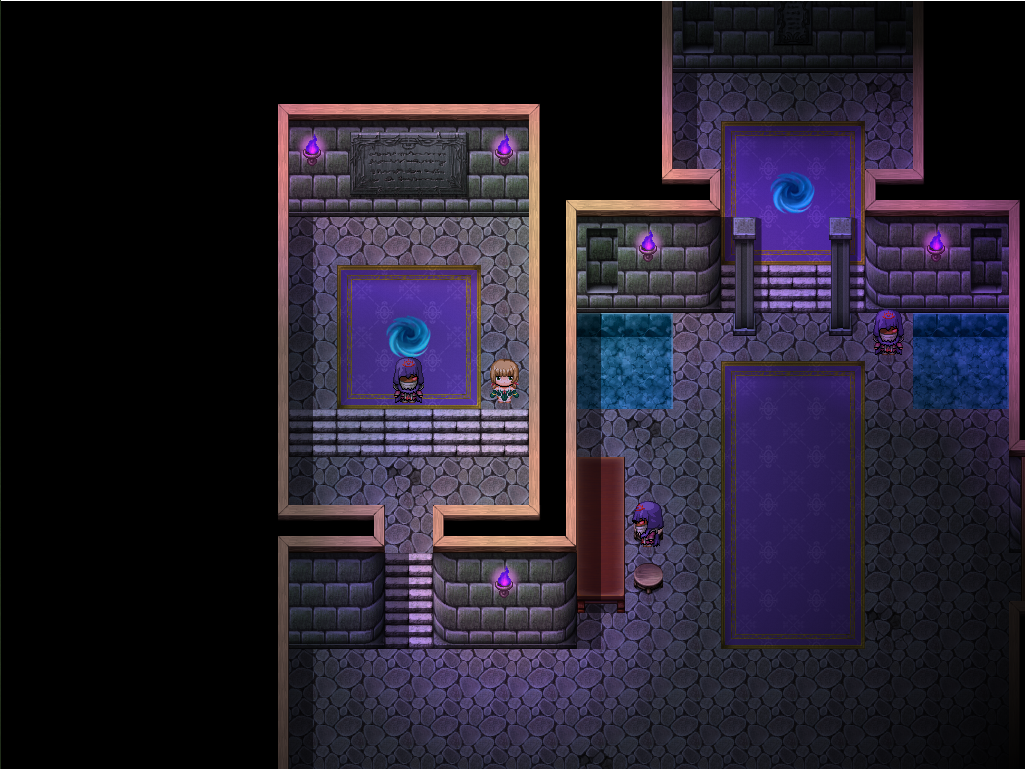
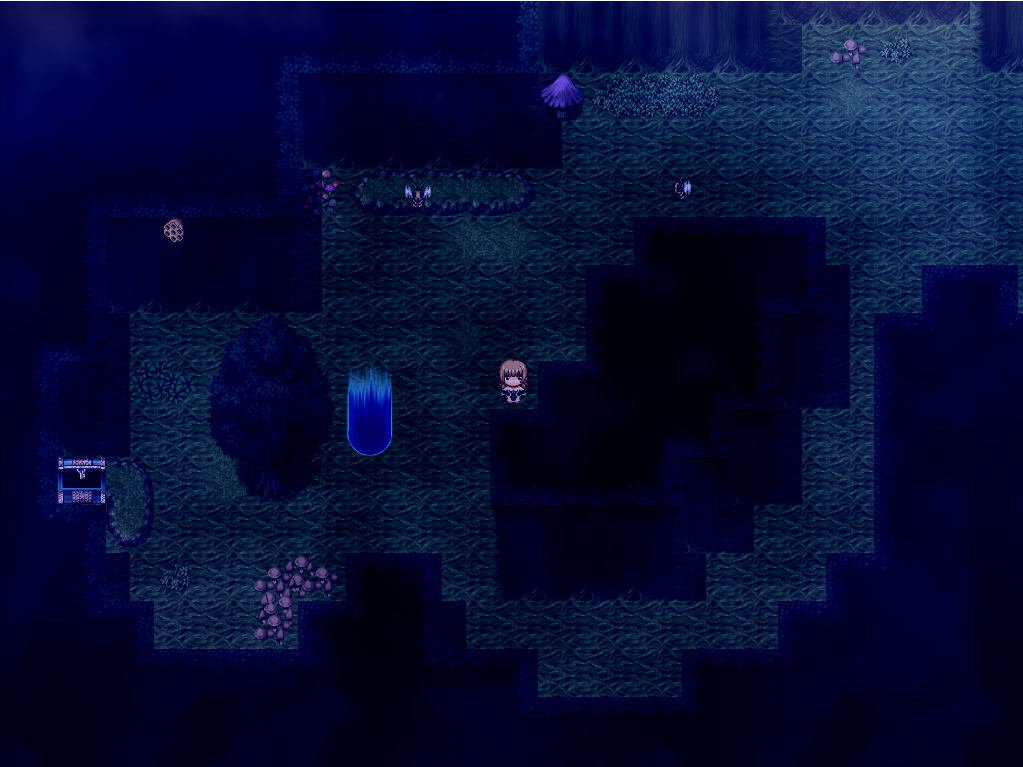
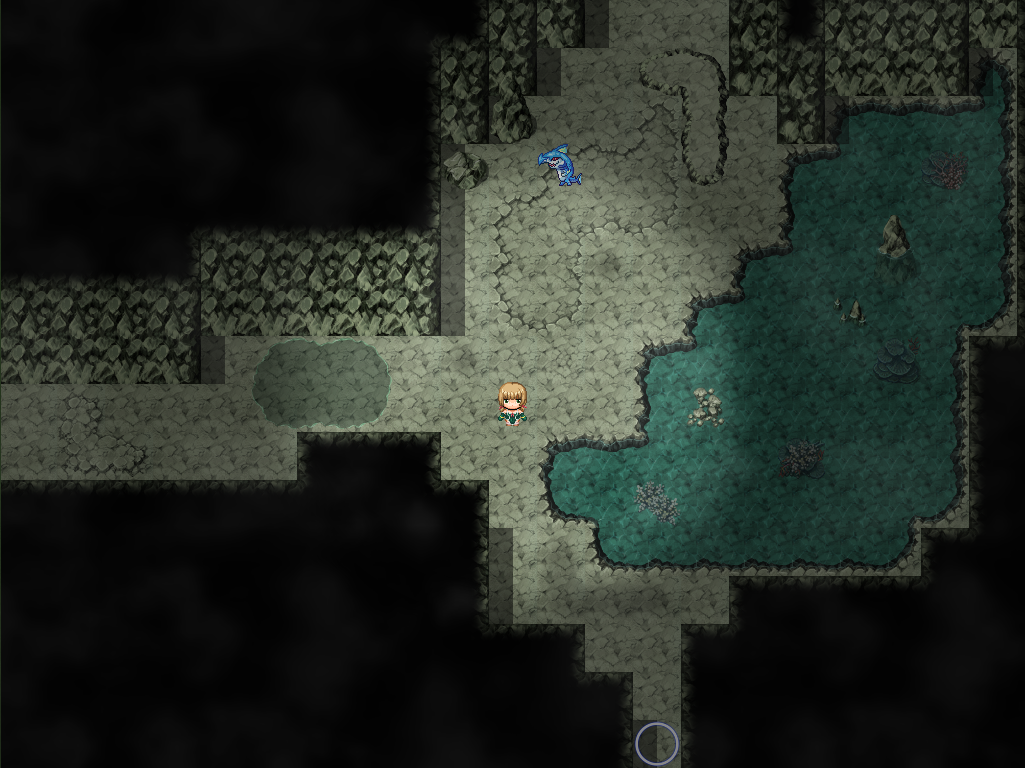
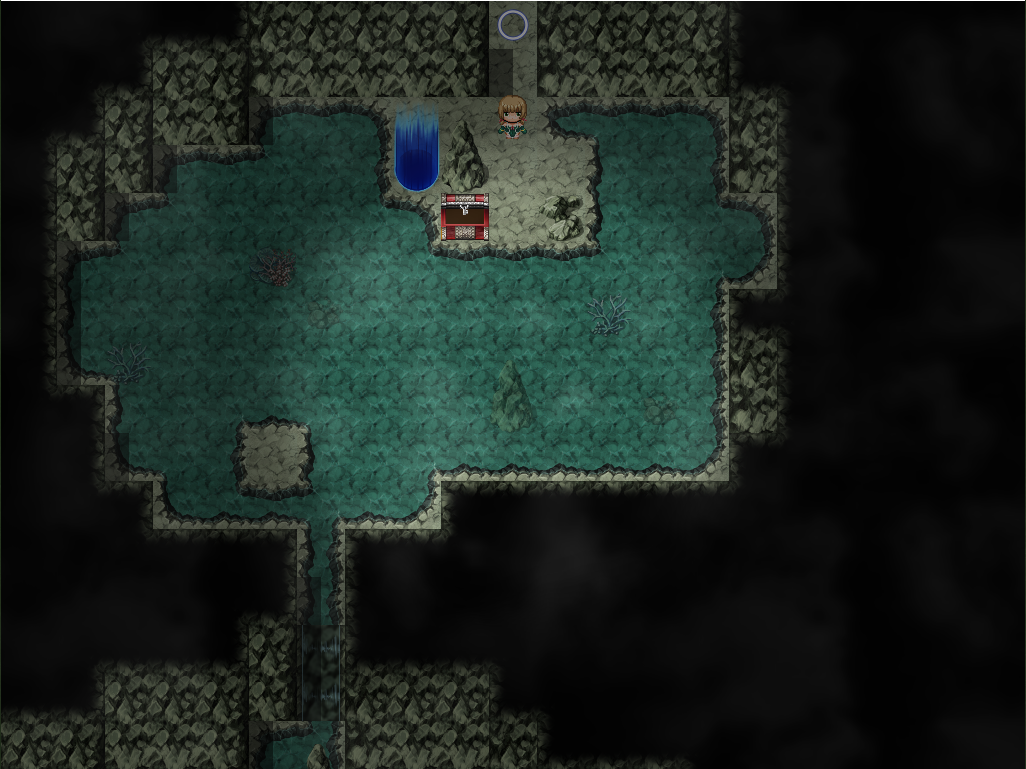
Night-Time Bosses
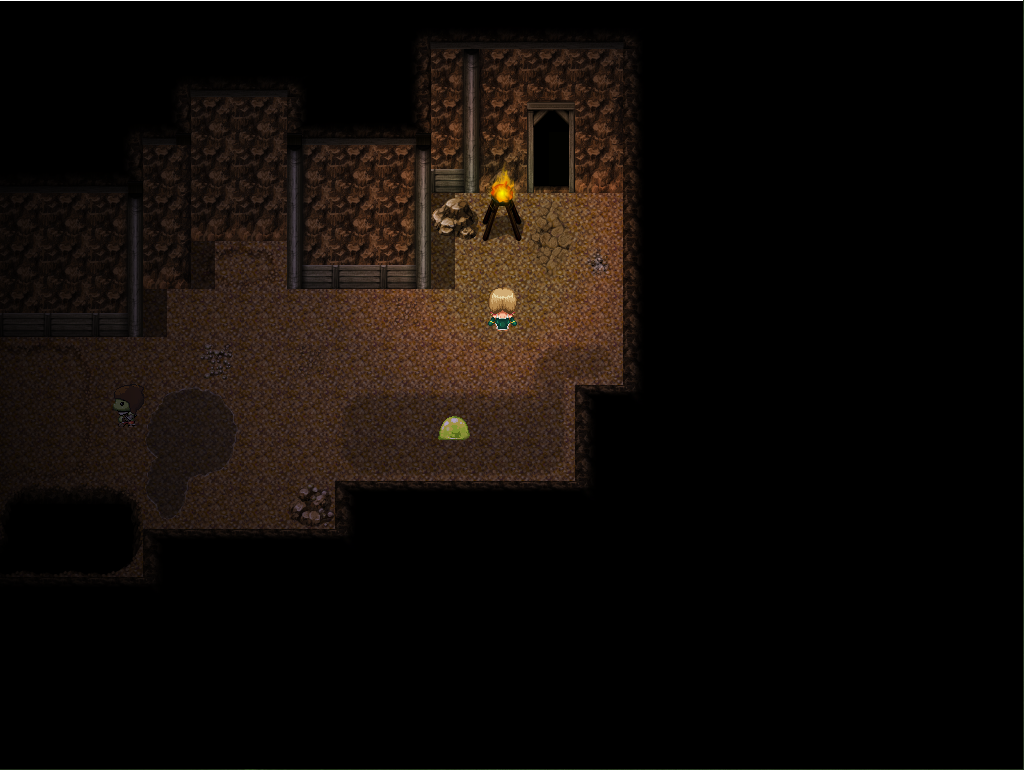
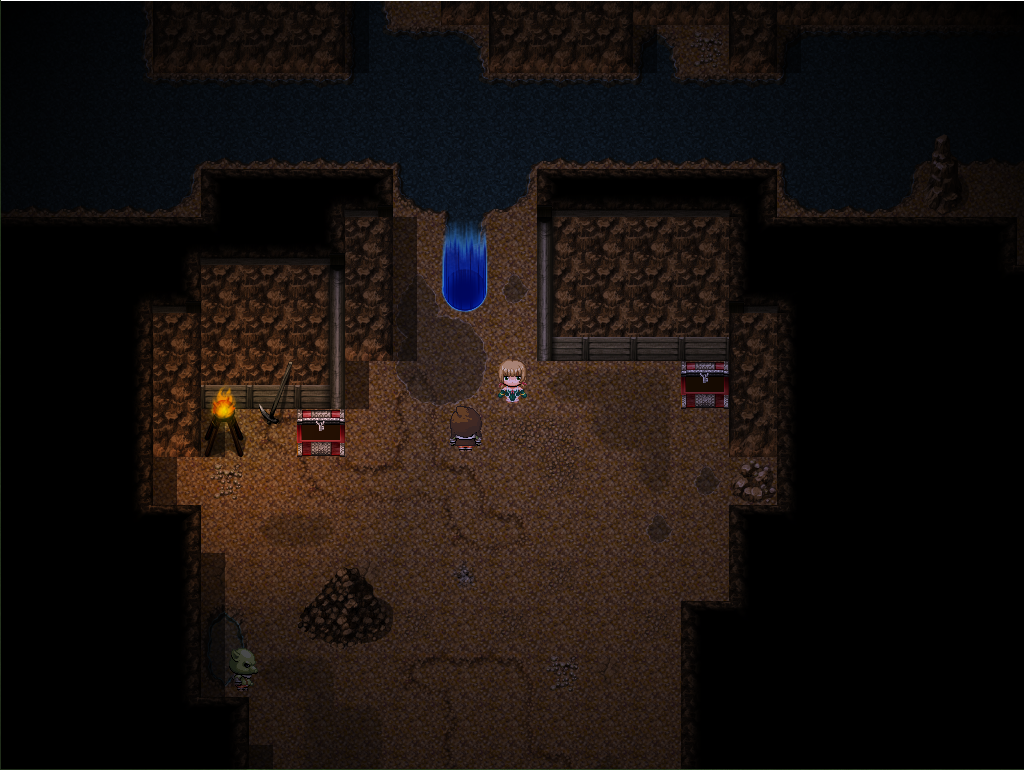
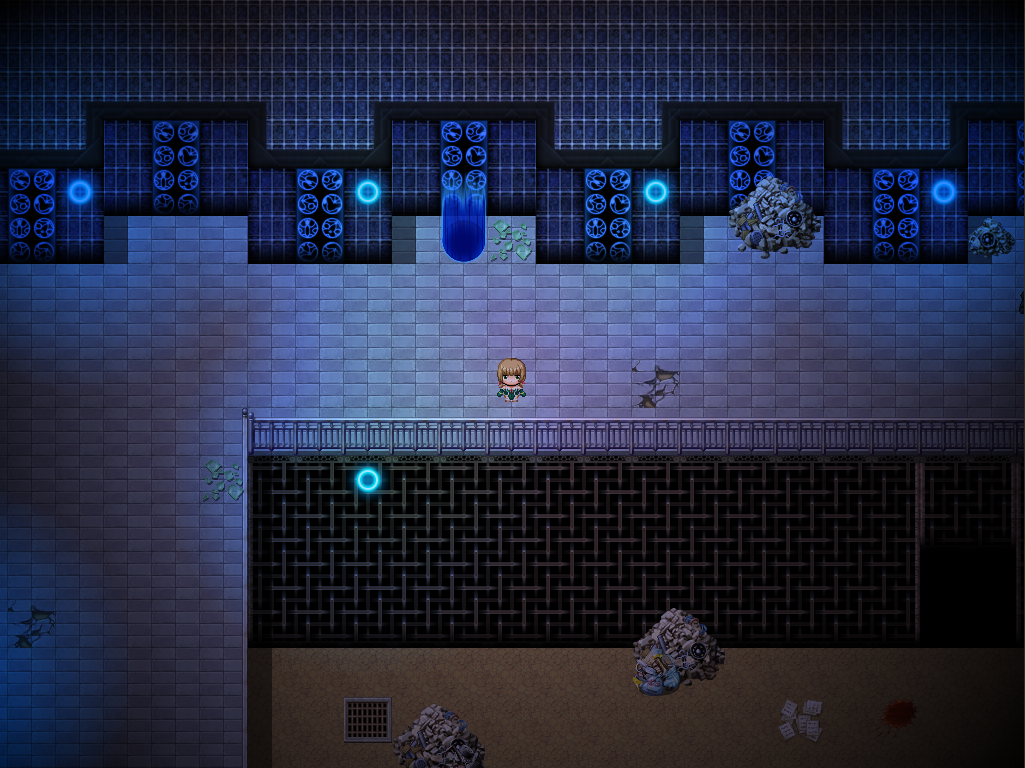
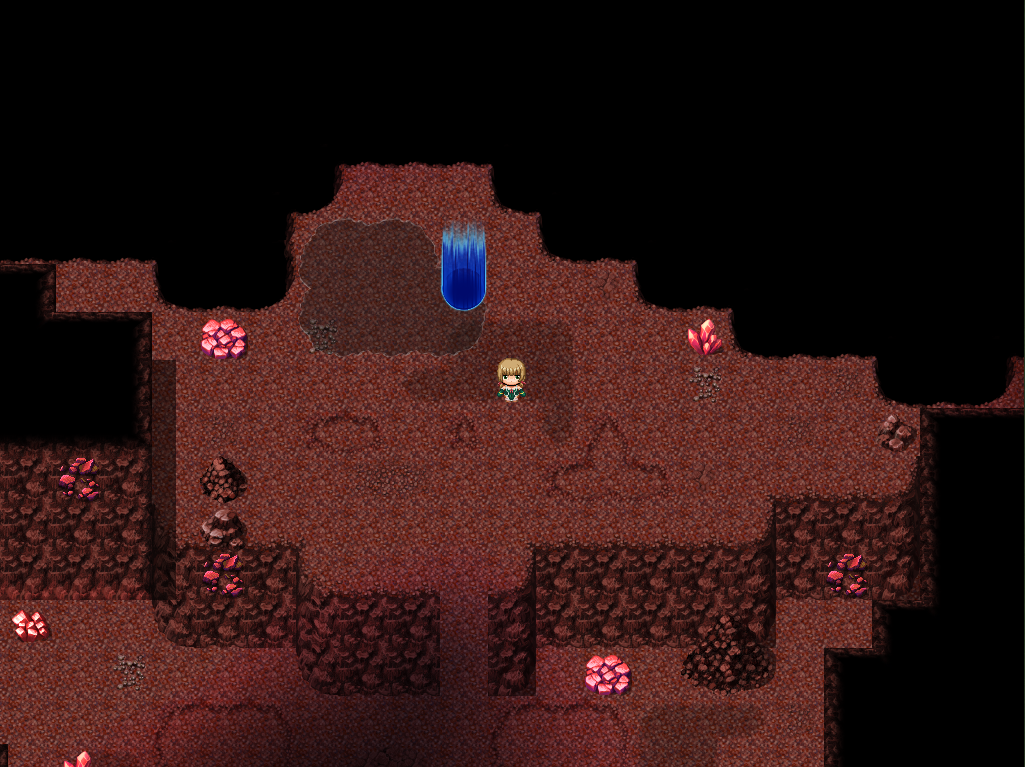
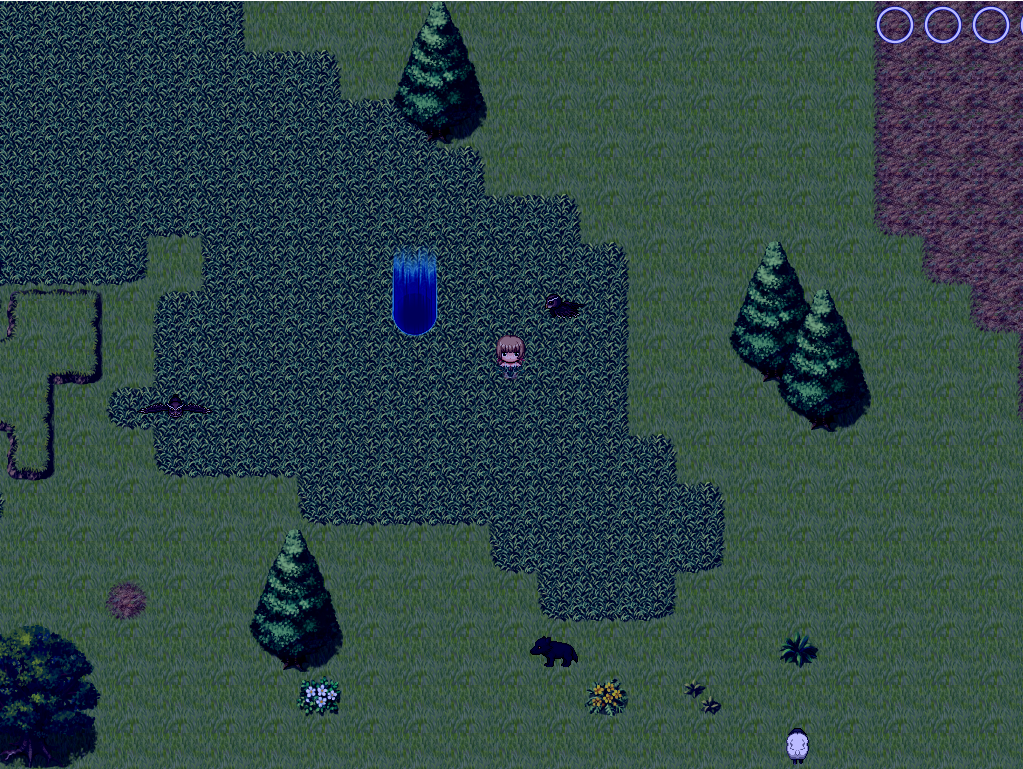
This deserves its own section because 1st) they have to be found at night and 2nd) They have a difficulty curve. Which is all I needed in order to make it into its own section! So in here, I will order the bosses by difficulty (NOT BY LOCATION); and I will also provide pictures to pinpoint their locations.
One other thing to note: You CAN surprise all but one night-time bosses by initiating the battle on their right-side tile so you have an extra turn in the beginning.
=======
Basilisk (Forest)
HP: 4900
Drops: Wasp Emblem (100%); Gold Bar
Notes: Poisons semi-frequently, so having a wearable item to nullify poison is essential
Notes(2): You can gain an upper-hand on the fight by approaching it on the right side to initiate the fight, to get a free turn
=======
Kraken (Coastal Cave)
HP: 8000
Weakness: Electric-element magique
Drops: Sea Monster Emblem (100%); Pure Mana Water
Notes: Can poison you semi-regularly
=======
Demi-Orc Hero (Abandoned Mine)
HP: 9999
Drops: Warrior Emblem (100%)
Notes: Can be poisoned, can be put to sleep, can be blinded.
Notes(2): You can gain an upper-hand on the fight by approaching it on the right side to initiate the fight, to get a free turn
=======
Grim Reaper (Temple)
HP: 13333
Weakness: Holy-element magique
Drops: Harvest Emblem (100%) ; Pure Mana Water
Notes: You can gain an upper-hand on the fight by approaching it on the right side to initiate the fight, to get a free turn

=======
Outer God (Pilgrimage)
HP: 20000
Weakness: Qliphoth Sign (Melee-only when equipped)
Drops: Spiritual Emblem (100%)
Notes: You can gain an upper-hand on the fight by approaching it on the right side to initiate the fight, to get a free turn

=======
Chimera (Alchemy Facility)
HP: 25000
Weakness: Electric-element magique
Drops: Demon Beast Emblem (100%) ; Pure Mana Water
Notes: Attacks twice each turn.
Notes(2): You can gain an upper-hand on the fight by approaching it on the right side to initiate the fight, to get a free turn
=======
Leidran the Spirit Eater (Leid Mountain/Cave)
HP: 50000
Drops: Demon Dragon Emblem (100%) ; Dragon Blood
Notes: Highly resistant to all 3 offensive element-magique spells (Holy isn’t affected)
Notes(2): You can gain an upper-hand on the fight by approaching it on the right side to initiate the fight, to get a free turn
=======
Nuxy (Fear Plains)
HP: 50000
Drops: Giant Beast Emblem (100%) ; Nuxy Meat
Notes: Permanently regains 250 HP every turn.
Notes(2): You can gain an upper-hand on the fight by approaching it on the right side to initiate the fight, to get a free turn
=======
=======
I could have easily switched Leidran and Nuxy but I personally struggled with Nuxy more because of the passive healing from Nuxy was obnoxious.
True Final Boss
Name: Paracress Antithesis
HP: 120000
Weakness: Reverse Nemesis (unlockable spell) ; Qliphoth Sign (Melee-only when equipped)If you are seriously attempting to battle this boss (on any difficulty), it is highly recommended to be at least level 90-99, highest level staff you have (Shark Staff is best, Paracelsus Staff second best), best gear and accessories you can use (more on that later) and Rank 9 Priestess rank for the best possible skills to use. It’s entirely possible to beat this boss on a fresh NG playthrough, but it’s 100% recommended to battle in NG+, after unlocking all of the skills from the Fortune Teller (which all give good passive effects useful in this battle).
So first off, I’ll detail the best possible gear/accessories to have, followed by the next best; and if you can’t afford those, a final option will be presented though isn’t entirely recommended/guaranteed to let you win.
- Weapon: Shark Staff > Alchemic Staff: Paracelsus > Alchemic Staff: Aurora
- Body: Priestess Dress > Magique Uniform
- Head: Eden’s Flower Crown > Saint’s Ribbon
- Feet: Astral Boots > Silver Wings
- Accessory (1): Omnipotent Brand > Demi-god Soul > Eternal Coin > E. Master Ring
- Accessory (2): Forest Charm (for MP regen) > Qlipoth Sign > Destruction God Insignia
- Special: Nox’s Protection > Holy Woman’s Necklace
After the gear optimization, next is spells. Depending on the weapon and gear you’re using, your spell usage will also change drastically. If you have the Shark Staff or the Alchemic Staff: Paracelsus, you likely will not use any other offensive spell besides those primarily. The only concern comes from how you’re going to recover MP; either through item recoveries, or through an accessory that passive regens.
- Shark Staff’s Shark Bringer brings good consistent damage each turn, normally out-damaging the heal Antithesis can do.
- Alchemic Staff: Paracelsus’ Spirit Destruction, paired with E. Master Ring‘s high-level magic works well. Massive MP consumption.
- Reverse Nemesis is a must-have for Phase 2 and beyond in this battle, and everyone can obtain it by beating the secret boss (looting the chest behind it) in the Forgotten Treasure House. It simply nullifies the Holy Energy buff Antithesis applies to himself while also doing some weakness-typed damage to him.
- Senescence debuffs Antithesis considerably well, allowing you to reduce the amount of physical and magical damage you receive whenever it’s applied (although managing to keep it active is tough sometimes when you’re being hit by a streak of bad luck).
- Drop of Leight is the best possible heal you can use (besides item heals if you want to save MP and have an abundance of HP-healing items).
- Rainbow Protection is the best counter to the debuffs that Antithesis casts on you. If you’re hit with the debuff from Qliphoth Elixir, simply using it will erase the debuffs and protects you from further ones until they run out. One thing to take note on, if you’ve been hit with Qliphoth Elixir to always heal first before using Rainbow Protection in-case Antithesis charges up for Nemesis immediately after. You can survive if you have full HP + defending even with lowered stats; the same can’t be said if you’re defending with low HP but full stats.
Lastly, item usages. For these, I’ll simply name off the best recovery items to prioritize over others in the same category, then some additional items to consider using in Phase 2-3 (or 3 only if limited supplies).
- For HP recovery: Complete Recovery ; Life Essence ; Nectar ; Sweet Syrup
- For MP recovery: Nectar ; Sweet Syrup ; Spiritual Water ; Pure Mana Water
- For additional buffs: Dragon’s Blood, Soul Powder, Heat Potion
Dragon’s Blood is the best item to save until the last phase of the battle, where you’re more likely to need to out-damage Antithesis through his 5000 HP heals. Next best is Soul Powder, which has a passive MP regeneration throughout its use along with a massive buff to your magical attacks.
——-
Now to the meat of the matter: how this boss functions + how to combat it.
Paracress Antithesis has 3 ‘phases’ or ‘stages’ it can effectively be categorized into.
Phase 1: Its initial stage it starts the battle with. This is generally the warm-up for both of you to feel each other’s attacks, see the damage each of you can dish out, and generally is the most important step of this battle. If you notice you’re not doing good damage, or you’re taking too much damage already, you’re not ready enough to battle this boss without some serious headaches and a lucky streak.
Phase 2: This phase starts when Paracress Antithesis starts ‘bathing itself with holy energy’ as a visible buff (and not the attack). What this buff means is: Antithesis does double the amount of damage for everything. If you were having trouble in Phase 1, Phase 2 isn’t going to be easier unless you have Reverse Nemesis. But if you do, simply use the spell whenever Antithesis buffs itself to remove it, and continue on in Phase 2 as you were in Phase 1. Simply watch out for its HP-halving attack (which massively debuffs you, too), and its 3000 HP heals. Other than that, Phase 2 is no different than Phase 1.
Phase 3: Continuing onwards in the long battle, Antithesis will eventually enter Phase 3, where instead of a 3000 HP heal; it becomes a 5000 HP heal. Along with that change, it also has a Miasmatic Flare attack it will use. Besides those 2 changes, the fight remains the same. Simply remove the holy energy buff whenever possible to make the fight easier, and keep your health up.
The different possible attacks Paracress Antithesis can do:
- Tentacle arms (x2 physical attack)
- Eclipse (single medium-damage magical attack)
- Qliphoth Elixir (Miasmatic-typed(?) attack that halves your current HP and debuffs your stats significantly)
- Miasmatic Flare (single high-damage magical attack)
- Nemesis [After a 1-turn warm-up message of collecting massive amounts of holy energy] (x3 magical attacks)
- 3000 (5000) HP self-heal [Although technically not an attack, needs to be listed here]
===================
Below is the stat-page and build I used in the video at the bottom of this section.
Please note: These stats should not be used as a baseline to what you’ll need to beat Antithesis on the default (Story) difficulty. This is just natural character progression through 3 play-throughs as a NG++ save file.
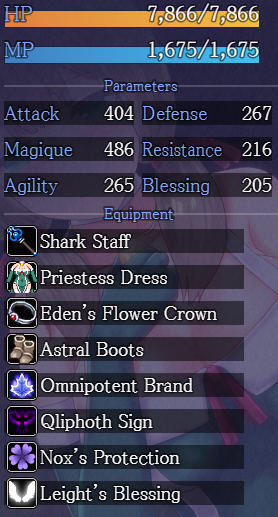
As seen in the video, Antithesis on Very Hard does whatever whenever so it’s not the best guideline to what I’ve mentioned earlier. It does show how the fight can progress and what you can do to win.
By DaKatGod
Incredible Guide!!!!! This is my favorite H-Game,,, now, thanks to you, i can finish it completely, thankyou very much 😀