This guide will review the breaching interface, basic breaching mechanics, types of breaches, and strategies and tips for optimal solutions.
Introduction
Note that the final sections of this guide – Strategy and Tips – will contain information that will completely trivialize all Breaching puzzles (based on Normal difficulty – need confirmation this is also true at higher difficulties). If you don’t wish to have the puzzles completely trivialized for you, do not read the final two sections. The other sections will still provide some useful information.
Interface
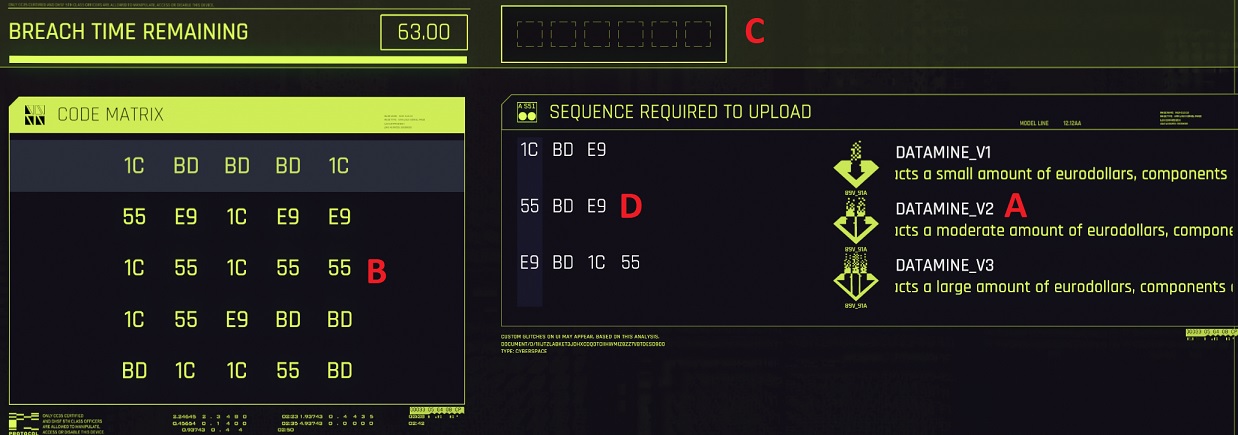
A) This is the list of Daemons (software) available to install during this breach.
B) This is the hex digits matrix that you’ll use to add hex digits to your buffer.
C) This is your buffer, the size of your buffer will be discussed later.
D) These are the hex digit sequences that will allow installation of each of your Daemons.
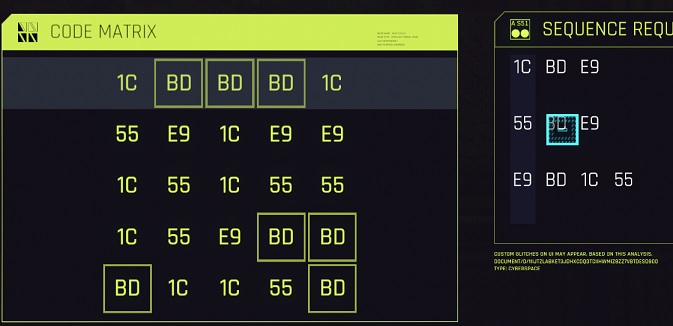
You can hover over digits in the sequences of your Daemons (see: D) to have them highlighted in the Matrix:
Breaching Basics
The purpose of the breaching minigame is to upload Daemons – this is special software that will impact the network it is uploaded to (more on networks in the next section). Which Daemons you wish to install is up to you. You can attempt to install all of them, or you can limit yourself to a subset of the Daemons available, that choice is up to you.
Note that from my experience, you will only get the opportunity to breach a network one time. If you want to upload a Daemon to that network, it must be done during the initial breach as all future breaching attempts will be blocked.
To install a Daemon, you only need to do 2 things: make sure it’s sequence appears in the buffer in the same order as shown on the right, and make sure that the sequence is uninterrupted (no non-sequence digits separate the sequence).
For example, take the sequences in the images above, if you ended a breach with the buffer of:
55 1C BD E9
Then DATAMINE_V1 would be installed because it’s sequence – 1C BD E9 – appears in the buffer in order, uninterrupted.
DATAMINE_V2 would not be installed. Although it’s sequence does appear in the buffer and is in the correct order, the sequence is interrupted with a 1C after the 55. Once 1C was entered, this Daemon would only install if it’s sequence was started again from the beginning – 55 1C 55 BD E9. Of course, this would have prevented DATAMINE_V1 from installing, as the second 55 would interrupt it’s sequence.
DATAMINE_V3 would also not be installed. Although all its hex digits are present in the buffer, they do not appear in the correct order.
This is the only requirement for installing a Daemon. You can install Daemons in any order, and you do not have install any Daemons you don’t wish to (with a small caveat discussed below). You only need to make sure their sequence appears in order, uninterrupted, in the final buffer.
Creating the buffer involves selecting hex digits from the matrix on the left. You will always start by choosing 1 of the digits in the first row. The digit you choose will set the column from which you’ll choose the next digit.
For example, take the following matrix:
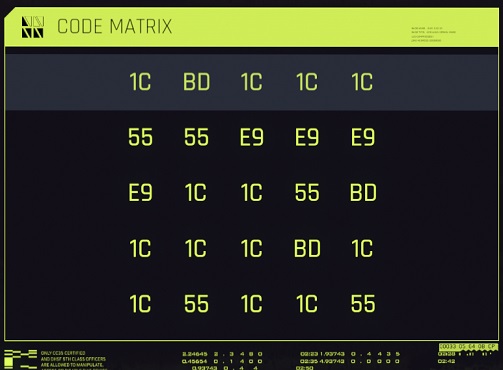
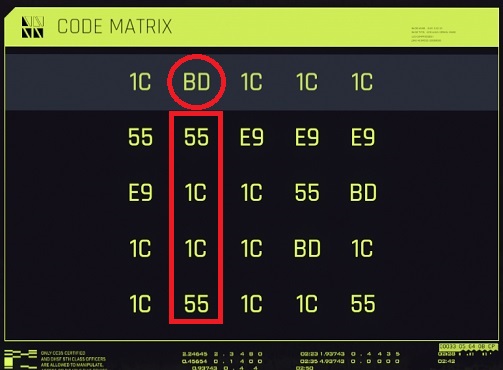
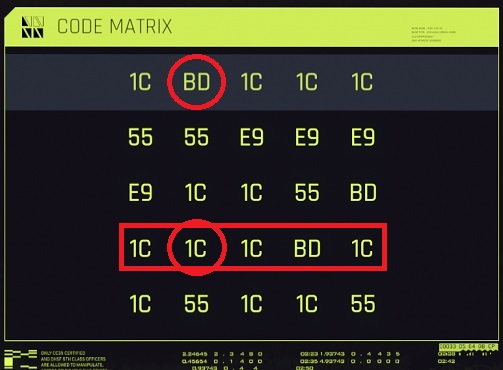
If BD is chosen from the first row, then the 2nd column will be the only available set of digits from which to choose the next digit (see box in the image to the right).
If the 2nd 1C is chosen, then the 4th row will be used to choose the 3rd digit.
It needs confirmation, but I do not believe that the same digit can be chosen twice – once a digit is chosen, you must choose a different digit, even if a previously chosen digit appears in the current row or column.
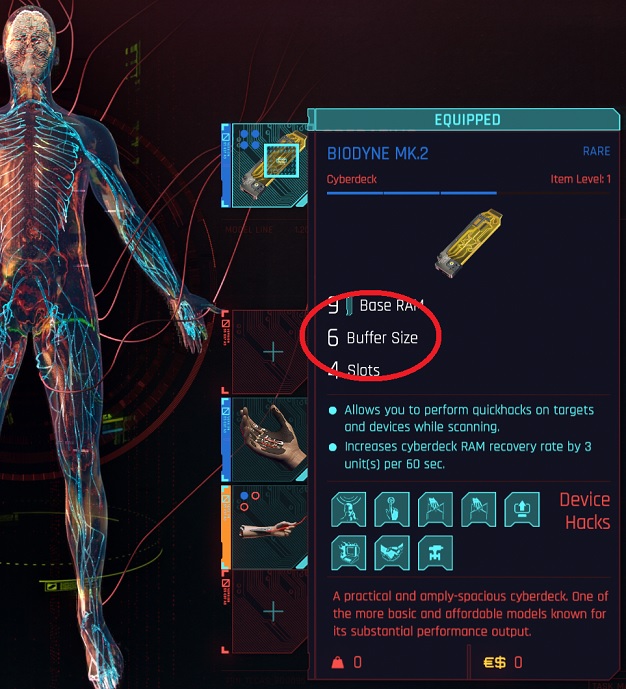
The total buffer space you have for a breach is determined by your Cyberdeck (a type of Cyberware). The “Buffer Size” stat on your Cyberdeck determines the buffer size for breaches (it’s possible this can be improved with mods or perks, but I have not yet found any):
You can reduce the buffer space needed to install a Daemon whenever the last digit or digits of a Daemon’s sequence exactly match (including order) the starting digit or digits of another Daemon’s sequence. In this case, to save buffer space, you must install one Daemon after the other (this is the only time where the order that Daemons are installed matters).
As an example, take the following Daemon sequences:
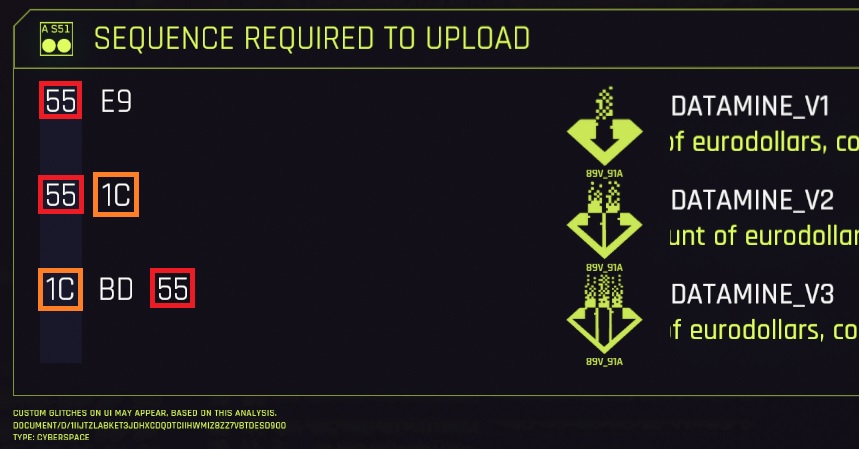
Notice that both DATAMINE_V1 and DATAMINE_V2 start with a 55. These two Daemons can’t be used to save buffer space. Remember that we must match the end of one sequence to the start of another. Since these are both starts, they can’t be paired.
However, V3 does end with a 55, so V3 could be paired with V1 or V2. If we wanted to pair V3 with V1, we would put V3 into our buffer, then put the last digit of V1 into our buffer, giving us:
1C BD 55 E9
Notice that our buffer now contains the V3 sequence in order, uninterrupted, and it contains the V1 sequence in order, uninterrupted – but they overlap! Overlapping is fine, remember we said that only order and being uninterrupted matter. Overlapping has no impact except to save buffer space.
To save buffer space, we had to install V3 first. If we install V1 first, then V3:
55 E9 1C BD
You’ll see that while V1 appears in the buffer in order and uninterrupted, V3 appears both out of order and interrupted by E9. But sometimes the order can be reversed. Look at V2 and V3. V2’s starting digit matches the ending digit of V3, and V2’s ending digit matches the starting digit of V3. If we install V3 first, then V2, our buffer looks like:
1C BD 55 1C
If we install V2 first, then V3:
55 1C BD 55
In both cases, you can find the sequences for V2 and V3 uninterrupted and in the correct order.
Lastly, you can match multiple digits at the beginning and ends of a sequence, take the following Daemons as an example:
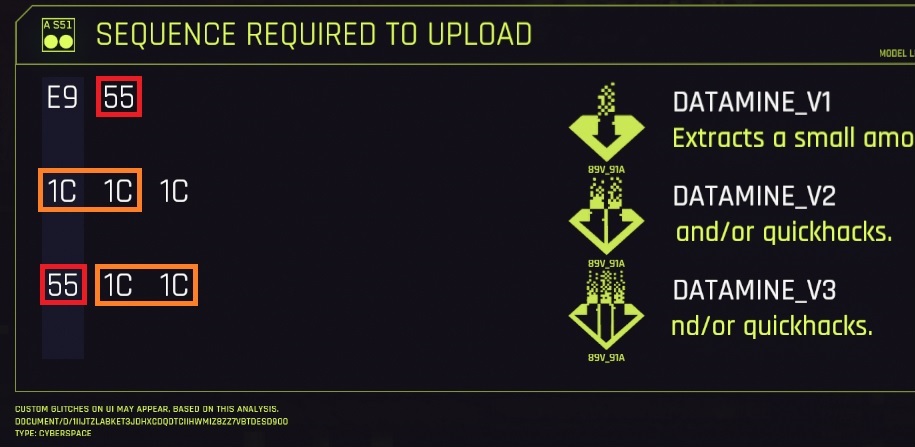
In this case, if you install V3 and then V2, you only need 4 buffer space:
55 1C 1C 1C
Notice that these 4 digits contain both the complete V3 sequence, and the complete V2 sequence, and both are in order and uninterrupted. In fact, you can install all 3 Daemons with just 5 buffer space:
E9 55 1C 1C 1C
Note that to do so, however, you had to install them in a specific order: V1, V3, V2. While you are always free to install Daemons in any order, installing them in a specific order can be useful for saving buffer space.
One extra nuance to saving buffer space. Take the following Daemons as an example:
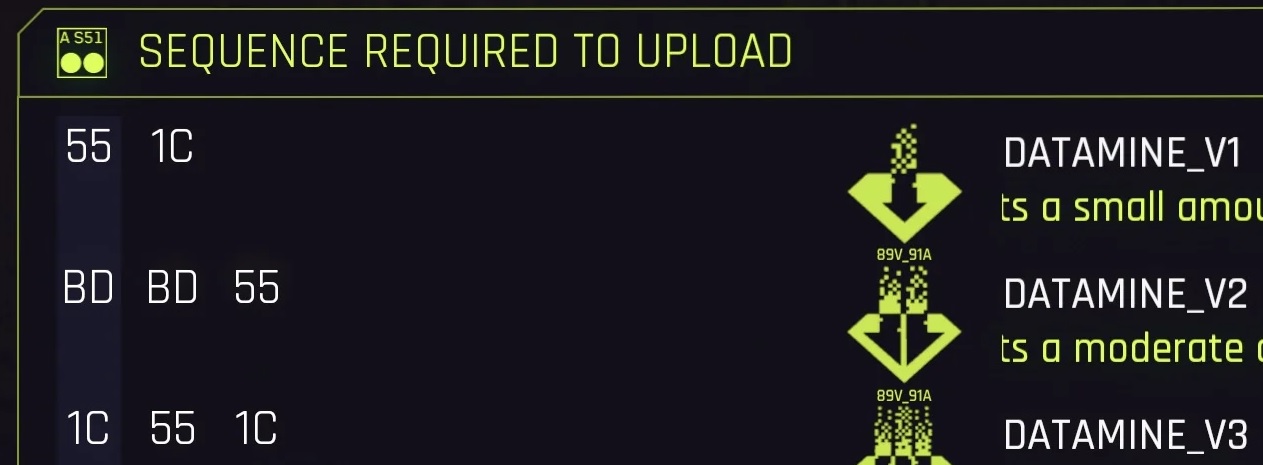
If you install V3, you are also automatically installing V1. That’s because V1’s sequence is entirely contained with V3. For example, let’s say you end your buffer with just V3’s sequence:
1C 55 1C
Notice that you can also find V1’s sequence in this buffer. In this special case, V1 happens to be a subset of V3. When a Daemon is a subset of another Daemon, installing the latter Daemon automatically (and unavoidably) installs the first Daemon. In this case, there’s no way to install V3 without also installing V1.
To summarize, the goal of breaching is to install Daemons. Daemons can be installed in any order and you do not have to install a Daemon if you don’t want to. Daemons are installed by ensuring that their sequence appears in your final buffer in the exact order shown and uninterrupted by other digits. You can add digits to your buffer from the matrix by choosing a digit in the first row. Then a digit from the same column as the first. Then a digit from the same row as the second, etc.. You can save buffer space if you can pair the last digit of one Daemon to the first digit of the next Daemon – if you want to do this, then the order you install Daemons does matter.
Access Points are the simpler of the two types of breaches, so we’ll discuss them first.
Access points will show up with a network icon, but you can also remember it as the network icon looks similar to a bow on a gift box:
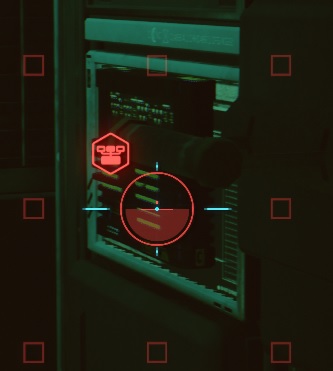
Breaches of this type will reward you with credits and crafting materials that can be used to make quick hack mods. You can think of Access Points as being similar to locked chests in other RPG’s. In this case, the Access Point requires a sufficiently high intelligence score for you to open it, instead of a lockpicking score.
These breaches cannot be performed remotely (from a distance, or via a camera network). You must physically jack into an Access Point, and therefore must be standing next to it.
All other breaches (to my experience) fall into another category that I’ll refer to as a network breach. These will appear simply with the intelligence symbol.
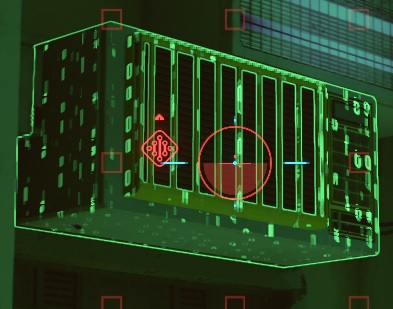
You can think of these networks in a very similar way to networks in real life. They’re an interconnected series of computers and systems. In the case of Cyberpunk 2077, many of the NPC’s have cybernetic mods that also connect them to the network, so even NPC’s may be a part of the network you are breaching.
Generally speaking, what is in the network is an arbitrary collection of computers, cameras, turrets, devices, and NPC’s in an area. The developers generally include any device that can be breached in a specific mission area to all be on the same network, therefore breaching anything in that area breaches everything simultaneously.
Once you breach a network, you cannot breach it again later – everything on that network is considered already breached, so bare in mind that the access point you use to breach a network and the Daemons you upload cannot be changed while you remain in that area.
Strategy
Warning: the following information will trivialize the difficulty of breaches (at least on normal difficulty, higher difficulties need to be confirmed). It is unlikely CDPR intended breaches to be as easy as this information will make them as it makes certain in game stats and equipment irrelevant.
If you don’t wish to have this spoiled for you, don’t continue.
The timer for breaches will only start running when you’ve selected a digit from the matrix to place in the buffer (this needs to be confirmed on difficulties higher than normal). Therefore, you have all the time you need to determine exactly what Daemons you want to install, the optimal order (or orders, if some Daemons are interchangeable) to install them, and the path through the Matrix that will enable you to do so.
With this information, you should be able to install virtually any number of Daemons your buffer will allow in under 5-10 seconds. The breach time is virtually irrelevant and can be completely ignored.
Choose the Daemons you wish to install. Then add together the number of digits in their sequences to determine the buffer space you need. If you plan to use overlapping of sequences to reduce the needed buffer space, then subtract 1 for each overlapping digit, for example:

If you wanted to install all 3 Daemons, that would be 8 buffer space. If you use overlapping, then subtract 1 for the overlapping 55’s, and subtract 2 more for the overlapping 1C’s. The new total is 5 buffer space.
This method will help you determine whether you have enough buffer space to install all the Daemons you want and how flexible you can be on the order you install them. If you have excess buffer space, you may not need to do all the overlapping available to you, or you may even be able to insert “junk” digits if doing so helps you move around the matrix to a better position.
If you still don’t have enough buffer space after overlapping (or if you can’t achieve the minimum buffer space because of matrix layout – discussed further down), then repeat this process to count buffer space but this time exclude the Daemon you least wish to install (you’ll have to skip that Daemon for this breach). Alternatively, you could save scum (save game before the breach and reload) or simply disconnect without starting the breach and then reconnect to get a new puzzle.
Next, begin planning your path through the matrix. You have to remember the order you’re going to install your Daemons in. Remember, don’t choose any digits yet. You are still just planning and you want the timer to remain off.
Map your route by deciding which digit available in the first row you want to start with. Then look at what is available in the corresponding column as a 2nd digit. When you have a second digit, see what digits are available in that row as a 3rd digit. Repeat this process until you’re either stuck in a row/column where you can’t choose the next correct digit, or you’ve finished all the sequences for all the Daemons you wish to install.
If you do get stuck, back track. Undo your last selected digit and see if that same digit appears multiple times in the last row or column you were choosing from.
For example, if you chose digit 1 from the first row, but couldn’t find the correct 2nd digit in the corresponding column, see if you can find the same first digit again in the first row (repick the 1st digit). If you can, see if the correct 2nd digit appears in the new column.
Keep repeating this process of back tracking as needed. If you’ve exhausted all possible paths through the matrix and cannot find a way to install the Daemons you wish to install in the order you wish to install them (it is possible that some combinations will be impossible based on the Matrix you’ve been given), you may need to give up on installing 1 of the Daemons in your list and come up with a new path. Alternatively, you could try save scumming or disconnecting and reconnecting.
Also, if you have excess buffer space that you don’t need, you may be able to insert some “junk” digits to help yourself move to a better location on the matrix. For example, let’s say you’re installing the 3 Daemons listed above, and you’re using overlapping so only need 5 buffer space, but you have 6 available.
You need to install V1 first, which starts with E9. But what if E9 doesn’t appear in your starting row? Not a problem! You have 1 extra buffer space. Look for a column that has an E9 in it. If you choose the digit at the top of that column as your first “junk” digit, then you can begin your 5 digit sequence with E9 using the E9 in that column. Use the above information to plan out the path to ensure you can reach all the other digits in the correct order.
Junk digits don’t have to be used only at the beginning of your buffer. But if you decide to use a junk digit to navigate the matrix, know that you must do it in between Daemon sequences (if you do it in the middle of a sequence, it will interrupt the sequence and stop the Daemon from installing), also note that you can’t do it where you plan to overlap digits. For example, if you wanted to add a junk spacer after V3 and before V2, then you couldn’t overlap 1C 1C and you’d need 8 buffer space (5 original buffer space, +1 for the junk digit, +2 for not overlapping 1C 1C).
Once you’ve decided on the Daemons you’ll install and found a path through the Matrix to install them, I like to practice the path once or twice to make sure it works and I remember it, then begin executing.
While executing, don’t feel rushed. You likely have plenty of time and you already know where you’re going. Take your time to choose the correct digit, then proceed to the next.
Tips
- Look at the starting digits of your Daemons and the digits in the first row. If any of your Daemons starts with a digit that doesn’t appear in the first row, know that you can’t begin your buffer by installing that Daemon (unless you use a “junk” digit from the first row).
- If any of your sequences requires you to enter the same digit twice, hover over the digit to see where it appears in the Matrix. If the digit never appears in the same row, or if it never appears in the same column, you’re going to need to do some special planning to input that Daemon’s sequence.
- Don’t make installing Daemons more complicated than it needs to be. Sometimes overlapping makes things easier, but many times it doesn’t. The flexibility to install Daemons in any order is strong. If your buffer space allows you to install Daemons without overlapping, don’t try to force an overlap if it’s easier just to install them in a different order.
- It’s quick and easy to tell which Daemons can be “paired” for overlapping, just look at the last digit of a Daemon, then the starting digit of all the other Daemons. If you find a match, they can be paired. Repeat this for each Daemon you want to install.
- If you’re having trouble finding a path that installs the Daemons in the order you want, make sure you haven’t overlooked any other overlapping combinations (especially using the tip above!). Perhaps there’s a different order you can install the Daemons in that will be easier?
Related Posts:
- Cyberpunk 2077: 100% Achievement Guide
- Cyberpunk 2077: How to Fix the Game is NOT Launching
- Cyberpunk 2077: How to Fix the Game Constantly Crashes on Window 7
- Cyberpunk 2077: Stutter Fix and FPS Boost
- Cyberpunk 2077: How to Fix Black Screen Loading Save

