
I’ll be upfront about something before you read any further: this guide is built around a compact game, and everything interesting in it lives near the ending. If you care about discovering the true route yourself, close this tab. If you’re like me and just want a clean record of what triggers what so you can hit every ending without guessing, this is exactly that. I’ve organized it so you can check your progress against the game’s own hidden numbers rather than fumbling through the dark.
What This Guide Covers (And a Spoiler Heads-Up)
I put this together as a quick reference for myself first and decided it was worth sharing. It documents the sleeping mechanic, the ending conditions, and the hidden elements — including the one tucked away behind the staff roll. Fair warning again: end conditions and secret content get spoiled throughout, so this is a post-playthrough read, not a first-time companion.
The Sleep Phase: Where Every Point Comes From
The core of Opi Popi is the sleeping sequence, and everything hinges on how many action points you’ve racked up before you drift off. For the protagonist there are three touchable spots, and the last one genuinely caught me off guard — I almost never thought to poke at it.
Two key things about investigating objects: checking the same spot twice triggers an event, and each item-related achievement unlocks naturally when you view that repeated interaction. A third check on the same object does nothing for your drowsiness, so don’t bother cycling the same object endlessly.
Action Points — Protagonist (3 Total)
- Hair
- Clothes
- Arm — honestly the easiest one to overlook
Action Points — Room (11 Total, 10 Counted)
The room is where most of your points sit. Here’s my full list — note that the Wardrobe shares its event with Clothes on the protagonist.
| Object | Note |
|---|---|
| Houseplant | — |
| Wardrobe | Same event as Clothes |
| Music Player (desktop) | — |
| Mug / Door (desktop) | — |
| Book (desktop) | — |
| Light / Switch (ceiling) | This is the important one |
| Diary (desk) | — |
| Incense (desk) | — |
| Bed | — |
| Cat Plush | — |
| Window | — |
The item achievements each pop when you re-examine the same location and trigger its event. Everything else unlocks through the individual ending achievements plus one final achievement named after the game itself. That last one, from what I can tell, is tied to a special event firing — I’ll admit I haven’t fully confirmed the trigger, but it ties directly into the roll-skipping tip further down, so read that before you assume you’ve missed it.
Reading the Ceiling Numbers: Your Ending Hint
Here’s the part that made the whole design click for me. When you examine the Light, a number appears on the ceiling — and that number is your ending condition hint. Two thresholds matter:
- /5 — Fill this and you get the Good Ending. It fills when you take actions on sleep-related items. When you qualify, you’ll get a sparkle sound effect and a visual flourish, so you’ll know it’s counting.
- /2 — This is the True Ending track. It fills when you recall memories tied to traces of someone — items like the Houseplant, Incense (aroma), or Wardrobe when you examine them a second time.
If you fall into sleep without meeting these conditions, you land on the Normal Ending. The content doesn’t shift much outside of True, though I have a suspicion the Good Ending tweaks a bit of dialogue based on whichever item you touched last — don’t quote me on that one, it’s just a hunch.
Managing Your Drowsiness Value
You can watch all of this play out through the message log by scrolling up with the mouse wheel — it tracks your sleep checks and how your drowsiness value moves. From what I’ve observed, crossing 6.0 triggers a cutscene, and hitting 12.0 or higher kicks off sleep and starts the ending. That means you need to satisfy the conditions above before you pass 12.
There are plenty of ways to investigate, and the conditions themselves aren’t hard if you keep half an eye on the ceiling number. The trickier part, oddly, is steering toward the Normal Ending on purpose — it’s more restrictive than you’d think. If you want to force it, one pattern that works is:
- Light ×2
- Mug ×2
- Bed ×2
- Incense ×2
So What Does the Title Even Mean?
It never gets stated out loud, which I appreciated. There’s a small message window at the bottom of the in-game config menu that explains it. The text reads that the name is a shortening of “opium poppy” — a type of poppy that serves as a raw material for painkillers and anesthetics, and also connects to narcotics. I’ll leave what that implies about the story to you.
Don’t Skip the End Credits
This is the tip I’d hand to anyone finishing the True Ending. After the credits roll, if you let them play all the way through, a strange number appears: 04510000000. The problem is it’s painfully easy to skip with a mouse click, so resist that reflex. You can also re-read it from the title screen if you miss it.
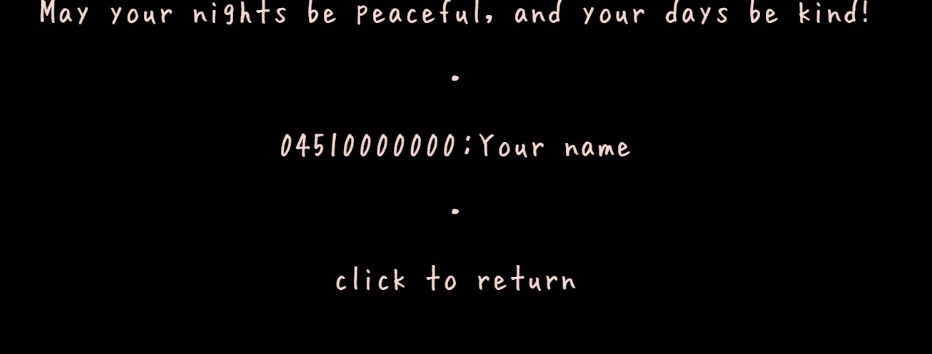
Here’s what to do with it: from the New Game name entry field, type that 11-digit number in using half-width digits. Doing so unlocks a short special event. It contains supplementary developer content about the game, so if the behind-the-scenes side of things interests you, it’s worth the minute it takes.
