

Organizing stock in WandNOrder is the kind of task that looks simple until you’re standing in front of a shelf with a fistful of tarot cards and no idea which one goes where. This guide lays out the exact placement rules for all three zones — tarot cards, wands, and potions — so you can shelve everything correctly the first time instead of shuffling items back and forth.
A quick note before we dive in: the guide covers Zone 1 in full detail with mapped shelf positions, while Zone 2 and Zone 3 are documented by category and color. Screenshots for the later zones are still on the way, but the written placement rules below are complete as-is.
How Progression Between Zones Works
Before any placement matters, you need to actually reach the next zone. Each level must be cleaned to 100% completion, and once that threshold is hit, a portal opens up to take you to the following level.
Tracking your remaining work is straightforward — there’s an indicator in the upper-left corner of the screen showing how many shelves and items are still left to handle. When you pick up a cleaning item, that same indicator updates to show how many messes remain and what kind they are, which makes it much easier to plan your sweep instead of wandering aimlessly. It’s a small UI detail that saves a lot of backtracking, and it’s worth checking regularly rather than only when you feel stuck.
Zone 1: Tarot Cards
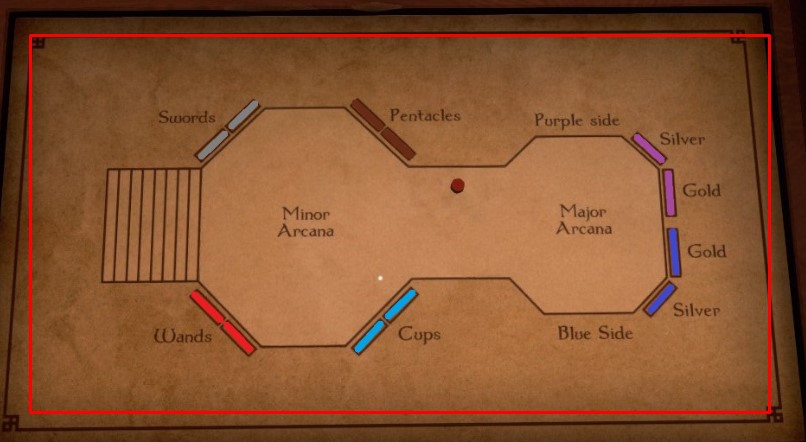
Tarot cards are split into two big families — the Major Arcana and the Minor Arcana — and each one follows its own shelving logic. Get the shelf orientation right first, and the rest falls into place.
Major Arcana Placement
The Major Arcana cards are divided across four shelves, arranged by number sequence and by shelf color.
| Shelf | Location | Color | Cards |
|---|---|---|---|
| Blue Gold | Middle Right Shelf (6 Shelves) | Blue Gold | 5 – The Hierophant, 6 – The Lovers, 7 – The Chariot, 8 – Strength, 9 – The Hermit, 10 – The Wheel of Fortune |
| Blue Silver | Far Right Shelf (5 Shelves) | Blue Silver | 0 – The Fool, 1 – The Magician, 2 – The High Priestess, 3 – The Empress, 4 – The Emperor |
| Purple Silver | Far Left Shelf (5 Shelves) | Purple Silver | 11 – Justice, 12 – The Hanged Man, 13 – Death, 14 – Temperance, 15 – The Devil |
| Purple Gold | Middle Left Shelf (6 Shelves) | Purple Gold | 16 – The Tower, 17 – The Star, 18 – The Moon, 19 – The Sun, 20 – Judgment, 21 – The World |
Minor Arcana Placement
The Minor Arcana follow a simpler pattern: four suits, each with its own color, each split across two shelves. The first shelf holds the numbered cards Ace through 7, and the second shelf holds 8 through 10 plus the four court cards.
| Suit | Color | Shelf 1 | Shelf 2 |
|---|---|---|---|
| Cups | Blue | Ace, 2, 3, 4, 5, 6, 7 | 8, 9, 10, Page, Knight, Queen, King |
| Pentacles | Brown | Ace, 2, 3, 4, 5, 6, 7 | 8, 9, 10, Page, Knight, Queen, King |
| Swords | Gray | Ace, 2, 3, 4, 5, 6, 7 | 8, 9, 10, Page, Knight, Queen, King |
| Wands | Red | Ace, 2, 3, 4, 5, 6, 7 | 8, 9, 10, Page, Knight, Queen, King |
Zone 2: Wands
Wand placement is organized by floor first, then by section, with each section carrying its own color and material-tier breakdown. The Exotic (Gold) column lists antler-type materials, Metal (Silver) lists the metal materials, and Wood (Bronze) lists the wood materials.
Floor 1
| Section | Color | Exotic (Gold) | Metal (Silver) | Wood (Bronze) |
|---|---|---|---|---|
| Alteration (Left) | Gray | Antler, Chitin, Fossil, Ivory | Brass, Copper, Iron, Silver | Birch, Elder, Oak, Pine |
| Necromancy (Center) | Brown | Antler, Chitin, Fossil, Ivory | Brass, Copper, Iron, Silver | Birch, Elder, Oak, Pine |
| Illusion (Right) | Dark Purple | Antler, Chitin, Fossil, Ivory | Brass, Copper, Iron, Silver | Birch, Elder, Oak, Pine |
Floor 2
| Section | Color | Exotic (Gold) | Metal (Silver) | Wood (Bronze) |
|---|---|---|---|---|
| Restoration (Left) | Blue | Antler, Chitin, Fossil, Ivory | Brass, Copper, Iron, Silver | Birch, Elder, Oak, Pine |
| Destruction (Center) | Red | Antler, Chitin, Fossil, Ivory | Brass, Copper, Iron, Silver | Birch, Elder, Oak, Pine |
| Conjuration (Right) | Purple | Antler, Chitin, Fossil, Ivory | Brass, Copper, Iron, Silver | Birch, Elder, Oak, Pine |
Zone 3: Potions
Potions are the most color-dependent zone. Every section has its own distinctive color pairing, and matching the color correctly is really the whole task here. Sections are split across two floors, with each floor divided into a Moon Side and a Sun Side.
Floor 1 – Moon Side
| Section | Color |
|---|---|
| Cryogenic (Left) | Light Blue & White |
| Illusion (Center) | Dark Purple & Purple |
| Ethereal (Right) | Dark Purple & Light Purple |
Floor 1 – Sun Side
| Section | Color |
|---|---|
| Botany (Left) | Dark Green & Bronze |
| Beast (Center) | Dark Brown & Bronze |
| Aquatic (Right) | Dark Teal & Bronze |
Floor 2 – Moon Side
| Section | Color |
|---|---|
| Celestial (Left) | Navy Blue & Bronze |
| Tempests (Left) | Blue & Gold |
| Chronomantic (Center) | Yellow & Red |
| Enchanted (Center) | Blue & Silver |
| Anthropomorphic (Right) | Red & Gold |
| Draconic (Right) | Orange & Silver |
Floor 1 – Sun Side (Upper)
| Section | Color |
|---|---|
| Avian & Reptilian (Left) | Dark Red & Gold |
| Insectoid (Left) | Green & Light Green |
| Pyromantic (Center) | Orange & Red |
| Venoms (Center) | Green & Yellow |
| Geodes (Right) | Blue & Bronze |
| Metallic Ores (Right) | Brown & Red |
Floor 3
| Section | Color |
|---|---|
| Abyssal | Black & Red |
| Divine | White & Gold |
Editor Warning: The shelf layout for tarot cards is easy to mix up because the blue and purple shelves sit on opposite sides of the room. If you’re fast-tracking through a zone, double-check the shelf color before slotting anything — a single mismatched card can mean re-sorting an entire shelf later.
The three zones each reward a different kind of attention: Zone 1 asks you to keep card sequences straight, Zone 2 asks you to match section, color, and material tier at once, and Zone 3 is almost purely a color-matching exercise. Once you’ve internalized the color codes, placement becomes muscle memory rather than guesswork — and those powers of pattern recognition will carry you through the later levels with far less frustration.
