
Getting every choice, every record, and every hidden achievement right in Walkthrough can eat up hours of trial and error — especially since several prompts are one-shot and a handful of them quietly lock you out of trophies if you misclick. Everything below is the exact route I used, laid out episode by episode so you can clear it in one clean pass.
Two quick notes before you dive in. First, this covers the game up to the end of its Early Access content, so if you’re on a later build, expect a few extra prompts that aren’t listed here. Second, several achievements are tied to specific dialogue selections rather than to the “correct” answer — read the notes under each step carefully, because approving is not always the trophy-winning move.
Episode 1 — Nailing the Opening Choices
The first episode leans heavily on approval decisions, and the loot-related rejects are where most players fumble. Work through them in order:
- Approve
- Reject — Incorrect Loot
- Approve
- Reject — Incorrect Loot
- Reject — Incorrect Loot
- Approve
- Reject — Quest Deadline
- Approve
- Approve
Once the decisions are done, head into cooking. The required recipes are:
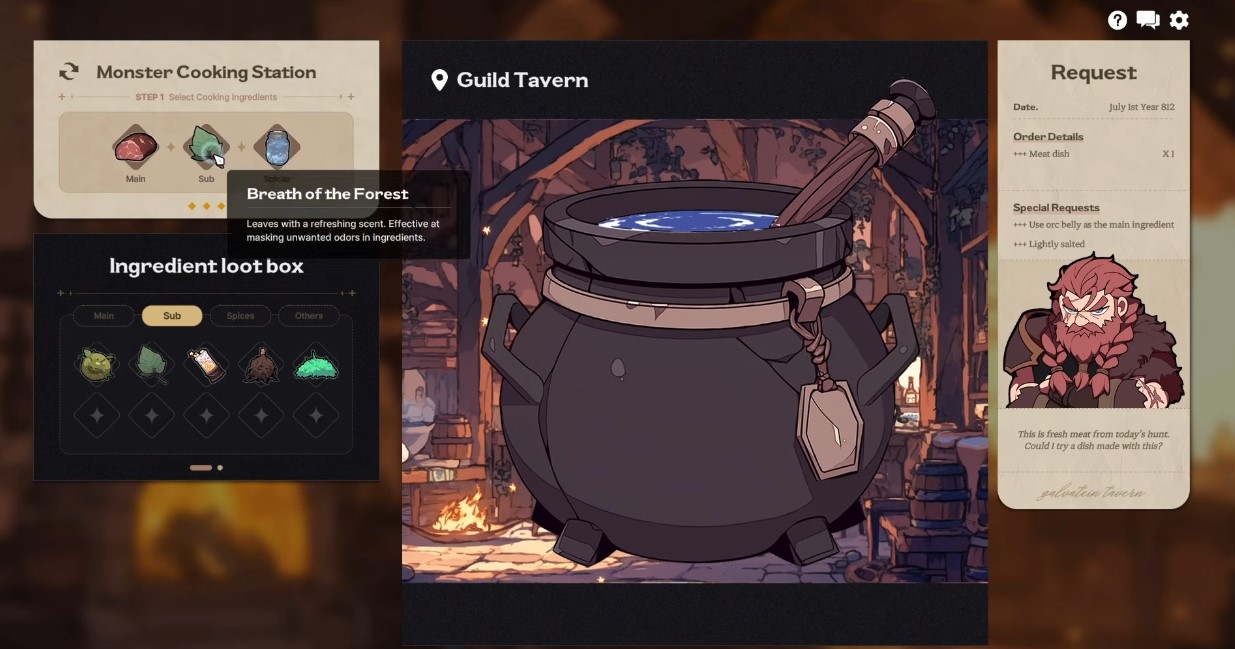
| Cook | Ingredients |
|---|---|
| Galen | Orc Belly + Forest Breath + Flame Seed |
| Rina | Slime Core + Pamston Barley Flour + Green Bell |
| Dorothea | Bitter Cold Tear + Spirit Knot + Elder Well’s Eternal Snow |
Completing all three unlocks “Galvatein: 1% Friendship”.
Episode 2 — Hints, Notes, and the Merchant Purchase
Click through every single hint prompt in this episode — skipping even one can leave you short later. The choices run as follows:
- Approve
- Approve
- Reject — Quest Deadline
- Reject — License Holder
- Reject — Incorrect Loot
- Reject — Incorrect Loot
- Reject — Incorrect Loot
- Reject — Quest Deadline
- Approve
- Approve
- Select the following: An Entire Oak Barrel Emptied, A Love of Flame and Lead, Barley Beer Fragrance, Waves on the Lake, and The Princess who Embraced the Champion.
Editor Warning: The note imagery is a genuine hint, not flavor text — the visual contrast is a thin woman versus a short, stocky one. If you collected every note in this episode, the pictures point you toward the right combination. Overlooking them is one of the most common reasons players stall on the multi-select step.
When the multi-select resolves, you’ll unlock “One Truth Prevails”. Before moving on, buy from the Loot Merchant — that purchase is what triggers the “Would You Like a Receipt?” achievement.
Next, cook the combination Lunarbear Paw + Forest Breath + Flame Seed. After you’ve locked in any of the choices above, “I’ve Seen 14,000,000 Futures” pops.
Episode 3 — Day 1 and Day 2
Day 1 starts straightforward, then hands you a cooking puzzle mid-episode:
- Approve
- Reject — Incorrect Loot
- Approve
- Reject — Incorrect Loot
- Approve
- Approve
Purchase Jellyfish Flower from the merchant, then cook Poisonous Giant Mushroom + Jellyfish Flower + Flame Seed + Starlight Star. The puzzle’s tell is in the recipe ordering — follow the ingredient steps exactly as shown and you’ll walk away with “I’m the cook”.
Day 2 mixes in an examination prompt that isn’t a plain approve/reject:
- Approve
- Approve, then click Loot/Evidence and choose “Um… may I really touch it?” to unlock “I Was Just Curious”.
- Reject — Expiration Date
- Approve
- Reject — Quest Deadline
- Approve
- Reject — Incorrect Loot
- Approve
- Approve
- Reject — Quest Deadline
Clear Day 2 and you’ll bank “We’re Gonna Be Rich!”. There’s a second unlock here that’s easy to miss: select Dorothea, Galen, and Olivia for the courage assignment, which grants “A Step Forward”.
Episode 4 — The Map Locations Quiz
This episode is a pure geography check. Open the map, zoom in, and identify each location in turn:
- Ahremdry Library
- Forgotten Maze
- Flame Overture
- Black Forest
- Blue Bay
- Serneild
- Calvera
- Glass Beach
- Milky Way Slope
- Dreamzone
Editor Warning: One Chinese-hosted riddle variant places its final answer at the Forgotten Maze in the upper-right corner. If your build is showing that puzzle instead, don’t force the Glass Beach answer here — match the prompt you’re actually looking at.
Episode 5 — Ranks, Gelatin, and Chewie
The standout here is the Adventurer Rank reject — a distinct rejection type that trips up people speedrunning the menu. The full sequence:
- Reject — Adventurer Rank
- Approve
- Reject — Incorrect Loot
- Approve
- Reject — Adventurer Rank
- Approve
- Reject — Quest Deadline
- Reject — Quest Deadline
- Approve
Two recipes matter this episode. Buy Suspicious Gelatin from the merchant and cook it with Bloody Bat Blood Gland + Suspicious Gelatin + Forest Breath. Then cook Sticky Tongue + Pamston Barley Flour + Flame Seed. Finish by picking the first dialogue option, which unlocks “Chewie Is Free Now.”
Episode 6 — Records and the Final Unlock Batch
The last stretch trades decision-making for documentation. Run the prompts first:
- Reject — Incorrect Loot
- Reject — Quest Deadline
- Approve
- Reject — Adventurer Rank
- Approve
- Approve
- Reject — Expiration Date
- Approve
- Approve
Then log the three records exactly as specified:
| Record | Location | Creature / Subject | Witness |
|---|---|---|---|
| Record 1 | Black Cliff Mine | Golem | Dwarf Miners |
| Record 2 | Glass Beach | Cockatrice | Tourist |
| Record 3 | Veileden | Goblin | Ria |
Completing this batch unlocks three achievements at once: “You Can’t Make It Like It Never Happened”, “Art Is An Explosion!”, and “Adventurer’s, Assemble!”.
Solving the Great Pirate’s Treasure Riddle
This optional riddle stumps a lot of players, and it’s worth breaking down because the wording is deliberately misleading. If you follow the arrows across the Crimson Plains, the trail appears to point at the Ephesto and Hwanghwan blacksmiths — yet the quest rejects both answers every time.
Here’s the key that unlocks it: the directions have nothing to do with distance. Each arrow points toward a different town, and only the final destination in that sequence is the actual answer. Graph it out as a town-to-town path rather than a length-of-travel measurement, and the riddle resolves cleanly.
If you’d rather just take the solution and move on — the correct answer is Glass Beach. I landed on it by working the directions as towns myself, and it checks out.
Conclusion
That covers the whole Early Access route from the opening prompts through the final record entries. If you spot a choice that’s shifted in a newer build, or an achievement step that doesn’t fire, drop a note and I’ll update the list — being locked out of a late-game trophy by one early misclick is exactly the kind of frustration this guide exists to prevent.
