Overview of the Machine Hunter’s abilities and options, and how to play the class.
Why Machine Hunter?
Pros:
- Exceptional single target damage
- Hard-counters armored enemies through his preferred munitions (Armor Piercing, Anti
- Materiel and Ion)
- Great survivability through Ambush bonuses, Turtle Shield and Defensive measures
- Good crowd control through HEAT
- Can ocassionally shot through walls with preferred munitions, specially with HVAP
- Can start engagements from entrenched positions or directly through walls, with Mortar Cover, Anti-Tank mine or just shooting through walls with HVAP
- Ambush replenishes HEAT/HVAP and Turtle Shield, potentially faster than other classes’s skills when ambushes can be activated reliably
Cons:
- Poor performance against shields with preferred munitions, often necessitating picking up a soft ballistic/fusion side weapon or offensive items
- No good mobility options besides ambush
- Repositioning and cover dependency to reliably activate Ambush limits the MH’s potential in open areas.
- Preferred weapons tend to have mediocre to low magazine sizes
Perks
Ambushing as often as possible is the key to playing MH effectively, as it powers most of his abilities. On activation, it gives a very convenient burst of speed to prepare for a flanking shot or simply for getting around. Most importantly, it recharges HEAT/HVAP and Turtle Shield. They will not recharge on their own otherwise.
Activating it is intuitive enough: you don’t shoot and you don’t get hit for three seconds. This is easily done by hiding behind any available cover in the area. A white circle will close around the MH to visually indicate how close you are to triggering an ambush.
Note that you can activate ambush only while in combat. Starting combat is easy enough, as combat starts the moment the bots are somewhat aware of your presence, either by shooting directly at them, around them, or if they hear you shooting in the vicinity.
The firerate increase mostly synergizes with Turtle Shield, which gives lowered deviation. It helps with burst firing weapons and with panic magdumping some slow weapons like the patrol revolver up close.
This perk is two perks in one, even though the primary focus is its most evident and spectacular first function.
This function is creating a smoke screen granting 50% dodge for its duration the moment you drop below 1000 health (as of this writing). This can potentially save you and buy you just enough time to get back into cover. It’s also makes for a low health reminder you can’t possibly miss. The treshold is generous enough to make sure it activates, but it won’t help if a big hitter later in the game or in higher escalation levels has enough damage to one-shot you. It takes a while to recharge, so it can’t be depended upon to be constantly active (which is a terrible idea anyway).
The second function instantly replenishes a fraction of your shields upon activating an ambush, which should mitigate chip damage taken by your shields through several engagements and goes a long way to boost the class’s survivability.
Much like the other classes, the synergy perk improves on what the class already excels at. For the MH, he receives from it buffs to weapons using his favored munitions. Of note is the critical damage increase, which is great for HVAP and APC Destroyer Kit users. The magazine size increase and reload buffs help with most of the HP’s preferred weapons across many builds.
Another twofer with a highly visible first effect overshadowing the second, although in this case it’s mostly justified, outside of a smoke build.
The first effect triggers some mortar shells to fall on the enemy closest to your crosshairs upon triggering your turtle shield. The shells do High Explosive damage, which notably doesn’t have penalties against shields, making it a decent opener against nasty shield users like Pulsar Defenders or Mortars. While the range is good, you need to be in combat for it to trigger. The shells also take a few short moments to land, making them bad against fast moving targets – unless you shoot them to pin them while they fall. If there’s a large crowd rushing towards you, they’re bound to hit one of them regardless.
The second effect instantly activates an ambush when Defensive Measures activates, specifically when the smokescreen effect, replenishing Shield/HVAP/HEAT – in this situation having the Shield handy is great. This ambush also activates the shield replenish from Defensive Measures. Overall a more consistent boost to the survivability from Defensive Measures. Still something you want to avoid activating, except through Defensive Smoke (More on that later).
Specializations
Not pictured: Stacks up to 2. Unlocked by default.
It can be thrown very far but be wary of map features like overhead pipes and the like, as it can collide with and attach to those instead. They go off when anything walks near, including you, so take note where you place them as they’re hard to see. Additionally, it does minor blunt damage if it directly hits an enemy before exploding.
While not spectacularly powerful against unarmored or shielded targets, it is free damage, so you can use it as an emergency grenade if caught jammed or out of ammo. The intended use though is to lay them beforehand before starting combat, then lure the bots towards them after your initial engagement.
Another clever usage involves throwing them at a very distant enemy pod while retreating to a cleared area. If you’re far enough detection range, the enemies should not path to you (at least not immediatly) – however this should start combat when it explodes so you can refresh HEAT/HVAP safely.
Other than that, there’s not much to say. They’re simple, they’re reliable. Just don’t step on them, specially not with shields down.
Not pictured: The buffs granted by Radio Triangulation are the following:
-10 credits per kill
-Decreases deviation and movement inaccuracy by 1 degree per stack. This bonus gains stacks with kills, and decreases by 1 stack every 6 seconds.
As complicated as the stacking buff sounds, it won’t do much except maybe helping you mop up an enemy squad with a fast firing weapon. You already have Turtle Shell for that, so it’s not advisable to focus on building many stacks of it. The chief benefits of this specialization are the credits and the slow. As meager as the reward is, it does add up over time. The enemy slowdown helps the enemies bunch up for a juicy HEAT/HVAP shot.
Placement is important so as to prevent enemies (or yourself) from walking over the deployed jammer and destroying it. Good places for the jammer are corners and side crevices that the enemy can’t use as cover when they path towards you.
Another way of preventing the jammer from being stepped on is to take a summon off a power slot, preferably one that can’t move (such as DMR Turret) or floats (such as the C32 Slicer or Shock Drone). The bots will focus on shooting at the distraction over moving, giving you that much time to deal with them.
It is unfortunately the slowest recharging specialization the MH has, taking a while to recharge even after the previous one has run its effect to completion. Because of that I can only recommend it as a means of building up cash for boosting other abilities and gear. If you do boost this specialization though, the slowdown gets strong enough that it can basically freeze enemies in place. Not something you can’t count on every run but something to consider if you get something like a pioneer weapon that boosts it.
As an aside, this specialization is shared with the Recon Sniper.
Visually creates thick smoke, granting the bonuses listed. The dodge chance is huge, and gets better if you pick up a few dodge upgrades along the way, but ideally shouldn’t be relied upon (as most things that involve RNG). The slight slowdown shouldn’t really hinder your movement much. Despite the description, it is currently a speed up. Given it is also described as a slowdown in the buff tooltip, I believe this is currently a bug.. The shield replenishment is slight but nice to have. These buffs should apply to all teammates in multiplayer. Perfect movement accuracy helps with firing back onto your pursuers while looking for cover.
While the overall doesn’t sound particularly amazing, it really comes into it’s own once you unlock Mortar Cover at level 15. This enables the “smoke build” I mentioned earlier through a few perk interactions that aren’t listed and honestly I don’t know if they’re intended, although I seriously hope they are.
Even though Mortar Cover’s text indicates its second function activates when Defensive Measures activates, it actually activates in response to the smoke from that perk. In fact, it activates in response to any smoke, such as from this specialization. In practice,from level 15, this specialization triggers an ambush instantly on demand, refreshing shields (From Defensive Measures), Turtle Shell and HEAT/HVAP, potentially giving you two uses of HEAT/HVAP back to back.
Speaking of Defensive Measures, the smoke from this stacks with the smoke of that perk, giving you a handy 100% dodge, making you invulnerable for the duration.
Overall a great survivability option that spikes in power with Mortar Cover unlocked, you’ll want to have it up as often as possible.
Not pictured: Stacks to 2.
Everything about this specialization is completely bonkers, from the bonuses to the cover itself. This places an absolute unit that blocks gunfire, and, for a period, grants the bonuses listed while fighting behind it, as indicated by the circle that surrounds it. “Fighting behind” is easy, just have the cover mostly in front of you and stand in the buff circle. The buffs from this alone enable you to almost fight in the open like a Heavy Gunner if you’d like. The buff circle fades after a short while, but the cover itself remains for a while longer. It is quite durable and has respectable armor, although currently, the AI will not fire directly at it and will only hit it from weapon deviation.
The best part, however, is that the AI just can’t seem to path properly around these thicc boys, specially when they are completely blocking a passage. Most of the time, they will path as if they were not there, getting stuck behind them, prime targets for a mortar strike or HEAT/HVAP. Other times, they will pace side to side, making room for more HEAT targets. In any case, it makes it incredibly easy to activate ambushes in the middle of a firefight. Like with most cover, you can shoot through it with HVAP (It won’t last long if you do, though).
It recharges fast enough that you can keep a chokepoint walled off for a long while, enabling degenerate strategies such as building a Minecraft fort out of these in a chokepoint and activating Mortar Cover while your enemies just bunch up and die. Or you can opt for a fairer approach and just build a long corridor to funnel your enemies through and try to see how large of a single shot multikill you can get.
I can’t recommend this specialization enough. The cover buffs alone are amazing, it almost completely eliminates the class’s dependency of cover, and it only gets better as you find more ways to exploit the AI with it.
As an aside, this specialization is shared with the Heavy Gunner.
Kits

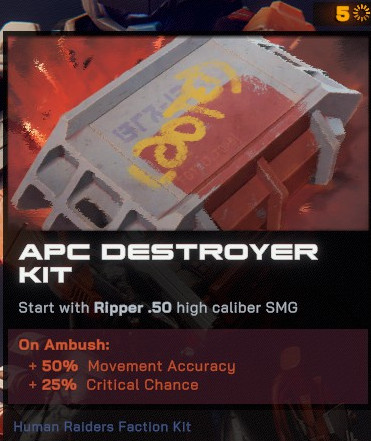
This kit gives the Ripper SMG as a starter weapon. It has very good power, armor piercing and accuracy, but very low magazine and extremely high recoil, all probably from the oversized AM cartdriges. Because of this, it is still better used as a marksman rifle, although it can be magdumped in emergencies (preferrably under Turtle Shield).
It has the Takedown skill, making it better against elite enemies (the named ones), increasing its long term viability. It still loses out to most dedicated marksman weapons and sniper rifles on most stats, but most importantly, because it’s reserve of ammunition it’s very poor.

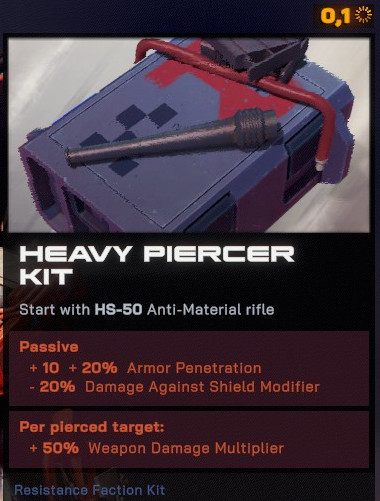
The meat of the kit lies in the on-pierce buff. The way this buff works, is that it triggers whenever you shoot at an enemy with sufficient armor-piercing for the projectile to keep going, potentially hitting targets behind, and can stack (additively) with itself as the shot pierces further targets. As shown on the tooltip, it lasts 1/10th of a second, which for most practical purposes means it will only apply to the fired shot, with a couple of exceptions.
The first exception are burst firing weapons, particularly those with very fast bursts like the Ninata Sniper or the CR-18. These are part of the reason why you get two HVAP shots per activation: the second shot will benefit from the stacks granted by the first one, essentially doubling the damage potential of the skill. The tradeoff is that you are spending both shots in one, losing versatility for damage output.
The second exception would be sufficiently fast firing weapons, which can achieve the same thing. Most burst weapons can do this, although with their lower damage per shot the damage ceiling isn’t that high even with the stacking pierce buffs. With sufficient fire rate bonuses and ambush, you might get the second HVAP shot in time with your marksman weapon, although you will need Turtle Shield and recoil buffs to manage it and reliably hit anything smaller than a boss.
This kit gives the HS 50 as a starter weapon. It is probably the strongest weapon you could ask for as a starter in terms of single-shot damage, which you really want to power HEAT/HVAP. While the weapon itself works great as a marskman rifle, its magazine is quite small, and most importantly, its ammo reserve is very low, as is the case with most kit starter weapons. It still works great into the endgame if you can get some sort of ammunition buff for it. The Vehicle Breaker skill only benefits the first bullet in the magazine and honestly isn’t that great, so you shouldn’t waste any valuable bullets trying to activate it.

The deviation buff is sadly the highlight of this kit, enabling long accurate bursts with almost any weapon which helps in most situations.
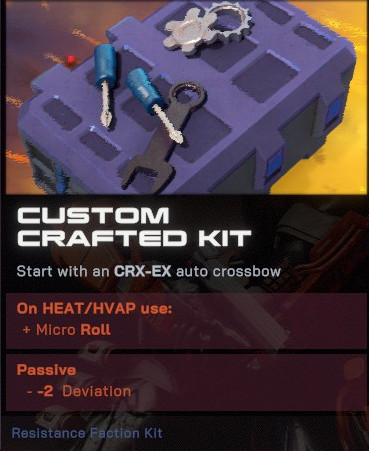
This kit gives the Ballistic HE Crossbow as a starter weapon, which fires delayed explosive bolts. As mentioned, HE works well against shields. It has an acceptable magazine and can be partially reloaded without wasting ammo. The ammo reserve is low, but not as bad as the HS 50’s.
Its damage output isn’t too great, at the start at least. It has the Heartpiercer skill as an invitation to use it as your marksman throughout the game, which is kind of cute. Unfortunately, it is hard to build since you MUST take the kill with the initial shot – if the enemy dies from the delayed explosion, it doesn’t count as HE cannot hit weakpoints. If you DO manage to build many stacks on it (mostly through HVAP empowered shots), its damage potential will surprise you, specially with weapon perk buffs.
Secondaries
Build recommendations
Closing
Changelog
Thanks to waitwaht for his excellent guide, all credits belong to his effort. if this guide helps you, please support and rate it via Steam Community. enjoy the game.

