
Here is a simple and comprehensive guide to do the “Sacro Egoismo” achievement efficiently in public matches. Consiting of tips and tricks coming mainly from experience.
Foreword : What to do and structure of the guide
Complete all of the Class Challenges
Simple in theory, in practise the most time consuming achievement in the game, since you gotta both level up and complete all of the 42 class challenges available in the base game. And some of those challenges need the player to adapt to a different playstyle or mindset in order to be completed efficiently, which is why it is the second least completed achievement in the game on steam… and we are here to solve that!
The guide will proceed like this:
- Part 1 will cover levelling tips as well has a ranking of the easyness of every class to level up
- Part 2, the interesting part, will cover, from the easiest class to 100% to hardest, all of the class challenges available in the base game.
Now enough talking, let’s get this bread !
Part 1: Levelling tips
The main strategy is, whenever you unlock a new challenge, for any class, you should start focusing on it asap . It will unlock gear that helps or is mandatory for challenges onward. So don’t wait!
When you are not doing any challenges tho, you should do what I’m about to advise in the following:
- Has a general advice, play the objective ! You gain more exp for kills on the objectives (that is either you or the enemy being on the point) and you can realize actions which grant you good amounts of exp : sabotaging, defuses, plantings and, of course, capturing objectives ! If you stick with your teammates, you can even bandage them to add a little touch of exp.
- Although I just said that you should ptfo, and not focus on blind kills, kills do matter, in their quantity too! Get as much has you can while still focusing on the things said in the first point.
- If you do all of the above, you should get plenty of medals at the end of the match: they do count for your class level and therefore are very important too
Now that the generalities have been spoken about, let see about more class-specific advices:
- Mountaineer: One of the easiest class to level up. Use the flare guns as much has possible. It will make it very easy to get tons of exp, especially if you don’t increase the effect of your flare by firing them in quick succession. Less time duration and no artillery buff, but more area coverage, which equals more exp. If you have a buddy who is levelling up his rifleman, ask him to equip the ammo box. The both of you will be able to rack enormous amounts of exp, being a perfect feedback loop.
- Officer: Some people say it is an easier class to level up than mountaineer, and they are not wrong at all. Spamming charges with the assault officer perk (the first one you get), placing orders where your team is bunch ups and spamming the reconnaissance plane call in will make you skyrocket to the top of the leaderboard without breaking much of a sweat! And if you know how to maximize the amount of kills done by your more lethal call-ins, well you could surely be level 20 in one good day during a week-end !
- Rifleman: The venerable rifleman has a lot of tricks up his sleeves to level up, has hinted earlier. Indeed, by treating it like a support class, equipping the ammo box and resupplying/ bandaging everything and everyone that needs it, you’ll get exp very very quickly. Just don’t forget to pull out the rifle from time to time to get a few kills… you’re a rifleman after all !
- Engineer (gaming): The most you can do has an engineer is building stuff and sabotaging the enemy’s. Remember the double Bs: Build anything, break everything, and level 20 is sure to follow.
- Marksman: Honestly, the only thing you can do with this class is prioritize who you kill, especially if you get the scoped rifle. The focus should be done has such for when you are not on the point:
– Enemies on objectives that are easy to headshot
– Enemies on objectives
– Enemies outside of the point that are easy to headshot
– The rest
If you lack the scoped rifle however, you should just ptfo, has you are a powerful asset to your team for the taking of an objective.
- Assault: Honestly chief… this one kinda dry ngl. You could equip the Grenadier perk, and build grenade crates, but, except for your personal consumption, you are better off just focusing on the objective and raining explosives or lead on the enemy!
Well, the tips out of the way, we can now attack the meat of the potatoes, what I’m sure 90% of people are here for: The class challenges, and how to proceed efficiently with them!
Strap up boys because it’s gonna be a long one !
Part 2.1: Mountaineer
- Spotting I : Spot 10 enemies with the binoculars / kill 10 enemies while being in the contested sector
- This one is easy, just lay prone in a covered up position and keep the enemies spotted. Maps like dolomiti makes this trivial.
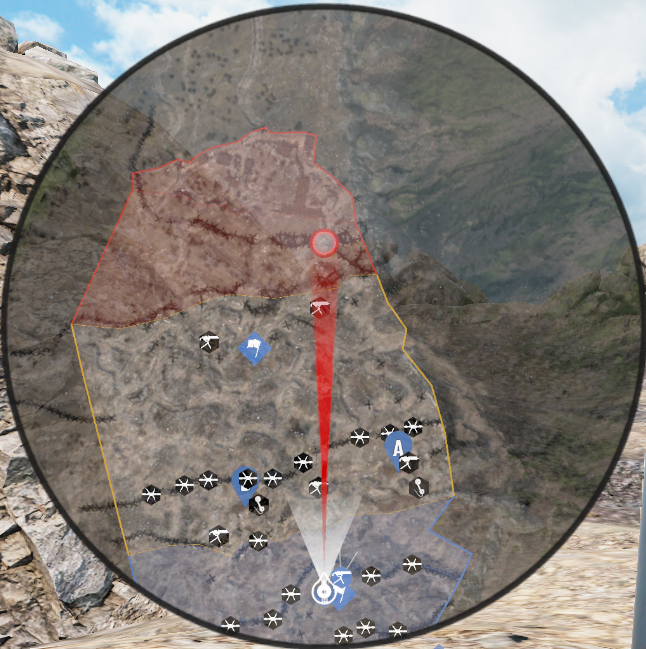
for the contested sector you need to make kills while being in a zone covered in red on the minimap.
Has an example here’s the first sector on Caporetto: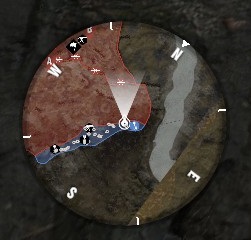 10 kills shouldn’t be a big difficult task tho, especially on attack
- This one is easy, just lay prone in a covered up position and keep the enemies spotted. Maps like dolomiti makes this trivial.
- Alpine climbing I : Spot 5 static weapons
- Again, piece of cake. Be on the attack side at the beginning of an advance, lay in an advantageous position where you see an HMG, and spot it. wait for the marker to expire and do it again until the challenge is completed. Piece of cake really
- Spotting II: Spot 20 enemies with the periscope
- At lvl 1, you unlocked a perk which lets you build a periscope using your shovel (default key is 3). This thing acts has a safer but static pair of binoculars. This challenge is best done on defense, on maps with overlooks that let you be safe from enemy fire, like Sabontino first sector, dolomiti, Carso or even Caporetto first sector in the tower if you can build it correctly.
Again a very easy challenge, which is the trend with the mountaineer class.
- At lvl 1, you unlocked a perk which lets you build a periscope using your shovel (default key is 3). This thing acts has a safer but static pair of binoculars. This challenge is best done on defense, on maps with overlooks that let you be safe from enemy fire, like Sabontino first sector, dolomiti, Carso or even Caporetto first sector in the tower if you can build it correctly.
- Reconnaissance I: Spot 50 enemies with flares / Get 30 kills with a carbine
- The flare gun is unlocked at level one, and is the most used gadget for most people with this class. Has said earlier in the guide, you can choose to not reinforce your flares by not firing them in quick succession, which lets you have 2 flares up at the same time. It comes handy for that sort of challenge don’t you think ?
Has for the carbines kills, the mochetto, the stutzen, the Vetterli and the m90 carbine count towards it. Do note that, due to a bug not fixed has of the writing of this guide, both the Kar 98 az and the Kar 88 do not count towards this challenge , so keep that in mind!
- The flare gun is unlocked at level one, and is the most used gadget for most people with this class. Has said earlier in the guide, you can choose to not reinforce your flares by not firing them in quick succession, which lets you have 2 flares up at the same time. It comes handy for that sort of challenge don’t you think ?
- Alpine climbing II: Kill 5 enemies with the icepick
- Easiest lvl 18 challenge in the game. Just be unexpected or be defensive when you are spotted and you should get it in no time. I personally got it done in the first life I spawned in !
- Reconnaissance II: Spot 100 enemies with flares / Kill 50 enemies from 50 meters or more
- Last for the mountaineer, we get to something that is actually a small challenge for once. The flaring has already be explained, so getting more of it will not be an issue.
Getting kills from 50 meters or more tho can be made trivial by equipping the sniper perk unlocked at level 18. It gives you sniper rifle-ish zoom while you hold your breath. Feel free to pick the rifle available at level 10 and either bulge or binoculars has your gadget (one is for mobility the other is for visibility) and you will get this quite hastily !
- Last for the mountaineer, we get to something that is actually a small challenge for once. The flaring has already be explained, so getting more of it will not be an issue.
Well, now that mountaineer is done, it is there the real challenge starts in my opinion. Brace yourself.
Part 2.2: Engineer (gaming)
- Construction I: Build or sabotage 2 HMGs / Kill 5 enemies with HMGs
- Starting things , we got some things to build. You can do this one right away at at the beginning of an assault, in either offense or defense. There’s usually enough to build to do so, so up and go.
Has for HMG kills… well it can be tricky, very tricky, has those things are death sentence to most people. But you can follow a set of easy to understand principles to ease your time and not wastefully die:– Pick hmgs that are not too obvious, but not too remote
-Know your sight lines
-don’t be too cocky and learn to dip when things start looking for the worse
-Finally, the more distance, usually the better !If you follow these, you’ll get your HMG kill quite easily. I heavily recommend Dolomoti on defense to do this. A lot of good hmg placement and in quite the range at time.
- Starting things , we got some things to build. You can do this one right away at at the beginning of an assault, in either offense or defense. There’s usually enough to build to do so, so up and go.
- Explosive expert I: Kill 10 enemies with mortars
- Well… build a mortar and just fire at spots with lots of bunched up enemies, like wires trying to be cut or objectives being captured. If you run out just go for the frontline and wait for the next sector.
On a side-note: you could redeploy has a rifleman and resupply the mortar with the ammo box and then redeploy with the engineer, but please don’t do that. You’ll waste tickets has an attacker, get side tracked by the rifleman challenges popping up and you’ll gain less exp for your engineer too. bad choice in my opinion, but if it suits your fancy I guess you can try…
Two spots of note: Sabontino first sector right side of the trench on defense, where the wire has to be cut, right about… here
 You can get crazy multi-kills in this one.
Another one is Carso, first sector. When the capture point is being nearly captured, you can vibe check the enemy team easily, has there is literaly no sky cover. Maps where people bunch up is the way to go for these kills, always.
- Well… build a mortar and just fire at spots with lots of bunched up enemies, like wires trying to be cut or objectives being captured. If you run out just go for the frontline and wait for the next sector.
- Engineering I: Build or sabotage 5 HMGs / Kill 15 enemies while using HMGs
- Not much to say here : Build, fire away. Rinse and repeat until completion.
- Construction II: Kill 25 enemies with a mortar / build or sabotage 5 mortars
- First one shouldn’t be much news to you, except that, you unlocked at level 10 the support company perk, which grants you 2x faster handling speed and building speed for Hmgs and mortars. Use that if that’s not clear enough for you.
It will also help for the second part, although for this one you can’t do much but ptfo and help your team push. More pushes = more mortars to build or sabotage.
- First one shouldn’t be much news to you, except that, you unlocked at level 10 the support company perk, which grants you 2x faster handling speed and building speed for Hmgs and mortars. Use that if that’s not clear enough for you.
- Explosive expert II: Arm or defuse 3 objectives / kill 30 enemies with grenades
- This one will send shivers down the spine of some of you reading this, has it is quite the hassle.
Firstly, getting armings is your best bet, has getting defuse require much more efforts, whereas armings just require you to sneak up behind the enemy and… plant. A personal favorite of mine to do this is Caporetto, the maps with the most points to destroy. Sabontino is also a very good pick.
Now… the 30 grenade kills. sigh… it is a long one, and for some people a hard one even. You only get one grenade (unlocked at level 5 btw) per life. The best advice I can give you is make it count. Don’t throw your grenades mindlessly and inaccurately. and wait for it to explode before you peak. if you die, the kills won’t register for the challenge!!!. If you follow my advices, you’ll get it without too much trouble. It will still be a time-consuming process tho, so mind that.
- This one will send shivers down the spine of some of you reading this, has it is quite the hassle.
- Engineering II: kill 100 enemies with static weapons / build or sabotage 40 static weapons.
- To wrap things up, you’ll need more HMG and mortar kills, no need to explain at this point.
For the second one, I suggest playing on offense and, having the level 18 perk sapper company equipped, just infiltrate the enemy position to break their stuff, killing the people you come across. Then once the position is taken, build your team’s asset. Rinse and repeat in each sectors. ez and fun
- To wrap things up, you’ll need more HMG and mortar kills, no need to explain at this point.
Out of breath already? Come now, we are not even mid way through… Steer up boy !
Part 2.3: Assault
- Trench fighting I: kill 2 enemies with a bayonet / kill 10 enemies that are less than 30 meters away
- … Do anyone need an explanation for this? Do your classes job and have the element of surprise for the stabs and you should get this in a heartbeat. No questions asked.
- Toughness I: Kill 5 enemies that re in objectives / Build or sabotage 2 forward post.
- Again, straight forward has it gets. objective to bomb also have a radius to make that one count so keep that in mind.
For the other, well, be the first one in the trench and go for the sabotage / building. So easy, one could do it blindfolded (no). Maps like Caporetto or Sabontino are especially suited for that sort of task
- Again, straight forward has it gets. objective to bomb also have a radius to make that one count so keep that in mind.
- Trench fighting: Kill 5 enemies with a dagger or a mace / Kill 40 enemies that are less than 30 meters away.
- At level 10 you unlocked the melee weapon has gadgets, what are you waiting for then? equip them and use the advice I gave you back in the mountaineer part! Kids these days…
- Toughness II: Kill 20 enemies that are in objectives with grenades / Kill 40 enemies while being in objective areas
- AHH finally, some hard hat ♥♥♥♥ ! So, the first part, while looking tricky, is actually not that bad. Equip the grenadier perk unlocked at level one, giving you three grenades and a way to resupply yourself, while being on the defense. this way you can rain explosives in relative safety on the poor enemy team, who can only cling to the point in order to win. Two particularly nasty points are the single objective to capture on Sabontino and the first point to capture on Carso. Literal free grenade kills it is insane.
The second parameter is really not that hard, just remember that, while you have to be on the point, the enemies don’t, so keep that in mind.
- AHH finally, some hard hat ♥♥♥♥ ! So, the first part, while looking tricky, is actually not that bad. Equip the grenadier perk unlocked at level one, giving you three grenades and a way to resupply yourself, while being on the defense. this way you can rain explosives in relative safety on the poor enemy team, who can only cling to the point in order to win. Two particularly nasty points are the single objective to capture on Sabontino and the first point to capture on Carso. Literal free grenade kills it is insane.
- Weapon expert II: Kill 75 enemies with LMGs or HMGs / Kill 100 enemies with grenades
- Well well, this section went at the assault’s pace did it not?
First one can be summed in three words : Lmg or bust. Equip one of the lmgs unlocked at level 15 or nothing. If you have trouble in cqb, the lvl 18 quickshot perk can help you outpacing even the smallest of pistols.
Second one should be familiar : Grenadier perk, bomb the ♥♥♥♥ out of the enemy (now with the new even more lethal lvl 18 grenades). Rinse and repeat until the deed is done.
- Well well, this section went at the assault’s pace did it not?
Well, look at you, half way through and with quite the gleam in your eye! Well I hope you got some resolve, because the last three ones are… let’s just continue.
Part 2.4: Rifleman
- Combat experience I: Kill 10 enemies
- Pushover, through and through. You went through worse than this already so no whining.
- Medical training I: Earn 150 resupply or bandaging points / bandaged or be bandaged 5 times.
- Again, another pushover challenge. You are already doing this to level up your class. So hang around your team and quench everyone’s need in medical assistance or in ballistics.
- Grenadier I: Kill 5 enemies with grenades / kill 3 enemies with a bayonet
- Still no sign of any challenge out here. You already did the same things for the assault, nothing new under the sun really. And even if you only have one grenade (for now…), you went for 30 kills with the same setup already.
- Medical Training II : Earn 250 Ressupply or bandaging points / bandage or be bandaged 15 times.
- Literaly passed out, snorting like a fatass on his keyboard, from un-challengeness
- Grenadier II: Kill 20 enemies with grenades / Participate in capturing or re-capturing 5 objectives.
- UNH WHAT DID THE NEW UPDATE DRO- oh wait I’m supposed to write a guide. So where was I…
There !
Getting 20 kills, although seeming like a lot for a class with a single grenade, is made trivial with the rifle grenade and the associated perk unlocked at level 10: 6 grenades + 1. It is huge ! you can easily get this one done in a match. Keep in mind that the grenade is sighted for 30 meters, so you have to aim low for cqb shots.
The second part however, is a taste of the hell what’s to come. Firstly, offense is mandatory, has I can count on my two hands the times I’ve witnessed a recapture. Secondly, if you die, even a pico-second before the point is take, you can have it up your ass. So to sum it up, you have to just camp in an unseen corner on a point on the attacking side and just pray you don’t die.
- UNH WHAT DID THE NEW UPDATE DRO- oh wait I’m supposed to write a guide. So where was I…
- Combat experience II: Kill 100 enemies that are in the contested sector while holding breath / Participate in capturing or recapturing 30 objectives.
- This is the wall I was talking about. First part is easy enough, just be in a red part of the map and do kills.
It is the second part that is dreadful. 30 objectives is a crap lot. It is not hard, just painfully long. And each points that you die on feels like a stab in the chest. This one is one the reason why most people don’t go for sacro egoismo legitimately. If you can do it without a bot lobby, congrats…
- This is the wall I was talking about. First part is easy enough, just be in a red part of the map and do kills.
… But next one will be even worse. So be ready for your crumbling fortitude and determination to take a very big hit.
Part 2.5: Marksman
You will see.
- Guardian I: Make 5 headshots / kill 5 enemies while being prone or crouched
- An easy one to start. you’ll get 5 headshots quite easily if you are accurate, and trivial if you get a scoped rifle.
Same for the prone or crouched kills. It can happen naturally, especially if you play has a sniper, hidden prone and laying accurate fire. The scoped rifle making this an absolute cake walk.
- An easy one to start. you’ll get 5 headshots quite easily if you are accurate, and trivial if you get a scoped rifle.
- Observer I: Kill 20 enemies from 50 meters or more / kill 15 enemies while having the body armor equipped
- Well, remember the mountaineer level 20 challenge? Well this time there is limited slots for the zoomy rifle, so this time we’ll have to play smart. Smart in just position yourself not too far so you can see the rifle, but not too short so the kills actually register.
In the meantime you can equip the body armor perk to get the kills required to the second part. Be careful tho: the Austrian body armor skin is blue colored, so you’ll have barely any camouflage. Be mindful and you should be good to go.
- Well, remember the mountaineer level 20 challenge? Well this time there is limited slots for the zoomy rifle, so this time we’ll have to play smart. Smart in just position yourself not too far so you can see the rifle, but not too short so the kills actually register.
- Deadeye I: Make 15 headshots / Kill 2 enemies in one breath 10 times
- Well more headshots, no need for more explaining don’t you think ?
Has for the second parameter, just play the objective and don’t beathe out if you get one kill. Use your pistol and the fast fire rate of your rifle and you should be good to go.
- Well more headshots, no need for more explaining don’t you think ?
- Guardian II: Kill 15 enemies without holding breath / kill 30 enemies from 100 meters or more
- Well the first parameter is easy. just play in cqb with your pistol or rifle and voila, good to go.
It is were the hard part starts with the second one. Has said early, the scoped rifle are highly sought after, so you’ll do this challenge probably without it. I hope you have good eyes, you are going to need them. Maps like Craso, Dolomiti (on defense especially), sabontino lasts sector on attack, Cengio and Gorizia on attack are the maps with the longest sightline. Find good cover, lay down, limit your sight lines and be patient and you should be good to go.
- Well the first parameter is easy. just play in cqb with your pistol or rifle and voila, good to go.
- Observer II: Kill 30 enemies while being prone or crouched / kill 2 enemies in one breath 15 times
- Well, more of the same really, although now you get the specialist perk, that you unlocked at level 15. It will make your rifle more accurate for the first parameter. then back to the scout perk for the second part. Really not that hard for a level 18 achievement.
- Deadeye II: Kill 30 enemies with headshots from 100 meters or more / kill 30 enemies that are in objectives from 50 meters or more
- This one… this one tells me all the challenges for the marksman are tailored to the scoped rifle. I tried to get those far away headshots… I wasn’t able (and trust me I tried). You are required to use the scoped rifle . It is horrible and I honestly wouldn’t blame you if you do it in a bot lobby. the other one, while not requiring the scoped rifle, is still kind of finicky. I advise playing on the same maps has the 100 meters challenges and then just go on.
“Well this one sucked, surely the officer challenges won’t be that hard?” Oh, they, will. I hope you are ready, ’cause you might gave up on the last one.
Part 2.6: Officer
- Staff I: Place 10 call in markers with the Flaregun / Place 5 call-ins over objectives
- A simple start has always. Just fire away your flares on top of objectives and as soon as you can call in recon planes if the objectives are empty. If they are people on it, you can call in the rest depending on the situation. This should be done quite easily really, like all the level 1 challenges before.
- Leadership I: Earn 250 points from followed orders / Issue 15 orders on the map
- Using the whistle by pressing A, you can place orders on the map. It gives exp if people do stuff in the area highlighted on the map, you get bonus points from followed orders. These bonus points are the ones counting towards the challenge. Just place them often and you should be good to go to. Easy
- Logistics I: 100 teammates spawned while Charge is active / kill 100 enemies using call-ins
- See, the whistle lets you use the charge abilities, which grants unlimited spawns for your team for a short time. Coupled with the first perk, assault officer, you can pretty much spam them. Wait for your team to be between 6/7 or more players waiting for a respawn, and use it. Racks you up enormous amounts of exp too
Has for the second one, and I’ll say it for all the call ins achievements :timing is key. Place your call ins depending on map flow and situation and you should be good to go. Don’t shy away from using the low tier call-ins! They can do serious damage if you use them accordingly.
For example using the strafing run on a trench line, Phosgene gas to block enemy sight lines or artillery clusters on objectives.
- See, the whistle lets you use the charge abilities, which grants unlimited spawns for your team for a short time. Coupled with the first perk, assault officer, you can pretty much spam them. Wait for your team to be between 6/7 or more players waiting for a respawn, and use it. Racks you up enormous amounts of exp too
- Staff II: Earn 500 points from followed orders
- Same has leadership I: just keep spamming orders where all your team is bunched up and go on.
- Leadership II: Kill 100 enemies with Artillery call-ins / Kill 100 enemies using aviation call-ins
- This is the Sacro Egoismo killer, period. When artillery was bugged it stupidly time consuming to get. Now that the bug has been fixed, it has come down from stupidly time consuming to just very time consuming. Again, timing is key. Know when and how to use each call-ins. Don’t just default the creeping barrage .
Has for the aerial call-ins well all the lethal one are excellent. You won’t have any issue getting 100 kills if you are half decent. One that I don’t see often used is the strafing run. You can wipe the enemy team off of the Carso first objective (or any narrow line with no sky cover for that matter) if, and I’ll repeat this until we are done with the officer class, you have good timing.
If you do this one without a bot lobby I’ll be very proud of you, it is quite the chore and made a lot of people give up.
- This is the Sacro Egoismo killer, period. When artillery was bugged it stupidly time consuming to get. Now that the bug has been fixed, it has come down from stupidly time consuming to just very time consuming. Again, timing is key. Know when and how to use each call-ins. Don’t just default the creeping barrage .
- Logistics II: Kill 50 enemies with a pistol or revolver / kill 50 enemies with Chemical call-ins
- At last, we come to the final challenge. And to be frank it is quite easy. Pistol kills shouln’t be to hard to achieve if you the area in which they are the most efficient. If you are on the German side try to unlock the reichrevolver, you won’t regret it.
Has for the chemical call-ins, it is surprisingly easy. Phosgene and of course mustard can get you buttloads of kills and will be your primary options. Just time them right and you can get has much kills has with a bomber squadron (not kidding).
- At last, we come to the final challenge. And to be frank it is quite easy. Pistol kills shouln’t be to hard to achieve if you the area in which they are the most efficient. If you are on the German side try to unlock the reichrevolver, you won’t regret it.
Well, if you didn’t give up on this one, congrats. You should now be part of the club…
Thanks to Gordon_Delacroix for his excellent guide, all credits belong to his effort. if this guide helps you, please support and rate it via Steam Community. enjoy the game.