This guide explains the process of creating basic custom units in addition to pointing out methods and resources that would be used to make more advanced units.
Custom Units in IXE
This process can be difficult if you want to make something complicated, but making simpler units is relatively easy (if a bit lengthy) once you know how the process works. This guide is to go through that process and point out where you can make more complicated units if you wish to explore that.
You will occasionally see the text “This section can be skipped if you just want to make a basic unit.” If you are new to making units in IXE I would recommend skipping all of these sections; make a unit or two with just the basics before jumping into something more complicated. However, it is your ship you are making, and it is your decision what you want to try to make it do.
What a Custom Unit Needs
- A JSON file that describes unit parameters and what other elements the unit uses.
- An image file that the unit will use in game.
- (Optional) IRPL script file(s) that describes custom behaviour for the unit.
In the unit JSON you often have multiple components, each of which is a separate unit with its own JSON. For your first unit I would recommend just using the base-game weapons and controllers for this so you don’t have to bug test multiple units interacting with each other.
To make your own units you will need to use external editors and save the files in the correct folder. On windows you can type
into the navigation bar of File Explorer to get to the Creeper World IXE save data. If the map you intend to add the custom unit to is in the map editor, the folder you want will be in the gameeditor folder, named whatever the map is named on your list of editor maps. You can save the relevant files directly in that folder, next to the save.cwi file, but I prefer to make a folder inside there to better organise things.
 So For example, on my map ‘Enter the Starborne’, the map was called ‘Starborne’ on disk and the Aegis MLRS unit files could be found in the folder:
and the Annihilator unit files could be found in the folder:
Extracting Unit Files
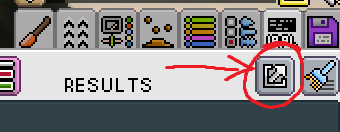 For any custom units it is possible to extract the files used to make them to a file on disk. On any map, hit shift+e to enable edit mode and get a new button in the top right UI that opens the map editor when clicked. Near the top right corner of the 7th tab of the editor is a button that when moused over has the text ‘Extract Modules to Disk’. When clicked this will open a window where you can select a folder to extract the files to.
After selecting a folder, navigate to that folder and it should be populated with any custom content on a map. Note that some maps do not have any custom content and are purely vanilla, though maybe with some custom parameters. Any custom unit JSONs, images and scripts can now be looked at and and either analysed or used in your own maps.
Images are usually png images, any program that can open pngs works well for those. The unit JSON and the irpl scripts can be read using a text editor; I use Notepad++ for this.
To be clear, this does not extract the base game unit files. We do not currently have access to those with the exception of some files that the dev has shared directly.
Unit Image
You want a program that can make pixel art png files, including deleting pixels so you can have non-rectangular shapes. I have been using MSPaint to make the images simply because it is a program I have used a lot, but I move the image over to paint.net to delete background pixels and/or more advanced image manipulation options. Use whatever you are comfortable with and save the image to the folder mentioned above.
Unit JSON
The following code is a standard setup we made for custom player units:
{
    "type": "unit",
    "displayname": "My Awesome Unit",
    "image": "body.png",
    "position": [0, 0],
    "pivot": [0.5, 0.5],
    "maxammo": 100,
    "maxcammo": 3000,
    "ammorequesttime": 6,
    "cammorequesttime": 6,
    "permanentinventory": true,
    "movable": true,
    "parts": [

    ],
    "controllers": [
        {
            "name": "ondestroy_sandexplosion",
            "amt": 500,
            "minvelocity": 1.5,
            "maxvelocity": 3,
            "color0":[0.2, 0.4, 2],
            "color1":[0.2, 0.6, 2],
            "sandtype": 98,
        }
    ],
}
- displayname is the name of the unit, replace “My Awesome Unit” with the name of your unit in quotes.
- image is the image file name (including .png), replace “body.png” with the file name of the image you want to use in quotes. Note that if the image is in a different folder you can write the path using the map folder as a base or $/ to use the IXE homepath for base game units. Also note that this is case sensitive, this string has to match the capitalisation of the file name and any folders.
- maxammo is the amount of ammo the unit can carry, this needs to be at least one for certain parts to load. Place the number between the colon and the comma. Don’t include this parameter at all if the unit isn’t supposed to carry ammunition.
- maxcammo is the number of Anticreeper the unit can carry. Don’t include this parameter at all if the unit isn’t supposed to store AC.
- ammorequesttime is the minimum time in frames between ammo requests. The lower the number, the faster this unit will receive ammo.
- cammorequesttime is the minimum time in frames between AC ammo requests. The lower the number, the faster this unit will receive AC.
- permanentinventory when true, the unit will go to the inventory upon destruction.
To add parts to a unit, you need to indicate which part you are adding to the ship in the parts section of the JSON. The following are the lines to add default weapons, add any of the following, multiple copies if you want multiple guns, in the square brackets following “parts” in the JSON.
Cannon:
Rocket:
Lathe:
Freeze Cannon:
Sentinel Cannon:
Phantom Beam:
Sanddropper:
Maker:
In the above code you will see a “position” parameter; this determines where the weapon goes on the ship. It is easier to deal with this when finalising a ship so we will leave them all at 0,0 for now.
This subsection can be skipped if you just want to make a basic unit.
You don’t need to use the above template, there are a lot of other JSON parameters that can make units generate power or be immune to creeper. We do not have a list of the JSON parameters, we are hoping to get that when the IRPL documentation is released. For now all the JSON parameters we know about have been from unit JSONs written by the developer that we got to see. Most of these are in-game using the ‘Extract Modules to Disk’ button.
It is also possible to create custom parts by switching “type”: “unit” to “type”: “part”. These parts can then be installed on another ship by adding a part with the parameter “part”: “(filepath)” to the unit JSON. The filepath by default starts in the same folder as the unit JSON, so if the part JSON is in the same folder, you just need “part”: “filename.json”.
Don’t be surprised if a unit doesn’t work as you intend. An example of this is the solar panel unit in the Enter the Starborne map; it says it is generating energy but it is not because I didn’t know to include a “powerdispatchstoremax” parameter in the JSON.
This subsection can be skipped if you just want to make a basic unit.
In the template given above, there is a controller with the name “ondestroy_sandexplosion”. These controllers can be thought of as pre-made scripts that you can attach to the unit. For example, the Fixed Emitter enemy produces creeper using an attached ‘CEmitter’ controller.
There are several of these controllers, again without documentation yet, that you can attach to the unit using the same notation as is used in the template JSON above.
Scripting
You are not just limited to the weapons and controllers that the game gives you; Creeper World IXE has a full scripting language called IRPL implemented, allowing you to give units very non-vanilla behaviour. To give an idea how extensive the changes you can make are, ‘Hero Mode’ was implemented using IRPL.
Disclaimer: At time of writing, we do not have access to the IRPL documentation, so all player-made IRPL code was done by analysing code from other maps. A lot of mapmakers who used CW4’s equivalent (4RPL) are waiting on this documentation before they make anything too crazy.
IRPL is a stack based language, what this means is that you don’t run functions on variables, you push variables to something called the stack and then run functions on that. The wiki has a Creeper World 4 scripting introduction[knucklecracker.com] page, and IRPL is very similar to 4RPL.
IRPL code can be extracted from a map using the ‘Extract Modules to Disk Button’. Without the documentation this is practically necessary to know what functions you have available. I am going to skip the ‘how to make code’ section of this because no documentation means that I am guessing half the time.
Once you have a script typed up, save it with the extension ‘.irpl’ in the map folder you want the script to run in. There are 2 ways of running a script; as a unit script or a global script.
Unit scripts are scripts that are attached to a unit; the code is run by the unit and stops running when the code stops. You can attach a script to a unit by including the following:
"scripts": [
    {"name": "FileName.irpl"}
]
in the unit JSON where FileName.irpl is the filename of the script. This script will run once per game tick (30 times per second) and will not run while the game is paused.
The other way of running a script is as a global script, which is not attached to a specific unit. To run a script as a global script, make a new JSON file that looks like the following:
{
    "type": "global",
    "scripts": 	[
                {"name": "FileName.irpl", "run_when_paused" : true},
            ]
}
Finalising the Unit
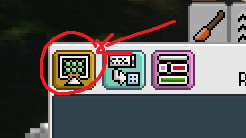 With the unit image, unit JSON and possibly a script you should hopefully be ready to construct the ship in game. In the scripting tab of the editor (second from the right), there are 5 buttons along the top. The left most button is the ‘Build Modules’ button; press it and if everything appears in order then you will get a “Success: Added Module: …” message. If not, you will get one (or like 20+ depending on the error) red messages that attempt to tell you what has gone wrong. You can either troubleshoot the problem yourself or read the troubleshooting section below.
If you have a success message, you can go to the 6th (units) tab of the editor and either add the unit to the players inventory, or add that unit to the map directly.
In the unit JSON each part had a position parameter that I said we would deal with later; it is now later. With the unit in game you can see the position instead of counting pixels. The first number is the left-right position (right = positive) of the part and the second number is the up-down position (up = positive). Also note that these coordinates are based on terrain tiles, not ship pixels. So if you want to move the gun 1 pixel to the left, you would reduce the first number by 0.5.
Make the changes to the JSON, remember to save the file, and then hit the ‘Build Modules’ button again. You should see the parts position get updated, keep messing with the position until you are happy with the result.
Test your units. Even if the game doesn’t spit out any errors it does not mean the unit is working as you intend it to. Try your map with those units and make sure that all the inputs give the expected outcome. A single misspelled parameter will not give an error when constructing the unit, it just won’t set that parameter correctly. If something isn’t working as intended, check it and hopefully you can fix it easily.
If you do not get a success message, the error message(s) that appear will try to help you. A single typo can spit out a ton of error messages but from my experience, you mostly just care about the first one.
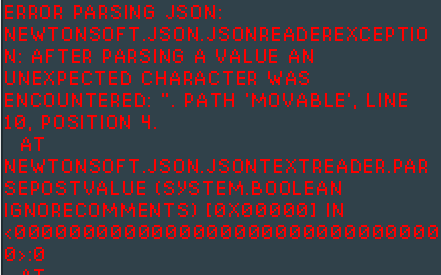 The error pictured on the left has the second block there repeated another dozen times and is the result of a missing comma at the end of line 9, which is the line that sets the parameter “movable”. In the first block of the error message, you can see it say ‘movable’ and line 10. It says line 10 because that is when it sees the next line and realises there wasn’t a comma. When you see a line indicated as the error location, check both that line and whatever line the previous parameter is set on.
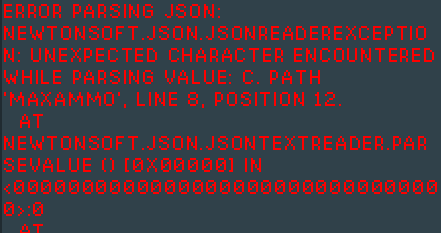 On the right is a similarly looking error, including the spam of that second block, caused by me attempting to set “maxammo” to c75. The error is telling me that an unexpected error occurred in ‘maxammo’ on line 8 at position 12. Maxammo is expecting a number and now it is complaining that it didn’t get one, presumably at line 8, position 12. Well I indented that line with a single tab so the rogue ‘c’ is actually at line 8 position 16 according to notepad++.
![]() Another possible error is the one pictured on the left. This one is caused by me using the wrong capitalisation on the image name. I typed in “aegisMLRSBody.png” instead of “AegisMLRSBody.png”.
Another possible error is the one pictured on the left. This one is caused by me using the wrong capitalisation on the image name. I typed in “aegisMLRSBody.png” instead of “AegisMLRSBody.png”.
I am not going to keep listing all the different errors I can create from inputting things in slightly wrong; hopefully these 3 examples give you a good idea how to parse the error messages and will let you identify the problem for whatever errors you come across.
You have made it! Congratulations on building your own custom unit!

