This is a guide for creating so-called “auto-reversing” trains.
What is an “auto-reversing” train? It is one where the locomotive will automatically switch from one end of the train to the other as needed so that it is always at the front of the train.
Why is this needed? Because the game’s native solution to the fact that a train can’t easily turn around is to have a locomotive at each end, which many people do not like.
Things You Need
In order to create an auto-reversing train you’ll need the following mods:
- Extended Asset Editor⠀
This mod, EAE for short, is required in order to properly load, end, and save all of the properties of a train. - ModTools (Stable)⠀
This mod is required in order to set the property of the locomotive that makes it auto-reversing.
You will also need a train asset to edit. Any train will work except for the vanilla cargo train that comes with the game.
Overview
I’ll start by describing how an auto-reversing train really works, or else everything else to come won’t make sense.
The game doesn’t really support an auto-reversing train. It doesn’t even technically support having a locomotive at both ends.
An auto-reversing train consists of a locomotive, a series of trailers for cargo or people, and one final trailer that looks like the locomotive despite being a trailer. This is true for any train with locomotives at both ends. On top of that, an auto-reversing train is configured so that only one locomotive is visible at a time.
Note that I said visible; the locomotive (and its trailer-counterpart) are always in existence. This is why an auto-reversing train will always have a phantom vehicle, as seen here:
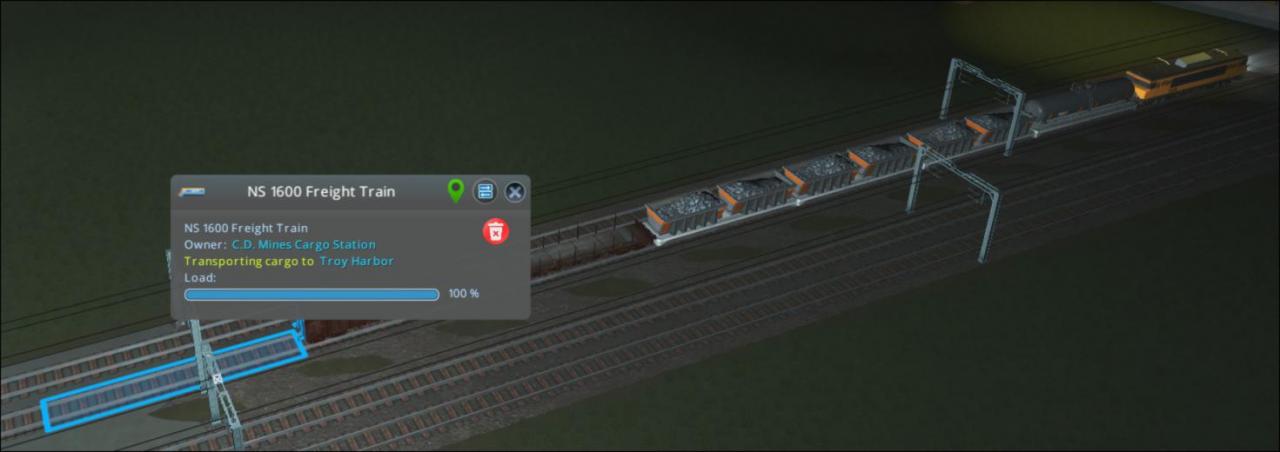
(Figure 1: A screenshot of the game with an auto-reversing train front and center.)
Important: Do not touch anything in the “Trailers” section of the “Properties” window in the lower-right corner of the Asset Editor, as doing so will override any of the changes that you’ll be making shortly.
I hope that this guide helps you. Please feel free to ask any questions, but don’t be offended if it takes me a few days not answer.
Load a Train Asset
The first step is to load your train asset into the editor. I’m assuming that you already have a train asset that you wish to edit. If you need instructions on how to build a train from scratch, I recommend Phresh’s “How to create your own cargo trains” guide.
First, open the Asset Editor and choose to load a preexisting vehicle.
In the Asset Importer, select any train vehicle. It doesn’t matter which vehicle you choose, because it is only temporary. Now, click on Continue.
In the next window, click on Default from template and then Continue.
You will now see a screen that looks like this:
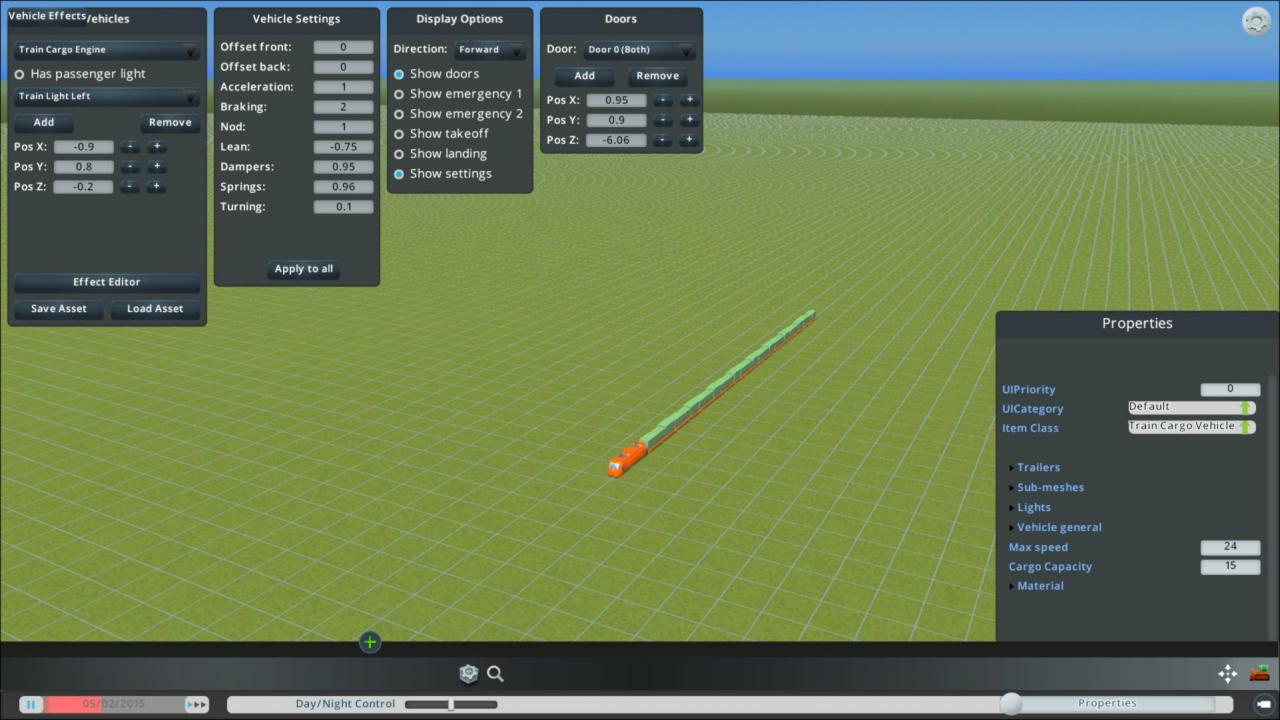
(Figure 2: A screenshot of the Asset Editor with a generic train loaded.)
Notice the extra information panels in the upper-left corner. These are all provided by the Extended Asset Editor, or EAE for short.
You now need to use EAE to load the train asset that you wish to edit. You need to use this method to load the asset, or else all of the extended properties won’t be loaded. In EAE’s main “Vehicles” window, click on Load Asset.
The Asset Importer will reappear. This time find the train that you wish to edit. Make sure to select the locomotive portion of the train, or else you won’t load the entire train. Click on Continue. Your full train should now be loaded.
Before continuing, verify that the full train has been properly loaded, as EAE doesn’t always work. If the train was improperly loaded, then try again. If it still doesn’t load properly, try creating a new Vehicle asset from scratch and then use EAE’s Load Asset function again. If it still doesn’t load properly, exit the Asset Editor and start all over at the top of this section. Sooner or later, EAE will load the asset properly.
Configuring the “Real” Locomotive
In this section, you’ll configure the train’s front / real locomotive to automatically disappear whenever the train is running in reverse.
Open up ModTools’ “Scene Explorer”. On the keyboard, type Ctrl + E. You’ll see a window appear that looks like this (note that you may need to type Ctrl + E more than once):
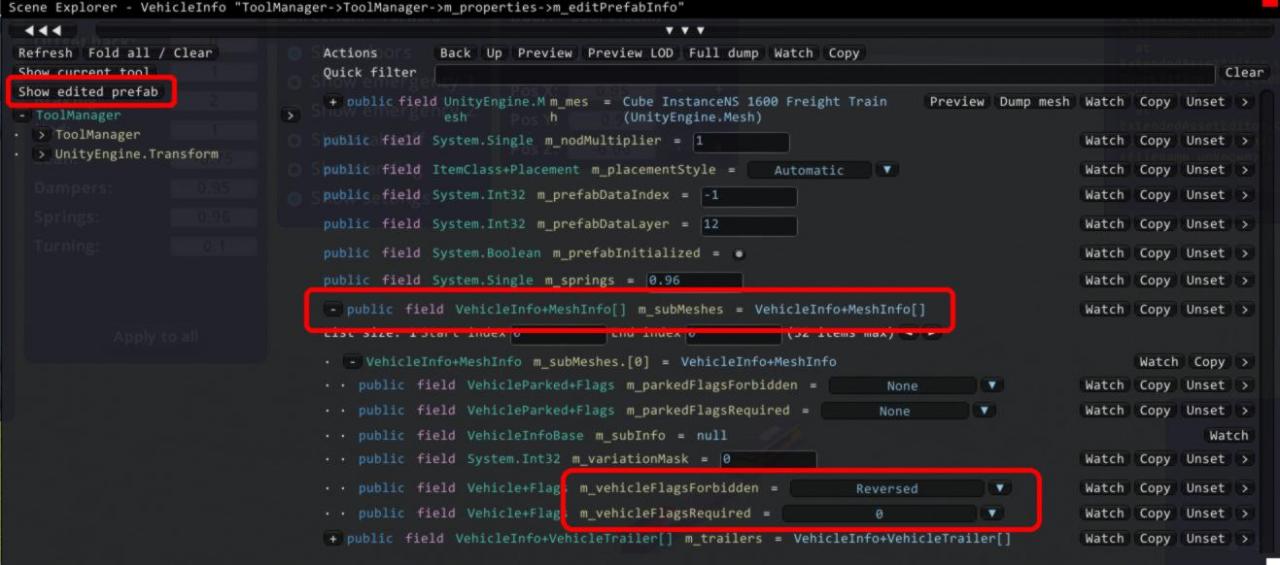
(Figure 3: A screenshot of the ModTools “Scene Explorer”, with the locomotive’s mesh-hiding properties highlighted.)
In the upper-left corner of the “Scene Explorer” window, click on the Show edited prefab button. This will cause the “Scene Explorer” to focus on the locomotive. Now, scroll down until you see this line of information (it will probably be near the bottom of the window):
public field VehicleInfo+MeshInfo[] m_subMeshes = Vehicle+MeshInfo[]
Having found the line, click on the + button on the left to expand the information. Then click on the + button next to this line:
VehicleInfo+MeshInfo m_subMeshes.0 = Vehicle+MeshInfo
You’ll see two variables controlling the visibility of the locomotive. Each variable can be configured to one or more values using a drop-down menu. Set the variables as follows:
- m_vehicleFlagsForbidden: Reversed
- m_VehicleFlagsRequired: Nothing, which will be shown as a 0.
Now, close the “Scene Explorer” window using the red button in the upper-right corner of the window.
The next step is to configure the lighting and sound effects to only be present when the locomotive is visible.
Now, in EAE’s “Vehicles” window, make sure that the vehicle-selection drop-down menu at the top of the window is set to the locomotive. The locomotive will be described something like this:
Freight Train.Freight Train_Data
The important part is the “_Data”, as this always refers to the locomotive.
Then, click on the drop-down menu for selecting the train headlight:

(Figure 4: A screenshot of EAE’s headlight-selection menu.)
This menu will tell you which headlights are installed on the locomotive. In the screenshot above, you’ll see that the train has three headlights (Left, Right, and Center) as well as an internal passenger light.
Next, in EAE’s “Vehicles” window, click on the Effect Editor button. A window like this should appear:
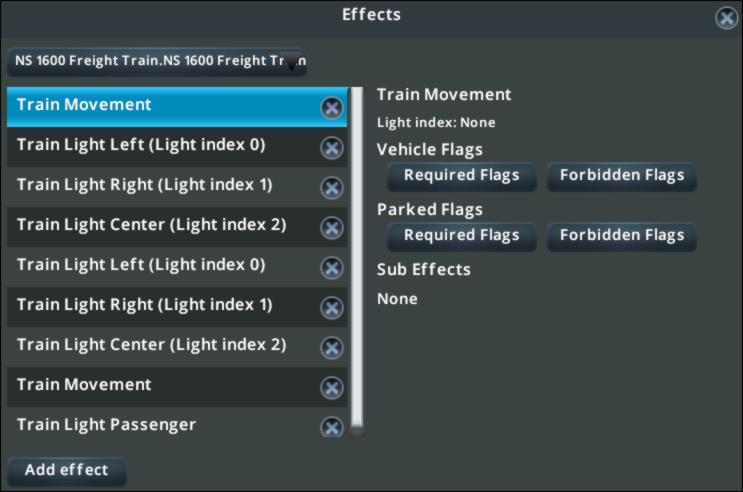
(Figure 5: A screenshot of EAE’s vehicle effects window.)
Make sure that the vehicle-selection drop-down menu in the upper-left corner of the window is set to the locomotive.
What you’ll need to do is to create two sets of effects. One set will be active when this locomotive is moving forward. The other set will be copied to the rear locomotive later and will be active when the rear locomotive is visible. (Note: Technically we could create separate effects for both vehicles, but this method has the advantage of saving you work if you ever reuse the locomotive in another train, and it allows the locomotive to be reused in a standard double-ended train.)
In the “Effects” window, you’ll see some, or all, of the following effects:
- Train Movement: This refers to the sound effect made when the locomotive is moving.
- Train Light Left/Center/Right: These refer to the headlights on the locomotive. They correspond to the left, center, and right headlights.
- Train Light Passenger: This refers to the internal passenger light.
You may not see all of these effects, or you may see multiple copies of each.
Click on the Add effect button to add a new effect. A window should now appear, but it may be behind the main “Effects” window.
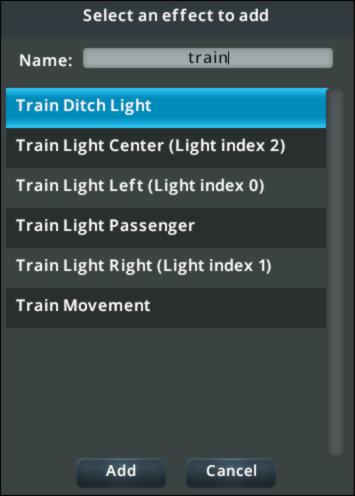
(Figure 6: A screenshot of EAE’s list of vehicle effects to add.)
Select Train Movement and then click on Add to add the effect to the list. Repeat this step for a second Train Movement effect and then two copies each of the various “Train Light *” effects, Remember, if your train doesn’t have a center (or left, etc.) headlight installed, you don’t need a corresponding effect. When done, you should have two copies of each effect.
Once you have all of the effects listed, select the first effect in the list, and then click on the Required Flags button underneath Vehicle Flags on the right. Check the Created box and uncheck all of the rest. Click on the Done button. Then click on the Forbidden Flags button underneath Vehicle Flags on the right. Check the Inverted and Reversed boxes and uncheck all of the rest. Click on the Done button. When done, the two sets of flags will look like this:
(Figure 7: A screenshot of the required and forbidden flags for the forward direction.)
Now, repeat this process for one half of the effects. That is, do this for one “Train Movement”, one “Train Light Left”, etc:
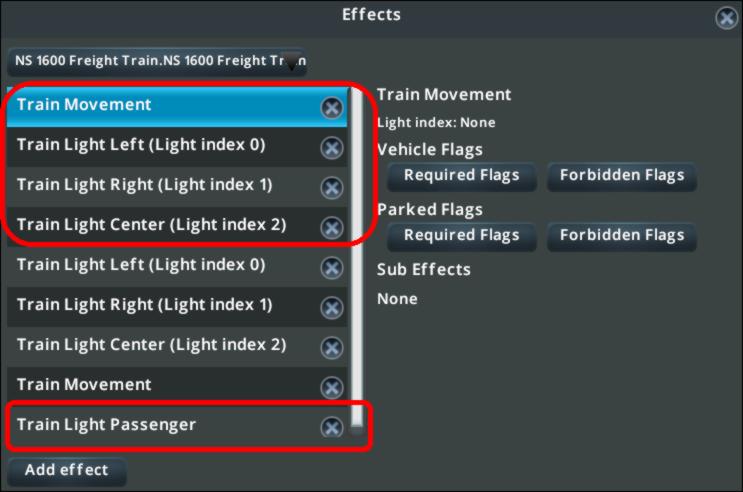
(Figure 8: A screenshot of the list of effects with the “forward” half of the effects highlighted.)
It is important that you only do this for one half of the effects, because the second half gets configured separately.
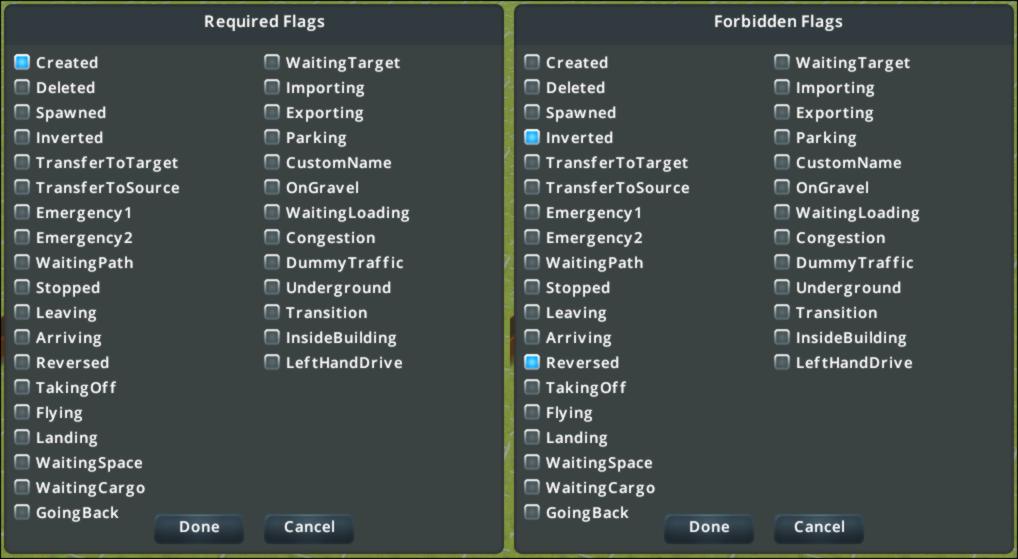
Having configured the “forward” half of the special effects, now configure the “backward” half. Each of the “backward” effects will need to be configured as follows: click on the Required Flags button underneath Vehicle Flags on the right. Check the Inverted and Reversed boxes and uncheck all of the rest. Then click on the Forbidden Flags button underneath Vehicle Flags on the right. Uncheck all of the boxes. Click on the Done button. When done, the two sets of flags will look like this:
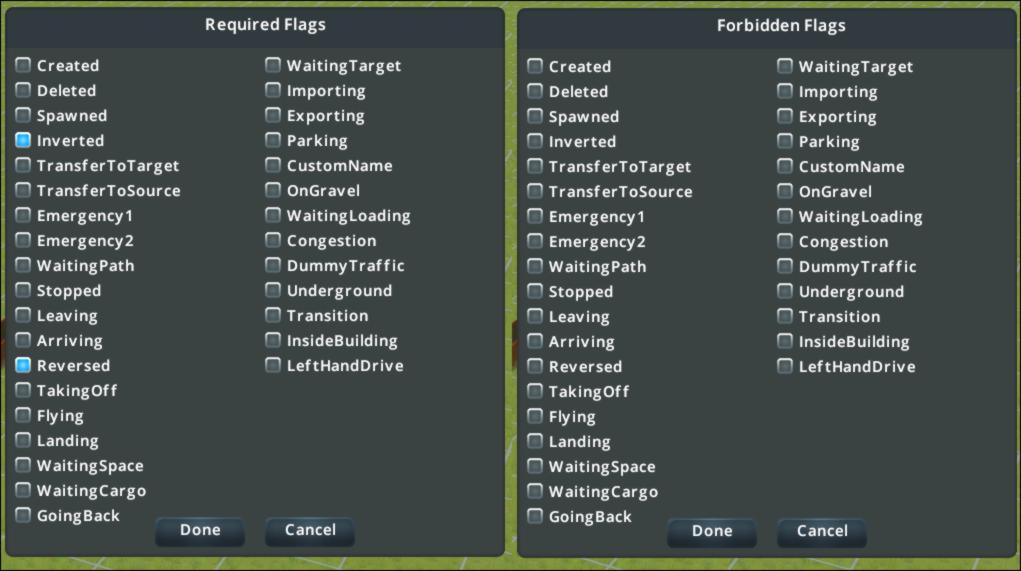
(Figure 9: A screenshot of the required and forbidden flags for the backward direction.)
You’re done with locomotive configuration.
Configuring the “Fake” Locomotive
In this section, you’ll make a copy of the “real” locomotive, sticking it on the back of the train, and configuring it to only be visible when running in reverse.
In EAE’s “Vehicles” window, select the last car in the train from the car-selection drop-down menu at the top of the window. It’ll be at the very end of the list, and it’ll be called something like:
4 - Freight Train.TrailerFreight Train3
Next, click on the Duplicate button. That will create a new trailer that is a copy of the current last-in-line trailer.
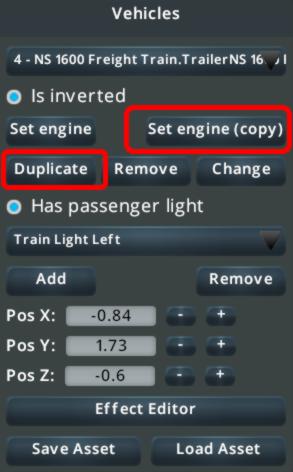
(Figure 10: A screenshot of EAE’s “Vehicles” window, with the engine-copying buttons highlighted.)
Then, use the car-selection drop-down menu to select the new last car in the train.
Now, click on the Set engine (copy) button. This will replace the existing trailer, no matter what it looks like, with a copy of the locomotive, include all of its special effects. It is still going to be considered a trailer. however.
Make sure that the Is inverted option in the “Vehicles” window is checked, because we want/need the new copy of the locomotive to be facing in the opposite direction from the real locomotive.
Now open up ModTools’ “Scene Explorer” again. On the keyboard, type Ctrl + E. This time, however, you’ll need to dig down deeper to get at the settings for the new “fake” locomotive.
In the upper-left corner of the “Scene Explorer” window, click on the Show edited prefab button. This will cause the “Scene Explorer” to focus on the locomotive. Now, scroll down until you see this line of information (it will probably be near the bottom of the window):
public field VehicleInfo+VehicleTrailer[] m_trailers = VehicleInfo+VehicleTrailer[]
Clicking on the + button will reveal a list of trailers attached to the locomotive. Scroll down until you reach the final trailer. It’ll look like this (although the number may be different):
VehicleInfo+VehicleTrailer m_trailers[3] = VehicleInfo+VehicleTrailer
Click on the + button and then the + button for the VehicleInfo property that is immediately revealed.
Now, scroll down until you reach the trailer’s mesh information at:
public field VehicleInfo+MeshInfo[] m_subMeshes = VehicleInfo+MeshInfo[]
Click on the + button to expand this section.
You’ll see two variables controlling the visibility of the “fake” locomotive. Each variable can be configured to one or more values using a drop-down menu. Set the variables as follows:
- m_vehicleFlagsForbidden: Nothing, which will be shown as a 0.
- m_VehicleFlagsRequired: Reversed
When done, your properties should look like this. Note that I’ve cropped the picture for clarity; there will be a lot of material that you’ll need to scroll past.
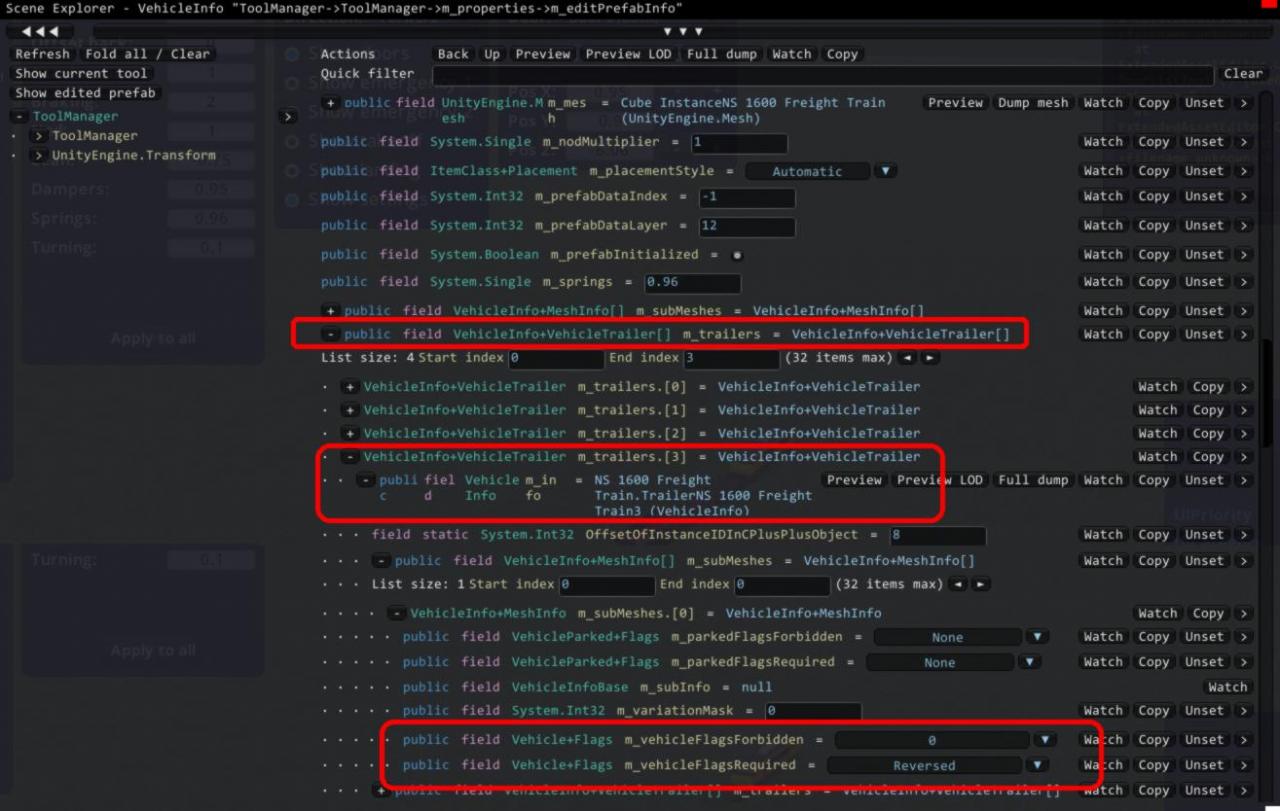
(Figure 11: A screenshot of the ModTools “Scene Explorer”, with the locomotive’s mesh-hiding properties highlighted.)
Now, close the “Scene Explorer” window using the red button in the upper-right corner of the window.
The “fake” locomotive should now be configured to only appear when the train is going in reverse.
Saving Your Train
It’s time to save your modified train.
DO NOT PRESS ESCAPE AND CLICK THE “SAVE ASSET” BUTTON. Doing so will cause many of the custom settings to be destroyed.
Instead, in EAE’s “Vehicles” window, click on the Save Asset button:
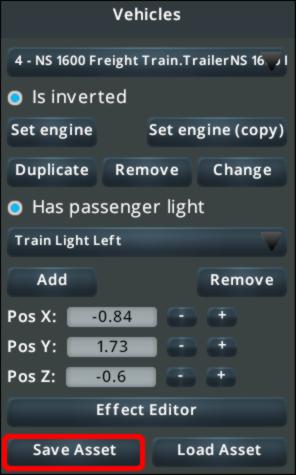
(Figure 12: A screenshot of EAE’s “Save Asset” button.)
A new “Save Asset” window will appear. Enter a package/file name for the new train and an asset name. For instance:
- Package name: MyFreightReversibleTrain
- Asset name: Auto-Reversing Train 1000
The train should now be saved.
Testing Your Train
If you’re like me, you’ll have made a mistake somewhere. So, before going any further, you need to test the train.
Load a game and do whatever it takes for a copy of your train to spawn. If you have “Advanced Vehicle Options” installed, use it to configure all of the trains except yours to no longer spawn.
Wait for a copy of your train to spawn and follow it around. Make sure that only one locomotive is ever visible. Make sure that you see the train actually switch into reverse mode. Wait for night to verify that the lighting effects work. (Because, let me tell you, having headlights appear out of thin air is weird.)
If you discover errors, you’ll need to reload the train and make the necessary fixes. You do not need to start all over, though.
Once everything is working, pat yourself on the back for a job well done.
Notes
Can I use Advanced Vehicle Options’ “Replace last car with engine” function with my new auto-reversing train?
- No. True, AVO will let you use this option, but the end result will be a train with two locomotives when going forward and no locomotives when going backward.
Does the invisible engine count towards the length of my train?
- Yes, it does. So, when planning, make sure that the length of the train plus the invisible engine will fit safely into potential train stations. For vanilla passenger stations, this is 18 squares long, for vanilla cargo stations, this is 22 squares.
Are auto-reversing trains compatible with the “Vehicle Effects” mod?
- Yes, they are. But, remember that, when EAE saves the asset, it will rename all of the trailers to use its own naming scheme. Therefore, it is best to save the asset, exit the Asset Editor, reenter the Asset Editor, load the new/modified asset, and determine the names for the various vehicles. To work with Vehicle Effects, you’ll need the full name (ex: “MyCustomTrain.TrailerMyCustomTrain0”). In addition, you’ll need to remember to specify the proper inverted/reversed flags in the Vehicle Effects XML file for each locomotive. For more information on using Vehicle Effects, set the various tutorials included on its Workshop page.
There are a couple of notes about the flags that are worth mentioning, since they aren’t obvious.
The Inverted property means that the effect will only apply to or be banned from locomotives that are inverted (that is, flipped back-to-front).
The Reversed property means that the effect will only apply to or be banned from locomotives when the train is running in reverse. And “running in reverse” is always relative to the “real” locomotive, whether visible or not.
If multiple “Required Flags” are set, then they must all be met in order for the effect to be applied.
If multiple “Forbidden Flags” are set, then only one needs be met in order for the effect to be banned.
If you set the same property in both the “Required Flags” and “Forbidden Flags”, then the “Required Flags” will override the “Forbidden Flags”.
Also, these flags can be set using ModTools. In fact, once I became familiar with ModTools, I found it quicker and easier to set the flags since ModTools has a copy-and-paste function. The relevant locations within ModTools are:
VehicleInfo+Effect[] m_effects → m_effects.[‹##›]
and
VehicleInfo+VehicleTrailer[] m_trailers → m_trailers.[‹##›] → VehicleInfo+Effect[] m_effects → m_effects.[‹##›]
Thanks to meriadoc.hobbit for his great guide, all credit to his effort. you can also read the original guide from Steam Community. if you have any questions about this guide, you can leave a comment via the Steamcomunity.
Related Posts:
- Cities Skylines: How to Install Patch Loader in MacOS
- Cities Skylines: How to Make Money with Industries DLC