There’s a lot of new players coming to Black Survival: Eternal Return – either completely fresh, or from other MOBAs – and something I hear a lot from them is commonly things along the lines of: “I can’t do damage”, “Defence is too strong”, “Everyone does so much more damage”, and so on. Given there’s a very small Western playerbase of Black Survival players before ER came out, I’m here to give you a short guide on the basics of what makes BS:ER unique and why playing it like most MOBAs or other “Battle Royales” are doing you no favours. If you’re not one of those people, and are just confused about how the game’s general flow is, then don’t worry – this’ll tailor to you, too.
I’m going to cover the general flow of Black Survival as a series, what certain stats are that confuse new players, and a small rundown of how to get started playing BS:ER and not feeling like a pool noodle caught between lawnmower blades.
Black Survival’s Unique Gameplay Flow
First of all, this guide will assume you’ve already completed all of the basic tutorials and have a grasp on how the game controls. What we’re going to cover in this guide is how to go about playing the game so you can start having fun without being confused by all the numbers. Now, if you just want a basic idea of how to get into the general game flow and want to learn the rest yourself, you can jump from the end of this section to the final ones, as the following sections will just go into the basics of Weapons, Armour and food, which are the other three main sticking points of getting into Black Survival.
I’ll also preface this guide by saying I’ve played the game over several hundred hours during the closed alphas, some of the betas, and the open beta before Early Access, as well as having a good few hundred hours on Black Survival on mobile, PC emulator, and Steam combined, so by now, I’ve got a firm grasp of the mechanics, myself. Not Dragon-rank level knowledge, but definitely enough to share a basic understanding.
Black Survival has a very unique gameplay flow thanks to the Mastery system. You can see this window in game by hitting “V”, by default.
This is a fairly unique system to the Black Survival series, and whereas it was once represented by Grades from F to SSS+, Eternal Return represents it in numbers, up to a maximum of 20 for each Mastery.
 What do these numbers mean?
Mastery is what constitutes your level. In short, for every action you do, the more experience you gain in that specific Mastery’s category. Let me explain:
As you can see above, Sisella’s weapon she has equipped are of the Shuriken mastery type. These are the only ones she can currently use, so there’s no way to get a mix up. However, other characters can use multiple weapons, and I’ll explain why you gotta watch out for that later.
For now, you see how the overall level is one? That’ll raise once I gain Mastery EXP, and this is done by fulfilling certain criteria that is unique for each Mastery. You can check these by mousing over the Mastery window by pushing V. Don’t worry about memorising or trying to max out specific stats, only a few really matter.
For example, the character gains Shuriken – and similarly for most weapons in the game – mastery EXP for fulfilling any of these criteria:
- Dealing 100 Damage to a Player
- Dealing 100 Damage to a Wild Animal
- Killing a Player
- Crafting a Weapon (Of that Weapon Type)
These each give varying amounts of Mastery EXP depending on the criteria fulfilled – usually in order of difficulty (with Weapon crafting giving more depending on the rarity).
You following me so far?
Now here’s why this matters. As you can see along the top of the lil’ popup window, beneath the title of the mastery, it describes what you gain for each Mastery level. For weapons, this is typically more damage, faster attack speed and so on. The stats you gain differ depending on the weapon, so I absolutely recommend familiarising yourself with your preferred weapons’ stats if you wanna think about what you’re building in relation to your character. These are usually summarised in the pre-game weapon select by a brief description, which we’ll cover when we talk about why Weapons are important in the next section.
Mastery levels also apply to other stats that come under the other 2 categories – of which I’m unsure of the names of so I’ll dub “Exploration” and “Personal”, respectively – which also have their own criteria for Mastery EXP gain. You can check the criteria and which stats you gain from them by hovering over each.
To reiterate, this is super important, because while each character has their own stats they gain from leveling up, Mastery levels will increase anything from movement speed to defence, to how much HP or Stamina you regenerate over time, as well as increasing your overall level to enable you to upgrade your skills.
How Do I Go About Leveling These?
This is the million dollar question that no newcomers seem to ask, instead blaming inherent character values, like this was another MOBA. Here’s how you solve this problem:
This is probably the most important step of Black Survival as a series, and why so many people struggle to get into it because they don’t feel like they’re as strong as others seem to be. In the original Black Survival, all you had to worry about was your own level and doing various tasks to increase it, as well as your weapon level. However, knowing what you do now about the way Eternal Return differs, you’re probably thinking it’s impossible to keep track of. The solution to this is to not worry about specifics and just stay active. Here’s a few examples:
- If you’re currently searching a search point, craft an item while you grab everything you need.
- Kill chickens, bats or whatever you can manage to kill on your way to the next area – they can often drop needed or helpful items and add to your Mastery EXP in a few ways. You also deny certain characters[eternalreturn.gamepedia.com] the chance to benefit from them early on.
- If a player is nearby, even if you have no plans to kill them, smack them about a bit with your abilities, you’ll work towards the damage needed to gain weapon EXP.
- If you need to rest or stop to check something in the catalogue or the map, make some food or add some optional targets to your route.
Where a lot of people go wrong is by just gunning for their items to make the highest rarity they can without engaging with other players or animals, because they may be scared or too focused on what they feel is their powerspike. While some of these really matter, like crafting weapons and armour, the aim of game is to minimise your time spent searching for what you need, and maximise your time building what time you actually spend. I’ll go more into the benefits of taking small diversions later in each section, but for now, all you gotta worry about is trying to make sure you keep your Mastery levels increasing throughout the game while you’re working to create stronger weapons, armour and cooking good food.
Now, with that out of the way, hopefully you have a basic idea of how to go about putting what the game has already taught you into practice, armed with some more knowledge of the Mastery system. If you’re content with that, jump into a queue, play a few matches and forget about aiming to win, and focus on the attitude of making your time count. You’ll start to notice a difference in levels and damage within a few attempts.
However, if you’re still looking for some information, head to the next section where I’ll cover some more basics of some other systems Black Survival operates on, as well as habits that you’ll have to develop regarding other aspects of the game.
A Selection of Painful Things…
So as we touched on earlier, there’s a lot of weapons in Black Survival – with more to come – that each fall under a weapon mastery type, with each character (from how it’s looking so far) set to have access to a maximum of 3 types of mastery each.
The weapon types we have currently, as you can see on the right here – from left to right, top to bottom – are:
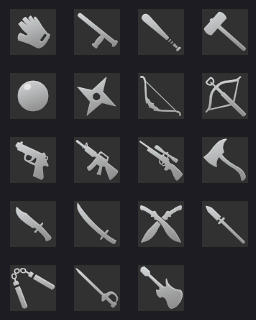
- Glove
- Tonfa
- Bat
- Hammer
- Throw
- Shuriken
- Bow
- Crossbow
- Pistol
- Assault Rifle
- Sniper Rifle
- Axe
- Dagger
- Two-handed Sword
- Dual Swords (We’ll talk about that one specifically)
- Spear
- Nunchaku
- Rapier
- Guitar (We’ll touch on this one, too.)
You can see what weapons a character uses on their character page: We’ll use Jackie’s selection of weapons as our first example:
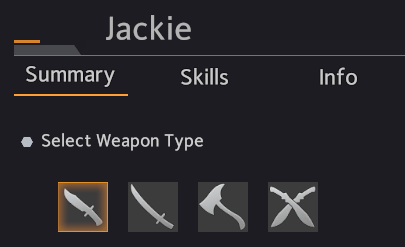 As you can see, Jackie has access to four different weapon masteries – Daggers, Two-handed Swords, Axes, and Dual Swords.
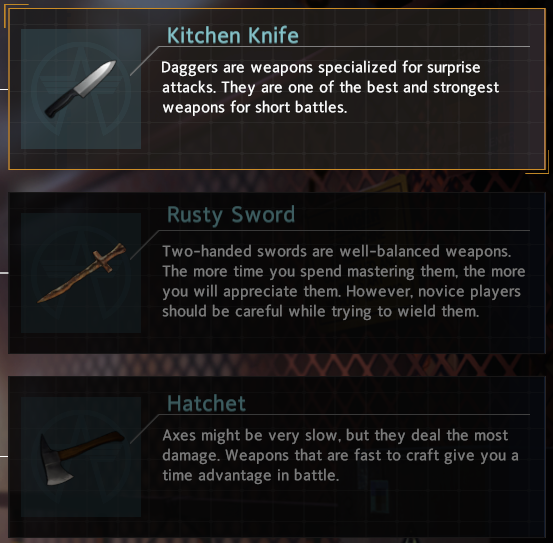
These can also be seen on the character and weapon selection screen when you first start a game right after match-making, as you can see on the right, here.
Given that you’ve played the tutorial, you should know how to make weapons, but the question is usually, which should I make? The answer really simple;
Just like with character choice, you pick based on your preference.
As a quick example, Daggers attack incredibly quickly, but lack a lot of damage that Axes have early on, of which Axes trade for a lower attack speed.
Given that there’s so many options and places to start to make them, you can usually get away with building the weapon type that you prefer with the character you prefer. Likewise, if you’re playing Squad or Duo, you can build to compensate for your teammate’s weakness. An example with Jackie being running daggers/dual blades to compensate for the lack of consistent damage that someone like Sissela has in the early game.
Again, it’s all about your preference.
With that in mind, some quick notes to keep a track of:
- All weapons have unique stats, ranging from attack, health, skill amplification and so on. I’d encourage you to look through the Catalogue in the home menu to see what some of the weapons have to inform any builds you’re making once you get to planning builds, yourself.
- Every weapon comes with their own ranges and baseline stats. As an example, knives are inherently faster to attack than axes, so even if an axe – for an example – boasted the same attack speed bonus as a knife weapon, it would still be slower to attack, so it’s good to keep it in mind.
- Following on from the Mastery segment, it’s possible to swap weapons mid-match, but keep in mind that Mastery does not carry over between weapons. So if you were at Level 10 in Dual Blades but then decided to swap to a Sword, then you’d have to start over. The Mastery you left behind does not reset, however, so if you change your mind, you can go back to the old weapon.
- We’ll address this in the general tips later, but it’s good to remember that while your attack stat does inform your skill damage, the “Skill Amplification” stat or “Skill Amp” will further boost your skill damage exclusively, so it pays to know exactly what you want to go for with your character, as most of the cast can benefit from normal attack and skill attack focuses.
- While preference is important, also keep in mind of what you want for your build and work on it accordingly.
Let’s talk quickly about – what will no doubt remain the case:
If you’re planning on playing Hart or – at current, with likely more users to come – Jackie, it’ll pay to know about Guitars and Dual Blades.
Guitars are currently only available to use by Hart. While Magnus is the only Hammer user, this will be likely to change as we get more characters included in the game.
However, in Hart’s case, the Guitar is her exclusive weapon, as it actively ties into her abilities. This is worth to note for new players who want to play Hart, as you need to understand that – as of now – these are Hart’s only options.
It’s not all dark clouds, though, as there are a wide variety of guitars to adhere to all playstyles a Hart could want, as well as a very unique weapon skill. Again, I do expect them to add options to Hart later down the line, but for now, it’s good to keep in mind.
On to Dual Blades, BS:ER’s only current hidden weapon mastery. While in Black Survival, these were simply weapons in the stab/blade category, with ER’s approach to weapons being more about what kind of weapon they are (whether they’re an axe, sword or dagger/knife) rather than the type of damage they do.
Dual Blades, like any other Mastery, offer options in weapons and a unique weapon skill, but with one difference; you aren’t offered dual blades at the weapon select. The way to create Dual Blades is to follow a crafting recipe in order to transform the dagger/knifes into Dual Blades. They take a little longer to make than Swords – and definitely longer than Axes, but their consistent damage can be terrifying.
As it stands, this is the only Secret Weapon Type, but with the amount of stuff the BS:ER team has planned for this year, it’s probably only a matter of time until more is added.
Closing on Weapons
To round out, I want to finish by saying that Weapons are definitely not the most complicated part of Black Survival – that definitely belongs to the routing – but your choice of weapon will definitely impact how you get around each experiment in terms of your general safety, how much you have to fight for the materials, and so on. However, now that we’re done looking at how to get about putting more pain on others, let’s look at how to fend off the pain.
…And How to Defend Against Them
Armour Categories
So unlike Weapons, Armour only comes under five categories, one for each slot in your inventory besides your equipped weapon.

These Categories are:
- Head
- Chest
- Arm
- Leg
- Accessory
A lot of the armour for each category falls under the typical category of increasing defence or defensive stats in some way, but it’s very important to remember that not all armour provides defence, usually trading off for HP, Stamina, Attack and other stats.
Here’s a quick example:
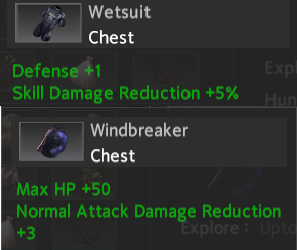 Stat Tradeoffs and Differences
Wetsuit and Windbreaker are both common items, found in different areas of the Island. They’re both Chest piece items, however, as you can see, they differ in stats and fundamental uses.
They both feature defensive stats, but the Wetsuit boasts defence and skill damage reduction stats. This means it’s typically a good option against skill-based builds or characters who really rely on damage from their skills, like Chiara and Sisella (based on common builds).
Windbreaker offers additional HP and reduction against normal attacks, meaning it’s far more useful against builds or characters who want to be clicking on you a lot with their guns or knives, like Jackie or Aya.
I want to drill this into your heads while you’re brand new, because this is a thing that is shared with a lot of MOBAs, but is a lot less guaranteed with Eternal Return, given the ability to almost instantly change your build by end game; While League of Legends and other MOBAs have characters’ damage dedicated to specific types, Eternal Return gives the option to focus on normal attacks or skills, so the build is less about eyeing a character and building one option or following a build, and more about adapting to what you experience.
There’s a few other statistics that armour items typically offer, like Life Steal or HP & SP Regen. However, there’s one particular set of stats that I’d like to draw attention to, as they’re fairly unique amongst the other stats and will be good to keep in mind for newer players:
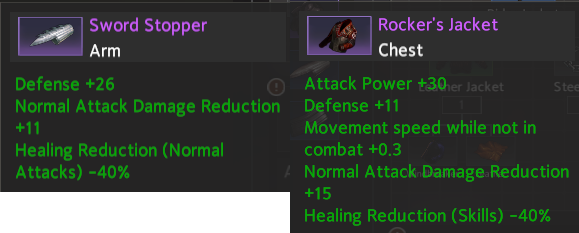
Healing Reduction can be an immensely helpful stat to have, though it’s only available for certain pieces of armour. However, building it as a base every game isn’t typically a good idea, as you lose out on things like Skill Amp and HP which your character may need, and may also be out of the way of your route. As such, you should either make an additional plan ahead of time, or build these as a reaction to seeing characters who may be building towards life steal or characters like Chiara or Jackie, who can get by through a plethora of healing via normal attacks or skills.
In effect, Armour isn’t too difficult on paper:
- Craft the armour that’ll benefit you, while aiming towards a certain goal, like amplifying skills or increasing movement speed.
- Craft appropriate defence for what you think you’ll have to deal with, or what you struggle with.
- Build as a reaction to things you can see or have experience of, like a Jackie rushing for those good ol’ lifesteal items or a Chiara who wants to make her skills hit like a truck.
- Avoid building the same thing every game, because if a certain character is becoming a problem, you’re going to have to bite the bullet and adapt. Black Survival’s unique flow is about making the best of the situation you’re in. It’s Black Survival after all.
As a closing note, be sure to look through the Catalogue, as well as making use of Saved Plans so you can itemise towards certain developments and commit those alternatives to memory.
Finally, Some Good Food..!
So all I can really offer is a couple of tips regarding food and how you can inject it into the gameplay flow each game. With that in mind, we’ll go over some basics:
Food comes in two categories: Health and Stamina / Food and Drink (Defined “Beverages” by the game, but y’know, we’re not gonna over-complicate things).
Health items are typically solid food items – ice cream, too – and (unlike in Black Survival) provide an HP restoration effect as indicated on the food item over a fixed time frame.
Drink items are almost always fluids, like water and such, and operate similarly to Health items, with the difference being that they instead restore stamina gradually.
The amount of Health/Stamina food restores depends on the food, the quality of it (uncommon, rare, etc), how exclusive the materials are to obtain – like bread recipes – as well as the quantity, as items that are cooked in larger quantities, like fried chicken, typically heal less. Certain effects, such as Xiukai’s Passive, Juggernaut Chef
Two good examples of the food items are the two default items that everyone is provided at the start of the game: Bread and Water, health and stamina items, respectively.

While Bread and Water can be found in a good few places, they’re fairly versatile with what you can make with them, so your first step should always be knowing what you can make with Bread and Water in the areas you’re running through. I’ll add extra tips about this when we talk a bit about routing.
For now, however, some all-purpose tips for your gameflow:
- Food is incredibly common, with ingredients that can be used to make various recipes found in every area of the island. It’s typically a good idea to pick up what you can, whenever you can, if you have space that will allow you to.
- Food should always be a priority once you’re finished making your weapons and armour. If you can’t find anyone to fight in the moment, it’s always best to find stuff to make for later.
- Whether or not you have food is a decider at the end of the game. Besides running out of HP as an obvious concern, a lot of characters rely on stamina for using skills, and not having skills can result in that end screen coming a lot sooner.
- Always remind yourself what your character uses for skills. Sisella and Xiukai are two characters who use HP for their skills, but rely on stamina for searching and crafting. As those characters, balancing out what you spend more time cooking is in your best interest.
- Don’t hold onto your bread or eat all of it. As mentioned before, it’s very versatile, and hanging onto it holds a spot in your inventory that could instead hold a 500+ heal.
Routing Around Lumia Island
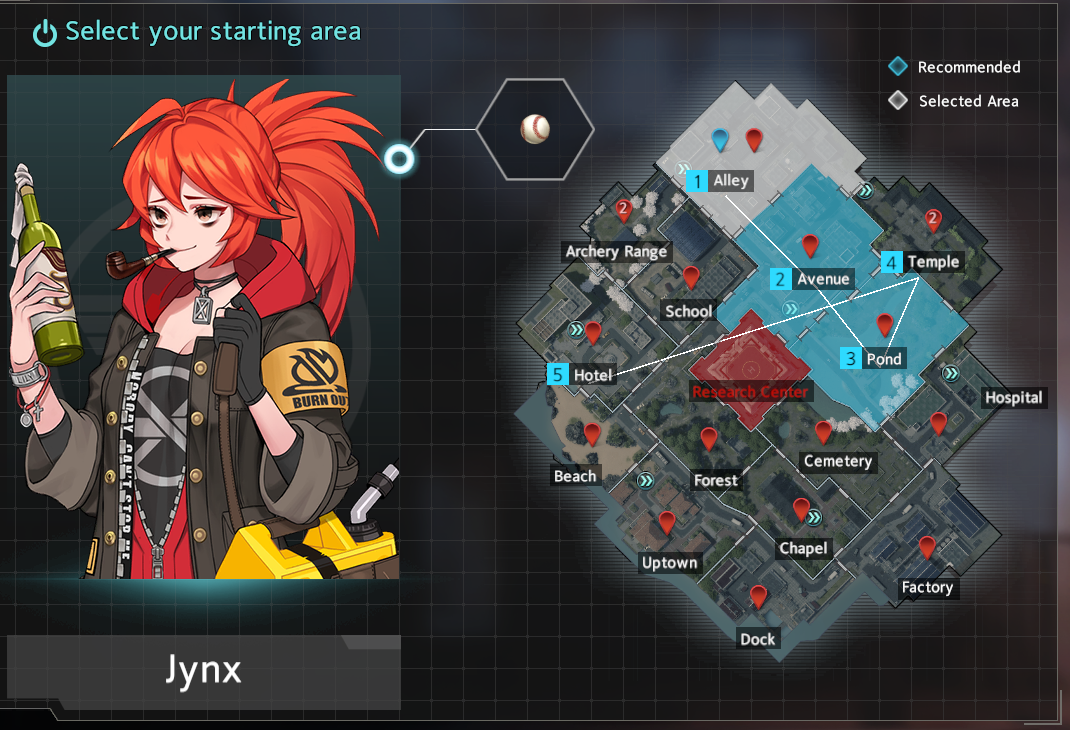
This is the map of Lumia Island, and all of it’s labelled zones. As you’ve come to understand, your plan is to go to each zone, making your weapons and armour as you kill animals, fight other test subjects and make food out of illogical recipes. (Cramming a handful of garlic cloves into a whole loaf of bread doesn’t sound appetizing, but I mean if it’s all you got…?)
You’ll select which zone you want to start in, and then off you go to partake in the experiment.
So in Black Survival, you could only set one target item you were aiming for at a time, but with how Eternal Return works, you gain access to “Saved Plans”, which you can find in the main menu, up at the top of the screen:
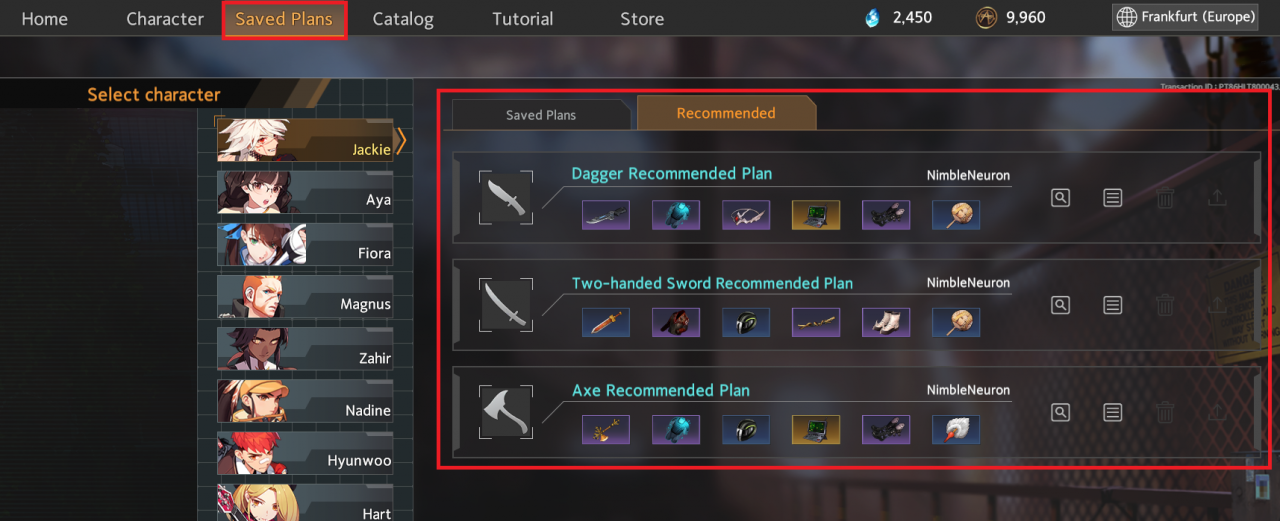
Given how this game functions – though I don’t understand why or how – you’re required to select a plan before you start. You don’t have to follow this plan, but it’s nonetheless a requirement before you can play. On a fresh new account, you’ll be provided a Recommended plan for each character and each weapon they use by Nimble Neuron. You can, however, press this button –

You can import a selection of plans that other players have created and shared, allowing you to use their plans.
I digress – a Plan, once selected, creates what is termed in Black Survival, a “route”. Your route will define what weapons and armour you build when and how, who you run into, and your general pace of gameflow. As an example:
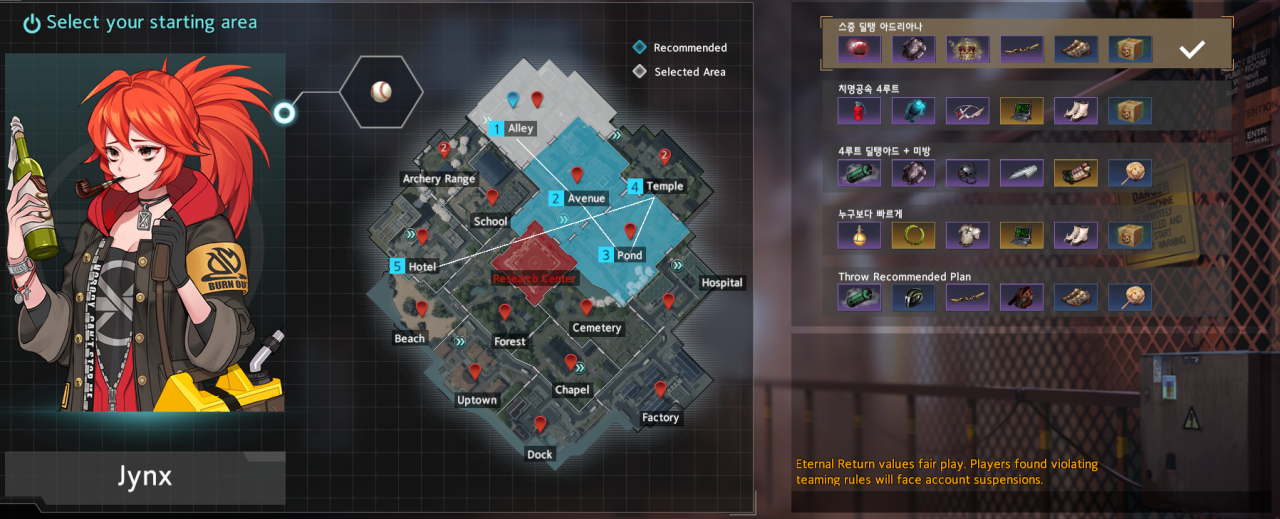
I’m playing as Adriana, with two different routes I tend to use that are imported from other players, given how recent a character she is. This first route is a build that’ll have me start in Alley, and take me through 4 other areas for a total of 5 areas before my build – in an ideal scenario – would be finished. As a reminder, your Plan is what you’re building, but your Route is how you’re going about it.
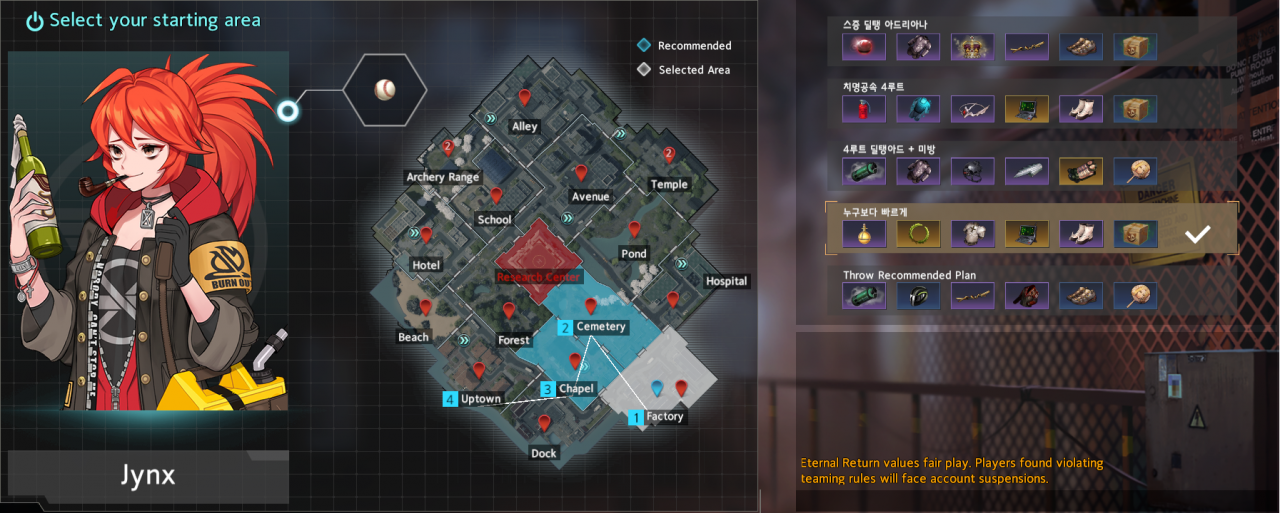
Just to drive the point home, here’s the other Plan, and the Route it leads me down has me start at Factory, and travel through 3 other areas, for a maximum of four.
This is the general idea for Routing in Black Survival; minimize time searching and crafting your final build, and maximize your time spent fighting, travelling and cooking food to build Mastery.
Of course, nothing ever goes to plan. If you’re pushed out of a zone – especially in Squad or Duo modes – you’ve got to be sure you’re aware of where you can find what you’re looking for from other places.
Gemstones, as example, are very sought after for a lot of Plans, and Pond is a popular place to find them, given that it provides other resources needed to craft them into components – such as hammers. However, Beach, Forest and Temple are also sources for Gemstones, so if you’re bullied out of those because you’re behind or outnumbered or a character suited for late-game, then don’t worry; you have options.
Another good point to note is that some areas on the plan require you to go to the other side of the map. This is easily done through “Hyperloops”, which is Eternal Return’s way of adapting the source game’s function of being able to travel to areas instantly. Functionally, they work as teleporters disguised as phone boxes:
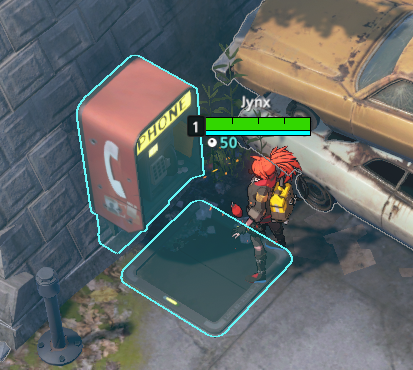
However, not every area has a Hyperloop, so it’s important to remember that when building your own Plans so your Route requires less on-foot travel to keep your progress hasty.
While we’re on the subject of Hyperloops, avoid using them if not required, as once you’ve selected an area, during the wind up of the teleport, the location of your teleportation will show up as a small platform, allowing nearby enemies to prepare an ambush.
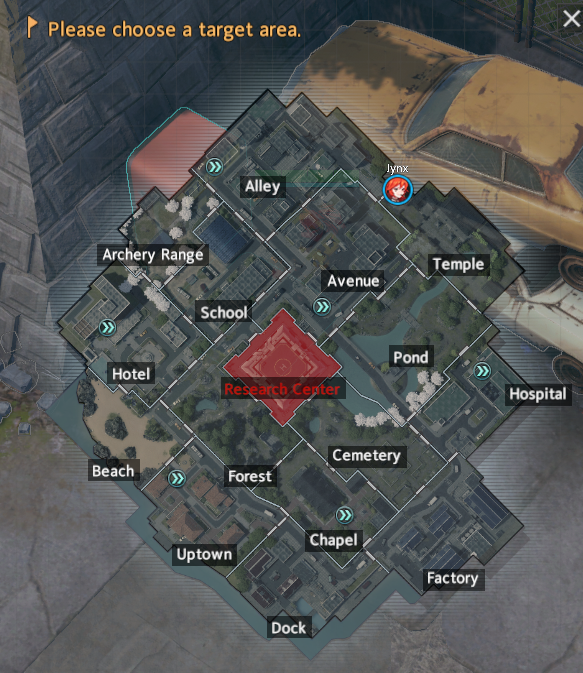
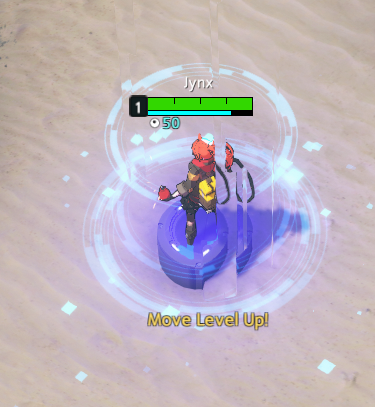 In short, if you can walk to an area, it’s much more advised, because you can see alerts on the map that will notify you for any nearby fights, allow you to hear nearby footsteps, and so on.
I’m New, What Should I Do?
In general, if you’re new, I’d advise you follow the recommended plans or import player-made ones to follow. This’ll help you keep toe-to-toe with other plays, have a good, quick guide to follow, and if things go right or wrong, either way you’ll be learning where all of the game’s items are. This is really the biggest piece of advice I can give for routing: learn where the items you need are.
It’ll take you a few games of doing it over and over and taking detours to find items elsewhere, but eventually, you’ll memorise your options. Even if you cant, you can always click on an item in your plan in the upper right to check the components and where to find them. Either way, it’s all part of the learning process, so don’t feel disheartened.
A couple of tips related to routing:
- Water and Bread can be found in a few places around Lumia Island, so if you’re making a Plan or adjusting your route on the fly, be sure to keep track of those places, as those two foodstuffs are very multi-purpose and are good to have on hand.
- Branches and rocks can be found almost everywhere. If you need them later on, gather them when required; taking them early can eat up space in your inventory, as branches don’t stack and rocks come in a large number when you only ever need a few, so crafting with them would use an extra slot.
- Have priorities. If you need rubber and a lighter to make Flubber, for example, you should make that first and prioritise those items, especially if that area is currently contested.
- Play to your own speed. If you don’t want to rush through each area if you don’t have to, then don’t. Take it to your pace and figure things out.
- Have an alternate routing for your usual plan, as this’ll help you know where you need to go if something goes awry. If Pond gets restricted or is just too busy, you can move to Forest and then Beach for Gemstones and hammers, for example.
This is the other most unique part of Black Survival, and the most complex to get into when making your own Plans and Routes, so it’s more than I can really cover in a basic beginners’ guide, so I implore you to explore and try out everything, experimenting with making your own routes for what works with your playstyle and character.
Final Thoughts and Suggestions
 And with that, it’s about the end of the guide and all I can reasonably advise anyone on before being too far out of my own knowledge zone.
However, I’ll finish up with a couple of thank yous and suggestions for beginners.
Recomended Characters
Like any other MOBA, Black Survival: Eternal Return is mostly about picking a favourite and just rolling with them, as it’ll motivate you more to have fun and maybe want to get better and better.
If you’re coming from Black Survival, I urge you to try your favourite from the old game, it’s very fun to see how everyone’s been adapted. If they’re not in yet, then hold tight, because the developers are adding them at a frightening rate of one every two weeks so far, so at this rate, we’ll have everyone by next Summer.
However, for brand new players, here’s a few recommendations for good, simple characters who’ll help you ease into the game without too much difficulty.
- Aya: Aya is a simple character with straightforward abilities and gun masteries. Most of what she has is reactive, and only has one skill you need to aim, that allows you to move to readjust the aim after activating it. Getting used to the limited ammo system for guns is all you have to figure out, and once you do, it’s universal between all gun users, so it’ll help you later.
- Hyunwoo: Hyunwoo is a simple character with one goal: punch, and punch harder than the last one. His passive rewards him for longer fights by healing him upon dealing or receiving damage, and his abilities all make landing one or the other simple, as well as not being too complicated and rewarding new players for getting into the flow of quick brawls that may or may not end in deaths.
- Chiara While Chiara isn’t as surface level simple as Magnus, with two of her skills being skillshots, and all of them being close ranged, she has a simple playstyle that revolves around her passive, and sticking onto your target. On top of that, she thrives in larger brawls using her ultimate to heal and deal un-mitigated true damage to a target she’s applied her passive onto. Her only disadvantage is that she suffers greatly against targets with good crowd-control skills as well as healing reduction skills and items.
I’d also like to suggest you find the Discord for Eternal Return: Black Survival. You can speak to the GMs about any concerns you’re having and speak to other players there. Everyone is very nice and helpful, always looking to offer advice to new players.
On that, I’d like to say thank you to the GMs and Developers for always keeping us updated and answering all of our questions about the game.
Related Posts:
- Eternal Return Black Survival: Isol Guide
- Eternal Return Black Survival: How to Improve Nadine’s Skills
- Eternal Return Black Survival: Hyejin Guide
- Eternal Return Black Survival: Hart Guide (How to Build)
- Eternal Return Black Survival: Jackie Build Guide

