
I’ve been sitting on this pile of notes since the beta testing period, adding to it after launch, and I figured it was finally time to put it somewhere useful instead of letting it rot in a text file. If you’re tired of guides that climb to the top of the ratings just because they happen to be written in your language, well, here’s one that actually tries to say something. Everything below comes from my own runs and the things I picked up along the way — the good builds, the dumb ones, and the mechanics that saved or ruined my day.
Quick framing before we start: you’re playing a representative of a defeated people, captured by the Emperor. You survive the arena battles thrown to entertain the common folk, and eventually you aim to overthrow the dictatorship and win your freedom. You can go solo or with a team of up to four.
The Online Problem You Need to Know About First
This game leans hard on your internet connection, so I want to get the bad news out of the way. If one teammate has a weak connection, they’ll get booted from the lobby over and over. Best case, they reconnect and you restart the whole day from scratch — even if they dropped 0.01 seconds before the last NPC died. Worst case, someone gets stuck on a black UI screen just saying “Loading” while you can still hear attacks and the rattling of chains in the background. I haven’t found a fix for that one yet, and it’s genuinely maddening when it hits mid-run.
When you create an online lobby, I recommend turning on Crossplay. It probably doesn’t change your odds of hitting that bug, but it lets players join with a lobby code instead of you hand-inviting everyone.
One more housekeeping note: this is a translating job, so a few perk and shop item names below might be slightly off. I’ll switch the game language and compare them whenever I get the chance.
All Eight Beasts and What Each Level Actually Does
There are currently 8 beasts in the game, and I put together this table of their buffs and debuffs so you can stop flipping between screens mid-run. Understand one thing going in: the level bonuses do not stack. They’re just different upgrade paths, so feel free to read “LVL” as “Build.”
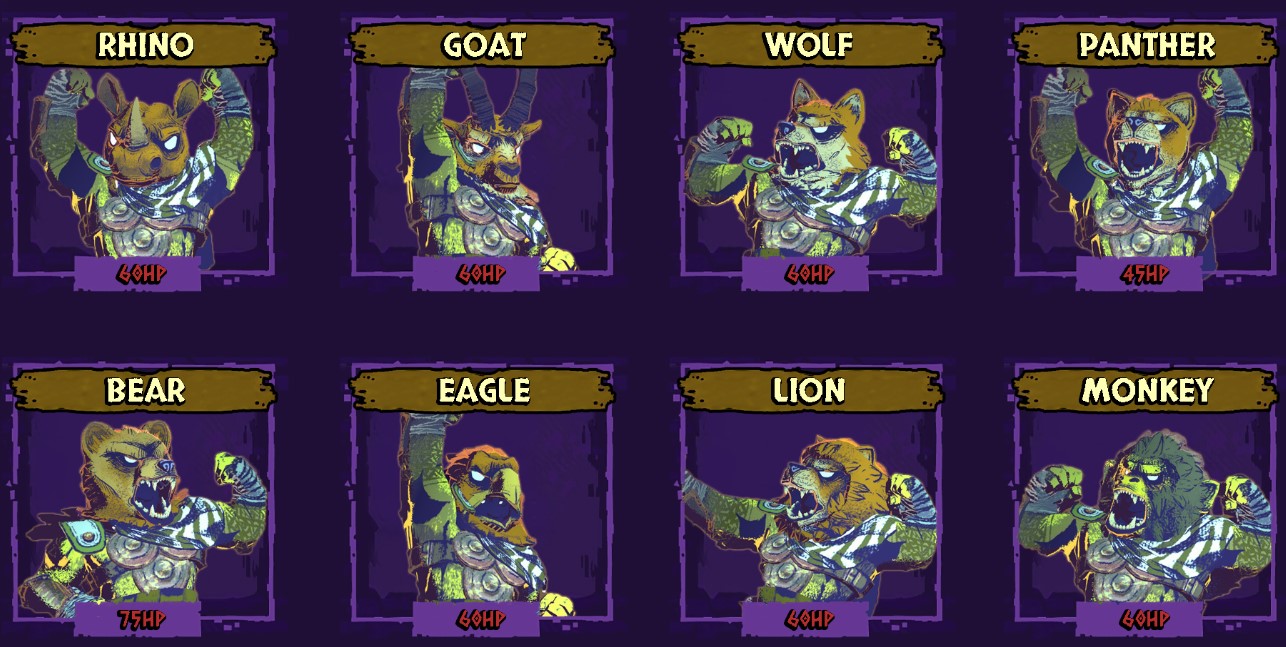
| Beast | LVL 1 | LVL 2 | LVL 3 |
|---|---|---|---|
| Rhino (x2 shield durability) | -25% damage taken | +50% stun duration | Shield throw |
| Goat (+20% movement speed) | -50% stamina cost for dodging | Gain the “Vigor” effect when HP is below 25% | Increased chain length (chains deal additional damage to enemies) |
| Wolf (increased chance to sever limbs) | +200% limb damage | Picking up a severed limb grants 4 gold | Picking up a severed limb restores 2 HP |
| Panther (-15 HP, +20% damage dealt) | +50% special attack damage | Dodging into enemies knocks them down | Landing consecutive hits on an enemy increases damage dealt |
| Bear (+15 HP, -20% movement speed) | Become invulnerable and enter a rage state for 2 seconds when taking damage | +20% blunt weapon damage (stuns enemies for 0.5 seconds) | Revive after death with 10% HP and Rage |
| Eagle | +50% throwing damage after a melee kill | +50% throwing damage after a backstab | +50% throwing damage after blocking |
| Lion (unlocks taunts after kills when the crowd is excited) | Taunting (Tab) grants all players increased damage and movement speed for 10 seconds | Taunting (Tab) grants 2 gold | Taunting (Tab) grants a weapon |
| Monkey (+1 skill reroll per level) | +2 random skills, +1 affliction (2/3) | +50% fist damage; special fist attack launches enemies into the air | +1 skill every 3 levels; only one skill can be chosen from the options provided |
Those movement and damage percentages for Goat and Panther are approximate. The game calculates damage in such an inconsistent way that the same setup can spit out anything from 1 to 6 damage — I once measured +50%, another time +18%, and a third time no increase at all. The numbers I list are based on the arithmetic mean, so treat them as a rough direction rather than gospel.
S-Tier: The Beasts I’d Take Into Anything
Rhino LVL 1 is the laziest, simplest build in the game, and that’s exactly why I love it. Your shield practically lives in your hands, and doubling its durability makes everything smoother. Block, wait for the right timing, hit. The crowd won’t be impressed, but you’ll barely take damage. On top of the -25% damage taken, you can buy the same defensive gear in the shop and become an absolute tank that soaks up half the damage and charges into the worst fights. When luck is on my side I assemble a Rage build — Counterattack, Eternal Flame, Pain Threshold, Center of Attention — for 5 seconds of Rage (halving incoming damage) after a successful block, plus another 10% damage reduction stacked on top.
Wolf LVL 1 puts out ridiculous damage through severed limbs. Bosses can go down with a couple of limbs, and if you’re hitting their backs, sometimes one is enough. Limb attacks also inflict Weakness, and throwing a head hits twice as hard as throwing other body parts. Don’t take two Wolves, though — the severing chance doesn’t stack, so you’d just be wasting a slot. Leather Gloves are a must-have here for the 50% chance not to consume weapon durability, and I like pairing them with perks that boost backstab damage. Against the rats, leave a couple of arms intact for the boss, get behind it, and cash in.
Panther LVL 1 can one-shot most regular enemies with special attacks, backstabs especially. The low health pool stings, but the damage output is genuinely impressive. You can run a flail build, spinning it constantly while keeping Vigor up, or play it safer with dodges that grant Rage and enhanced backstabs.
Bear LVL 1 is good but painfully slow. No real mystery here: level up as much as you can for the +5% health bonus, then hunt for perks and gear that raise movement speed. Otherwise Goliath will be a rough fight. Those 2 seconds of invulnerability and Rage are extremely useful — they used to be even better, but apparently someone on the team is a big fan of this thing called “balance.” The build mirrors Rhino’s: stay aggressive and keep Rage rolling. The difference is that Rhino has to work for it while Bear just needs to get punched in the face, then can stay enraged for practically the entire fight by alternating Rage and invulnerability. Extremely useful for boss fights and for Germany, where fire damage is especially punishing.
Monkey LVL 2 is, surprisingly, the only Level 2 character up here. After giving it some thought, I’ve concluded that kung fu is actually pretty damn good. Monkey gets demolished in fistfights early on, but once it gets going its damage becomes respectable (there’s a damage table further down) and its crowd control makes the game considerably easier. The heavy attack has decent range and launches several enemies into the air at once — yes, several. Before they can get up, the little monkey is already charging another heavy attack, which creates what’s known as a perma-stun. Build it with anything that says “fist attacks”: I Know Kung Fu, Martial Arts Master, Heavy Blows, Furious Combo, Finish Them While They’re Down, Beastly Rage, Knuckle Duster, and so on. The perk that counts hits against downed enemies as backstabs is especially valuable. Charge in and beat them until they drop their shield mid-air and never get back up. It’s brutal against minibosses surrounded by regular enemies, like the second phase of the Bark Tamer.
A-Tier: Strong Picks That Reward Some Effort
Wolf LVL 2 is a money printer — you can loot 20–28 coins per day, which is extremely lucrative. Lion makes fewer coins, but pairing the two can let you buy out half the shop. Play the rich daddy, earning gold from spectators and executions. The catch is that limb-severing chances have no published statistics, so which weapons work best is trial and error. Maybe an axe, maybe throwing weapons.
Bear LVL 2 is one I actually enjoy. Grab a mace or flail and turn your brain off. Slow and obnoxious, sure, but blunt weapons deal good damage and inflict a short stun that interrupts enemy attacks, and Concussion stretches that stun out further. Beyond that, invest in Stamina and Vigor. Crowd admiration perks aren’t really our thing — I’m almost always awarded the minimum points, sometimes zero, because our fights are apparently too boring to watch.
Eagle LVL 3 is niche but definitely viable. Block, throw your weapon at a confused enemy, pick it back up, repeat until victory. Take anything with the word “throwing” in it: Accuracy, Deep Breath, Stay Alert, Mighty Arms, Unbreakable. Lucky Dice works too. The result is block, knock them down, throw your weapon for 50+30+100+100 damage — a ridiculous amount. Solid build, I’d even give it 4.5/5.
Lion LVL 2 farms coins well, but you’ll have to keep your teammates’ hands off your kills and executions. Build it like Wolf. If you’re running with a Wolf, ask them for the perk that grants coins for executions. Steal weapons, charge, kick, dodge, spin around, and finish enemies to keep the crowd excited as long as possible. Crowd Favor and Deadlift are essential, and if you have Deadlift, grab Unbreakable too. Block, let your sheer awesomeness knock the enemy down, then pick them up — the crowd goes wild.
Monkey LVL 3 is a chill pick: you reroll one perk per level plus an extra perk every three levels. By the time you reach the final boss you’ll have 3–5 more perks than your teammates.
B-Tier to D-Tier: Situational Beasts
Goat LVL 2 means playing on low HP (15–30) to keep the permanent Vigor effect, and you can combine it with a perk that removes debuffs when your health is at 25% or below. It’s a build, alright. Useful for carrying a team when you’ve got nearly a hundred hours in and your teammates just installed the game — I’ve had runs where everyone else was wiped and one beast was left dodging around the map, desperately surviving. Pretty hopeless, but as a last-resort way to save a run, why not. Not my personal favorite, but that saving potential earns it B-Tier.
Wolf LVL 3, the so-called vampirism bloodsucker, is boring to me. Yes, it’s extremely useful, but there’s nothing interesting about running around munching on arms and legs for tiny heals. Sure, you can recover 10–15 HP per fight, but on higher difficulties that barely offsets drinking dirty water — and only if you finish without taking damage. For the tryhards.
Panther LVL 2 is the rolling ball build: roll into enemies, knock them down, spin around fast, and smack them in the back. Stack backstab damage and that’s the whole build. Not my cup of tea, because dodges often fail to register and you end up eating a spear to the face.
Bear LVL 3 is another run-saver. If you die, you revive with 10% HP and permanent Rage, which is useful — but when your whole team is dead and you’re a slow Bear at 7–14 HP, you probably die to the first stray arrow that drifts your way.
Eagle LVL 1 is the same throwing game but the bonus fires after kills. Who exactly are you throwing at if you already killed your enemy? Still, not the most useless class.
Lion LVL 1 is just meh. Lion is decent, but you need someone willing to actually play him, and he doesn’t interest me much. He buffs the whole team, so it’s nice to have and perfectly fine without one. Build it like the money-farming Lion.
Rhino LVL 2 — I’m running out of character space here, so short version: the passive is easy to replace with perks and not worth sacrificing a slot for.
Goat LVL 3 is extremely safe and extremely boring. You run in circles and trample enemies, easiest in solo, and you can replace the whole thing with a perk.
Panther LVL 3 I can’t comment on for damage scaling. If you love spamming LMB, go for it and main the spear.
Eagle LVL 2 is a good class that’s very hard to make work. Either play it against the rats, or look for a perk that knocks enemies down with a shield plus one that counts hits on downed enemies as backstabs.
Monkey LVL 1 is greedy, extremely greedy. You get two perks immediately, but the 2/3 affliction can completely ruin your run. No reason to play it except unlocking the other levels — Level 3 is considerably more enjoyable.
Rhino LVL 3 and Lion LVL 3 are basically achievement-hunter beasts at this point. Rhino’s shield throw doesn’t deal nearly enough to justify giving up your only defense, and Lion’s weapon-drop is too situational given how few weapons you get.
Weapon Damage Numbers I Measured
Average damage below was calculated on the lower difficulty levels, just so you have a baseline instead of guessing.
| Damage Type | Fists | Monkey Fists | Severed Limbs (Wolf) | Bow | Sword | Spear | Flail | Mace | Axe | Plank | Chair |
|---|---|---|---|---|---|---|---|---|---|---|---|
| Normal Attack | 1 | 1.3 | 13.5 | — | 2.7 | 1.8 | 2 | 3.8 | 6.6 | — | 16 |
| Special Attack | 1 | 1.3 + 3.6 | 13.5 | 11.7 | 8.1 | 5.2 + 5.2 | 2 | 9.2 | 11.3 | 9.5 | 16 |
| Throw | — | — | 11.6 | 5 | 10.7 | 9.8 | 9.2 | 7.8 | 18.3 | 10 | 10 |
A few extras the table can’t show: back attacks deal increased damage, stunned enemies take increased damage, and throwing an enemy deals 5.5 damage to them plus 5.5 if they collide with another enemy. Throwing a barrel or urn deals 12.4 damage.
Mechanics That Actually Decide Your Runs
On the lower difficulty levels you can coast by spamming LMB, but each new difficulty forces you to learn and, more importantly, use the mechanics. Here’s what I’ve gathered.
Learning to block is enormous. Pick up a shield, press the button, and aim at an enemy about to attack or throw at you. It survives several hits — but only one from a boss — so keep moving and picking up shields. A successful block also stuns the enemy for a couple of seconds.
Stun means the dummy just stands there, confused and clueless. While stunned they can’t block, which makes it trivial to slip behind them. Back attacks deal increased damage like in most games — if you see an opening, take it. Some skills grant +50% back attack damage, attacking a knocked-down enemy counts as a back attack, and back attacks give 3 seconds of Vigor.
There’s a reason the game is called Chained Beasts: your character is often chained to something. A chain can attach to a rock, a log, another player, or a mechanism. A rock just slows you down and occasionally snags. A log gets stuck far more often, especially on Goliath. The rest is self-explanatory — just don’t get tangled. Wrapping your chain around enemies, though, is a genuinely good idea. It can knock enemies down including bosses, giving you a brief window for a back attack. Wrap it tight around a dummy and dodge roll, and it deals a decent chunk of damage.
Scrolls, chairs, barrels, and body parts are all throwable. Green barrels break open into several snakes that deal minor damage to nearby targets. Red barrels explode when thrown, or after a short delay when hit.
Then there’s training, and this is where the game gets mean. From the second difficulty level onward you’ll do training sessions, each filling 1 to 3 bars. Once you reach the little skull you pick up a debuff, and each additional bar you fill gives you less and less. My best runs were the ones where I seriously overtrained — it lets you grab the maximum number of useful skills, but makes the run heavily luck-dependent. Some debuffs are manageable (a limp, a hernia), others are extremely unpleasant (hallucinations, farsightedness). If a debuff is tolerable, take it. And if you see red meat in the shop, buy it, because it stops your experience from decreasing at the end of training.
Watch the economy. If you can save money, save it. If the surgeon offers you a debuff or a chance at one in exchange for money, don’t pass it up.
Don’t fear debuffs, either. Getting 7+ per run is perfectly normal — I’ve completed runs with 11–12, training to the limit every day and pouring everything into experience. Generally they’re all manageable. The unpleasant ones are Paranoia (you can’t tell enemies from hallucinations), Confusion (input delay), and Farsightedness (up-close objects are harder to distinguish). Particularly dangerous are Madness (button controls swapped) and Impulsiveness (automatically buys items and selects skills).
When you pick up a perk you already have, it shows x2, x3, and so on next to it. Perks stack — confirmed.
Difficulty level affects how much experience your Beast earns at the end of a run, but is it worth tryharding endless high-difficulty runs just for that bonus? Probably not. On the lower levels I pull around 100–110 XP just mindlessly chopping enemies and basking in the crowd’s applause.
Small details that matter: attacks with severed limbs inflict the Weakness debuff, block direction automatically locks onto the nearest enemy, and barricades, campfires, traps, and other hazards work great when you throw enemies into them. In Germany you’ll often find spiked walls that deal good damage when an enemy hits them.
The Shop, and What’s Worth Your Coins
The shop has plenty of items and it’s easy to get lost, so here’s how they break down. Instant Effect items activate right after purchase and heal ailments or restore HP. Passive Effect items stay active permanently and are must-haves. Equipment is bought permanently and can be equipped in the lobby before a fight — each player has only one slot. To unequip, walk to an empty rack in the lobby and press E. There’s plenty of storage, so at least 6 items can sit there without anything being deleted. Arena items spawn continuously on the arena at the start of a fight.
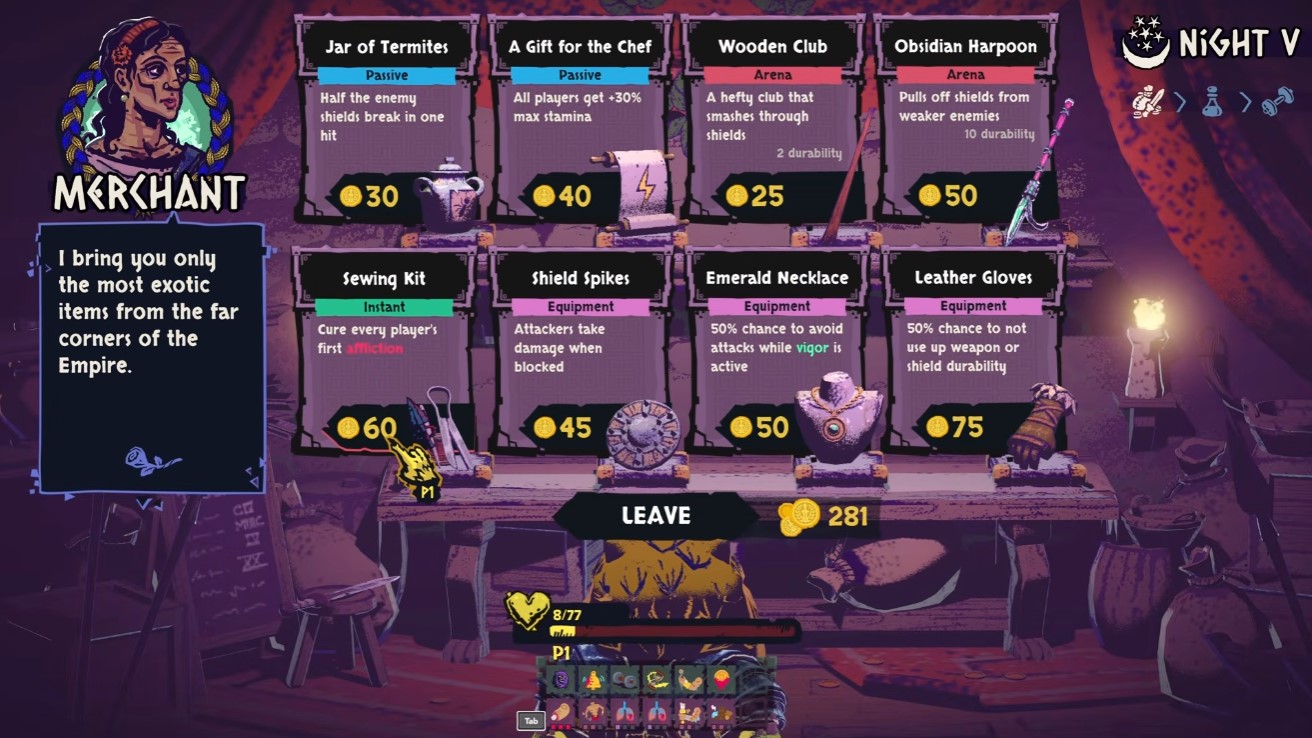
Every purchase is permanent, and the shop only opens two or three times per run, so hoarding money doesn’t get you much. Unless you’re deep into gold farming, you’ll barely afford one decent shopping spree anyway. Since getting this guide approved by moderators takes forever if I upload images, I’ll keep it text-only and focus on the best buys:
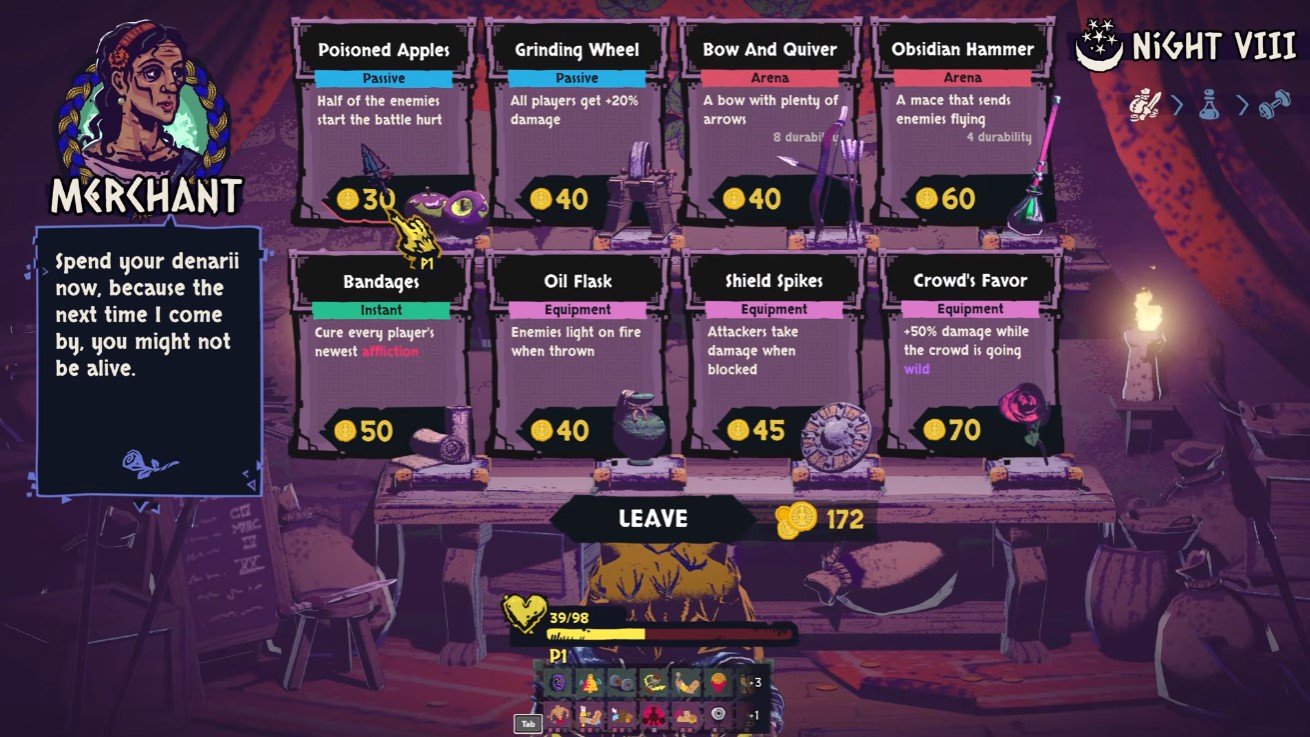
- Red Meat — prevents experience loss at the end of training. Helps you dodge unnecessary debuffs.
- Poisoned Apples — half the enemies enter the arena with reduced health. Plenty of dummies, so this comes in handy.
- Orange Slice — water restores an additional 12 HP. Obviously one of the best buys if you’re good at avoiding hits.
- Speed Sandals — movement speed +25%. I buy these pretty often.
- Leather Gloves — 50% chance not to consume weapon or shield durability. Great with purchased weapons.
- Weighted Vest — move 20% slower, but gain 2 XP at the start of training.
- Ankh — if you die in combat, resurrect with 50% health. Destroyed after use.
- Explosive Arrows — good against bosses and minibosses that surround themselves with dummies. You don’t get many shots, but they make an impact.
- Blazing Obsidian Sword — deals good fire damage. Hit, wait for the burning to finish, hit again.
- Pliers — almost always a must-have, though you’ll be fighting your buddies over them. Pick them up and hit your own chain to break it and free yourself from all that chain nonsense.
Conclusion
That’s where my notes stand for now. I’ll keep updating this as I discover new things, and if a perk or shop name looks off, it’s the translation catching up with me. Until then, train hard, block on time, and don’t let the crowd decide your worth.
