

I still remember staring at the Ancient Oak Treant fight, convinced my mostly-Rare setup could sneak through. It couldn’t. That level 25 wall doesn’t care how clever you feel — you can’t out-level it, so if you’re stuck here like I was, you’re going to need to grind out some proper gear. Here’s the full build that finally put the treant down for me.
Why This Boss Feels Like a Brick Wall
You can’t level past the Ancient Oak Treant, which is the whole problem. With mostly Rare gear I just couldn’t close the gap, so I accepted the reality that farming some Legendary pieces was the only way forward. The fight boils down to out-sustaining its healing while keeping yourself alive long enough to land the kill.
My approach is honestly pretty intuitive once it clicks: stack health regen, attack speed, and Life on Hit. Paired with a few key Legendary items, that combination gave me enough damage to outpace the treant’s healing and enough survivability to stay upright through the whole encounter. The real turning point was a lucky find with a pair of Legendary Rings that turned my strong attack into something genuinely terrifying.
One thing I’d stress from experience: get at least a Legendary weapon, then hunt for a powerful passive on other legendary slots that you can actually build around. Half my legendary passives did absolutely nothing useful for me — that’s just how it goes — but the couple I leaned into carried the run.
The Gear That Killed the Treant
Here’s exactly what I was wearing when it finally went down. Notice the mix — I wasn’t fully decked in legendaries, and that’s fine.
| Slot | Item | Level |
|---|---|---|
| Weapon | Hellstorm Mace +2 | 24 |
| Gloves | Ragefire Gauntlets +2 | 19 |
| Shoulder | Ragefire Gauntlets +0 | 19 |
| Helmet | Crown of the King +0 | 23 |
| Necklace | Pendant of the Suring Mind +1 | 24 |
| Pants | Greaves of the Edge +1 | 20 |
The two rings deserve their own callout because they made the whole thing work:
- Bloodfang Signet of the Wyrm +1 — level 17
- Bloodfang Signet of the Wyrm +0 — level 23
These two together were genuinely powerful for me because they stack, which makes Half Moon Strike fire off five times. That single interaction made up a huge chunk of my total damage. Without it I don’t think the kill happens.
For the remaining slots I leaned on Rare gear, and I want to be honest that none of it was special:
- Boots (level 23): nothing special, just some decent stats that fit the build I was going for.
- Chestplate (level 24): good defence, some dodge, and +8 Life on Hit.
- Belt (level 24): nothing special — just attack speed, really.
Whenever I had the chance, I hunted for extra + Life on Hit or attack speed bonuses, on top of damage and resistances. Those two stats did a lot of quiet heavy lifting.
Use the Town Merchants — Seriously
I can’t overstate how much the merchants mattered here. Lady Shadow sells random gear, which is a great way to fish for Legendaries in specific slots you’re missing. On top of that, you should ideally use the blacksmith at least once or twice per slot — the more the better. I neglected the blacksmith for a while and I regret it, because every extra roll is another shot at something that fits.
The Talent Setup That Made It Work
I reset my talents at least twice during the end-game before I landed on something functional, so don’t feel bad if your first spread doesn’t click. If you want a broader look at how these choices fit together, the same logic applies here as in any good talent build guide — you build around your gear, not the other way around.
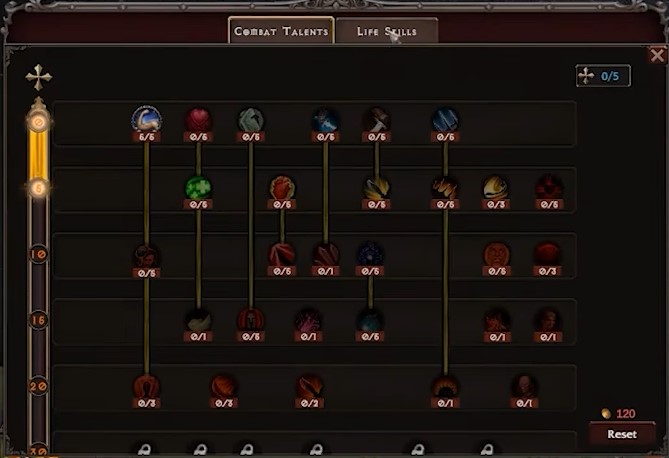
Here’s the exact spread that took down the treant:
- Vitality x5 → Life regeneration x5 → Second Wind x1
- Ferocity x5
- Attack Speed x5 → Cleaving Rage x1
- Enhance Vigilant Strike: Mana Gain x2
Minion and Abilities
For my minion I ran the Bloodmoon Werewolf. Its attack speed ability stacked nicely with the rest of the setup — combined with the +10% Life on Hit, it fit this build like a glove.
The abilities I brought into the fight:
- Valiant Strike
- Half Moon Strike — the damage engine, thanks to those stacked rings
- Rage Shout
- Rage Shield
What I Learned Farming This Fight
Before I found this setup, I tried a thorns build and it simply wasn’t working. My chest piece boosted thorns by 500%, but it was only level 19, so the payoff never came. That’s a lesson I keep repeating to myself: sometimes your first Legendary drop doesn’t mean you should build around it. It just means you got a Legendary drop.
If you’re farming for upgrades, the loop that worked for me was running Kings Woods South 3 over and over, then heading back to base to sell junk and buy more random gear from the merchant. Use Speed and Gold potions while you farm, and the dark horse minion helps you move through it faster.
One habit worth building: duck into the boss every so often to test whether your upgrades are actually landing. I deliberately didn’t use potions during those test runs, because you seem to lose them when you die — no sense burning them on a scout attempt.
Keep every Legendary that drops, even the ones that don’t fit your current build, because your build can change. And don’t instantly dismiss a Rare piece — sometimes a good Rare helps you more than a bad Legendary does. By the time I finished farming, I also had all my Life Skills unlocked, and chances are if you farm long enough for a working build you’ll be able to afford them all too.
A Few Honest Caveats
I want to be straight with you: this strategy is subjective, and I only just beat the boss myself. You might find an easier path, or take it down with a completely different gear set. I also got genuinely lucky with those two rings handing me a huge damage boost — so work with whatever the game gives you instead of chasing exactly what someone else found. RNG loot might not give you that choice, and that’s okay.
